Affiliate links on Android Authority may earn us a commission. Learn more.
How to flash Cyanogenmod 10.1 on your Galaxy S2 GT-I9100
Published onJanuary 3, 2013
Considering there’s no official Jelly Bean update coming to the Samsung Galaxy S2 in the immediate future, and as the CyanogenMod team have begun pumping out stable nightly builds of Android 4.2.1 for my phone, I decided to install Jelly Bean on my own S2 this week.
So far, it’s working brilliantly, and, for a nightly build, I haven’t noticed any problems. There are a few known issues with the camera recording effects, the absence of a working FM radio, and the USB transfer speed can be a bit slow, but if these things aren’t a big concern for you then read on.
Warning
- The instructions in this guide are intended for use with the Samsung Galaxy S2, model number GT-I9100. Applying these instructions on another device or model may produce undesired outcomes.
- The information in this guide is provided for instructional and educational purposes only. There is no guarantee that these instructions will work under your specific and unique circumstances.
-
Use these instructions at your own risk. We shall not claim any responsibility or liability for whatever happens to you or your device arising from your use of the info in this guide.
Requirements
Here’s everything you’ll need for the installation.
- A Samsung Galaxy S2 GT-I9100 running Ice Cream Sandwich
- USB debugging enabled on your handset
- A Windows PC
- Odin3
- Clockworkmod Recovery 5.5.0.4, so you can make backups and install the required kernel.
- Latest CM 10.1 nightly
- Google Apps (gapps) zip file for Android 4.2.1, to reinstall the native Google applications and the Google Play market.
- CyanogenMod 10.1 and Google Apps zip files need to be saved on your SD card.
- Make sure drivers are installed on your PC and that your device is detected correctly in Odin. If you have Kies installed and have connected your device at least once then the drivers should be installed correctly.
- Disable Samsung Kies on your PC, as it can interfere with the procedure.
- Charge up your phone to 100%. You don’t want your device cutting out part way through flashing!
Before getting started, make backups of text, contacts and apps if you want. It’s not recommended to backup applications by copying and pasting files. Instead re-download them once the ROM is up and running. For backup tips, check our guides on how to sync your data to the cloud and how to create local backups of your mobile data.
Installing Clockworkmod Recovery
I’ve included the installation of CWM Recovery because it is important no-one skips this step or you will brick your phone. CWM will install a custom kernel which will prevent your phone from bricking if it suffers from the MMC Superbrick Bug, so don’t miss this step out!
Before moving on, make sure you’ve downloaded Odin3 and the Clockworkmod Recovery .tar file and put them on your desktop.
- Power off you Galaxy S2
- Boot into the phones download mode by pressing volume down + home + power together
- Press Volume Up to accept the warning
- Launch Odin3 on your PC
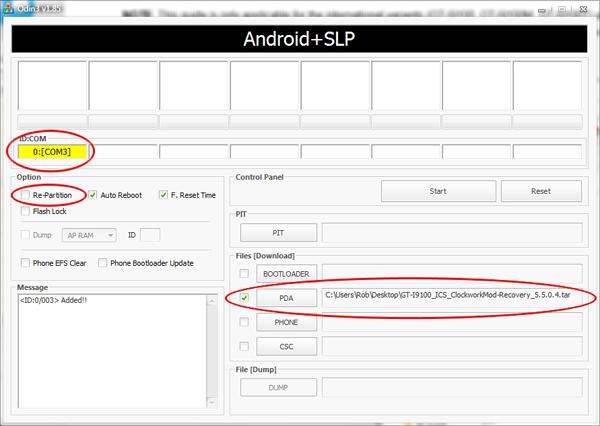
- Choose the CWM Recovery .tar file under PDA; it should be called “GT-I9100_ClockworkMod-Recovery_5.5.0.4.tar” if you downloaded the file I listed above.
- Double check that re-partition is unchecked, and that reboot and f.reset time are ticked before you continue. These are the default options anyway, but it’s worth checking.
- Connect your phone via USB; the connected port should appear in Odin at this point.
- Press start to begin flashing

Your phone will display a blue bar as the data is transferred and then should reboot. Once rebooted Odin should display a green pass mark above the phone port and you should be able to check that you are now running the required codeworkx kernel in your system settings. You can now unplug your phone from your PC, but make sure you’ve got plenty of battery.
Backing up your ROM (optional)
Before going any further you should probably make a backup of your existing ROM, even an official one. This is important as you can simply restore your phone through Clockworkmod if something goes wrong or if you don’t like Jelly Bean for whatever reason.
- To boot into CWM press volume up + home + power together when you’re phone is off.
- Once in recovery use the volume up and down buttons to navigate and press the power button to select options.
- Select backup and restore to create a backup of current installation on your Galaxy S2. This might take a little while.
-
Once the backup is complete you can reboot your phone from the main CWM menu.
Flashing Cyanogenmod 10.1
Now that you’re backed up and running a kernel which won’t brick your phone, we can begin the fun part; installing Jelly Bean.
- Download the latest version of CyanogenMod 10.1 and Google Apps, if you haven’t already, and put the zip files on your SD card, preferably somewhere you can easily navigate too.
- Turn off your phone and boot into the ClockworkMod Recovery by holding volume up + home + power.
- Select the option to Wipe data/factory reset.
- Then select Wipe cache partition.
- Select Install zip from sdcard.
- Select Choose zip from sdcard.
- Select the CyanogenMod.zip file, which is called something like cm-10.1-xxxxxxxxxx-nightly-i9100.zip.
- Navigate to the one option which says yes, and the installation will begin.
- Before rebooting, install the Google Apps by performing steps 6 through 9 again, but selecting the gapps-jb-xxxxxxx-signed.zip file.
- Once the installation has finished, reboot your from the main menu and wait for Cyanogenmod to load.
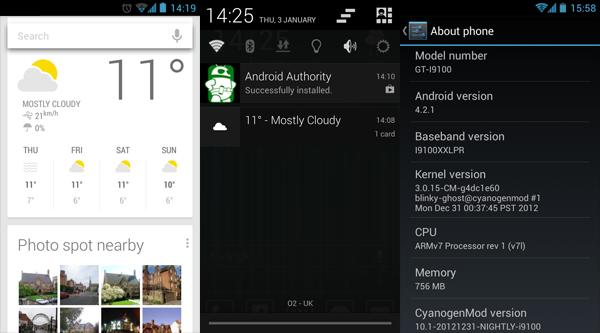
Congratulations, you should now boot into CyanogenMod 10.1. Time to play with your new Jelly Bean 4.2.1 features.
