Affiliate links on Android Authority may earn us a commission. Learn more.
How to optimize your Android smartphone and get the best performance
Since the beginning, one of the core tenets of Google’s mobile operating system has been its versatility. Android offers a diverse range of features and a level of personalization that lets you truly make an Android phone your own. But despite its power, Android isn’t without its pitfalls. In fact, it has one weakness that’s particularly pertinent: As an operating system, Android tends to have very poor resource management.
By now, we’re all surely aware that even with half or even a third of the RAM found in the most recent generations of Android devices, iPhones remain top performers because of the strong memory management in iOS. But with as much as six gigabytes of RAM, we shouldn’t be left wanting for performance from our Android devices.
On paper, four or six gigabytes of RAM should be overkill, especially with iOS devices only very recently increasing to three gigabytes with its iPhone 7 Plus, and 2GB (or less) for other older models. Yet the 4 to 6GB found in many modern Android flagships still isn’t overkill. Instead, it shows that OEMs are planning ahead and trying to compensate for Android’s shortcomings. After all, nobody wants to spend over $800 on a brand new smartphone just to have it lag.
However, increasing the amount of RAM in a phone isn’t the only way to ensure smooth performance. There are actually many ways a person can do some manual resource management and optimize Android devices in ways the operating system doesn’t do natively. Sounds too good to be true, right? But it’s not.
Don’t settle for acceptable performance from your Android device. Get exceptional performance by taking full advantage of your Android’s RAM and processing power with some of the optimization methods we’ve compiled for you below.
Uninstall unused or power-hungry apps
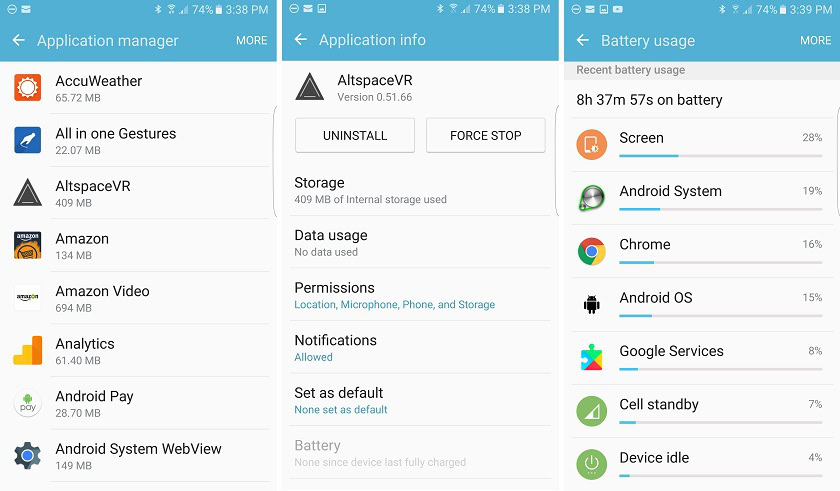
The first thing you’ll want to do is uninstall the apps you’re not using or that are draining your battery. Chances are that you have quite a few of them. Not long ago, a study determined that of all the people who download any given app, only 26 percent of those people will use the app ten or more times; meanwhile, another 26 percent of those people will use that app once, before never opening it again. You don’t have to uninstall all your apps, but almost half of all smartphone users have between one and five apps that they use regularly, at least once per week.
There are a couple ways to uninstall apps. You can go into your app drawer, tap and hold an app, and drag it to “Uninstall” after it appears over your home screen. However, if you’re planning on uninstalling more than just a couple apps, this method might get a little tedious. The alternative would be to go to Settings > Apps to see a full inventory of applications currently installed on your phone, in alphabetical order. Clicking an app in this list will bring up information about that app, including how much space it’s taking and what permissions the app has been granted.
Getting rid of unused or resource-intensive apps will go a long way in improving the performance of your Android phone
You’ll also see a button near the top that says “Uninstall”, which will remove the app and its data from your phone. If it’s a system app or one that came preloaded, you may instead see “Disable”, which is the next-best thing. Disabling an app minimizes the amount of space the app takes on your phone and essentially hides it from the app drawer.
Once you’ve cleaned out your unused apps, you should see whether there are any apps draining your battery; when an app is draining your battery, you can bet that it’s because the app is very resource-intensive. What you want to do is return to Settings and go into the submenu for your battery options (it may be called Battery or something similar). In most instances, you’ll see a graph that shows your phone’s power level over the last half a day or so. Beneath that graph, you’ll see a list of things that are putting a strain on your battery in the order of most to least strain. You can expect to see the display or screen either at or near the top and some system-related resources, but you’ll also see apps in the list.
Depending on how you use your phone, you might see YouTube, a web browser, Pokemon Go, Instagram, or whatever other apps you might use daily. However, if you see any apps that you don’t use regularly or at all, it means that they’re running in the background on your device and causing the battery to drain faster than it should. Clicking on an app from within that list will usually give you options to force-stop the app; otherwise, you may want to go back to Settings > Apps to uninstall or disable the app.
Getting rid of unused or resource-intensive apps will go a long way in improving the performance of your Android phone. The most notable difference might be in how long your battery lasts, but if you installed or disabled numerous apps there will be a noticeable boost in performance, too.
Change sync settings
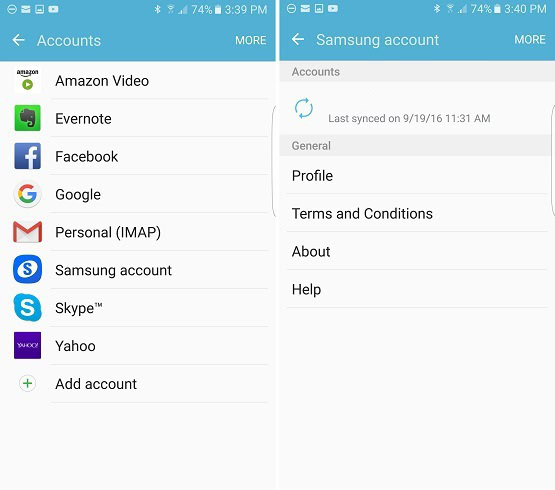
At any given time, there’s usually something on your Android phone syncing to some type of cloud or server. It might be your contacts, photos, email, or even your device settings. Depending on how frequently this occurs, your device could be syncing in the background the majority of the time, which occupies resources that could be used elsewhere. Plus, this is obviously going to put additional strain on your battery, so it’s a good idea to change the sync settings on your device.
You can see all the accounts that are syncing on the device by navigating to Settings > Accounts. In addition to the list of accounts, there’s usually an option here to turn off auto-sync, but you may not want to turn syncing off completely. Instead, look through the list of accounts to see if there are any you don’t want or need syncing, and remove them.
To change the sync interval for the accounts you want to keep, you’ll typically have to go into each account’s respective application and into the app settings to increase or decrease the amount of time between syncs.
Check for updates
Making sure that your Android device is running the most recent firmware and has the most up-to-date security patch is beneficial for both security and performance. If your device is relatively new, this is especially important since most new devices have a number of bugs that handicap a smartphone’s performance and can only be addressed through software updates. Fortunately, checking for updates is super easy and there’s a good chance you already know how to do. Just in case you don’t, here’s what you need to do.
On your Android phone, go into Settings. Depending on the device you own, you might select About Device or Software Update. The update check will either initiate on its own or require you to initiate the check by clicking on “Check For Updates” or something similar. If there’s an update available for your device, you’ll see a prompt asking you to confirm that you want to download and install the update.
Traditionally, this has involved the device shutting down and installing the update before booting back to the home screen, but Nougat will allegedly install updates a bit differently, doing most of the work in the background and asking for a quick reboot to signal completion. Whether you’re on Marshmallow, Nougat, or an older version of Android, the process is very simple and requires only a confirmation.
Change animation settings
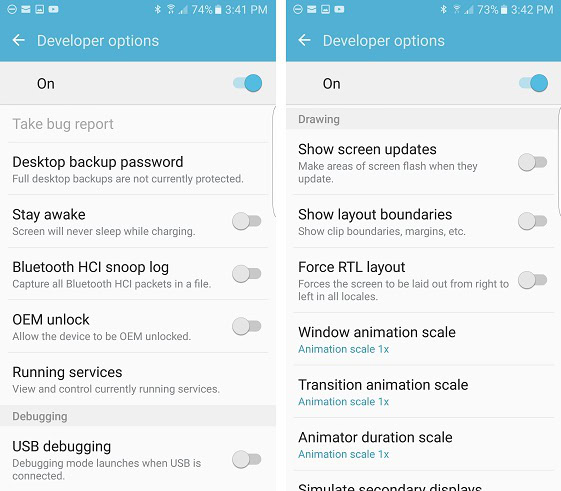
One of the really impressive things about Android is the smooth animations used throughout the system. You can see them when you open or close an app, pull open the notification panel, enter the app drawer, when clicking certain icons, and just navigating through Android. While animations give the user interface some bravado, they also make Android slower, but there’s a way to turn them off in Developer Settings.
If you’ve never activated Developer Settings, chances are you didn’t know that turning down or off Android animations was an option. Simply navigate to Settings > About Phone. Here you’ll see a list of details about the Android device, including the version of Android and security patch installed. Scroll through the list until you find “Build Number”. When you find it, click on it seven or eight times, or until you see a prompt that says “You have activated Developer Options”. Return Settings and you’ll see Developer Options near the bottom of the list.
After going into Developer Options, you’ll see a long list of different settings that can be changed. The vast majority of these settings are ones you’ll never need to use. However, if you scroll about halfway down the list, you’ll see a section labeled “Drawing”. In the Drawing section, there are three options for controlling animations: window animation scale, transition animation scale, and animator duration scale.
By default, the values are “1x” for all three. This means animations take about a second, start to finish. When you open or close an app, the accompanying animation takes a second. Returning to your home screen takes a second, and so on. When you’re used to the default setting, this doesn’t seem like an abnormally long time, but try changing each of the animation options to either 0.5x or off. Once the animations have been reduced, you’ll notice that navigating the device has become blazing fast or instantaneous if you’ve turned them off. It makes a major difference in the overall use of your Android device and is a simple change that doesn’t strain a device’s resources.
For extra credit, there are a couple other settings you can change for other kinds of performance improvements. Just below the Drawing section should be a section called “Hardware accelerated rendering”. The options in this section are turned off by default; however, turn “Force GPU rendering” on for a boost in graphics performance. In essence, this boosts the performance of your device’s graphics processing unit or GPU. In effect, this means better rendering in applications and games, making your device just that little bit more responsive.
Additionally, there’s an option in the same menu called “Force 4x MSAA”, which will also boost graphics performance. MSAA stands for multisample anti-aliasing and this option quadruples its default performance. This is something that will be most noticeable in games. It’s worth noting that this will likely affect battery performance to some degree. As well, this option is turned back off anytime the device is rebooted, so you’ll have to return to Developer Options to turn it back on after every boot.
Overclock the device
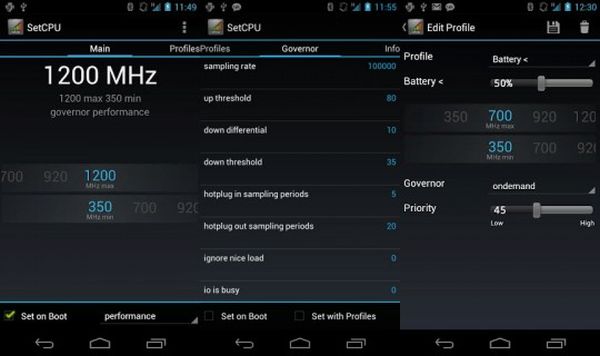
Though one of the most complicated solutions on our list, most Android modders swear by overclocking. You see, OEMs don’t typically allow a device’s hardware to run at its full potential. Instead, they hold back the CPU, which is most commonly referred to as “throttling”. You might say that leaving your device in its factory state is like going the speed limit on a highway while overclocking is like putting the pedal to the floor.
If you want to let your device run free, the first step is to root your phone. Depending on your device, this process can vary, so it’s difficult to provide step-by-step instructions since any instructions we might provide won’t work for the majority of devices. The best way to go about rooting your devices — assuming it’s possible since some OEMs put certain measures in place that prevent rooting — is just to do a Google search for rooting guides for your device.

Rooting your device is actually the most difficult part of this equation. Once your device is rooting, overclocking is as simple as downloading an app. There are numerous apps available that will give you complete control over the CPU of any rooted device. SetCPU is one example and although it’ll cost you two dollars, it’s a very usable and highly-rated app. Overclock for Android costs three dollars and does the same thing, but the app is a bit more refined. There are also some free options available like No-Frills CPU Control, which, as its name suggest, is a no-frills app for overclocking your device.
After you’ve changed your CPU settings and are overclocking your device, you’ll notice a significant boost in performance, especially when it comes to sustained performance. Normally, your device will get throttled after being continually used for a period of time; although this is done to keep the device from getting too hot, throttling is typically a bit more aggressive than it needs to be. Nonetheless, you’ll want to keep an eye on your device and make sure it’s not getting too hot during use since overclocking essentially means turning off the failsafe switch.
Remove bloatware and System apps
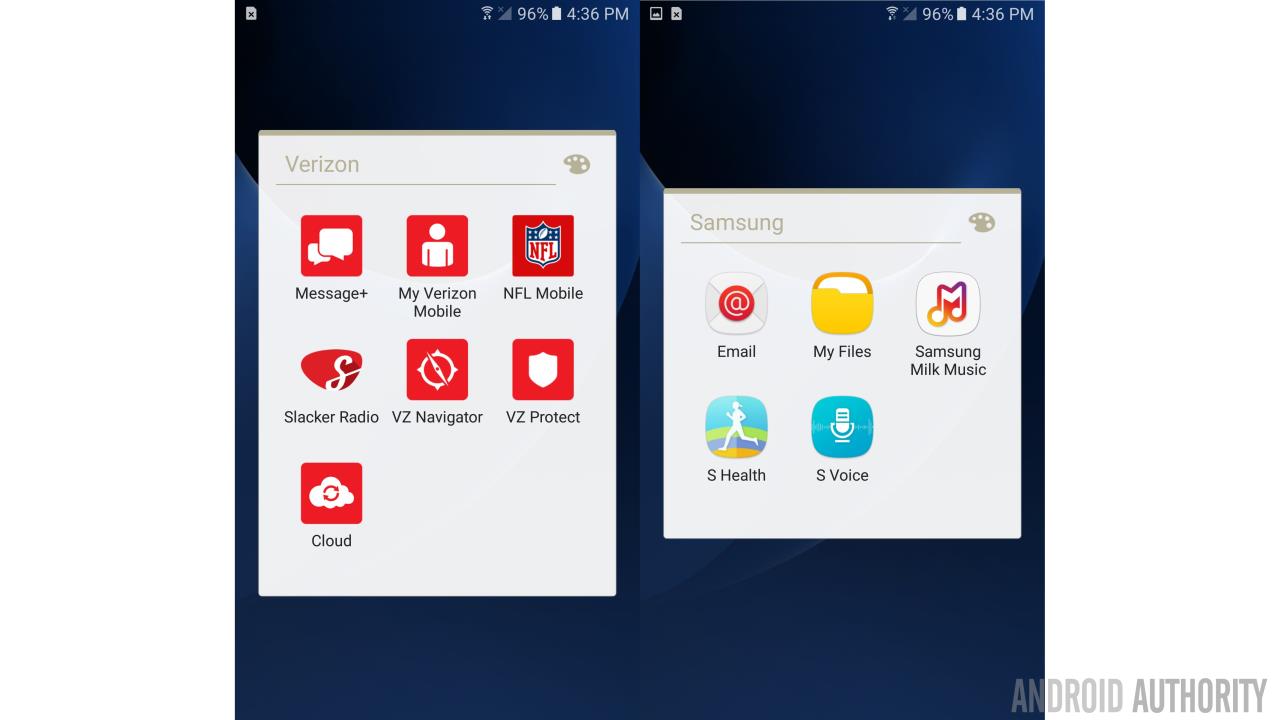
Anyone who’s ever bought a carrier-locked phone will be intimately familiar with the bloat that carriers add to our beloved Android devices. And that’s on top of all the superfluous apps loaded onto Android phones by default. However, in addition to overclocking, another major benefit that rooting gives you is the ability to uninstall bloatware and system apps.
On a rooted device, all you have to do is download an app. It may sound contradictory that you’d need to download an app to uninstall apps, but the reason for this is because root access doesn’t make system apps uninstallable. Instead, rooting a device gives you access to administrator’s privileges, and you need an app that can essentially uninstall bloatware and system apps as an administrator. There are numerous apps available that can do this, most of which are free, but System App Remover and All-in-One Toolbox [no longer available] will definitely get the job done. The first time you open the app you will probably be prompted to grant it administrative or “superuser” access, which you should allow. After that, the app will populate a list of all your apps and you simply choose the ones you want to uninstall like you would do in the settings of your device.
Install a custom ROM
As a mobile operating system, Android is unique in that it’s open-source, which means that anybody with the know-how can take the base code of Android and make tweaks to it. There have been many OEMs and Android development hobbyists to have done this, and that’s why there are a plethora of modified versions of Android referred to as custom ROMs. Technically, the modified versions of Android used by Samsung, HTC, LG and most other smartphone manufacturers are custom ROMs, but installing custom software doesn’t necessary improve performance beyond what you’d expect from an Android phone in its default state.
CyanogenMod and its sibling Cyanogen OS are two of the most well-known custom Android ROMs, but there are many others with amusing names like Dirty Unicorns, Paranoid Android, Resurrection Remix, and Cataclysm. If you’re unsure where to start, CyanogenMod is always a safe bet. It has one of the largest development teams, especially when you consider its community of followers, and is updated regularly; plus, most of the most popular custom ROMs — including some of the ones named above — are built upon CyanogenMod. All it takes is a Google search to learn more about them and read some feedback from actual users.
However, you need to be able to unlock the device’s bootloader to install custom ROMs. This is something separate from rooting a device; in fact, you don’t actually need to root your device to install a custom ROM. What you do need is an unlocked bootloader and, usually, some sort of custom recovery like TWRP [no longer available] or ClockWorkMod installed on the device. If the bootloader can’t be unlocked,you’ll have to stick to some of the other performance enhancement methods we’ve provided.
The instructions for bootloader unlocking and installing custom recovery and a ROM vary somewhat depending on your device. More often than not, whoever it was that developed your chosen custom ROM will provide step-by-step instructions to get the ROM up and running on your device. The process is a little disconcerting the first time so you’ll want to take extra care to make sure you’re following the steps completely. To prepare, you might consider checking out some YouTube videos that show custom ROMs being installed on Android devices; it helps a lot to actually see the process before doing it. But once you’ve actually going through the entire process, it’s actually much less complicated that it seems.
There are a number of benefits to installing custom ROMs, but each ROM is created with certain goals in mind. Choosing the right ROM boils down to figuring out which ROM has the features you want. The majority of custom ROMs either have additional features added, improved customization options, or enhanced performance. Or some combination of the three.
Factory reset the device
If rooting isn’t an option, you don’t feel comfortable installing a custom ROM, and none of the other methods we’ve provided have made much difference, our last suggestion would be to do a factory reset on your phone. If you’re considering a reset, chances are you’ve owned and been using your device for a while — perhaps a couple of years or more — and it’s seen a lot of app installs, downloads, and accumulated lots of junk files. At this point, starting over with a clean slate might make more of a difference than anything else we’ve suggested. Luckily, the process of factory resetting a device is really simple.
First, make sure all of the important data on your device has been saved or backed up; this can be done by uploading your files to the cloud, a flash drive, an external hard drive, or by transferring them to your computer. Once all the important stuff is safe, navigate to Settings > Backup & Reset and select the “Factory Data Reset” option. If there’s password protection on your device, you’ll probably be prompted for your password before the reset process begins, which is to make sure a factory wipe doesn’t happen accidentally or by someone who has stolen your phone. Simply type your password, confirm, and the device will wipe itself. Afterward, it’ll reboot to the setup wizard so you can setup your device like it’s your first time using it.
That’s all the performance improvement tips we have for now. Aside from the methods provided here, there are other things that can help, too. For instance, manually shutting down recently-used apps that you no longer need so they’re not running in the background. As well, apps like CCleaner and Clean Master are able to perform scans of your device, alerting you to junk content, large files, and other stuff that can be deleted or uninstalled for better performance.
Now we’d like to hear from you. What types of things do you do to optimize the performance of your Android device? Have you tried any of the methods we’ve provided here? Will you? Sound off in the comments below and make sure Android Authority remains your go-to destination for all things Android.