Affiliate links on Android Authority may earn us a commission. Learn more.
How to Root Your Samsung Galaxy SL I9003 with Android 2.3.6 DDKP1/DDKP2 Firmware
Published onDecember 29, 2011
If you happen to own a Samsung Galaxy SL I9003 with Android 2.3.6 Gingerbread DDKP1 or DDKP2 firmware, then you’re in luck–we have step-by-step instructions on how to root your phone.
Rooting your phone opens the way for third-party applications to access your system files, which allows you to customize your phone and make use of apps that require root access. Although rooting your device voids its warranty, it can be recovered by updating your device with default or stock firmware.
If you want to customize your phone and use apps that require root, then go ahead and read through our rooting instructions for the Samsung Galaxy SL I9003 running Android 2.3.6 Gingerbread DDKP1 or DDKP2 firmware.
Rooting Prerequisites
Before we talk about how to root your Samsung SL I9003, let’s first focus our attention on some requirements.
- Download the respective rooting packages for DDKP1 or DDKP2. Get the package for DDKP1 here, and the package for DDKP2 here.
- Create a backup of your phone data and files or transfer all data in your SD card in case it gets erased or corrupted during the rooting process.
- Enable USB debugging. You can check it at Settings > Applications > Development > USB Debugging.
- Disable all system tools on your computer such as antivirus software, Samsung KIES, and firewall programs. These may interfere during the rooting process.
- Make sure your phone has at least 60% power or more.
- Double check that your device’s firmware version is either DDKP1 or DDKP2 by looking in Settings > About Phone > Firmware Version. These rooting instruction will only work with DDKP1 or DDKP2 firmware and not with other versions.
Rooting Instructions
After you’ve covered all prerequisites, let’s proceed to rooting your Samsung Galaxy SL I9003.
- Extract the contents of the rooting package to your computer. Use “androidauthority.com” as password for extracting the files.
- Run the Odin executable file from the folder where you extracted files.
- Turn off your phone and switch it back on into download mode. To do that, you need to press the Volume Down key and Home button (middle key) simultaneously as you switch on your phone.
- While in download mode, connect your phone to your computer via USB cable.
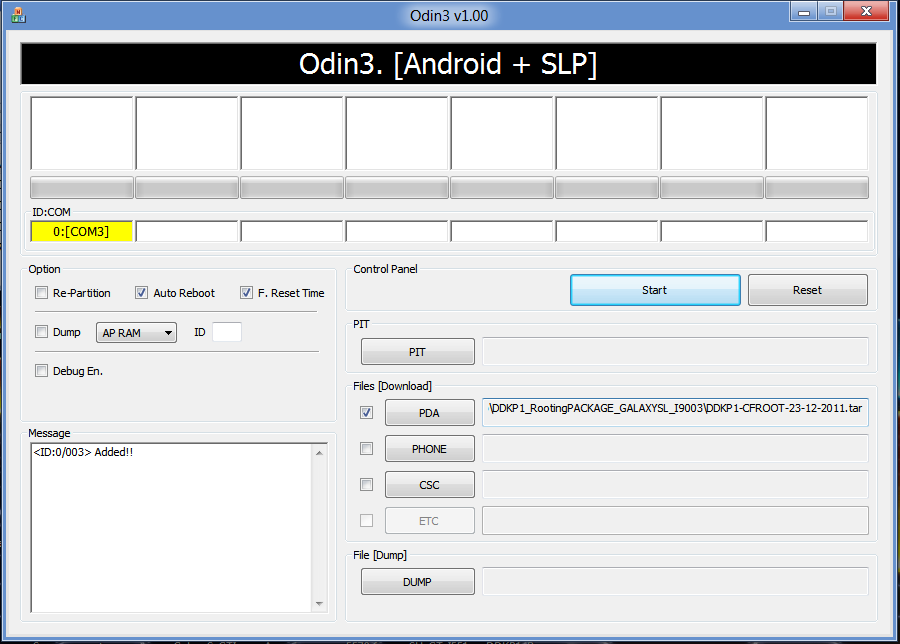
- Once connected, wait for Odin’s ID:COM box to be turn yellow, signaling that the device has been detected.
- Manually add the respective files into Odin. If you want to root your phone on DDKP1 firmware, click “PDA” and select the file “DDKP1-CFROOT-23-12-2011.tar” (For DDKP2 firmware, choose the file “DDKP2-CFROOT-23-12-2011.tar” instead.)
- Make sure the other appropriate options in Odin are checked, such as auto-reboot and F. Reset Time, as seen in the following screenshot:

In Case of Force Close Issues
In case the rooting process doesn’t go as planned and you are faced with force close errors, you can wipe the cache in recovery mode. To enter recovery mode, turn off your phone, then press the Volume Up key and Home button (middle key) simultaneously while turning your phone on. While in recovery mode, choose “Wipe data/factory reset” and then select “Wipe cache partition”. Afterwards, you will need to reboot your phone by selecting the “Reboot system now” option. You can either restart the rooting process, or stick with the phone’s default firmware.
Have you successfully rooted your Samsung SL I9003 with Android 2.3.6 Gingerbread DDKP1/DDKP2 firmware? How did the process go?