Affiliate links on Android Authority may earn us a commission. Learn more.
Add any GitHub library to Android Studio, using Maven, JCenter, and JitPack
Published onJune 5, 2017
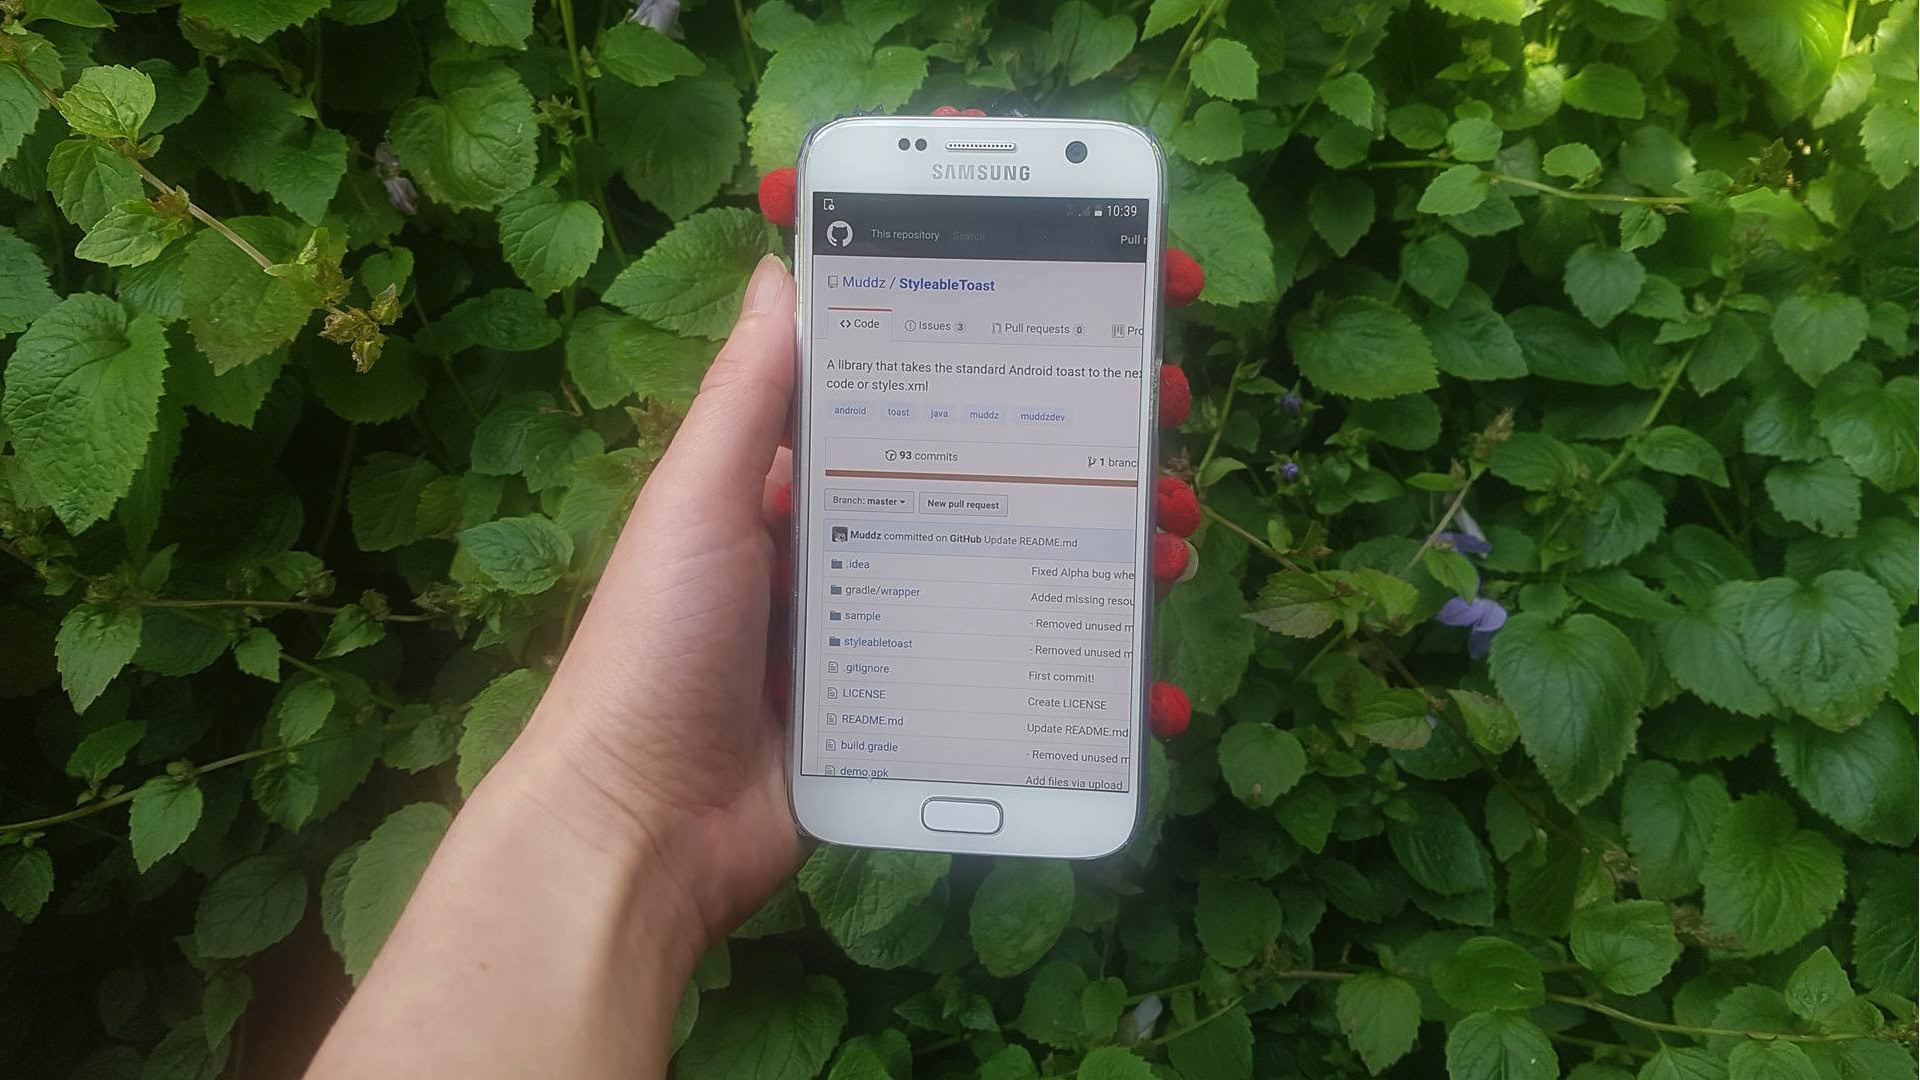
Very few Android projects are an island! The majority of Android projects have dependencies on a number of other components, including third party Android libraries.
An Android library contains the same files you’d find in a regular Android project, such as source code, resources, and a Manifest. However, instead of compiling into an Android Package Kit (APK) that can run on an Android device, a library compiles into a code archive that you can use as a project dependency. These libraries give you access to a wide range of additional functionality, including some features that aren’t included in the vanilla Android platform.
One of the best places to find Android libraries, is GitHub. However, getting a library from its GitHub page and into your project isn’t always straightforward, especially since there’s several different repositories that developers can use to distribute their GitHub projects – and it may not always be obvious which repository a developer is using!
In this article, I’m going to show you how to import any library you discover on GitHub into your Android project, regardless of whether you want to add the library as a remote dependency, or as a local dependency.
Adding remote dependencies
Android Studio’s Gradle build system adds libraries to your project as module dependencies. These dependencies can either be located in a remote repository, such as Maven or JCenter, or they can be stored inside your project, as a local dependency – you just need to let Gradle know where it can find these dependencies.
Adding a library as a remote dependency is typically the quickest and easiest way of getting a library’s code into your project, so this is the method we’re going to look at first. When you add a library as a remote dependency, Gradle will make sure that dependency has everything it needs to able to run, including any transitive dependencies, so you’ll typically want to add a library as a remote dependency wherever possible.
To add a remote dependency, you’ll need to provide Gradle with two pieces of information:
- The repository. Gradle needs to know the repository (or repositories) where it should look for your library (or libraries). Android libraries tend to be distributed via either Maven Central or JCenter.
- The compile statement. This contains the library’s package name, the name of the library’s group, and the version of the library you want to use.
Ideally, the library’s GitHub page should provide you with all this information. In reality this isn’t always the case, but let’s start with the best case scenario and assume that the library’s GitHub page does include this information.
Adding a remote dependency with JCenter
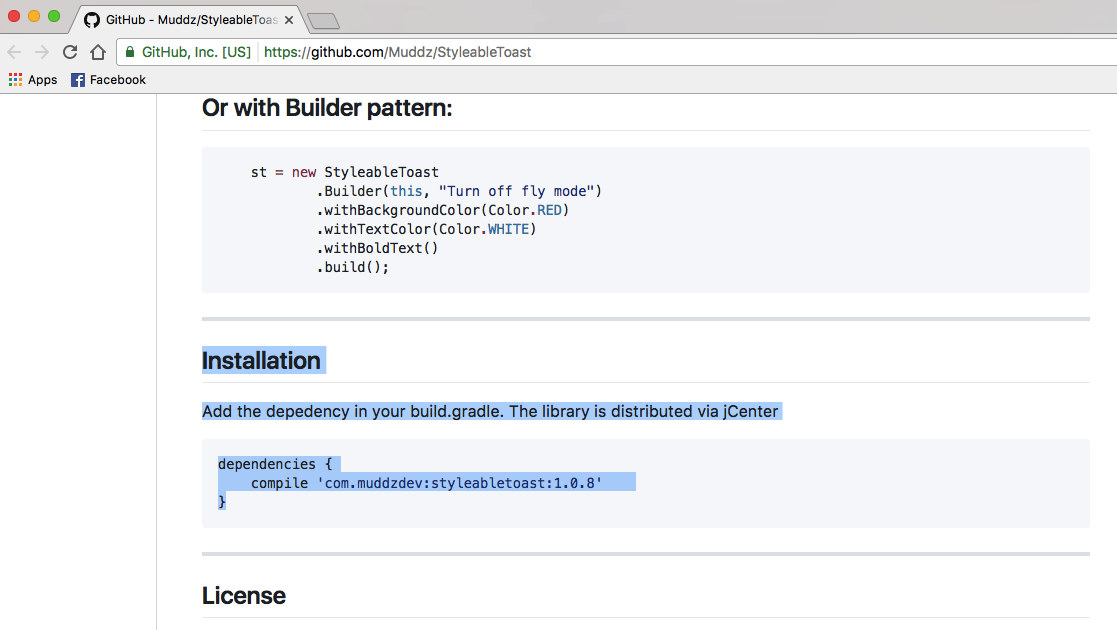
StyleableToast is a library that lets you customize every part of Android’s toasts, including changing the background color, corner radius and font, and adding icons. It also provides all the information you need to add this library to your project, in its dedicated ‘Installation’ section. Here, we can see that this project is distributed via JCenter.
When you create a project with the latest releases of Android Studio, your project’s build.gradle files are already setup to support JCenter. If you open your project-level build.gradle file, then you’ll see that JCenter is already included in the ‘allprojects / repositories’ section:
allprojects {
    repositories {
        jcenter()
    }
}
Note, the project-level build.gradle file contains two ‘repositories’ blocks, but the ‘buildscript / repositories’ block is where you define how Gradle performs this build. You shouldn’t add any module dependencies to this section.
Since your project is already configured to check JCenter, the only thing we need to do is add our compile statement to the module-level build.gradle file.
Once again, StyleableToast provides us with exactly the information we need, so simply copy the compile statement from StyleableToast’s GitHub page, and paste it into your Gradle file:
dependencies {
    compile 'com.muddzdev:styleabletoast:1.0.8'
}
Sync your Gradle files, either by clicking the ‘Sync’ banner, or by selecting the ‘Sync Project with Gradle Files’ icon in the toolbar. Gradle will then query the JCenter server to check that the Styleabletoast library exists, and download all of its files. You’re now ready to start using this library!
2. Adding a remote dependency with Maven Central
Alternatively, if the project’s GitHub page states that this library is distributed via Maven Central, then you’ll need to tell Gradle to check Maven Central instead.
Open your project-level build.gradle file and add Maven Central to the “allprojects” block:
allprojects {
    repositories {
        mavenCentral()
    }
}
From here, the rest of the process is exactly the same: open your module-level build.gradle file, add the compile statement and sync with Gradle.
3. Adding a remote dependency that’s hosted on its own server
Occasionally, you may encounter a project that’s still distributed via JCenter or Maven Central, but the developer has chosen to host their project on their own server. When this is the case, the project’s GitHub page should tell you to use a very specific URL, for example Fabric’s Crashlytics Kit repository is located at https://maven.fabric.io/public.
If you see this kind of URL, then you’ll need to open your project-level build.gradle file, and then declare the repository (in this instance, Maven) along with the exact URL:
repositories {
    maven { url 'https://maven.fabric.io/public' }
}
You can then add the compile statement and sync your files as normal.
What if I can’t find the repository and/or compile statement?
Up until now, we’ve been optimistic and assumed that the project’s GitHub always tells you all the information you need to know. Unfortunately this isn’t always the case, so let’s shift from the best case scenario, to the worst case scenario, and imagine that the project’s GitHub page doesn’t provide you with any information about the repository and compile statement you need to use.
In this scenario, you can either:
- Use JitPack.
- Clone the entire repository, and import its code into your project as its own module.
Using JitPack
JitPack is a package repository for Git that lets you add any GitHub project as a remote dependency. As long as the library contains a build file, JitPack can generate all the information you need to add this library to your project.
The first step, is to open your project-level build.gradle file and add JitPack as a repository:
allprojects {
    repositories {
        maven { url 'https://jitpack.io' }
        }
    }
You can then use the JitPack website to generate a compile statement, based on that project’s GitHub URL:
- In your web browser, navigate to the library’s GitHub page. Copy its URL.
- Head over to the JitPack website.
- Paste the URL into the website’s search field and then click the accompanying ‘Look Up’ button.
- The webpage will then display a table of all the versions of this library, split across various tabs: Releases, Builds, Branches and Commits. Typically, Releases tend to be more stable, whereas the Commit section contains the latest changes.
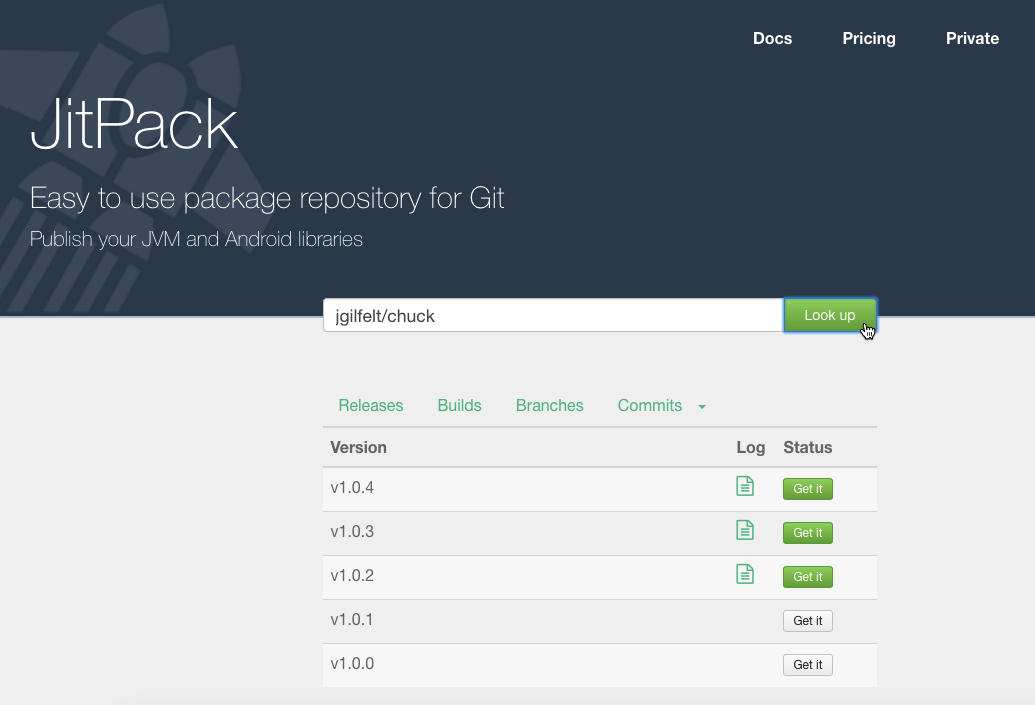
- Once you’ve decided what version you want to use, click its accompanying ‘Get It’ button.
- The website should update to display the exact compile statement you need to use.
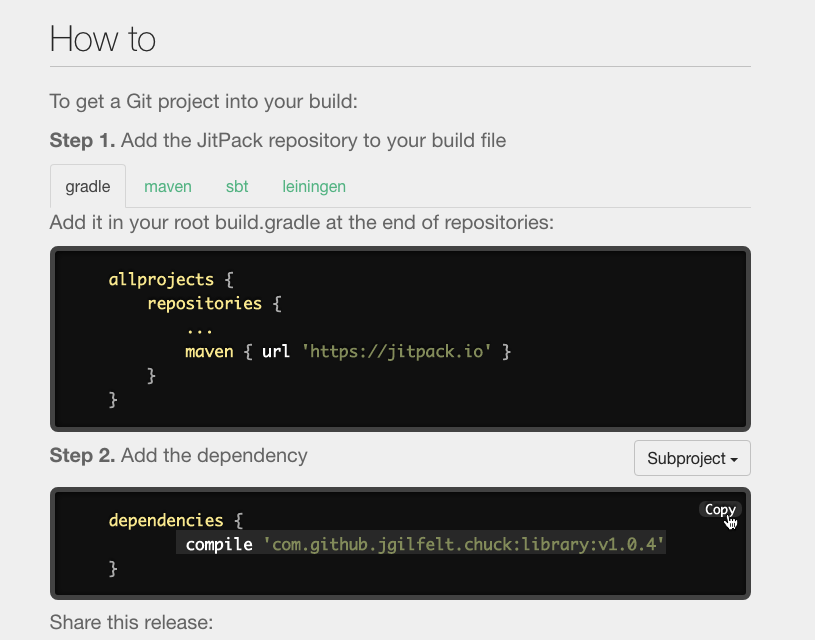
- Copy/paste this compile statement into your project’s module-level build.gradle file.
- Sync your Gradle files, and you’re ready to start using your library!
Cloning a GitHub project
Alternatively, when you’re unsure of a library’s repository and/or compile statement, you may want to clone the GitHub project. Cloning creates a copy of all the GitHub project’s code and resources, and stores this copy on your local machine. You can then import the clone into your project as its own module, and use it as a module dependency.
This method can be time-consuming, and importing the entirety of a project’s code may cause conflicts with the rest of your project. However, cloning does give you access to all of the library’s code, so this method is ideal if you want to customize the library, for example by tweaking its code to better integrate with the rest of your project, or even adding new features (although if you feel like other people might benefit from your changes, then you may want to consider contributing your improvements back to the project).
To clone a GitHub project:
- Create a GitHub account.
- Select ‘Checkout from Version Control’ from Android Studio’s ‘Welcome’ screen.
- Enter your GitHub credentials.
- Open your web browser, navigate to the GitHub repository you want to clone, and then copy/paste its URL into the Android Studio dialog.
- Specify the local directory where you want to store the cloned repository.
- Give this directory a name, and then click ‘Clone.’
Now you have a copy of the library’s code, you can import this library into your Android project, as a new module:
- Open the project where you want to use your cloned library, then select ‘File > New > Import Module’ from the Android Studio toolbar.
- Click the three-dotted button and navigate to your cloned repository. Select this repository, then click ‘OK.’
- Click ‘Finish.’
- Select ‘File > Project structure’ from the Android Studio toolbar.
- In the left-hand menu, select the module where you want to use this library.
- Select the ‘Dependencies’ tab.
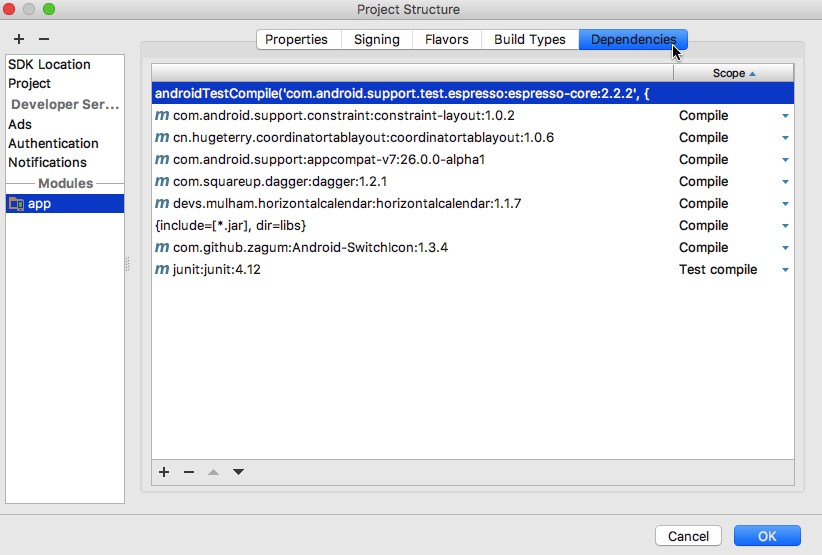
- Select the little ‘+’ icon, followed by ‘Module dependency.’
- Select your library module, then click ‘OK.’
- Exit the ‘Project structure’ window.
Depending on the library you’re using, you may need to make some adjustments to your imported code before your project will compile. For example if Android Studio’s ‘Messages’ tab is complaining about incompatible minSdkVersions, then chances are the APIs being used by the library aren’t compatible with the versions of the Android platform defined in your project’s build.gradle file. Similarly, if Android Studio is complaining about your project’s buildToolsVersion, then it’s likely there’s a mismatch between the version defined in the library and the version defined elsewhere in your project. In both of these scenarios, you’ll need to check the values defined in both build.gradle files, and change them accordingly.
Troubleshooting
When you’re working with any kind of third party software, as a general rule you’re more likely to encounter incompatibilities, bugs, and all-around strange behavior, compared to when you’re using a suite of software that was developed by the same team, and where every piece of the puzzle was specifically designed to work together.
If you do run into problems after adding a library to your project, then try the following fixes:
- Check that you haven’t accidentally added multiple versions of the same library. If Android Studio is reporting a “multiple DEX files define…” error, then you may have added the same library to your project more than once. You can review your module’s dependencies by selecting ‘File > Project structure’ from the Android Studio toolbar, then selecting the module you want to examine, and clicking the ‘Dependencies’ tab. If a library appears in this window multiple times, then select the duplicate, and click the little ‘-’ icon to remove it.
- Search the web. There’s always a chance that other people may have encountered the same issue as you, so perform a quick Google search to see whether anyone has posted about this issue on forums, or communities like Stackoverflow. You may even get lucky and find a blog or a tutorial that includes instructions on how to resolve this exact issue.
- Clean and rebuild your project. Sometimes, selecting ‘Build > Clean project’ from the Android Studio toolbar, followed by ‘Build > Rebuild project,’ may be enough to solve your problem.
- And if all else fails… Getting third party software to work correctly sometimes requires a bit of trial and error, so if there’s an alternate method of importing your chosen library, then it’s always worth trying. Just because your project is refusing to compile after you’ve imported a cloned repository, doesn’t necessarily mean that it’s going to have the same reaction if you try to use that same library as a remote dependency.
Wrapping Up
In this article, we looked at how you can add any library you discover on GitHub, to your Android project, regardless of whether that library is distributed via JCenter or Maven Central. And, even if you have no idea what repository or compile statement you need to use, then you always have the option of using JitPack, or cloning the library’s code.
Have you discovered any great Android libraries on GitHub? Let us know in the comments below!