Affiliate links on Android Authority may earn us a commission. Learn more.
Build an augmented reality Android app with Google ARCore
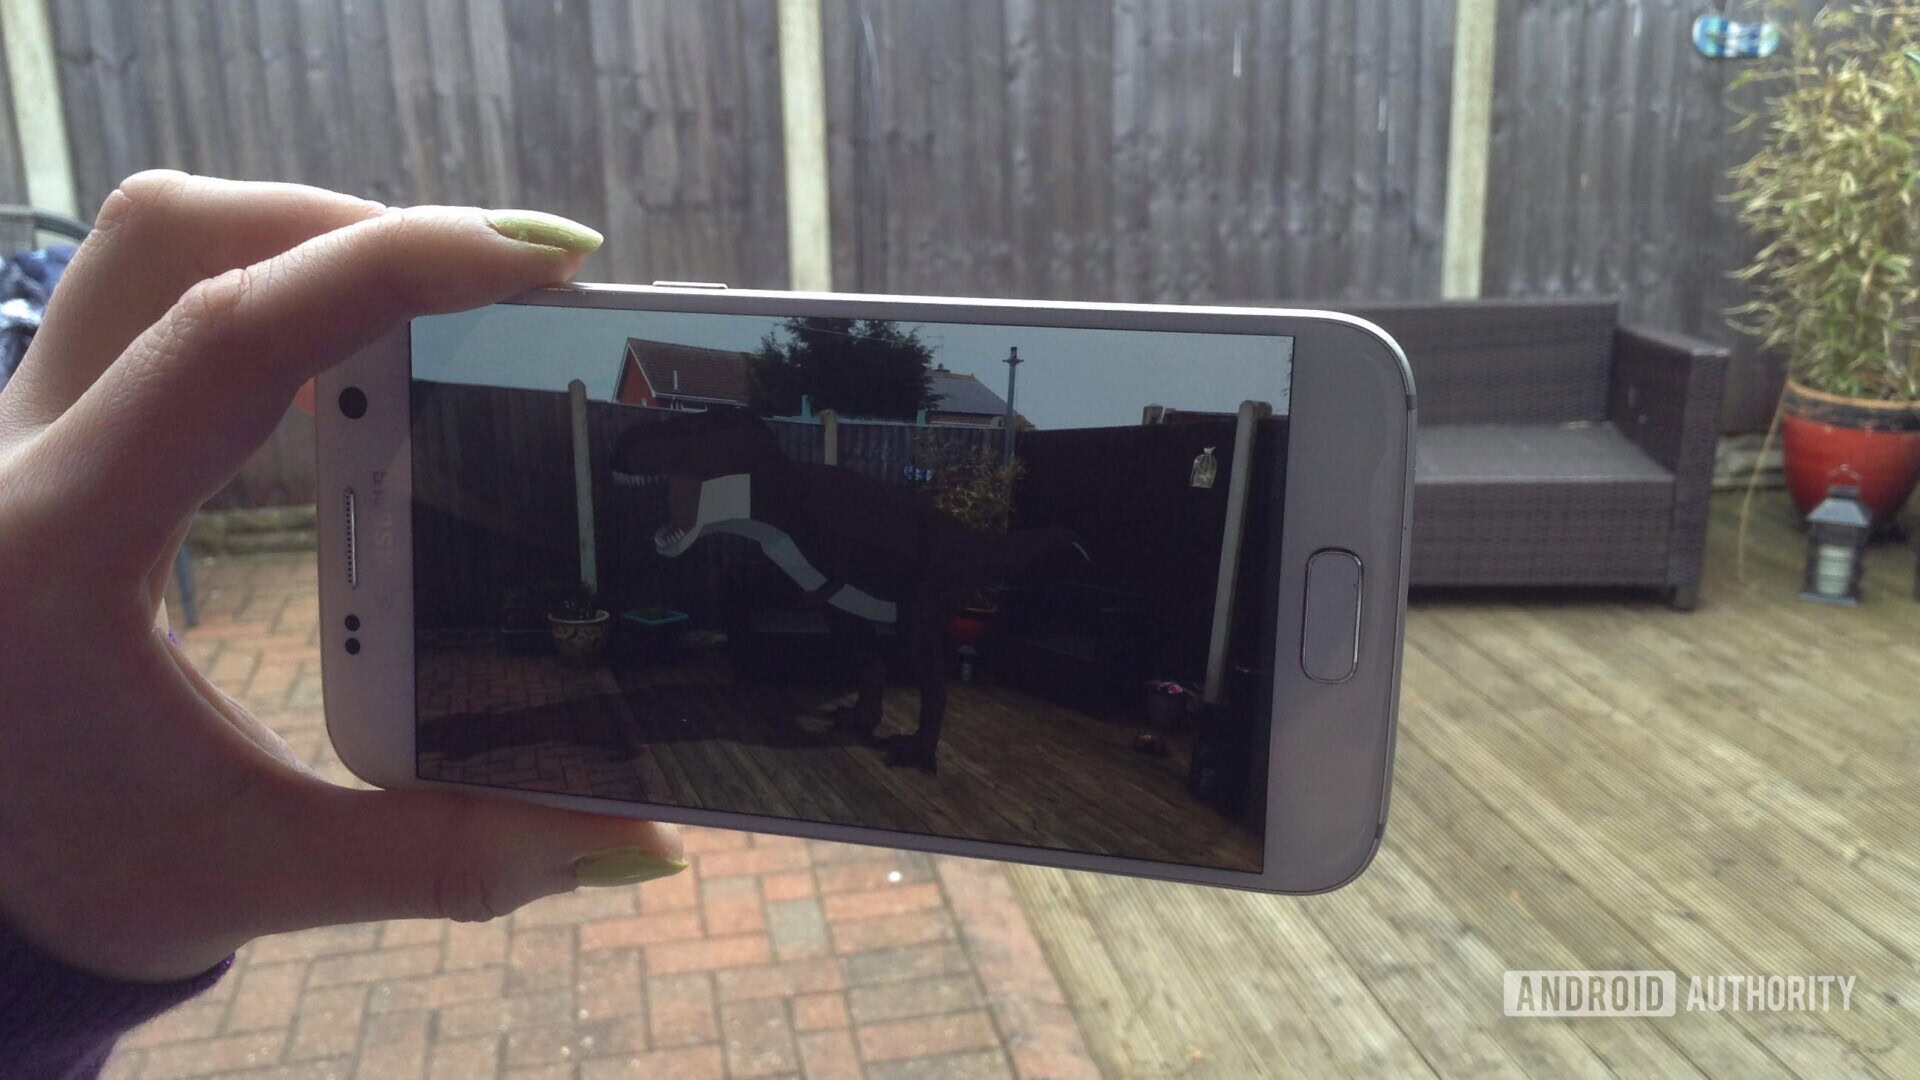
Augmented Reality (AR) is a huge buzzword, and a topic that’s really captured the imagination of mobile app developers.
In AR applications, a live view of the physical, real world environment is augmented by virtual content, providing a more immersive user experience. Pokemon Go may be the first thing that springs to mind when you think about AR mobile apps, but there’s plenty of mobile applications that harness the power of AR technology. For example, Snapchat uses AR to add filters and masks to the device’s camera feed, and Google Translate’s Word Lens feature is powered by AR.
Whether you dream of creating the next big AR mobile game, or you want to enhance your existing app with a few AR-powered features, augmented reality can help you design new and innovative experiences for your users.
In this article, I’ll show you how to get started with AR, using Google’s ARCore platform and Sceneform plugin. By the end of this article, you’ll have created a simple AR application that analyzes its surroundings, including light sources and the position of walls and floors, and then allows the user to place virtual 3D models in the real world.
What is Google ARCore?
ARCore is a Google platform that enables your applications to “see” and understand the physical world, via your device’s camera.
Rather than relying on user input, Google ARCore automatically looks for “clusters” of feature points that it uses to understand its surroundings. Specifically, ARCore looks for clusters that indicate the presence of common horizontal and vertical surfaces such as floors, desks and walls, and then makes these surfaces available to your application as planes. ARCore can also identify light levels and light sources, and uses this information to create realistic shadows for any AR objects that users place within the augmented scene.
ARCore-powered applications can use this understanding of planes and light sources to seamlessly insert virtual objects into the real world, such as annotating a poster with virtual labels, or placing a 3D model on a plane – which is exactly what we’ll be doing in our application.
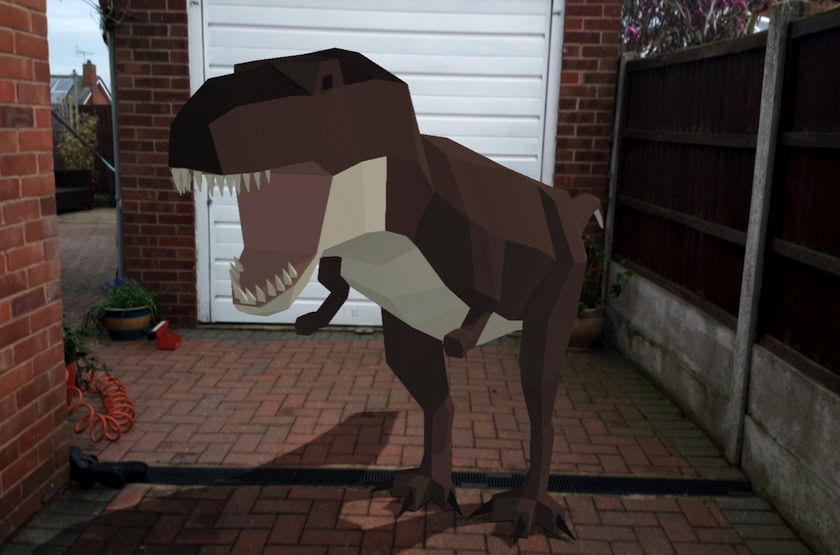
Importing 3D models, with the Sceneform plugin
Usually, working with 3D models requires specialist knowledge, but with the release of the Sceneform plugin Google have made it possible to render 3D models using Java – and without having to learn OpenGL.
The Sceneform plugin provides a high-level API that you can use to create Renderdables from standard Android widgets, shapes or materials, or from 3D assets, such as .OBJ or .FBX files.
In our project, we’ll be using the Sceneform plugin to import a .OBJ file into Android Studio. Whenever you import a file using Sceneform, this plugin will automatically:
- Convert the asset file into a .sfb file. This is a runtime-optimized Sceneform Binary format (.sfb) that’s added to your APK and then loaded at runtime. We’ll be using this .sfb file to create a Renderable, which consists of meshes, materials and textures, and can be placed anywhere within the augmented scene.
- Generate a .sfa file. This is an asset description file, which is a text file containing a human-readable description of the .sfb file. Depending on the model, you may be able to change its appearance by editing the text inside the .sfa file.
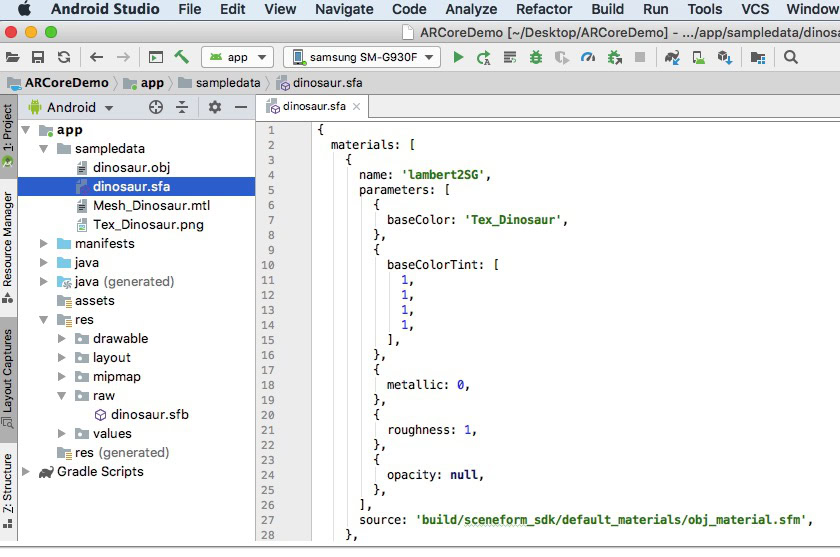
Just be aware that at the time of writing, the Sceneform plugin was still in beta, so you may encounter bugs, errors, or other strange behavior when using this plugin.
Installing the Sceneform plugin
The Sceneform plugin requires Android Studio 3.1 or higher. If you’re unsure which version of Android Studio you’re using, select “Android Studio > About Android Studio” from the toolbar. The subsequent popup contains some basic information about your Android Studio installation, including its version number.
To install the Sceneform plugin:
- If you’re on a Mac, select “Android Studio > Preferences…” from the Android Studio toolbar, then choose “Plugins” from the left-hand menu. If you’re on a Windows PC, then select “File > Settings > Plugins > Browse repositories.”
- Search for “Sceneform.” When “Google Sceneform Tools” appears, select “Install.”
- Restart Android Studio when prompted, and your plugin will be ready to use.

Sceneform UX and Java 8: Updating your project dependencies
Let’s start by adding the dependencies we’ll be using throughout this project. Open your module-level build.gradle file, and add the Sceneform UX library, which contains the ArFragment we’ll be using in our layout:
dependencies {
   implementation fileTree(dir: 'libs', include: ['*.jar'])
   implementation 'androidx.appcompat:appcompat:1.0.2'
   implementation 'androidx.constraintlayout:constraintlayout:1.1.3'
   testImplementation 'junit:junit:4.12'
   androidTestImplementation 'androidx.test.ext:junit:1.1.0'
   androidTestImplementation 'androidx.test.espresso:espresso-core:3.1.1'

//Sceneform UX provides UX resources, including ArFragment//

   implementation "com.google.ar.sceneform.ux:sceneform-ux:1.7.0"
   implementation "com.android.support:appcompat-v7:28.0.0"
}
Sceneform uses language constructs from Java 8, so we’ll also need to update our project’s Source Compatibility and Target Compatibility to Java 8:
compileOptions {
   sourceCompatibility JavaVersion.VERSION_1_8
   targetCompatibility JavaVersion.VERSION_1_8
}
Finally, we need to apply the Sceneform plugin:
apply plugin: 'com.google.ar.sceneform.plugin'Your completed build.gradle file should look something like this:
apply plugin: 'com.android.application'

android {
   compileSdkVersion 28
   defaultConfig {
       applicationId "com.jessicathornsby.arcoredemo"
       minSdkVersion 23
       targetSdkVersion 28
       versionCode 1
       versionName "1.0"
       testInstrumentationRunner "androidx.test.runner.AndroidJUnitRunner"
   }

   compileOptions {
       sourceCompatibility JavaVersion.VERSION_1_8
       targetCompatibility JavaVersion.VERSION_1_8
   }

   buildTypes {
       release {
           minifyEnabled false
           proguardFiles getDefaultProguardFile('proguard-android-optimize.txt'), 'proguard-rules.pro'
       }
   }
}

dependencies {
   implementation fileTree(dir: 'libs', include: ['*.jar'])
   implementation 'androidx.appcompat:appcompat:1.0.2'
   implementation 'androidx.constraintlayout:constraintlayout:1.1.3'
   testImplementation 'junit:junit:4.12'
   androidTestImplementation 'androidx.test.ext:junit:1.1.0'
   androidTestImplementation 'androidx.test.espresso:espresso-core:3.1.1'
   implementation "com.google.ar.sceneform.ux:sceneform-ux:1.7.0"
   implementation "com.android.support:appcompat-v7:28.0.0"
}

apply plugin: 'com.google.ar.sceneform.plugin'
Requesting permissions with ArFragment
Our application will use the device’s camera to analyze its surroundings and position 3D models in the real world. Before our application can access the camera, it requires the camera permission, so open your project’s Manifest and add the following:
<uses-permission android:name="android.permission.CAMERA" />Android 6.0 gave users the ability to grant, deny and revoke permissions on a permission-by-permission basis. While this improved the user experience, Android developers now have to manually request permissions at runtime, and handle the user’s response. The good news is that when working Google ARCore, the process of requesting the camera permission and handling the user’s response is implemented automatically.
The ArFragment component automatically checks whether your app has the camera permission and then requests it, if required, before creating the AR session. Since we’ll be using ArFragment in our app, we don’t need to write any code to request the camera permission.
AR Required or Optional?
There are two types of applications that use AR functionality:
1. AR Required
If your application relies on Google ARCore in order to deliver a good user experience, then you need to ensure it’s only ever downloaded to devices that support ARCore. If you mark your app as “AR Required” then it’ll only appear in the Google Play store, if the device supports ARCore.
Since our application does require ARCore, open the Manifest and add the following:
<uses-feature android:name="android.hardware.camera.ar" android:required="true"/>There’s also a chance that your application may be downloaded to a device that supports ARCore in theory, but doesn’t actually have ARCore installed. Once we mark our app as “AR Required” Google Play will automatically download and install ARCore alongside your app, if it’s not already present on the target device.
Just be aware that even if your app is android:required=”true” you’ll still need to check that ARCore is present at runtime, as there’s a chance the user may have uninstalled ARCore since downloading your app, or that their version of ARCore is out of date.
The good news is that we’re using ArFragment, which automatically checks that ARCore is installed and up to date before creating each AR session – so once again, this is something we don’t have to implement manually.
2. AR Optional
If your app includes AR features that are nice-to-have but not essential to delivering its core functionality, then you can mark this application as “AR Optional.” Your app can then check whether Google ARCore is present at runtime, and disable its AR features on devices that don’t support ARCore.
If you do create an “AR Optional” app, then ARCore will not be automatically installed alongside your application, even if the device has all the hardware and software required to support ARCore. Your “AR Optional” app will then need to check whether ARCore is present and up-to-date, and download the latest version as and when required.
If ARCore isn’t crucial to your app, then you can add the following to your Manifest:
<meta-data android:name="com.google.ar.core" android:value="optional" />While I have the Manifest open, I’m also adding android:configChanges and android:screenOrientation, to ensure MainActivity handles orientation changes gracefully.
After adding all this to your Manifest, the completed file should look something like this:
<?xml version="1.0" encoding="utf-8"?>
<manifest xmlns:android="http://schemas.android.com/apk/res/android"
   package="com.jessicathornsby.arcoredemo">

   <uses-permission android:name="android.permission.CAMERA" />
   <uses-feature android:name="android.hardware.camera.ar" android:required="true"/>

   <application
       android:allowBackup="true"
       android:icon="@mipmap/ic_launcher"
       android:label="@string/app_name"
       android:roundIcon="@mipmap/ic_launcher_round"
       android:supportsRtl="true"
       android:theme="@style/AppTheme">

       <meta-data android:name="com.google.ar.core" android:value="required" />

       <activity
           android:name=".MainActivity"
           android:configChanges="orientation|screenSize"
           android:theme="@style/Theme.AppCompat.NoActionBar"
           android:screenOrientation="locked"
           android:exported="true">
           <intent-filter>
               <action android:name="android.intent.action.MAIN" />

               <category android:name="android.intent.category.LAUNCHER" />
           </intent-filter>
       </activity>

   </application>

</manifest>
Add ArFragment to your layout
I’ll be using ARCore’s ArFragment, as it automatically handles a number of key ARCore tasks at the start of each AR session. Most notably, ArFragment checks that a compatible version of ARCore is installed on the device, and that the app currently has the camera permission.
Once ArFragment has verified that the device can support your app’s AR features, it creates an ArSceneView ARCore session, and your app’s AR experience is ready to go!
You can add the ArFragment fragment to a layout file, just like a regular Android Fragment, so open your activity_main.xml file and add a “com.google.ar.sceneform.ux.ArFragment” component.
<FrameLayout xmlns:android="http://schemas.android.com/apk/res/android"
   xmlns:tools="http://schemas.android.com/tools"
   android:layout_width="match_parent"
   android:layout_height="match_parent"
   tools:context=".MainActivity">

   <fragment android:name="com.google.ar.sceneform.ux.ArFragment"
       android:id="@+id/main_fragment"
       android:layout_width="match_parent"
       android:layout_height="match_parent" />

</FrameLayout>
Downloading 3D models, using Google’s Poly
There’s several different ways that you can create Renderables, but in this article we’ll be using a 3D asset file.
Sceneform supports 3D assets in .OBJ, .glTF, and .FBX formats, with or without animations. There’s plenty of places where you can acquire 3D models in one of these supported formats, but in this tutorial I’ll be using an .OBJ file, downloaded from Google’s Poly repository.
Head over to the Poly website and download the asset that you want to use, in .OBJ format (I’m using this T-Rex model).
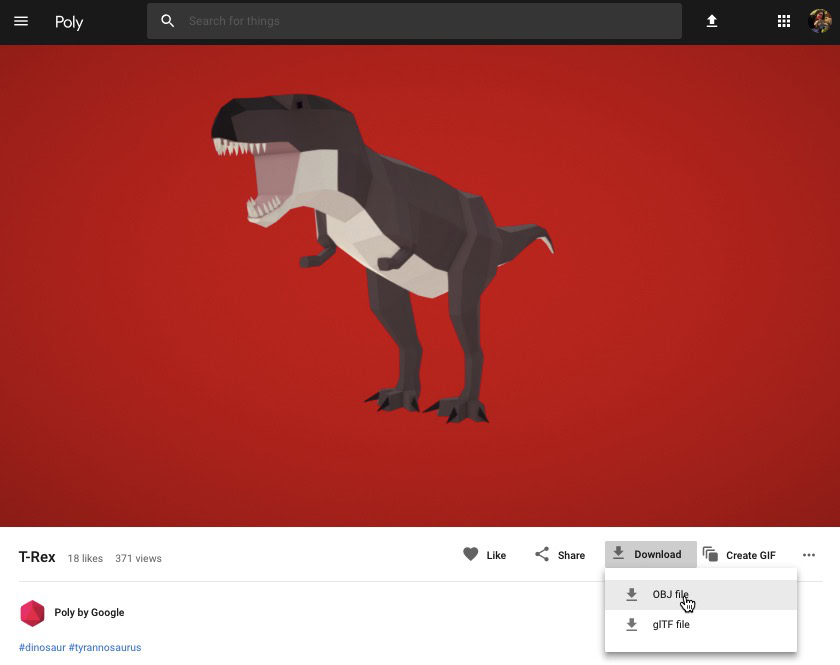
- Unzip the folder, which should contain your model’s source asset file (.OBJ, .FBX, or .glTF). Depending on the model, this folder may also contain some model dependencies, such as files in the .mtl, .bin, .png, or .jpeg formats.
Importing 3D models into Android Studio
Once you have your asset, you need to import it into Android Studio using the Sceneform plugin. This is a multi-step process that requires you to:
- Create a “sampledata” folder. Sampledata is a new folder type for design time sample data that won’t be included in your APK, but will be available in the Android Studio editor.
- Drag and drop the original .OBJ asset file into your “sampledata” folder.
- Perform the Sceneform import and conversion on the .OBJ file, which will generate the .sfa and .sfb files.
Although it may seem more straightforward, don’t drag and drop the .OBJ file directly into your project’s “res” directory, as this will cause the model to be included in your APK unnecessarily.
Android Studio projects don’t contain a “sampledata” folder by default, so you’ll need to create one manually:
- Control-click your project’s “app” folder.
- Select “New > Sample Data Directory” and create a folder named “sampledata.”
- Navigate to the 3D model files you downloaded earlier. Find the source asset file (.OBJ, .FBX, or .glTF) and then drag and drop it into the “sampledata” directory.
- Check whether your model has any dependencies (such as files in the .mtl, .bin, .png, or .jpeg formats). If you do find any of these files, then drag and drop them into the “sampledata” folder.
- In Android Studio, Control-click your 3D model source file (.OBJ, .FBX, or .glTF) and then select “Import Sceneform Asset.”
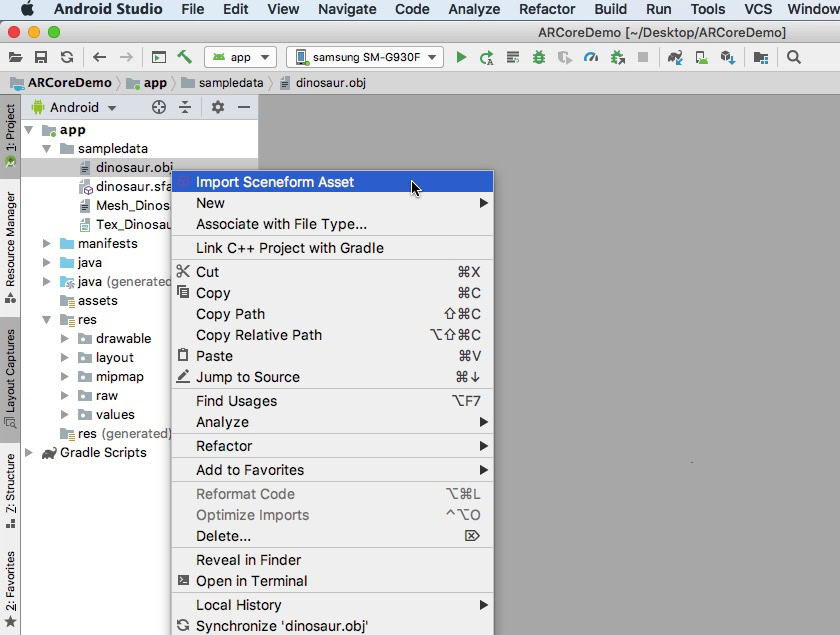
- The subsequent window displays some information about the files that Sceneform is going to generate, including where the resulting .sfa file will be stored in your project; I’m going to be using the “raw” directory.
- When you’re happy with the information you’ve entered, click “Finish.”
This import makes a few changes to your project. If you open your build.gradle file, then you’ll see that the Sceneform plugin has been added as a project dependency:
dependencies {
       classpath 'com.android.tools.build:gradle:3.5.0-alpha06'
       classpath 'com.google.ar.sceneform:plugin:1.7.0'

// NOTE: Do not place your application dependencies here; they belong
// in the individual module build.gradle files
   }
}
Open your module-level build.gradle file, and you’ll find a new sceneform.asset() entry for your imported 3D model:
apply plugin: 'com.google.ar.sceneform.plugin'

//The “Source Asset Path” you specified during import//

sceneform.asset('sampledata/dinosaur.obj',

//The “Material Path” you specified during import//

'Default',

//The “.sfa Output Path” you specified during import//

'sampledata/dinosaur.sfa',

//The “.sfb Output Path” you specified during import//

'src/main/assets/dinosaur')
If you take a look at your “sampledata” and “raw” folders, then you’ll see that they contain new .sfa and .sfb files, respectively.
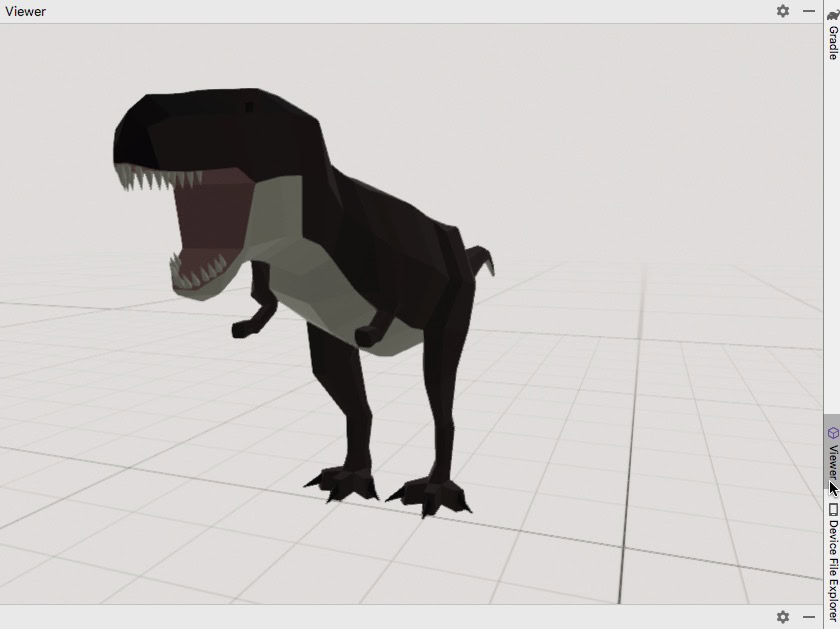
You can preview the .sfa file, in Android Studio’s new Sceneform Viewer:
- Select “View > Tools Windows > Viewer” from the Android Studio menu bar.
- In the left-hand menu, select your .sfa file. Your 3D model should now appear in the Viewer window.
Display your 3D model
Our next task is creating an AR session that understands its surroundings, and allows the user to place 3D models in an augmented scene.
This requires us to do the following:
1. Create an ArFragment member variable
The ArFragment performs much of the heavy-lifting involved in creating an AR session, so we’ll be referencing this fragment throughout our MainActivity class.
In the following snippet, I’m creating a member variable for ArFragment and then initializing it in the onCreate() method:
private ArFragment arCoreFragment;

   @Override
   protected void onCreate(Bundle savedInstanceState) {
       super.onCreate(savedInstanceState);
...
...
...
       }

       setContentView(R.layout.activity_main);
       arCoreFragment = (ArFragment)

//Find the fragment, using the fragment manager//

getSupportFragmentManager().findFragmentById(R.id.main_fragment);
2. Build a ModelRenderable
We now need to transform our .sfb file into a ModelRenderable, which will eventually render our 3D object.
Here, I’m creating a ModelRenderable from my project’s res/raw/dinosaur .sfb file:
private ModelRenderable dinoRenderable;
...
...
...

   ModelRenderable.builder()
           .setSource(this, R.raw.dinosaur)
           .build()
           .thenAccept(renderable -> dinoRenderable = renderable)
           .exceptionally(
                   throwable -> {
                       Log.e(TAG, "Unable to load renderable");
                       return null;
                    });
}
3. Respond to user input
ArFragment has built-in support for tap, drag, pinch, and twist gestures.
In our app, the user will add a 3D model to a ARCore Plane, by giving that plane a tap.
To deliver this functionality, we need to register a callback that’ll be invoked whenever a plane is tapped:
arCoreFragment.setOnTapArPlaneListener(
               (HitResult hitResult, Plane plane, MotionEvent motionEvent) -> {
                   if (dinoRenderable == null) {
                       return;
                    }
4. Anchor your model
In this step, we’re going to retrieve an ArSceneView and attach it to an AnchorNode, which will serve as the Scene’s parent node.
The ArSceneView is responsible for performing several important ARCore tasks, including rendering the device’s camera images, and displaying a Sceneform UX animation that demonstrates how the user should hold and move their device in order to start the AR experience. The ArSceneView will also highlight any planes that it detects, ready for the user to place their 3D models within the scene.
The ARSceneView component has a Scene attached to it, which is a parent-child data structure containing all the Nodes that need to be rendered.
We’re going to start by creating a node of type AnchorNode, which will act as our ArSceneView’s parent node.
All anchor nodes remain in the same real world position, so by creating an anchor node we’re ensuring that our 3D models will remain fixed in place within the augmented scene.
Let’s create our anchor node:
AnchorNode anchorNode = new AnchorNode(anchor);We can then retrieve an ArSceneView, using getArSceneView(), and attach it to the AnchorNode:
anchorNode.setParent(arCoreFragment.getArSceneView().getScene());5. Add support for moving, scaling and rotating
Next, I’m going to create a node of type TransformableNode. The TransformableNode is responsible for moving, scaling and rotating nodes, based on user gestures.
Once you’ve created a TransformableNode, you can attach it the Renderable, which will give the model the ability to scale and move, based on user interaction. Finally, you need to connect the TransformableNode to the AnchorNode, in a child-parent relationship which ensures the TransformableNode and Renderable remain fixed in place within the augmented scene.
TransformableNode transformableNode = new TransformableNode(arCoreFragment.getTransformationSystem());

//Connect transformableNode to anchorNode//

         transformableNode.setParent(anchorNode);
         transformableNode.setRenderable(dinoRenderable);

//Select the node//

         transformableNode.select();
     });
 }
The completed MainActivity
After performing all of the above, your MainActivity should look something like this:
import android.app.Activity;
import android.app.ActivityManager;
import androidx.appcompat.app.AppCompatActivity;
import android.content.Context;
import android.net.Uri;
import android.os.Build;
import android.os.Build.VERSION_CODES;
import android.os.Bundle;
import android.util.Log;
import android.view.MotionEvent;

import androidx.annotation.RequiresApi;

import com.google.ar.core.Anchor;
import com.google.ar.core.HitResult;
import com.google.ar.core.Plane;

import com.google.ar.sceneform.AnchorNode;
import com.google.ar.sceneform.rendering.ModelRenderable;
import com.google.ar.sceneform.ux.ArFragment;
import com.google.ar.sceneform.ux.TransformableNode;

public class MainActivity extends AppCompatActivity {
   private static final String TAG = MainActivity.class.getSimpleName();
   private static final double MIN_OPENGL_VERSION = 3.0;

//Create a member variable for ModelRenderable//

   private ModelRenderable dinoRenderable;

//Create a member variable for ArFragment//

   private ArFragment arCoreFragment;

   @RequiresApi(api = VERSION_CODES.N)
   @Override
   protected void onCreate(Bundle savedInstanceState) {
       super.onCreate(savedInstanceState);
       if (!checkDevice((this))) {
           return;
       }

       setContentView(R.layout.activity_main);
       arCoreFragment = (ArFragment)

//Find the fragment, using fragment manager//

getSupportFragmentManager().findFragmentById(R.id.main_fragment);

      if (Build.VERSION.SDK_INT >= VERSION_CODES.N) {

//Build the ModelRenderable//

           ModelRenderable.builder()
                   .setSource(this, R.raw.dinosaur)
                   .build()
                   .thenAccept(renderable -> dinoRenderable = renderable)
                   .exceptionally(

//If an error occurs...//

                           throwable -> {

//...then print the following message to Logcat//

                               Log.e(TAG, "Unable to load renderable");
                               return null;
                           });
       }

//Listen for onTap events//

       arCoreFragment.setOnTapArPlaneListener(
              (HitResult hitResult, Plane plane, MotionEvent motionEvent) -> {
                  if (dinoRenderable == null) {
                      return;
                  }

                  Anchor anchor = hitResult.createAnchor();

//Build a node of type AnchorNode//

                  AnchorNode anchorNode = new AnchorNode(anchor);

//Connect the AnchorNode to the Scene//

                  anchorNode.setParent(arCoreFragment.getArSceneView().getScene());

//Build a node of type TransformableNode//

                   TransformableNode transformableNode = new TransformableNode(arCoreFragment.getTransformationSystem());

//Connect the TransformableNode to the AnchorNode//

                   transformableNode.setParent(anchorNode);

//Attach the Renderable//

                   transformableNode.setRenderable(dinoRenderable);

//Set the node//

                   transformableNode.select();
               });
   }

   public static boolean checkDevice(final Activity activity) {

//If the device is running Android Marshmallow or earlier...//

       if (Build.VERSION.SDK_INT < VERSION_CODES.N) {

//...then print the following message to Logcat//

           Log.e(TAG, "Sceneform requires Android N or higher");
           activity.finish();
           return false;
       }
       String openGlVersionString =
               ((ActivityManager) activity.getSystemService(Context.ACTIVITY_SERVICE))
                       .getDeviceConfigurationInfo()

//Check the version of OpenGL ES//

                       .getGlEsVersion();

//If the device is running anything less than OpenGL ES 3.0...//

        if (Double.parseDouble(openGlVersionString) < MIN_OPENGL_VERSION) {

//...then print the following message to Logcat//

           Log.e(TAG, "Requires OpenGL ES 3.0 or higher");
           activity.finish();
           return false;
       }
       return true;
   }
}Testing your Google ARCore augmented reality app
You’re now ready to test your application on a physical, supported Android device. If you don’t own a device that supports ARCore, then it’s possible to test your AR app in the Android Emulator (with a bit of extra configuration, which we’ll be covering in the next section).
To test your project on a physical Android device:
- Install your application on the target device.
- When prompted, grant the application access to your device’s camera.
- If prompted to install or update the ARCore app, tap “Continue” and then complete the dialogue to make sure you’re running the latest and greatest version of ARCore.
- You should now see a camera view, complete with an animation of a hand holding a device. Point the camera at a flat surface and move your device in a circular motion, as demonstrated by the animation. After a few moments, a series of dots should appear, indicating that a plane has been detected.
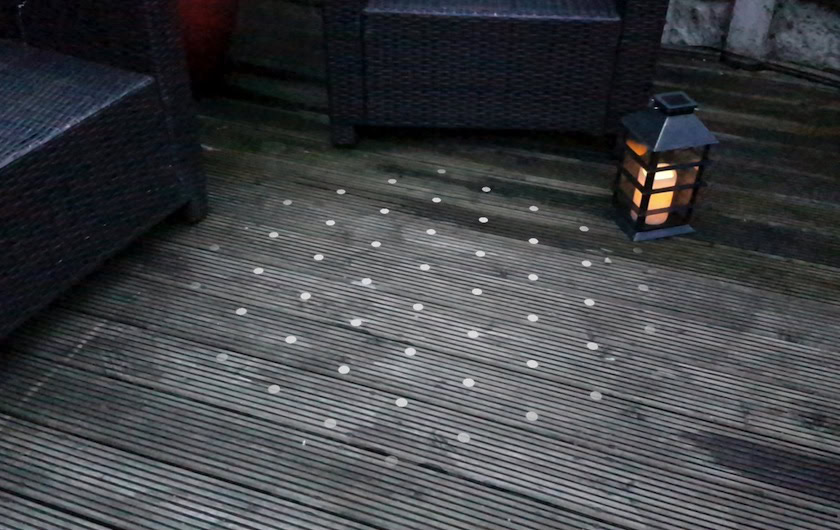
- Once you’re happy with the position of these dots, give them a tap – your 3D model should now appear on your chosen plane!
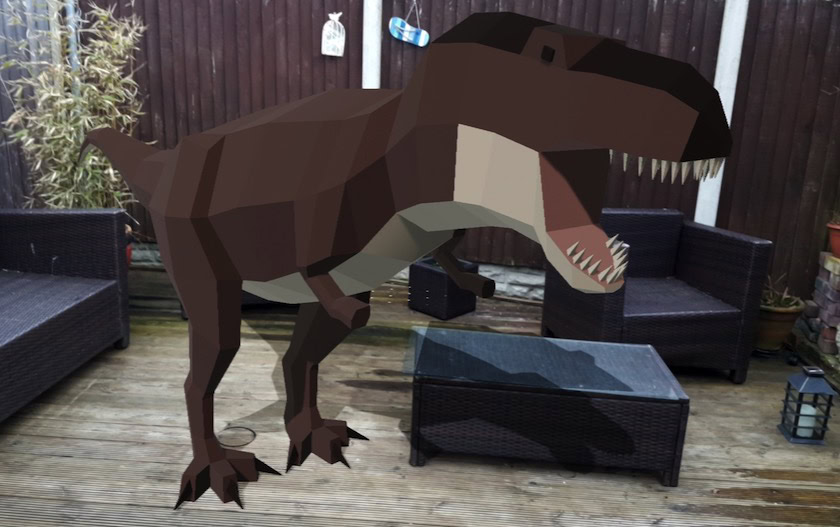
- Try physically moving around the model; depending on your surroundings, you may be able to do the full 360 degrees around it. You should also check that the object is casting a shadow that’s consistent with the real world light sources.
Testing ARCore on an Android Virtual Device
To test your ARCore apps in an Android Virtual Device (AVD), you’ll need Android Emulator version 27.2.9 or higher. You must also be signed into the Google Play store on your AVD, and have OpenGL ES 3.0 or higher enabled.
To check whether OpenGL ES 3.0 or higher is currently enabled on your AVD:
- Launch your AVD, as normal.
- Open a new Terminal window (Mac) or a Command Prompt (Windows).
- Change directory (“cd”) so the Terminal/Command Prompt is pointing at the location of your Android SDK’s “adb” program, for example my command looks like this:
Cd /Users/jessicathornsby/Library/Android/sdk/platform-tools
- Press the “Enter” key on your keyboard.
- Copy/paste the next command into the Terminal, and then press the “Enter” key:
./adb logcat | grep eglMakeCurrent
If the Terminal returns “ver 3 0” or higher, then OpenGL ES is configured correctly. If the Terminal or Command Prompt displays anything earlier than 3.0, then you’ll need to enable OpenGL ES 3.0:
- Switch back to your AVD.
- Find the strip of “Extended Control” buttons that float alongside the Android Emulator, and then select “Settings > Advanced.”
- Navigate to “OpenGL ES API level > Renderer maximum (up to OpenGL ES 3.1).”
- Restart the emulator.
In the Terminal/Command Prompt window, copy/paste the following command and then press the “Enter” key”
./adb logcat | grep eglMakeCurrent
You should now get a result of “ver 3 0” or higher, which means OpenGL ES is configured correctly.
Finally, make sure your AVD is running the very latest version of ARCore:
- Head over to ARCore’s GitHub page, and download the latest release of ARCore for the emulator. For example, at the time of writing the most recent release was “ARCore_1.7.0.x86_for_emulator.apk”
- Drag and drop the APK onto your running AVD.
To test your project on an AVD, install your application and grant it access to the AVD’s “camera” when prompted.
You should now see a camera view of a simulated room. To test your application, move around this virtual space, find a simulated flat surface, and click to place a model on this surface.
You can move the virtual camera around the virtual room, by pressing and holding the “Option” (macOS) or “Alt” (Linux or Windows) keys, and then using any of the following keyboard shortcuts:
- Move left or right. Press A or D.
- Move down or up. Press Q or E.
- Move forward or back. Press W or S.
You can also “move” around the virtual scene, by pressing “Option” or “Alt” and then using your mouse. This can feel a little clunky at first, but with practice you should be able to successfully explore the virtual space. Once you find a simulated plane, click the white dots to place your 3D model on this surface.
Wrapping up
In this article, we created a simple augmented reality app, using ARCore and the Sceneform plugin.
If you decide to use Google ARCore in your own projects, then be sure to share your creations in the comments below!