Affiliate links on Android Authority may earn us a commission. Learn more.
Android Architecture Components: Creating an app using Room, LiveData, and ViewModel
Published onFebruary 6, 2019
Building an Android app isn’t always easy, and you may find yourself grappling with the same problems, over and over again. How do you manage the application lifecycle so you don’t encounter memory leaks? How do you ensure your application’s data can survive Android’s configuration changes? How do you guarantee a good user experience, regardless of whether the device has an active Internet connection?
In this article, we’ll be exploring the Android Architecture Components. As part of Android Jetpack, these Architecture Components help you create more robust, testable and maintainable applications, by providing libraries for common tasks, including data persistence and lifecycle management.
Throughout this article, we’ll be creating an application that uses the Android Architecture libraries to solve some of the most common problems you’ll encounter when developing for Android. We’ll make sure the user always has access to the latest information, by saving data to a local Room database; avoid memory leaks and application crashes with the help of the lifecycle-aware LiveData component; and make sure your data survives Android’s configuration changes, using ViewModel.
Even if you have zero previous experience of SQLite, or even databases in general, by the end of this article you’ll have created an application that saves the user’s data to a local SQLite database, without having to deal with much of the complexities that typically surround creating and managing your own databases.
What we’ll be building
In this article, we’ll be creating a “Shopping List” application where the use can add items to a database, and then view that data in a RecylerView.
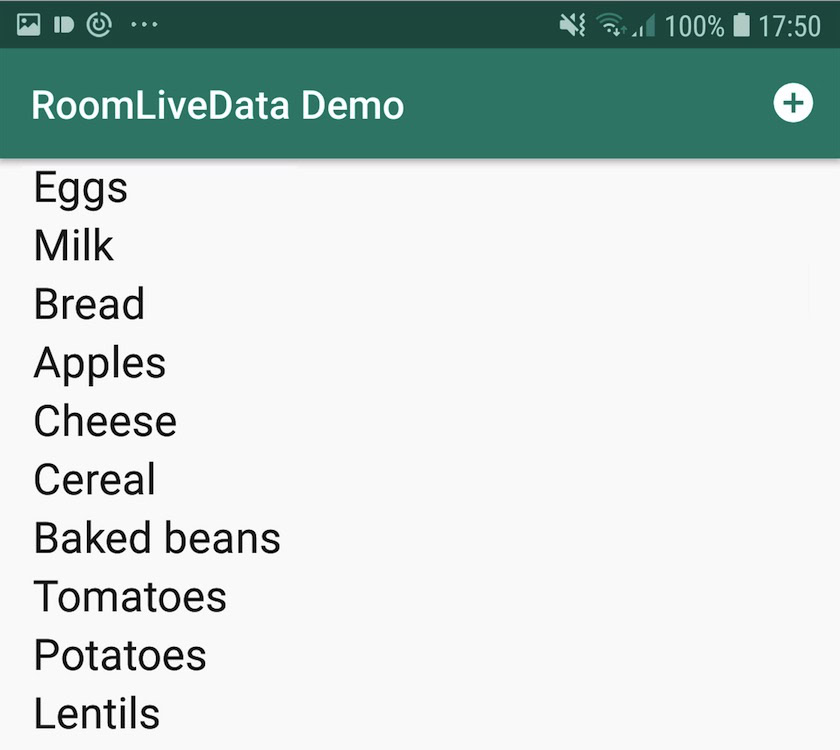
From the user’s perspective, this application will consist of two Activities:
- A MainActivity. This screen displays the user’s shopping list in a RecylerView, and features an action bar icon, which takes the user from the first screen, to the second.
- A NewItemActivity. This screen will feature an EditText where the user can enter items, and a “Save” button that lets them save each item to their shopping list. New items will be added to the RecylerView automatically.
On the surface, this seems like a fairly straightforward application, but behind the scenes we’ll be using a number of Android Architecture Components to deliver this functionality in a way that’s robust, maintainable and follows all the latest Android Architecture best practices.
We’ll be exploring each Architecture component in more detail as we implement them, but for now let’s get a high-level overview of how all of these components fit together:
- A ViewModel. Every time the device’s configuration changes, Android will respond by destroying the current Activity or Fragment, and then recreating it with the new configuration. If you hold your application’s data in a UI component, then you could potentially lose that data every single time the configuration changes, including every time the user moves between portrait and landscape mode. To keep our data separate from our application’s UI, we’ll be holding it in a ViewModel, which is designed to persist across configuration changes.
- A Repository. This class manages one or more data sources, including web services, caches, and Room databases.
- A Room database. Room provides an abstraction layer over SQLite, helping you create and maintain a local SQLite database, without having to write a tonne of boilerplate code. If you have previous SQLite experience, then Room manages all the tasks you’d typically handle in the SQLiteOpenHelper class.
- A DAO (Data Access Object). This contains the methods you’ll use to access your Room database.
- An entity. This is an annotated class that represents a table within the database. In our application, each item the user adds to their shopping list will be represented as an instance of the entity class.
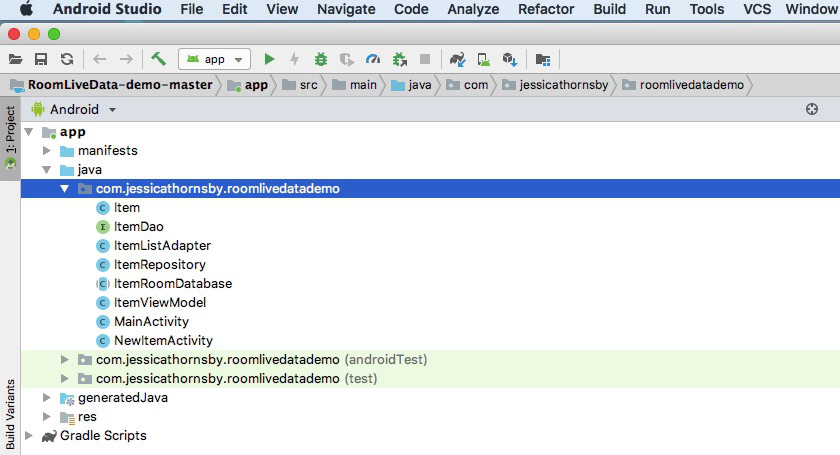
In our application, this will translate to the following classes:
Creating lifecycle-aware Observables, with LiveData
The LiveData observable data holder class is an Android Architecture Component that deserves a special mention, as it’ll allow us to update our RecylerView automatically as new data becomes available, i.e every time the user adds a new item to their shopping list.
Instead of writing the logic to process the new data, we can tweak our DAO methods so they return LiveData objects. LiveData objects support the Observer pattern, so we can use these objects to create Observer/Observable relationships where the relevant Observers are notified about changes to the underlying data. In this way, we can ensure that our application is notified whenever there’s a new item that it needs to add to the RecylerView.
LiveData is also lifecycle-aware, so you can use it without worrying about memory leaks, or the application crashes that can occur if you attempt to update an inactive component. LiveData will automatically stop and resume observation depending on the state of the observing Activity, Fragment or service, so it only ever notifies components when they’re in an active lifecycle state (STARTED or RESUMED).
Finally, although we won’t be exploring it in this article, if you’re a fan of the popular RxJava library then you can use RxJava rather than LiveData – just make sure you destroy your streams when they’re no longer needed! Alternatively, you can use LiveData alongside RxJava, by adding LiveDataReactiveStreams to your project.
Creating an Android Architecture Component project
Room, ViewModel, DAO, LiveData – we have lots to cover, so create an Android project using the “Empty Activity” template, and let’s get started!
Adding the Room, ViewModel and LiveData libraries
Open your module-level build.gradle file, and add all the Architecture Components libraries that we’ll be using throughout this project:
dependencies {
   implementation fileTree(dir: 'libs', include: ['*.jar'])
   implementation 'com.android.support:appcompat-v7:28.0.0'
   implementation 'com.android.support.constraint:constraint-layout:1.1.3'
   testImplementation 'junit:junit:4.12'
   androidTestImplementation 'com.android.support.test:runner:1.0.2'
   androidTestImplementation 'com.android.support.test.espresso:espresso-core:3.0.2'
   implementation 'com.android.support:design:28.0.0'

//Room//

   implementation "android.arch.persistence.room:runtime:1.1.1"
   annotationProcessor "android.arch.persistence.room:compiler:1.1.1"
   androidTestImplementation "android.arch.persistence.room:testing:1.1.1"

//ViewModel and LiveData//

   implementation "android.arch.lifecycle:extensions:1.1.1"
   annotationProcessor "android.arch.lifecycle:compiler:1.1.1"
}
Creating the Item entity
Each item in the user’s shopping list will be represented by an entity, so we need to create an entity class and use annotations to let Room know which parts of this class correspond to the entities in the database:
- Create a new Java class, named “Item.”
- Mark this class as an entity, using the @Entity annotation:
@Entity
public class Item {
}- Next, we need to give the table a name in the database, using the “tableName” property. If you don’t specify a name, then Room will use the class name by default:
@Entity(tableName = "item_table")
public class Item {
}- Each entity must define at least one field as its primary key, using the @PrimaryKey annotation. To help keep things simple, each item in our database will serve as its own primary key:
@Entity(tableName = "item_table")
public class Item {
    @PrimaryKey

}- Next, we need to use the @NonNull annotation to clarify that our return value can never be null:
@Entity(tableName = "item_table")
public class Item {

    @PrimaryKey
    @NonNull

}- By default, Room uses the field names as column names. Alternatively, you can specify a different column name, using the @ColumnInfo annotation:
@Entity(tableName = "item_table")
public class Item {

    @PrimaryKey
    @NonNull
    @ColumnInfo(name = "item")

}- Next, add a constructor that takes “item” as an argument:
private String mItem;

public Item(@NonNull String item) {
this.mItem = item;}- Finally, we need to create a “getter” method for our entity class; I’m using “getItem.” Your finished entity class should look something like this:
import android.arch.persistence.room.ColumnInfo;
import android.arch.persistence.room.Entity;
import android.support.annotation.NonNull;
import android.arch.persistence.room.PrimaryKey;

@Entity(tableName = "item_table")

public class Item {
    @NonNull
    @PrimaryKey
    @ColumnInfo(name = "item")
    private String mItem;

    public Item(@NonNull String item) {
        this.mItem = item;}

    public String getItem(){return this.mItem;}
}
Inserting items into the database: Creating DAOs
The Data Access Object (DAO) is an annotated class that provides abstract access to our Room database, by mapping SQL queries to our Java methods.
There’s several convenience queries that you can use in your DAO class, but in this article we’ll be focusing on @Insert. When you annotate a method with @Insert, Room generates an implementation that inserts all parameters into the database in a single transaction – as long as these parameters are all classes annotated with @Entity.
We’ll also be using @Query, which is a method that allows us to perform read/write operations on a database. Although we won’t be exploring it in this article, you can also use @Query to filter your data, by passing method parameters into your queries.
Finally, since we want our application’s UI to update automatically whenever there’s new data available, we’re going to use a return value type of LiveData in our @Query method description.
To create a DAO:
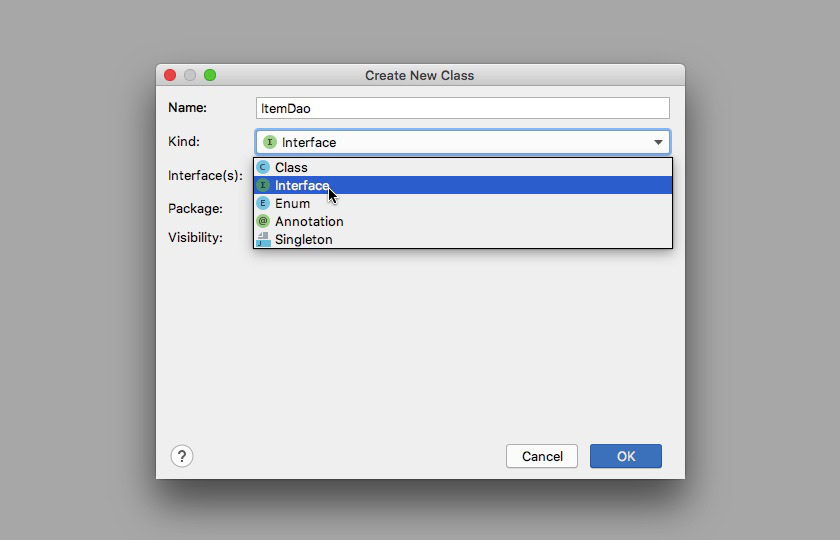
- Create a new interface named “ItemDao” (by selecting “New > Java Class,” then opening the “Kind” dropdown and selecting “Interface.”)
- Open ItemDAO and mark this interface as a DAO, using the @Dao annotation:
import android.arch.persistence.room.Dao;
@Dao
public interface ItemDao {- Create a method called “getItemList()” and annotate it with a SQL query that’ll retrieve all the items from your “item_table.”
//Get all items//

@Query("SELECT * from item_table ")
<List<Item>> getItemList();- Next, we need to tweak the @Query method description so that the result is returned as a LiveData object:
@Query("SELECT * from item_table ")
//Add the value type “LiveData” to our method description//
LiveData<List<Item>> getItemList();- Our next task, is declaring a method to insert an item, using the @Insert annotation:
@Insert
void insert(Item item);- In our @Insert method, we need to specify a conflict strategy, so our application knows how to handle duplicate data, for example if the user tries to add “Apples” to their shopping list twice. I’m going to use OnConflictStrategy.REPLACE, which will replace the older piece of data with the newer, duplicate piece of data, but alternatively you could use OnConflictStrategy.ABORT, OnConflictStrategy.FAIL, OnConflictStrategy.IGNORE, or OnConflictStrategy.ROLLBACK.
@Insert (onConflict = OnConflictStrategy.REPLACE)
   void insert(Item item);
After completing all the above steps, your finished code should look something like this:
import android.arch.lifecycle.LiveData;
import android.arch.persistence.room.Dao;
import android.arch.persistence.room.Insert;
import android.arch.persistence.room.OnConflictStrategy;
import android.arch.persistence.room.Query;

import java.util.List;

@Dao
public interface ItemDao {

//Annotate the insert() method//

   @Insert (onConflict = OnConflictStrategy.REPLACE)
   void insert(Item item);

   @Query("SELECT * from item_table ")
   <List<Item>> getItemList();

}
If you’re using RxJava, then Room’s @Query method also supports return values of Observable, Publisher, and Flowable.
SQLite made simple: Creating a database with Room
Room is a SQLite object mapping library that lets you store data locally on the user’s device, so they can access it regardless of the state of their Internet connection. Even if the user does have an active Internet connection, storing data locally ensures your application doesn’t waste the device’s bandwidth or battery by re-downloading the same data multiple times.
Working with SQLite can be complex, but Room uses your DAO to issue queries to the SQLite database, abstracting away much of the complexity of working with raw SQL tables.
Let’s see how easy it is to create a Room database:
- Create a new Java class named “ItemRoomDatabase.”
- Open this class and mark it as a Room database, using the @Database annotation:
import android.arch.persistence.room.Database;
@Database

public class ItemRoomDatabase {
}- Next, we need to declare the entity that belongs to this database, which in this instance is the Item class. In this declaration, I’m also specifying that this is version 1 of our database, and that we don’t want to export the database’s schema:
import android.arch.persistence.room.Database;

//The list of entities associated with this database//

@Database(entities = {Item.class}, version = 1, exportSchema = false)

public class ItemRoomDatabase {
}- Next, declare that ItemRoomDatabase is abstract, and that it extends RoomDatabase:
import android.arch.persistence.room.Database;
import android.arch.persistence.room.RoomDatabase;

@Database(entities = {Item.class}, version = 1, exportSchema = false)

public abstract class ItemRoomDatabase extends RoomDatabase {

}- We then need to reference our DAO; which in this instance is the ItemDao class:
import android.arch.persistence.room.Database;
import android.arch.persistence.room.RoomDatabase;

@Database(entities = {Item.class}, version = 1, exportSchema = false)

public abstract class ItemRoomDatabase extends RoomDatabase {

   public abstract ItemDao itemDao();

}- Finally, we can create our RoomDatabase object, which I’m going to call “item_list_database”:
import android.content.Context;

import android.arch.persistence.room.Database;
import android.arch.persistence.room.Room;
import android.arch.persistence.room.RoomDatabase;

@Database(entities = {Item.class}, version = 1, exportSchema = false)
public abstract class ItemRoomDatabase extends RoomDatabase {

   private static ItemRoomDatabase INSTANCE;
   public abstract ItemDao itemDao();

   static ItemRoomDatabase getDatabase(final Context context) {
       if (INSTANCE == null) {
           synchronized (ItemRoomDatabase.class) {
               if (INSTANCE == null) {

//Acquire an instance of the database//

                   INSTANCE = Room.databaseBuilder(context.getApplicationContext(),
                           ItemRoomDatabase.class, "item_list_database")
                           .build();
                   }
               }
           }
           return INSTANCE;
       }

}
No more SQLiteOpenHelper: Creating a Repository
The Repository is a class that handles data operations, and manages the tasks you’d typically perform in a separate SQLiteOpenHelper class.
Room can manage data from multiple sources, but in our application we’ll be retrieving data from a single Room database:
- Create a new Java class, called “ItemRepository.”
- Add member variables for our DAO and LiveData:
import android.arch.lifecycle.LiveData;
import java.util.List;

public class ItemRepository {

   private ItemDao myItemsDao;
   private LiveData<List<Item>> itemsList;

}- Next, add a constructor that gets a handle to the database and initializes the member variables:
ItemRepository(Application application) {
       ItemRoomDatabase database = ItemRoomDatabase.getDatabase(application);
       myItemsDao = database.itemDao();
       itemsList = myItemsDao.getItemList();
   }

}- We now need to add a wrapper method that returns the items as LiveData:
LiveData<List<Item>> getAllItems() {
   return itemsList;
}- To make sure we don’t block Android’s all-important main UI thread, I’m going to call the insert() method on a non-UI thread, using AsyncTask:
public void insert (Item item) {
   new newAsyncTask(myItemsDao).execute(item);
}- Implement the insertAsyncTask as an inner class, and your completed code should look something like this:
import android.app.Application;
import android.arch.lifecycle.LiveData;
import android.os.AsyncTask;
import java.util.List;

public class ItemRepository {

   private ItemDao myItemsDao;
   private LiveData<List<Item>> itemsList;

   LiveData<List<Item>> getAllItems() {
       return itemsList;
   }

   public void insert (Item item) {

// Run on a background thread//

       new newAsyncTask(myItemsDao).execute(item);
   }
   private static class newAsyncTask extends AsyncTask<Item, Void, Void> {

       private ItemDao myAsyncDao;

       newAsyncTask(ItemDao dao) {
           myAsyncDao = dao;
       }

       @Override
       protected Void doInBackground(final Item... params) {
           myAsyncDao.insert(params[0]);
           return null;
       }

   }

   ItemRepository(Application application) {
       ItemRoomDatabase database = ItemRoomDatabase.getDatabase(application);
       myItemsDao = database.itemDao();
       itemsList = myItemsDao.getItemList();
   }

}
Surviving configuration changes: Creating the ViewModel
Next, we need to create a ViewModel class, which will contain and manage all of your application’s UI-related data, and provide a communication layer between the Repository and your app’s UI.
ViewModel objects are designed to survive configuration changes, so even if Android destroys and then recreates your Activity or Fragment, the ViewModel’s data will be immediately available to the next instance of that Activity or Fragment.
Since the system retains a ViewModel instance across the application’s lifecycle, it’s crucial that your ViewModel doesn’t contain any direct references to Activities, Fragments or Views, as this can result in leaks following a configuration change.
To ensure our LiveData objects can survive Android’s configuration changes, we’ll be storing them in our ViewModel.
Let’s implement all of the above, in a ViewModel class:
- Create a new “ItemViewModel” class.
- Make sure ItemViewModel extends AndroidViewModel:
import android.arch.lifecycle.AndroidViewModel;

public class ItemViewModel extends AndroidViewModel {
}- Next, add private member variables to hold a reference to the Repository and the list of items:
import android.arch.lifecycle.AndroidViewModel;
import android.arch.lifecycle.LiveData;
import java.util.List;

public class ItemViewModel extends AndroidViewModel {

   private ItemRepository myRepository;
   private LiveData<List<Item>> allItems;

}- Add a constructor that gets a reference to the Repository and retrieves its list of items:
public ItemViewModel (Application application) {
   super(application);
   myRepository = new ItemRepository(application);
   allItems = myRepository.getAllItems();
}- To incorporate the LiveData component into our app, we need to include the “LiveData” field type in our ViewModel. I’m also adding a “getter” method, which will retrieve our list of items:
LiveData<List<Item>> getAllItems() { return allItems; }- Finally, create a wrapper insert() method that calls the Repository’s insert() method:
public void insert(Item item) { myRepository.insert(item); }Your finished code should look something like this:
import android.app.Application;
import android.arch.lifecycle.AndroidViewModel;
import android.arch.lifecycle.LiveData;
import java.util.List;

public class ItemViewModel extends AndroidViewModel {

   private ItemRepository myRepository;
   private LiveData<List<Item>> myAllItems;

   public ItemViewModel (Application application) {
       super(application);
       myRepository = new ItemRepository(application);
       myAllItems = myRepository.getAllItems();
   }

   LiveData<List<Item>> getAllItems() { return myAllItems; }
   public void insert(Item item) { myRepository.insert(item); }

}
Displaying our Android Architecture data: Creating a RecyclerView
At this point, we’ve implemented all of the Android Architecture Components we need to persist data locally, but if the user is ever going to see any of this data, then we need to create our UI.
I’m going to display the data as an infinitely-scrolling RecylerView, so there’s no limit to how many items the user can add to their shopping list! To stop this article from growing out of control, I’m going to skim over the process of implementing a RecyclerView but if you want more information, then check out our “How to use recycler views” article.
Create a new res/layout file, named “item_layout” and add the following:
<LinearLayout xmlns:android="http://schemas.android.com/apk/res/android"
   android:orientation="vertical" android:layout_width="match_parent"
   xmlns:tools="http://schemas.android.com/tools"
   android:layout_height="wrap_content">

   <TextView
       android:id="@+id/textView"
       android:layout_width="match_parent"
       android:layout_height="wrap_content"
       android:textAppearance="?android:attr/textAppearanceLarge"
       tools:text="placeholder text" />
   </LinearLayout>
Next, create a new res/layout file named “my_recylerview” and implement the RecylerView component:
<android.support.constraint.ConstraintLayout
xmlns:android="http://schemas.android.com/apk/res/android"
   xmlns:app="http://schemas.android.com/apk/res-auto"
   xmlns:tools="http://schemas.android.com/tools"
   android:layout_width="match_parent"
   android:layout_height="match_parent"
   app:layout_behavior="@string/appbar_scrolling_view_behavior"
   tools:context=".MainActivity"
   tools:showIn="@layout/activity_main">

   <android.support.v7.widget.RecyclerView
       android:id="@+id/recyclerview"
       android:layout_width="match_parent"
       android:layout_height="wrap_content"
       android:layout_margin="16dp"
       tools:listitem="@layout/item_layout" />

</android.support.constraint.ConstraintLayout>
Open your activity_main.xml file and add the RecylerView to your layout, using the <include> tag. While I’m here, I’m also adding a few other UI elements:
<?xml version="1.0" encoding="utf-8"?>

<android.support.design.widget.CoordinatorLayout
   xmlns:android="http://schemas.android.com/apk/res/android"
   xmlns:app="http://schemas.android.com/apk/res-auto"
   xmlns:tools="http://schemas.android.com/tools"
   android:layout_width="match_parent"
   android:layout_height="match_parent">

   <android.support.design.widget.AppBarLayout
       android:layout_width="match_parent"
       android:layout_height="wrap_content"
       android:theme="@style/ThemeOverlay.AppCompat.Dark.ActionBar">

       <android.support.v7.widget.Toolbar
           android:id="@+id/toolbar"
           android:layout_width="match_parent"
           android:layout_height="?attr/actionBarSize"
           android:background="?attr/colorPrimary"
           app:popupTheme="@style/ThemeOverlay.AppCompat.Light" />

   </android.support.design.widget.AppBarLayout>

//Include the RecylerView//

   <include layout="@layout/my_recylerview" />

</android.support.design.widget.CoordinatorLayout>
The next step, is creating an Adapter that extends the RecylerView.Adapter class:
import android.content.Context;
import android.view.LayoutInflater;
import android.support.v7.widget.RecyclerView;
import android.widget.TextView;
import android.view.View;
import android.view.ViewGroup;
import java.util.List;

public class ItemListAdapter extends RecyclerView.Adapter<ItemListAdapter.ItemViewHolder> {

   class ItemViewHolder extends RecyclerView.ViewHolder {
private final TextView textView;

       private ItemViewHolder(View itemView) {
           super(itemView);
           textView = itemView.findViewById(R.id.textView);
       }
   }

   private List<Item> myItems;
   private final LayoutInflater myInflater;

   ItemListAdapter(Context context) { myInflater = LayoutInflater.from(context); }

   @Override
   public ItemViewHolder onCreateViewHolder(ViewGroup parent, int viewType) {
       View itemView = myInflater.inflate(R.layout.item_layout, parent, false);
       return new ItemViewHolder(itemView);
   }

   @Override
   public void onBindViewHolder(ItemViewHolder holder, int position) {
       Item current = myItems.get(position);
       holder.textView.setText(current.getItem());
   }

   @Override
   public int getItemCount() {
       if (myItems != null)
           return myItems.size();
       else return 0;
   }

   void setItems(List<Item> items){
       myItems = items;
       notifyDataSetChanged();
  }

}
Now we’ve done all the background work, open your MainActivity and add the RecylerView to your application’s onCreate() method:
import android.support.v7.app.AppCompatActivity;
import android.os.Bundle;
import android.support.v7.widget.LinearLayoutManager;
import android.support.v7.widget.RecyclerView;

public class MainActivity extends AppCompatActivity {

   @Override
   protected void onCreate(Bundle savedInstanceState) {
       super.onCreate(savedInstanceState);
       setContentView(R.layout.activity_main);
       RecyclerView myRecyclerView = findViewById(R.id.recyclerview);
       final ItemListAdapter myAdapter = new ItemListAdapter(this);
       myRecyclerView.setAdapter(myAdapter);
       myRecyclerView.setLayoutManager(new LinearLayoutManager(this));
   }
}
Building the UI: Finishing touches
Although it’s not essential to deliver our app’s base functionality, I’m applying a few styles to our UI. Open the styles.xml file, and add the following:
<resources>
       <style name="AppTheme" parent="Theme.AppCompat.Light.DarkActionBar">
           <item name="colorPrimary">@color/colorPrimary</item>
           <item name="colorPrimaryDark">@color/colorPrimaryDark</item>
           <item name="colorAccent">@color/colorAccent</item>
       </style>

       <style name="AppTheme.NoActionBar">
           <item name="windowNoTitle">true</item>
           <item name="windowActionBar">false</item>
       </style>

</resources>
Apply these styles to your app, by opening the Manifest and changing the android:theme attributes to reference these new styles:
<?xml version="1.0" encoding="utf-8"?>
<manifest xmlns:android="http://schemas.android.com/apk/res/android"
   package="com.jessicathornsby.roomlivedatademo">

   <application
       android:allowBackup="true"
       android:icon="@mipmap/ic_launcher"
       android:label="@string/app_name"
       android:roundIcon="@mipmap/ic_launcher_round"
       android:supportsRtl="true"
       android:theme="@style/AppTheme">
       <activity
           android:name=".MainActivity"
           android:label="@string/app_name"
           android:theme="@style/AppTheme.NoActionBar">
           <intent-filter>
               <action android:name="android.intent.action.MAIN" />

               <category android:name="android.intent.category.LAUNCHER" />
           </intent-filter>
       </activity>
   </application>

   </manifest>
Testing your project
Install this project on an Android smartphone or tablet, or Android Virtual Device (AVD). The RecylerView should load, but there’s a catch: it doesn’t have any data to display!
The next step, is creating an Activity where the user can add items to the Room database.
Creating the data input Activity
Start by creating a new Activity, named NewItemActivity and a corresponding “activity_add_item.xml” layout resource file.
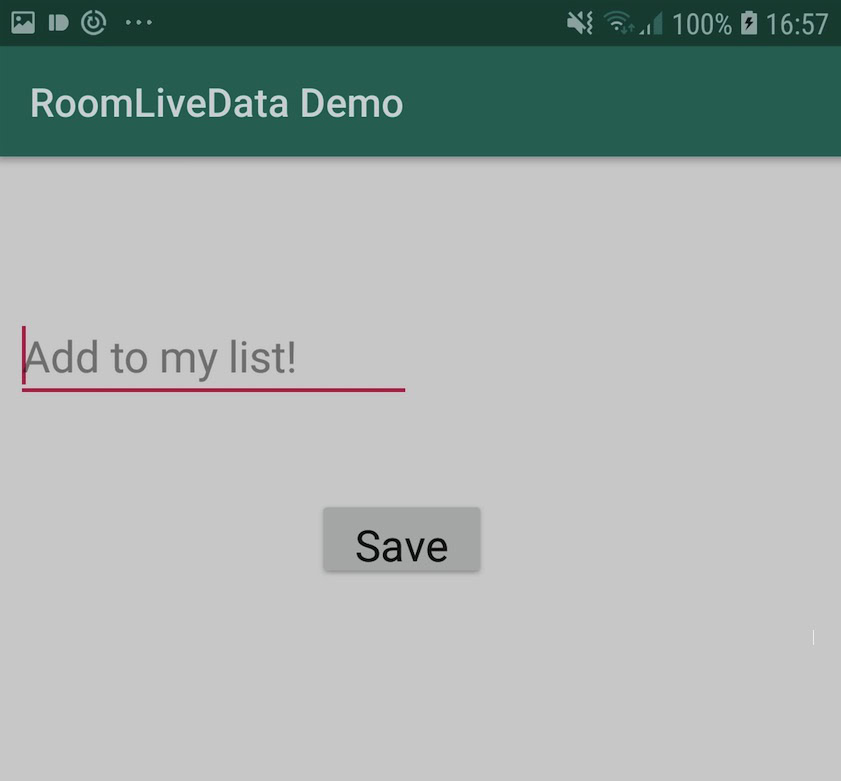
In the “activity_add_item.xml” file, I’m going to add an EditText where the user can type different items, and a “Save” button so they can save each item to their shopping list.
<android.support.constraint.ConstraintLayout
   xmlns:android="http://schemas.android.com/apk/res/android"
   xmlns:app="http://schemas.android.com/apk/res-auto"
   xmlns:tools="http://schemas.android.com/tools"
   android:layout_width="match_parent"
   android:layout_height="match_parent"
   tools:context=".MainActivity">

   <EditText
       android:id="@+id/add_item"
       android:hint="Add to my list!"
       android:textAppearance="?android:attr/textAppearanceLarge"
       android:layout_width="203dp"
       android:layout_height="wrap_content"
       android:layout_marginStart="8dp"
       android:layout_marginTop="76dp"
       android:layout_marginEnd="8dp"
       app:layout_constraintHorizontal_bias="0.0"
       app:layout_constraintTop_toTopOf="parent"
       app:layout_constraintEnd_toEndOf="parent"
       app:layout_constraintStart_toStartOf="parent" />

   <Button
       android:id="@+id/save_item"
       android:text="Save"
       android:textAppearance="?android:attr/textAppearanceLarge"
       android:layout_width="wrap_content"
       android:layout_height="44dp"
       app:layout_constraintHorizontal_bias="0.498"
       app:layout_constraintVertical_bias="0.0"
       android:layout_marginStart="8dp"
       android:layout_marginEnd="8dp"
       android:layout_marginTop="172dp"
       android:layout_marginBottom="8dp"
       app:layout_constraintBottom_toBottomOf="parent"
       app:layout_constraintEnd_toEndOf="parent"
       app:layout_constraintStart_toStartOf="parent"
       app:layout_constraintTop_toTopOf="parent" />

</android.support.constraint.ConstraintLayout>
This gives us the following layout:
Next, open your NewItemActivity class, and tell it to inflate the “activity_add_item” layout:
import android.support.v7.app.AppCompatActivity;
import android.os.Bundle;

public class NewItemActivity extends AppCompatActivity {

   @Override
   public void onCreate(Bundle savedInstanceState) {
       super.onCreate(savedInstanceState);
       setContentView(R.layout.activity_add_item);
   }
}
Don’t forget to add NewItemActivity to your Manifest:
<activity android:name=".NewItemActivity"></activity>
</application>

</manifest>
Adding navigation: Creating an action bar icon
Next, I’m going to add an action bar icon that’ll allow the user to navigate from MainActivity, to NewItemActivity.
You define action bar icons inside a menu resource file, which lives inside the “res/menu” directory. If your project doesn’t contain a “menu” directory, then you’ll need to create one:
- Control-click your project’s “res” directory and select “New > Android Resource Directory.”
- Open the “Resource type” dropdown and select “menu.”
- The “Directory name” should update to “menu” automatically, but if it doesn’t then you’ll need to rename it manually. Click “OK.”
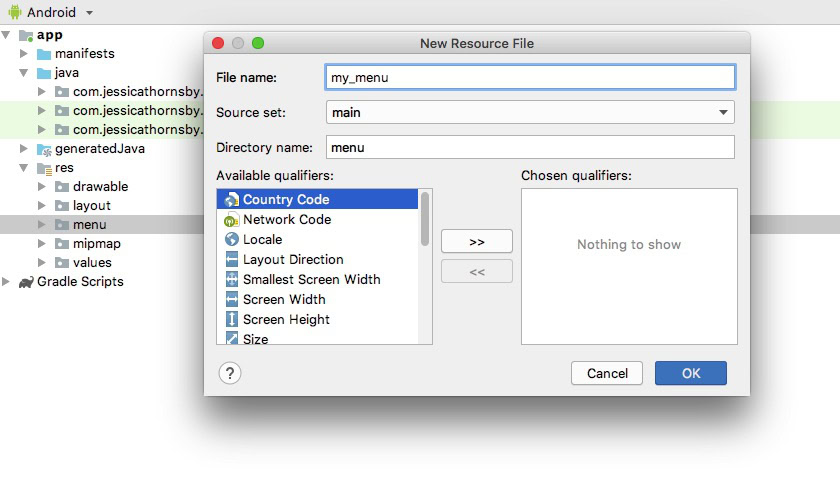
You can now create the menu resource file:
- Control-click your project’s “menu” directory and select “New > Menu resource file.”
- Name this file “my_menu.”
- Click “OK.”
- Open the “my_menu.xml” file, and add the following:
<?xml version="1.0" encoding="utf-8"?>
   <menu xmlns:android="http://schemas.android.com/apk/res/android"
       xmlns:app="http://schemas.android.com/apk/res-auto">

       <item
           android:id="@+id/add_item"
           android:orderInCategory="102"
           android:title="@string/add_item"
           android:icon="@drawable/add_icon"
           app:showAsAction="ifRoom"/>

   </menu>
This menu references an “add_item” string, so open your project’s res/values/strings.xml file and create this resource:
<resources>
   <string name="app_name">RoomLiveData Demo</string>
   <string name="add_item">Add item</string>
</resources>
Next, we need to create the action bar’s “add_item” icon:
- Select “File > New > Image Asset” from the Android Studio toolbar.
- Set the “Icon Type” dropdown to “Action Bar and Tab Icons.”
- Click the “Clip Art” button.
- Choose a drawable; I’m using “add circle.”
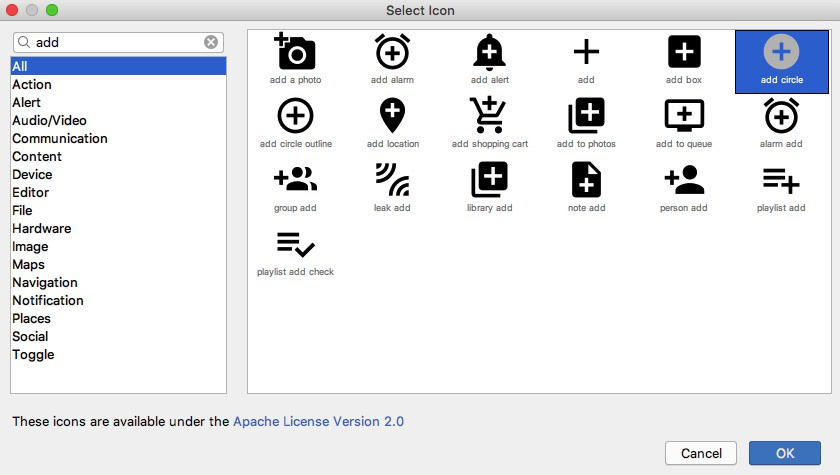
- Click “OK.”
- To make sure our action bar icon stands out, open the “Theme” dropdown and select “HOLO_DARK.”
- Name this icon “add_icon.”
- “Click “Next,” followed by “Finish.”
Now we’ve created our action bar icon, we just need to add it to our MainActivity, and tell our application to launch NewItemActivity every time the user interacts with this icon:
import android.content.Intent;
import android.support.v7.app.AppCompatActivity;
import android.os.Bundle;
import android.support.v7.widget.LinearLayoutManager;
import android.support.v7.widget.RecyclerView;
import android.view.Menu;
import android.view.MenuItem;

public class MainActivity extends AppCompatActivity {

   public static final int REQUEST_CODE = 1;

   @Override
   protected void onCreate(Bundle savedInstanceState) {
       super.onCreate(savedInstanceState);
       setContentView(R.layout.activity_main);
       RecyclerView myRecyclerView = findViewById(R.id.recyclerview);
       final ItemListAdapter myAdapter = new ItemListAdapter(this);
       myRecyclerView.setAdapter(myAdapter);
       myRecyclerView.setLayoutManager(new LinearLayoutManager(this));
   }

   @Override
   public boolean onCreateOptionsMenu(Menu menu) {
       getMenuInflater().inflate(R.menu.my_menu, menu);
       return true;
   }
   @Override
   public boolean onOptionsItemSelected(MenuItem item) {
       switch (item.getItemId()) {
           case R.id.add_item:
               Intent intent = new Intent(MainActivity.this, NewItemActivity.class);
               startActivityForResult(intent, REQUEST_CODE);
       }
       return false;
   }
}
Testing your project: Take two!
Install the updated project on your Android device or AVD, and you should encounter an action bar icon that, when tapped, launches NewItemActivity. Currently, you can type into the EditText, but no matter how many times you tap the “Save” button, no new items will be added to the underlying database.
In this section, we’re going to retrieve the user’s input from the EditText, add it to our Room database, and then display this new item in our RecylerView.
Retrieving the user’s input
Let’s start with the easiest task: updating our NewItemActivity so that every time the user taps the “Save” button, the contents of the EditText will be placed in an Intent and sent to our MainActivity.
Here’s the completed NewItemActivity class:
import android.support.v7.app.AppCompatActivity;
import android.os.Bundle;
import android.widget.Button;
import android.widget.EditText;
import android.content.Intent;
import android.text.TextUtils;
import android.view.View;

public class NewItemActivity extends AppCompatActivity {

   private EditText myEditText;
   public static final String EXTRA = ".REPLY";

   @Override
   public void onCreate(Bundle savedInstanceState) {
       super.onCreate(savedInstanceState);
       setContentView(R.layout.activity_add_item);
       myEditText = findViewById(R.id.add_item);

       final Button button = findViewById(R.id.save_item);
       button.setOnClickListener(new View.OnClickListener() {

           public void onClick(View view) {
               Intent reply = new Intent();
               if (TextUtils.isEmpty(myEditText.getText())) {
                   setResult(RESULT_CANCELED, reply);
               } else {
                   String item = myEditText.getText().toString();
                   reply.putExtra(EXTRA, item);
                   setResult(RESULT_OK, reply);
               }
               finish();
           }
       });
   }
}
Updating the Room database
Every time the user taps “Save,” we need to add their input to the database, and then use LiveData to update our RecylerView.
To start, open the MainActivity class and add the ViewModel to the onCreate() method:
myItemViewModel = ViewModelProviders.of(this).get(ItemViewModel.class);Note that the system may call the onCreate() method numerous times throughout the Activity’s lifecycle, for example following a configuration change. Every time this Activity is destroyed and then recreated, it’ll receive the same myItemViewModel instance. Since the ViewModel is restored automatically, we don’t need to add any logic to handle configuration changes.
Next, we need to retrieve the user’s input, by adding an onActivityResult() callback for NewItemActivity:
public void onActivityResult(int requestCode, int resultCode, Intent data) {
       super.onActivityResult(requestCode, resultCode, data);
If the Activity returns RESULT_OK, then we’ll call the insert() method and insert the returned item into the database:
if (requestCode == REQUEST_CODE && resultCode == RESULT_OK) {
           Item item = new Item(data.getStringExtra(NewItemActivity.EXTRA));
           myItemViewModel.insert(item);

       }
Now the user can add new items to the database, we need to make sure our RecylerView updates to reflect these changes.
Since we’re using LiveData, every addition to the database will trigger an onChanged() callback. We can use this callback to tell our application how to react to these database changes:
@Override
          public void onChanged(@Nullable final List<Item> items) {

//Update the UI//

              myAdapter.setItems(items);
          }
Next, we need to create the Observer/Observable relationship, by attaching the Observer object to the LiveData object, using the observe() method:
myItemViewModel.getAllItems().observe(this, new Observer<List<Item>>() {At this point, the Observer object is subscribed to the LiveData object, and will receive a notification every time the underlying data changes.
Since LiveData is lifecycle-aware, it’ll only invoke the onChanged() callback when the Activity is in an active state, so we don’t need to use the onStop() method to tell our application to stop observing the data.
Once you’ve implemented all of this in your MainActivity, your code should look something like this:
import android.support.v7.app.AppCompatActivity;
import android.support.v7.widget.LinearLayoutManager;
import android.support.v7.widget.RecyclerView;
import android.support.v7.widget.Toolbar;

import android.os.Bundle;
import android.content.Intent;
import android.view.Menu;
import android.view.MenuItem;

import android.arch.lifecycle.Observer;
import android.arch.lifecycle.ViewModelProviders;

import java.util.List;
import android.support.annotation.Nullable;

public class MainActivity extends AppCompatActivity {

   public static final int REQUEST_CODE = 1;
   private ItemViewModel myItemViewModel;

   @Override
   protected void onCreate(Bundle savedInstanceState) {
       super.onCreate(savedInstanceState);
       setContentView(R.layout.activity_main);

       Toolbar myToolbar = (Toolbar) findViewById(R.id.toolbar);
       setSupportActionBar(myToolbar);

       RecyclerView myRecyclerView = findViewById(R.id.recyclerview);
       final ItemListAdapter myAdapter = new ItemListAdapter(this);
       myRecyclerView.setAdapter(myAdapter);
       myRecyclerView.setLayoutManager(new LinearLayoutManager(this));

//Retrieve the ViewModel//

       myItemViewModel = ViewModelProviders.of(this).get(ItemViewModel.class);

//Observe the LiveData and deliver a notification every time the data changes//

       myItemViewModel.getAllItems().observe(this, new Observer<List<Item>>() {

           @Override
           public void onChanged(@Nullable final List<Item> items) {

//Update the UI//

               myAdapter.setItems(items);
           }

       });

   }

   @Override
   public boolean onCreateOptionsMenu(Menu menu) {
       getMenuInflater().inflate(R.menu.my_menu, menu);
       return true;
   }
   @Override
   public boolean onOptionsItemSelected(MenuItem item) {
       switch (item.getItemId()) {
           case R.id.add_item:
               Intent intent = new Intent(MainActivity.this, NewItemActivity.class);
               startActivityForResult(intent, REQUEST_CODE);
       }
       return false;
   }

   public void onActivityResult(int requestCode, int resultCode, Intent data) {
       super.onActivityResult(requestCode, resultCode, data);
       if (requestCode == REQUEST_CODE && resultCode == RESULT_OK) {
           Item item = new Item(data.getStringExtra(NewItemActivity.EXTRA));
           myItemViewModel.insert(item);

       }

   }

}
Testing the completed app
You should now be able to add items to the Room database and see them appear automatically in the RecylerView. Let’s put this to the test:
- Install the updated project on your Android smartphone, tablet or AVD.
- Give the action bar icon a tap.
- Enter an item into the EditText.
- Tap “Save,” and you’ll be taken back to MainActivity, where the RecylerView should have updated to include your new item.
- Rinse and repeat to add more items to your list.
To verify that your data persists across sessions, close the application and then relaunch it; the application should launch with your list already populated.
You should also test how the application handles duplicate data. Since we’re using the REPLACE conflict strategy, whenever you attempt to enter the same item twice the app will delete the original piece of data, and then replace it with the “new” data. Try adding an item that already exists in your list, to check that the application really is replacing old with new.
You can also download the completed app from GitHub.
Wrapping up
In this article, we got a hands-on introduction to several key Android Architecture Components, and saw how they can help solve many of the issues commonly encountered by Android developers, including data persistence, lifecycle management, and avoiding memory leaks.
Are there any other common problems you’d like to see the Android Architecture Components address? Let us know in the comments below!