Affiliate links on Android Authority may earn us a commission. Learn more.
Implementing Android Nougat and Oreo’s static, dynamic and pinned shortcuts
March 20, 2018
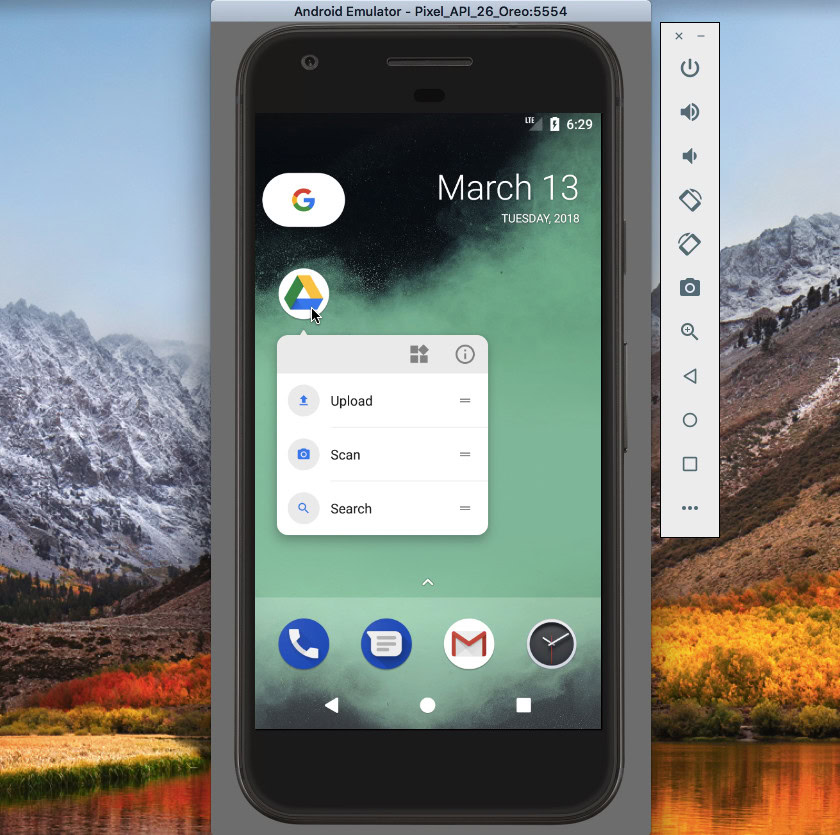
Android users can create shortcuts to any of their applications. It’s a quick and easy process that just involves placing the app’s launcher icon onto the homescreen.
While this kind of shortcut does make it easier to open apps, launcher icons do have one major limitation: they can only launch an app’s starting screen. If you’ve created a calendar app, then regardless of whether you want to review today’s schedule, add a new event, or edit an existing event, you’ll have to first enter the app at exactly the same location every time. From there, you’ll have to navigate to the appropriate Activity.
The fewer screens the user has to navigate to complete a task, the better the user experience, but this is difficult to deliver when every task has exactly the same starting point.
With the release of Oreo and Nougat, you can now use dynamic, static, and pinned shortcuts to create entirely different entry points for different tasks. That means making any app Activity accessible from the your homescreen and app drawer.
In this article, I’m going to show you how to implement these new shortcuts in your Android projects. We’ll create a static shortcut, a dynamic shortcut that changes at runtime based on user action, and a pinned shortcut that performs an action outside of your application.
What are the new Nougat and Oreo shortcuts?
Android 7.1 introduced static and dynamic shortcuts, which the user can access by long-pressing an app’s launcher icon, either on the homescreen or in the application drawer.
Static shortcuts are defined inside an XML resource file, so they can’t be changed at runtime or modified to suit the individual user. If you want to update a static shortcut, then you’ll need to release a new version of your app. Static shortcuts tend to work best for generic actions that remain constant across your application’s lifetime, for example launching an Activity where the user can create a new email.
Dynamic shortcuts are more flexible, and can be published, updated, and deleted at runtime, so you can modify dynamic shortcuts based on user behavior or preferences, or in response to factors such as their current location or time of day. Shortcuts that link to a specific document, contact, or file on the user’s device are all good candidates for dynamic shortcuts.
Your app can publish a maximum of five static and dynamic shortcuts.
Android 8.0’s Pinned Shortcuts
Introduced in Android Oreo, pinned shortcuts are shortcuts that the user can create at runtime, via a dialog.
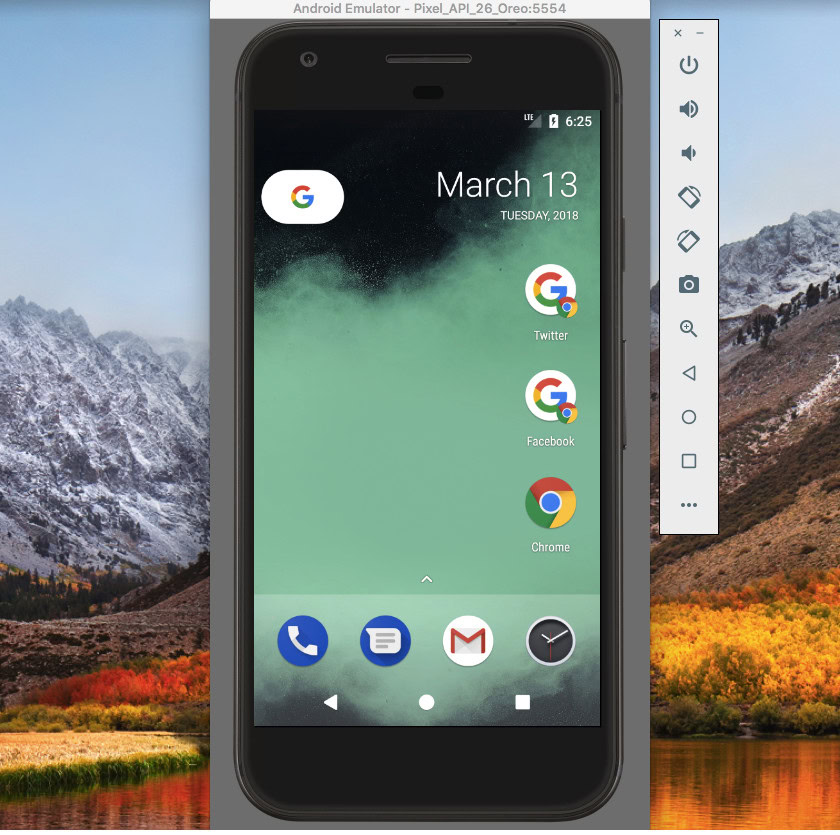
Applications typically trigger this dialog in response to user action, such as selecting “pin the current screen” from the app’s menu.
If you have an Android device or AVD (Android Virtual Device) that’s running 8.0 or higher, then the Chrome application provides a good example of how you might use pinned shortcuts:
- Launch Chrome and navigate to any website.
- Click the menu icon in Chrome’s upper-right corner.
- Select “Add to homescreen.”
- In the subsequent dialog, type the label that’ll appear underneath this pinned shortcut. Click “Add.”
- If you want Chrome to simply drop this shortcut onto your homescreen, then click “Add automatically.” To position this shortcut yourself, long-press the shortcut icon.
- Give this shortcut a tap, and it’ll load the associated URL in a new Chrome window.
Creating an Android 7.1 static shortcut
We’re going to start by adding a static and a dynamic shortcut to an Android application, so create a new project using the “Empty Activity” template.
While you could create a static shortcut that points to MainActivity, application shortcuts are designed to provide easy access to Activities that aren’t the starting Activity, so we’re going to create a second Activity that this static shortcut can link to.
I’m using a simple Activity that features a “Send Email” button. When tapped, this button will fire an intent that launches the device’s default email application.
- Create a new class, by selecting New > Java Class from the Android Studio toolbar.
- Name this class “EmailActivity,” and then click “OK.”
- Open EmailActivity, and add the following:
import android.app.Activity;
import android.os.Bundle;
import android.widget.Button;
import android.content.Intent;
import android.widget.Toast;
import android.net.Uri;
import android.view.View;

public class EmailActivity extends Activity {
   @Override
   protected void onCreate(Bundle savedInstanceState) {
       super.onCreate(savedInstanceState);
       setContentView(R.layout.activity_email);

       Button button = (Button) findViewById(R.id.newEmail);
       button.setOnClickListener(new View.OnClickListener() {
           public void onClick(View view) {
               sendEmail();
           }
       });
   }

   protected void sendEmail() {

//Launch the email client, with the ACTION_SEND action//

       Intent emailIntent = new Intent(Intent.ACTION_SEND);
       emailIntent.setData(Uri.parse("mailto:"));
       emailIntent.setType("text/plain");

       try {
           startActivity(Intent.createChooser(emailIntent, "Send mail..."));
           finish();
       } catch (android.content.ActivityNotFoundException ex) {
Toast.makeText(EmailActivity.this, "No email client installed.", Toast.LENGTH_LONG).show();
       }
   }
}- Create a corresponding activity_email layout, by control-clicking your project’s “res/layout” folder and then selecting New > Layout resource file.
- Name this file “activity_email.”
- Open activity_email.xml, and add the following:
<?xml version="1.0" encoding="utf-8"?>
<LinearLayout xmlns:android="http://schemas.android.com/apk/res/android"
   android:layout_width="fill_parent"
   android:layout_height="fill_parent"
   android:orientation="vertical" >

   <Button
       android:id="@+id/newEmail"
       android:layout_width="fill_parent"
       android:layout_height="wrap_content"
       android:text="@string/send_email"/>

</LinearLayout>- Add the following to your project’s strings.xml file:
<string name="send_email">Send Email</string>- Don’t forget to add the Activity to the Manifest:
<activity android:name=".EmailActivity">
</activity>
Create a shortcuts.xml file
You define static shortcuts inside their own XML file, which contains all the characteristics for that shortcut, such as its icon and label, but also the intent that’ll launch whenever the user selects that shortcut.
- If your project doesn’t already contain an “XML” directory, then create one by control-clicking the “res” directory and selecting New > Android resource directory. Name this directory “XML” and then click “OK.”
- Control-click the “XML” directory and then select New > XML resource file.
- Name this file “shortcuts” and then click “OK.”
- You can now define all the characteristics for each of your app’s static shortcuts:
<?xml version="1.0" encoding="utf-8"?>
<shortcuts xmlns:android="http://schemas.android.com/apk/res/android">
   <shortcut

//The string literal that’ll represent this shortcut//

       android:shortcutId="compose"

//Whether the user can interact with this shortcut. This is “true” by default//

       android:enabled="true"

//The drawable that’ll represent your shortcut//

       android:icon="@drawable/email"

//Describe your shortcut using 10 characters or less. This must be a string//

       android:shortcutShortLabel="@string/shortcut_short_label"

//Describe your shortcut in 25 characters or less//

       android:shortcutLongLabel="@string/shortcut_long_label">

//The action the system should perform whenever the user selects this shortcut//

 <intent
           android:action="android.intent.action.VIEW"
           android:targetPackage="com.jessicathornsby.shortcuts"

//Launch the EmailActivity//

           android:targetClass="com.jessicathornsby.shortcuts.EmailActivity" />
   </shortcut>
</shortcuts>
Drawables and strings
Next, you’ll need to define the drawable and string resources that are used in this shortcut:
- Select New > Image Asset from the Android Studio toolbar.
- Open the “Icon Type” dropdown and select “Notification Icons.”
- Select the “Clipart” button.
- Click the button with the little Android icon, which gives you access to Google’s Material Design icon library. Select the icon that you want to use (I’m opting for the “email” icon) and then click “Next.”
- Click “Finish.”
Next, you’ll need to create the short label, and the long label that’ll be displayed whenever there’s enough onscreen space.
<resources>
   <string name="app_name">shortcutsexample</string>
   <string name="send_email">Send Email</string>
   <string name="shortcut_short_label">Create email</string>
   <string name="shortcut_long_label">Create new email</string>
</resources>
Add shortcuts.xml to your Manifest
Finally, you need to add the shortcuts.xml file to your project’s Manifest. You must add shortcuts.xml to the Activity that has the android.intent.action.MAIN and android.intent.category.LAUNCHER intent filters, which is typically MainActivity.
<activity android:name=".MainActivity">
   <intent-filter>
       <action android:name="android.intent.action.MAIN" />

       <category android:name="android.intent.category.LAUNCHER" />
   </intent-filter>
   <meta-data android:name="android.app.shortcuts"
       android:resource="@xml/shortcuts" />
Test your static shortcut
To put this static shortcut to the test, install your project on a physical Android device or an AVD running Android 7.1 or higher.
You can access static shortcuts from your application’s launcher icon as it appears in the app drawer, or by adding the launcher icon to your homescreen (as I’ve done in the following screenshot). Long-press your app’s launcher, and a popup will appear containing the static shortcut.
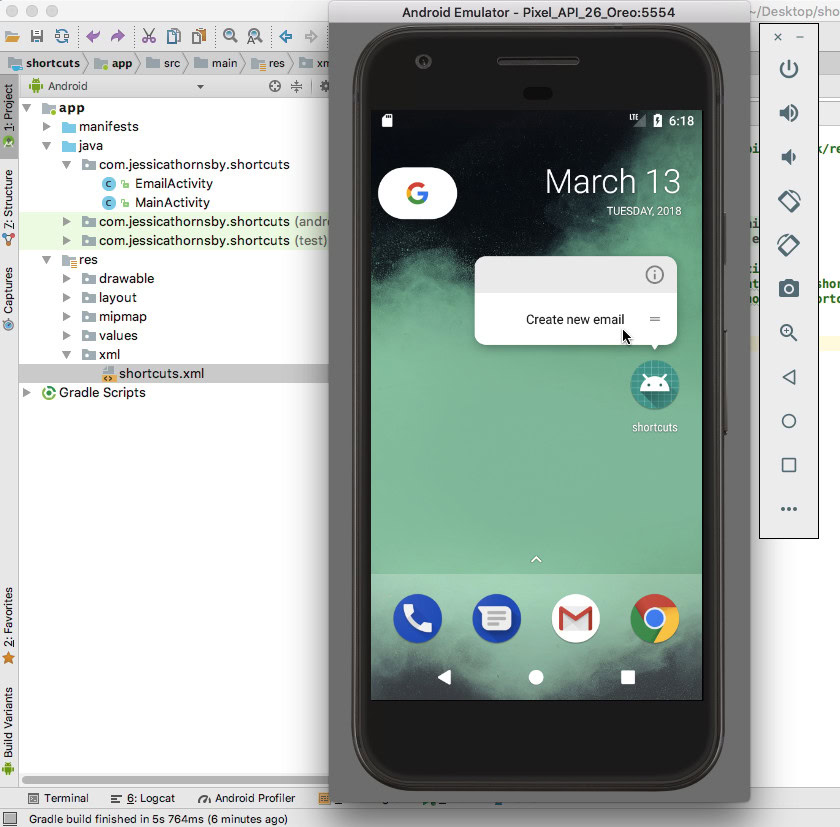
Tap this shortcut, and it should launch the EmailActivity.
Creating customizable dynamic shortcuts
Next, let’s add a simple dynamic shortcut to our project and look at how we can update this shortcut at runtime.
You create a dynamic shortcut by generating a ShortcutInfo object that defines all the shortcut’s characteristics, such as its short label and icon and the intent you want to trigger with the shortcut.
import android.support.v7.app.AppCompatActivity;
import android.os.Bundle;
import java.util.Collections;
import android.graphics.drawable.Icon;
import android.content.Intent;
import android.content.pm.ShortcutInfo;
import android.content.pm.ShortcutManager;

public class MainActivity extends AppCompatActivity {

   @Override
   protected void onCreate(Bundle savedInstanceState) {
       super.onCreate(savedInstanceState);
       setContentView(R.layout.activity_main);
       final ShortcutManager shortcutManager = getSystemService(ShortcutManager.class);

//Define the intent, which in this instance is launching MainActivity//

       Intent dynamicIntent = new Intent(this,MainActivity.class);
       dynamicIntent.setAction(Intent.ACTION_VIEW);

//Create the ShortcutInfo object//

       ShortcutInfo dynamicShortcut = new ShortcutInfo.Builder(this, "dynamic_shortcut")

//Define all the shortcut’s characteristics//

               .setShortLabel("MainActivity")
               .setLongLabel("Launch MainActivity")
               .setIcon(Icon.createWithResource(this, R.mipmap.ic_launcher))
               .setIntent(dynamicIntent)
               .build();
       shortcutManager.setDynamicShortcuts(Collections.singletonList(dynamicShortcut));

   }

}
Updating the shortcut at runtime
This is all you need to create a functioning dynamic shortcut, but the biggest advantage of dynamic shortcuts is their ability to update at runtime — something our shortcut doesn’t currently do.
Let’s add a button to activity_main.xml that, when tapped, changes the shortcut’s label:
<?xml version="1.0" encoding="utf-8"?>
<android.support.constraint.ConstraintLayout xmlns:android="http://schemas.android.com/apk/res/android"
   xmlns:app="http://schemas.android.com/apk/res-auto"
   xmlns:tools="http://schemas.android.com/tools"
   android:layout_width="match_parent"
   android:layout_height="match_parent"
   tools:context="com.jessicathornsby.shortcuts.MainActivity">

   <Button
       android:id="@+id/changeShortcutLabel"
       android:layout_width="wrap_content"
       android:layout_height="wrap_content"
       android:text="Change shortcut label" />

</android.support.constraint.ConstraintLayout>
To update a shortcut, you need to call the updateShortcuts() method and pass the ID of the shortcut you want to update:
import android.support.v7.app.AppCompatActivity;
import android.os.Bundle;
import java.util.Collections;
import android.graphics.drawable.Icon;
import android.content.Intent;
import android.content.pm.ShortcutInfo;
import android.content.pm.ShortcutManager;

import java.util.Arrays;
import android.view.View;

public class MainActivity extends AppCompatActivity {

   @Override
   protected void onCreate(Bundle savedInstanceState) {
       super.onCreate(savedInstanceState);
       setContentView(R.layout.activity_main);
       final ShortcutManager shortcutManager = getSystemService(ShortcutManager.class);

//Define the intent, which in this instance is launching MainActivity//

       Intent dynamicIntent = new Intent(this,MainActivity.class);
       dynamicIntent.setAction(Intent.ACTION_VIEW);

//Create the ShortcutInfo object//

       ShortcutInfo dynamicShortcut = new ShortcutInfo.Builder(this, "dynamic_shortcut")

//Define all the shortcut’s characteristics//

              .setShortLabel("MainActivity")
              .setLongLabel("Launch MainActivity")
              .setIcon(Icon.createWithResource(this, R.mipmap.ic_launcher))
              .setIntent(dynamicIntent)
              .build();
       shortcutManager.setDynamicShortcuts(Collections.singletonList(dynamicShortcut));

       findViewById(R.id.changeShortcutLabel).setOnClickListener(new View.OnClickListener() {
           @Override
         public void onClick(View v) {
               ShortcutInfo dynamicShortcut = new ShortcutInfo.Builder(MainActivity.this, "dynamic_shortcut")
                        .setShortLabel("Label changed")
                        .build();

                 shortcutManager.updateShortcuts(Arrays.asList(dynamicShortcut));
          }
      });
   }

}
To test your dynamic shortcut:
- Install the updated project on your Android device.
- Long-press the app’s launcher icon, and your app will display the dynamic shortcut, complete with “Launch MainActivity” label.
- Tap the dynamic shortcut to launch MainActivity.
- To update the shortcut, tap the “Change shortcut label” button.
- Exit your application and long-press its launcher icon; the dynamic shortcut should now have an entirely different label.
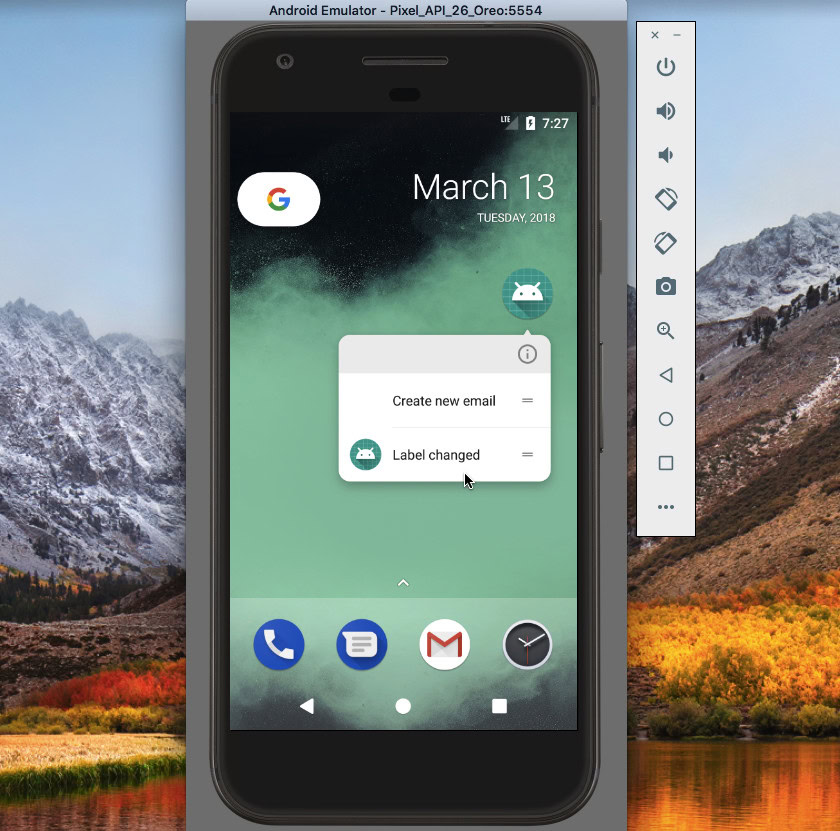
You can download this project from GitHub.
Pinned shortcuts
In Android Oreo and higher, users can pin shortcuts to supported launchers.
Unlike dynamic and static shortcuts, pinned shortcuts are displayed as separate icons and the user must complete a dialog in order to add them to their launcher. There’s also no limit to the number of pinned shortcuts that your application can offer.
As we’ve seen, application shortcuts reference intents, so even though we’ve focused on launching Activities, you can create a shortcut for any action that can be expressed as an intent, including actions that occur outside of your application’s Activities. For example, if your app has an online user manual then you might create a shortcut that, when tapped, loads this section of your website in the device’s default browser.
To demonstrate this, we’re going to create a pinned shortcut that loads a URL in the device’s browser.
import android.support.v7.app.AppCompatActivity;
import android.os.Bundle;
import android.graphics.drawable.Icon;
import android.app.PendingIntent;
import android.content.Intent;
import android.content.pm.ShortcutInfo;
import android.content.pm.ShortcutManager;
import android.net.Uri;

import java.util.Arrays;

public class MainActivity extends AppCompatActivity {

   @Override
   protected void onCreate(Bundle savedInstanceState) {
       super.onCreate(savedInstanceState);
       setContentView(R.layout.activity_main);

//Create an instance of the ShortcutManager//

       ShortcutManager shortcutManager = getSystemService(ShortcutManager.class);

//Create a ShortcutInfo object that defines all the shortcut’s characteristics//

       ShortcutInfo shortcut = new ShortcutInfo.Builder(this, "pinned-shortcut")
               .setShortLabel("Android Auth")
               .setLongLabel("Launch Android Authority")
               .setIcon(Icon.createWithResource(this, R.mipmap.launch_url))
               .setIntent(new Intent(Intent.ACTION_VIEW,
                      Uri.parse("http://www.androidauthority.com/")))
               .build();

       shortcutManager.setDynamicShortcuts(Arrays.asList(shortcut));

//Check that the device's default launcher supports pinned shortcuts//

       if (shortcutManager.isRequestPinShortcutSupported()) {
           ShortcutInfo pinShortcutInfo = new ShortcutInfo
           .Builder(MainActivity.this,"pinned-shortcut")
           .build();
           Intent pinnedShortcutCallbackIntent =
                    shortcutManager.createShortcutResultIntent(pinShortcutInfo);

//Get notified when a shortcut is pinned successfully//

           PendingIntent successCallback = PendingIntent.getBroadcast(MainActivity.this, 0,
                   pinnedShortcutCallbackIntent, 0);
shortcutManager.requestPinShortcut(pinShortcutInfo, successCallback.getIntentSender());
       }

   }

}
By default, your app’s broadcast receiver isn’t notified when the user pins a shortcut successfully. If your app does need to be notified, then you’ll have to create an intent, as I’ve done in the above example.
Next, you’ll need to create the “launch_url” icon:
- Select New > Image Asset from the toolbar.
- Open the “Icon Type” dropdown and select “Launcher Icons.”
- Select the “Clipart” radio button.
- Click the button with the Android icon, and choose an icon.
- Name this icon “launch_url” and then click “Finish.”
To test your pinned shortcut:
- Install your project on an Android device or AVD.
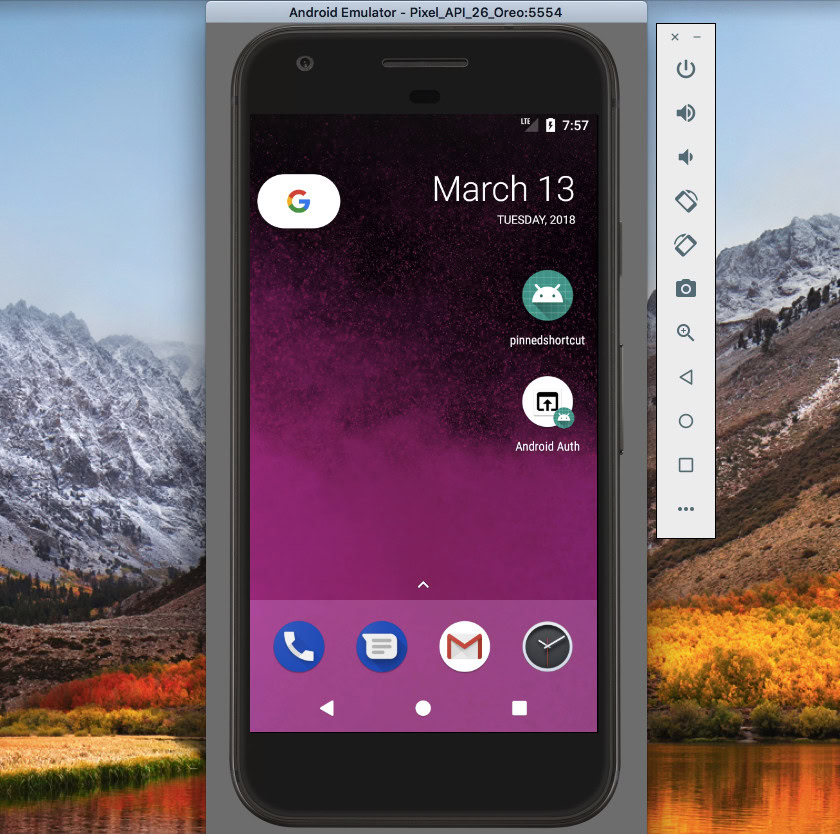
- As soon as the app launches, it’ll display some information about the pinned shortcut, and the user can then decide whether they want to add this shortcut to their homescreen.
- Long-press the pinned shortcut to drop it onto the homescreen.
- Tap the pinned shortcut to launch the device’s default browser, and load the URL.
You can download this project from GitHub.
Don’t break your app’s navigation!
Instead of using a shortcut to launch a single Activity, you may want to consider launching multiple Activities. The user will still only see a single Activity (the last Activity in the list) but when they press their device’s “Back” button they’ll return to the previous Activity in the list. If your shortcut launches a single Activity, then pressing the “Back” button will immediately take the user out of the application, which may not be the experience they want.
By launching multiple Activities, you can recreate your app’s usual navigation, so that pressing “Back” takes the user to the previous screen in the app.
For static shortcuts, you define multiple intents in your project’s xml/shortcuts.xml file:
<shortcuts xmlns:android="http://schemas.android.com/apk/res/android">
   <shortcut
       android:shortcutId="compose"
       android:enabled="true"
       android:icon="@drawable/email"
       android:shortcutShortLabel="@string/shortcut_short_label"
       android:shortcutLongLabel="@string/shortcut_long_label">
       <intent
           android:action="android.intent.action.VIEW"
           android:targetPackage="com.jessicathornsby.shortcuts"
           android:targetClass="com.jessicathornsby.shortcuts.MainActivity" />
       <intent
           android:action="android.intent.action.VIEW"
           android:targetPackage="com.jessicathornsby.shortcuts"
           android:targetClass="com.jessicathornsby.shortcuts.EmailActivity" />
   </shortcut>
</shortcuts>
Tapping the static shortcut will still launch EmailActivity, but when the user taps their device’s “Back” button they’ll be taken to MainActivity, rather than exiting the app.
You can assign multiple Activities to a dynamic shortcut, using setIntents() instead of setIntent():
ShortcutInfo shortcut = new ShortcutInfo.Builder(this, "my_shortcut”)
   .setShortLabel(“Send email”)
   .setLongLabel("Write a new email")
   .setIcon(Icon.createWithResource(context, R.drawable.email))
   .setIntents(new Intent[] {
                  new Intent(context, MainActivity.class)
                     .setFlags(Intent.FLAG_ACTIVITY_CLEAR_TASK),
                  new Intent(context, NewEmailActivity.class)

                  })
  .build();
Don’t recycle shortcuts
Application shortcuts often have a shelf life. Perhaps the user deletes the content a shortcut was originally pointing towards, or they remove a feature from the application, which makes one or more shortcuts redundant.
While you might be tempted to recycle a pinned shortcut, changing the action associated with a shortcut is a great way to get confused!
If a pinned or dynamic shortcut is no longer useful, then you can disable it by calling disableShortcuts() and then passing the ID of the shortcut(s) you want to disable.
public void disableShortcut(ShortcutInfo shortcut) {
        shortcutManager.disableShortcuts(Arrays.asList(shortcut.getId()));
    }
To remove a static shortcut from your project, you’ll need to issue a new version of your app.
Using Auto backup?
The Auto Backup feature, introduced in Android 6.0, can save up to 24 MB of your app’s data to your Google Drive account. This data can then be restored if you ever reinstall your app, for example following a factory reset or if you switch to a new device.
Auto Backup is enabled by default, so unless you’ve added android:allowBackup=”false” to the Manifest, your project is using Auto Backup.
If your app’s data is restored from one of these backups, then its static shortcuts and pinned shortcuts are restored automatically, but dynamic shortcuts aren’t restored. If you do use dynamic shortcuts, then you should check whether your app has been restored, and then re-publish its dynamic shortcuts if necessary:
if (shortcutManager.getDynamicShortcuts().size() == 0) {

//The app has been restored, so you need to re-publish dynamic shortcuts//

   shortcutManager.setDynamicShortcuts(getDefaultShortcuts());
        }
    }
Wrapping up
What do you think about Android Nougat and Oreo’s new shortcuts? Do you plan to use them in your projects? Or are you happy with the traditional launcher icon approach? Let us know in the comments below!
Thank you for being part of our community. Read our Comment Policy before posting.