Affiliate links on Android Authority may earn us a commission. Learn more.
Dark theme, Thermal API and Bubbles: Getting your app ready for Android 10
Published onAugust 15, 2019
The latest, greatest, as-yet-unnamed version of Android introduces features and APIs that you can use to design new experiences for your users — plus a few behavioral changes that you’ll need to watch out for.
Even if you’re not updating your app to target Android Q just yet, some of these changes will impact every application that’s installed on Android Q, even if your app doesn’t explicitly target this version of Android.
Some of these changes will impact every application that’s installed on Android Q.
Regardless of whether you’re eager to experiment with the latest features, or you just want to ensure your app won’t break the moment it’s installed on Android Q, now’s the perfect time to start preparing for Android Q’s imminent release.
In this article, I’ll cover all the steps you need to take to get your app ready for Android Q — from brand-new features to minor security tweaks that have the potential to break your entire application.
Avoid CPU and GPU throttling: Monitoring the device’s temperature
Overheating can seriously damage your smartphone or tablet. As a protective measure, Android will throttle your device’s CPU and GPU when it detects that temperatures are approaching dangerous levels.
While this behavior helps to protect the device’s hardware, it can also have a noticeable impact on application performance, particularly if your app uses high-resolution graphics, heavy computations, or performs ongoing network activity.
While this slowdown is imposed by the system, your typical smartphone or tablet user will blame your application for any drop in performance. In the worst case scenario, the user may decide that your application is buggy or broken, potentially even uninstalling your app and leaving you a negative Google Play review in the process.
In the worst case scenario, the user may decide that your application is buggy or broken.
Android Q introduces a new Thermal API that can help you avoid this CPU and GPU throttling. You can use this API’s addThermalStatusListener() method to create a listener for thermal status changes, then adjust your app’s behavior whenever the device’s temperature starts to rise. This can help reduce the chances of the system resorting to CPU or GPU throttling. For example, you might reduce the strain your application is placing on the overheating system by lowering your resolution or frame rate, or by disabling resource-intensive features such as network connectivity.
Note that Android Q’s Thermal API requires a new device HAL layer, which at the time of writing was only available on Pixel devices.
Reduce eyestrain and boost visibility with Dark theme
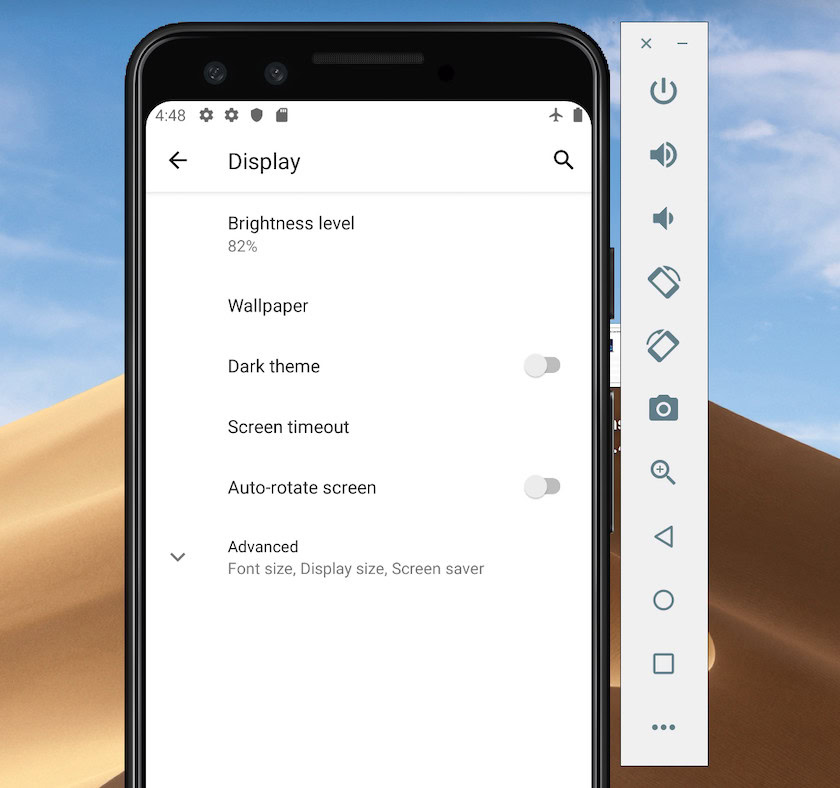
On Android Q, users can activate a system-wide Dark theme that’s designed to reduce eyestrain, improve visibility in low-light conditions, and reduce power usage on devices with OLED screens.
Dark theme is a low-light UI that uses dark surfaces for the background, and light foreground colors for elements such as text and iconography.
Users can activate this system-wide Dark theme at any time via a new Quick Settings tile, or by launching their device’s Settings application and navigating to Display > Theme. On Pixel devices, switching to Battery Saver mode will also enable Dark theme automatically.
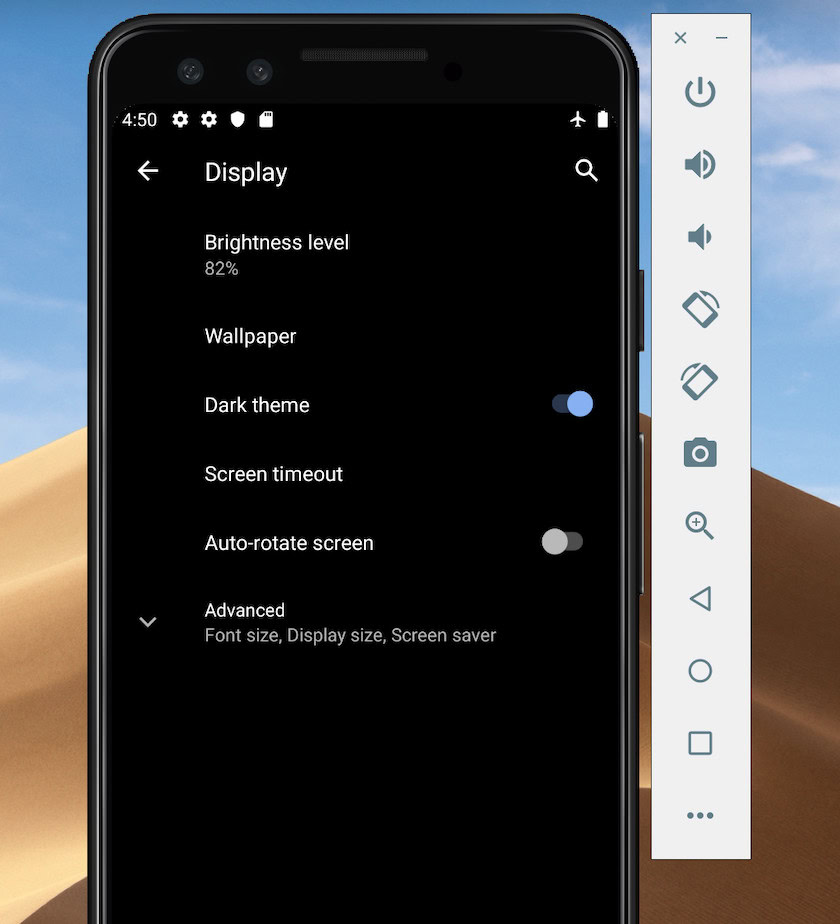
Dark Theme is applied across the entire device, so to provide a consistent user experience you’ll need to ensure that your application fully supports Dark theme.
To add Dark Theme support, make sure you’re using the latest version of the Material Android library, then update your app to inherit from Theme.MaterialComponents.DayNight, for example:
<style name="AppTheme" parent="Theme.AppCompat.DayNight">Alternatively, you can provide separate Dark and Light themes. To create a Light theme, open your res/values/themes.xml file and inherit from Theme.MaterialComponents.Light:
<style name="Theme.MyApp" parent="Theme.MaterialComponents.Light">

//To do//

</style>
You’ll then need to create a res/values-night/themes.xml file and inherit from Theme.MaterialComponents:
<style name="Theme.MyApp" parent="Theme.MaterialComponents">

//To do//

</style>
To provide a good user experience, you may need to modify your app’s behavior when Dark theme is enabled, for example replacing or removing graphics that emit a significant amount of light.
You can check whether Dark theme is enabled, using the following snippet:
int currentNightMode = configuration.uiMode & Configuration.UI_MODE_NIGHT_MASK;
switch (currentNightMode) {

//Dark Theme is not currently active//

    case Configuration.UI_MODE_NIGHT_NO:

        break;

//Dark Theme is active//

    case Configuration.UI_MODE_NIGHT_YES:
        break;
}
Your application can then modify its behavior, depending on which Theme is currently active.
Settings Panel API: Displaying device settings inside your app
If your app targets Android Q, you’ll no longer be able to directly alter the device’s Wi-Fi settings. Instead, you’ll need to prompt the user to make the desired changes using the Settings Panel API.
You can use this new API to display content from the device’s Settings application, as an inline panel that slides over your app’s content. From the user’s perspective, these in-app controls allow them to quickly and easily alter their device’s settings without having to launch a separate app. For an application developer, the Settings Panel API lets you change the Wi-Fi status, and other crucial device settings, without encouraging the user to navigate away from your app.
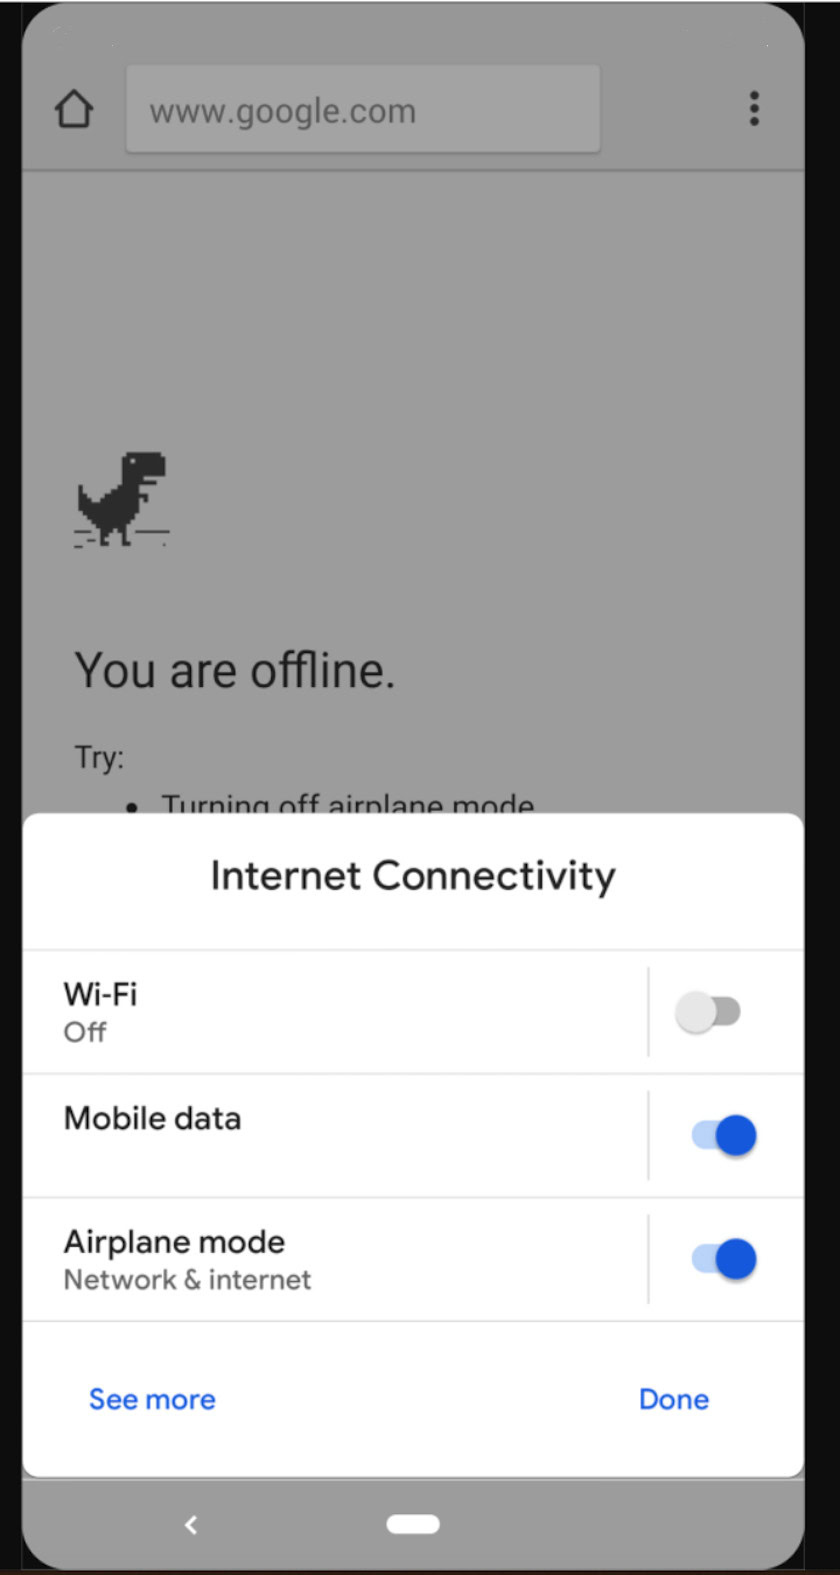
To use the Settings Panel API, you’ll need to fire an intent with one of the following actions, depending on the content you want to display:
- ACTION_INTERNET_CONNECTIVITY: This displays settings related to enabling and disabling internet connectivity, including airplane mode, Wi-Fi, and mobile data.
- ACTION_WIFI: This displays Wi-Fi settings only. This action is useful if your application specifically requires a Wi-Fi connection. For example, if you need to perform large uploads or downloads and don’t want to burn through the user’s mobile data allowance, use the ACTION_WIFI action.
- ACTION_NFC: This displays all the settings related to near-field communication (NFC).
- ACTION_VOLUME: This displays the device’s volume settings.
Here, we’re using the Settings Panel API to display the internet connectivity panel:
Intent panelIntent = new Intent(Settings.Panel.ACTION_INTERNET_CONNECTIVITY);
startActivityForResult(panelIntent);
Adding chat head notifications to your app
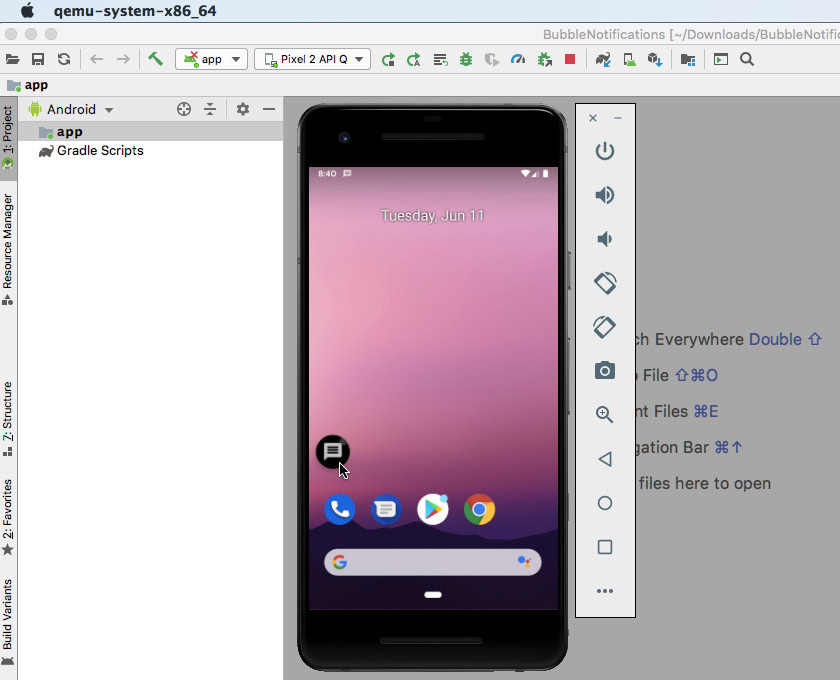
In Android Q, Google is making chat head-style notifications an official part of the Android platform with the introduction of the Bubble API.
Designed as an alternative to SYSTEM_ALERT_WINDOW, bubble notifications appear to “float” above other application content, in a style that’s reminiscent of the floating notifications used by Facebook Messenger for Android.
Bubble notifications can be expanded to reveal additional information, or custom actions that make it possible for users to interact with your app, from outside the application context.
When your app tries to create its first bubble, Android will ask the user whether they want to allow all bubbles from your application, or block all bubbles. If the user chooses to block all of your app’s bubbles, then they’ll be displayed as standard notifications instead. Your bubbles will also be displayed as standard notifications whenever the device is locked, or always-on-display is active. To provide a good user experience, you need to ensure that all of your bubbles display and function correctly as regular notifications.
To create a bubble, you’ll need an Activity that defines the expanded bubble’s behavior and a layout that defines its user interface. For a step-by-step guide on how to create your first bubble notification, check out Exploring Android Q: Adding bubble notifications to your app.
Increasing accessibility with system-wide gestural navigation
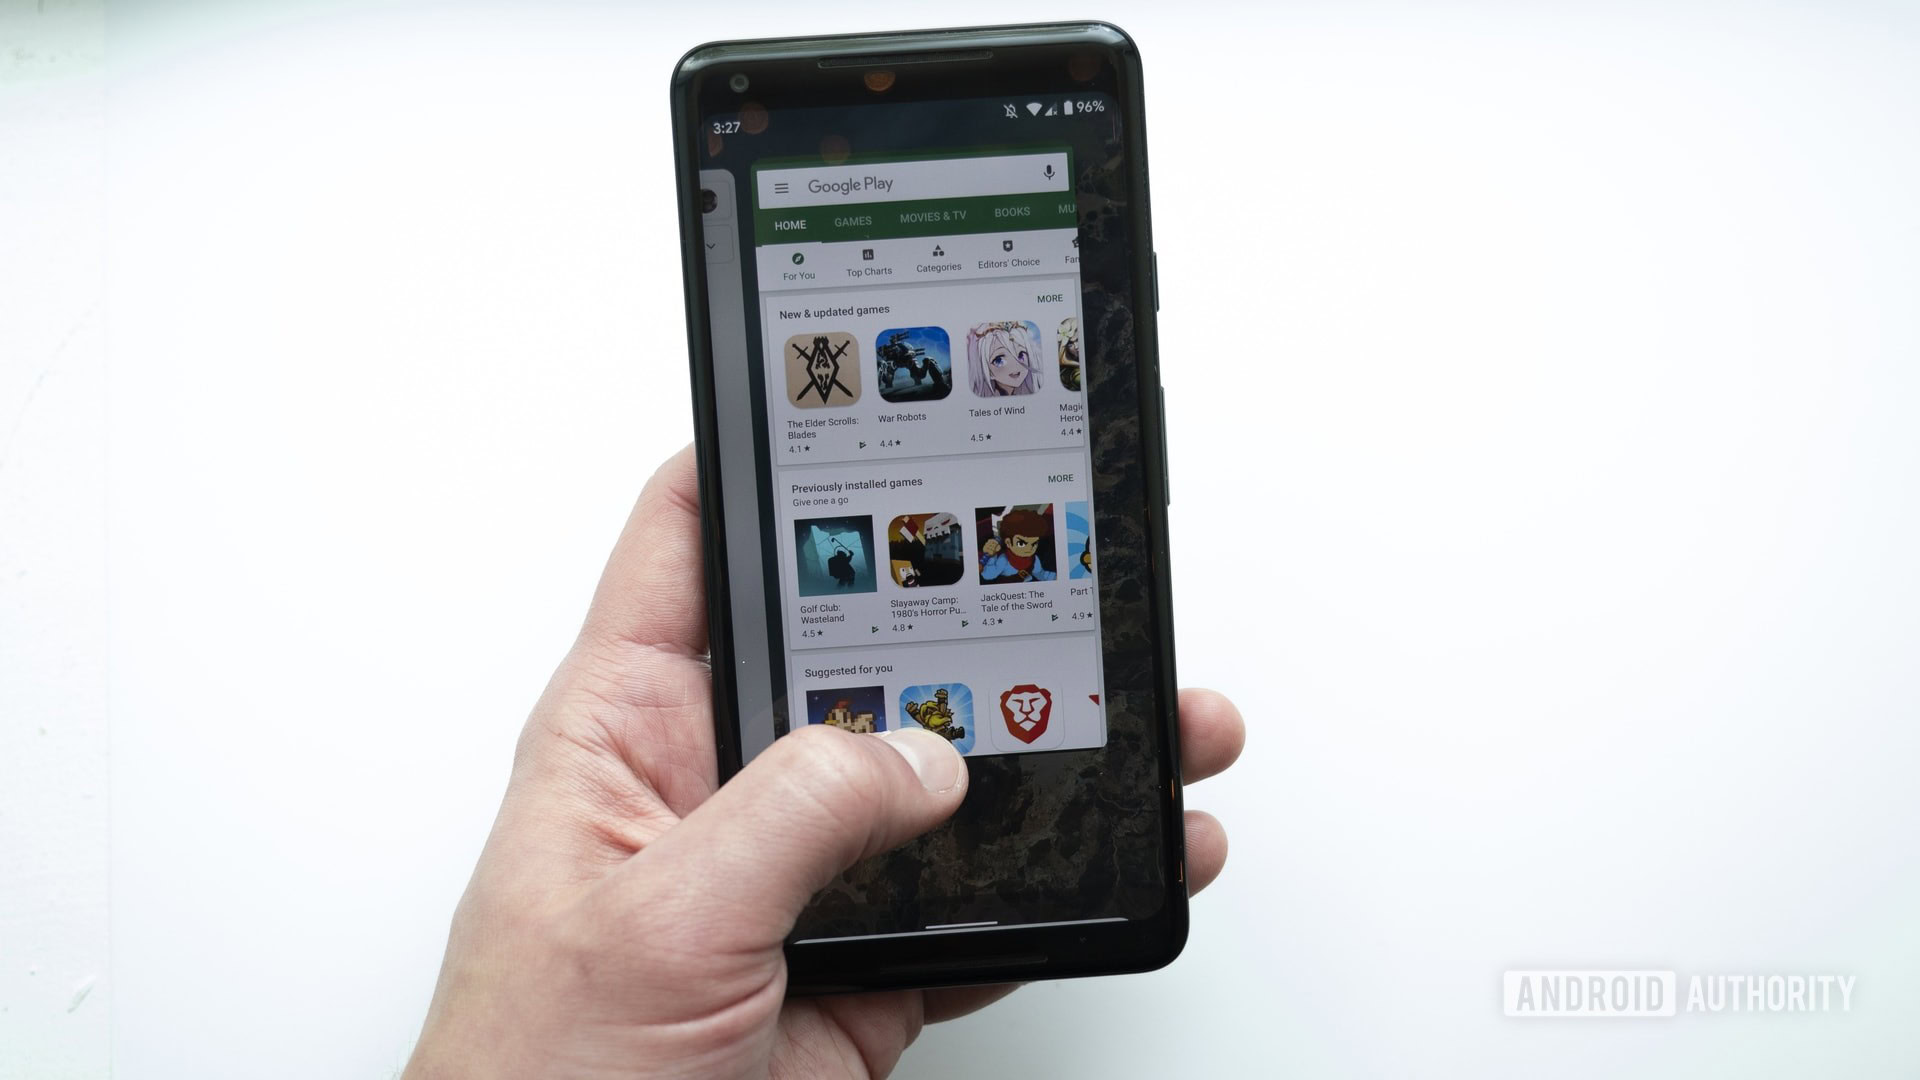
Users with dexterity issues may find it easier to interact with their device using gestures. In Android Q, users have the option to enable gestural navigation across their entire device, which will impact every application installed on that device.
Even if you don’t update your app to target Android Q, your application will be affected by the device’s navigation settings, so you need to ensure that your app is compatible with Android Q’s gestural navigation.
In gestural navigation mode, your app should use the entire screen, so the first step is telling the Android system that your application supports edge-to-edge view. To layout your application fullscreen, you can use the SYSTEM_UI_FLAG_LAYOUT_STABLE and SYSTEM_UI_FLAG_LAYOUT_HIDE_NAVIGATION flags, for example:
view.setSystemUiVisibility(View.SYSTEM_UI_FLAG_LAYOUT_HIDE_NAVIGATION
        | View.SYSTEM_UI_FLAG_LAYOUT_STABLE);
You’ll also need to implement support for a transparent system bar by adding the following to your theme:
<style name="AppTheme" parent="...">
    <item name="android:navigationBarColor">@android:color/transparent</item>
    <item name="android:statusBarColor">@android:color/transparent</item>
</style>
When it’s time to test your app, you’ll need to check that Android Q’s system gestures don’t trigger any of your app’s controls, such as buttons or menus. In particular, Android Q uses an inward swipe for the Back action, and an upwards swipe for Home and Quick Switch, which can interfere with any UI elements located in these areas.
If during testing you discover that swiping from the bottom of the screen, or swiping inwards is triggering your app’s controls, then you can indicate which regions are setup to receive touch input. To block out certain areas, pass a List<Rect> to Android Q’s View.setSystemGestureExclusionRects() API, for example:
List<Rect> exclusionRects;

public void onLayout(
        boolean changedCanvas, int left, int top, int right, int bottom) {
    setSystemGestureExclusionRects(exclusionRects);
}

public void onDraw(Canvas canvas) {
    setSystemGestureExclusionRects(exclusionRects);
}
If your app uses any custom gestures, then you should also check that they don’t conflict with the system’s navigation gestures.
Capturing audio from third party applications
Android Q introduces a AudioPlaybackCapture API which makes it possible for your app to capture audio from other applications — perfect if you’re creating a screen recording app!
To capture audio playback, you need to request the RECORD_AUDIO permission, and then:
- Build an AudioPlaybackCaptureConfiguration instance, using AudioPlaybackCaptureConfiguration.Builder.build().
- Configure and create the AudioRecord instance, by calling setAudioPlaybackCaptureConfig and then passing the configuration to the AudioRecord object.
For example:
MediaProjection mediaProjection;
     AudioPlaybackCaptureConfiguration config =
         new AudioPlaybackCaptureConfiguration.Builder(mediaProjection)
         .addMatchingUsage(AudioAttributes.USAGE_MEDIA)
         .build();
     AudioRecord record = new AudioRecord.Builder()
         .setAudioPlaybackCaptureConfig(config)
         .build();
This new API means, by default, third-party apps will be able to record all of your application’s audio. For some apps, this can be a privacy concern or may even put your app at risk of copyright infringement. If required, you can prevent third parties from capturing your app’s audio, by adding android:allowAudioPlaybackCapture=”false” to your Manifest.
Even with this flag in place, system apps will still be able to capture your app’s audio playback, as accessibility features such as captioning depend on audio capture.
To provide an accessible experience, it’s recommended that you always allow system components to capture your app’s audio, but you can block system apps using the ALLOW_CAPTURE_BY_NONE constant, if required.
Improved biometric authentication
Android Q is making a number of tweaks to Android’s BiometricPrompt authentication.
1. Check for biometric capability
Before invoking BiometricPrompt, you can now check whether the device supports biometric authentication, using the new canAuthenticate() method.
2. Streamlined biometric authentication dialogs
Android Q makes a subtle change to BiometricPrompt’s authentication dialogs.
Android allows users to authenticate their identify using a number of implicit “hands-free” biometric modalities, such as face or iris authentication. However, even if the user successfully verifies their identify using an implicit modality, they’ll still have to tap the dialog’s Confirm button in order to complete the authentication process.
For many implicit biometric modalities, this Confirm action is unnecessary, so in Android Q you can request that the system removes the Confirm button from your biometric authentication dialog.
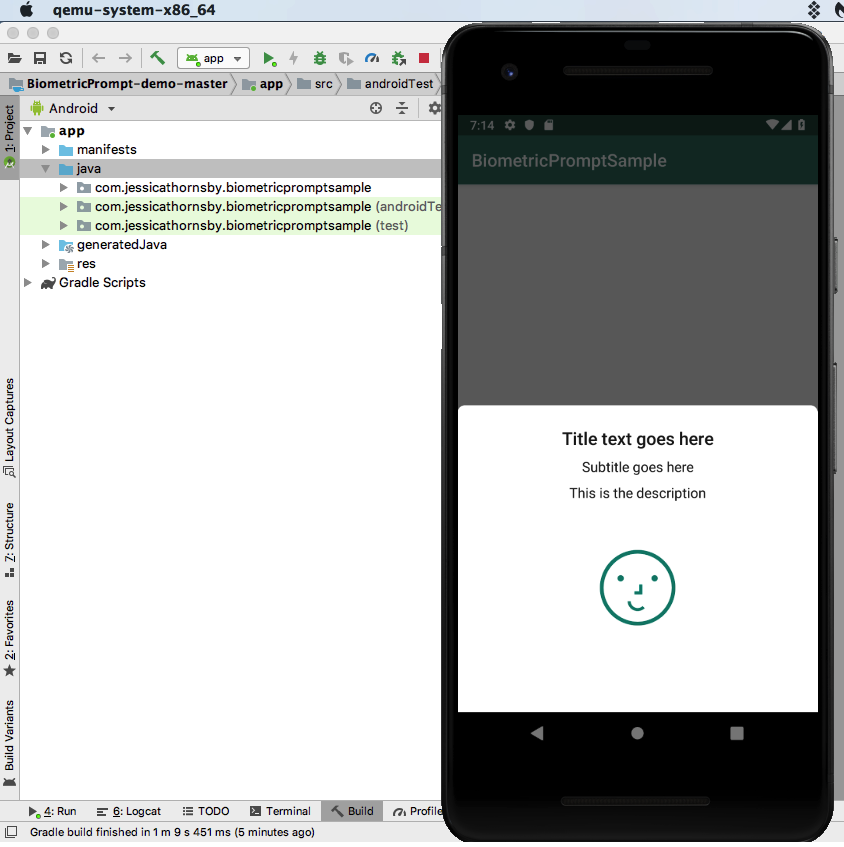
This small change can have a positive impact on the user experience, as verifying your identity by looking at your device, is easier than looking at your device, waiting for it to recognize your face, and then tapping the Confirm button.
In Android Q, you can request that the system removes the Confirm button by passing false to the setConfirmationRequired() method. Note that the system may choose to ignore your request in certain scenarios, for example if the user has disabled implicit authentication in their device’s Settings.
3. Alternative authentication methods
At times, a user may be unable to authenticate using biometric input. In these scenarios, you can allow them to authenticate their identify using their device’s PIN, pattern, or password using the new setDeviceCredentialAllowed() method.
Once this fallback is enabled, the user will initially be prompted to authenticate using biometrics, but will then have the option to authenticate using a PIN, pattern, or password.
Run embedded DEX code directly from your APK
In Android Q, it’s possible to run embedded DEX code directly from your APK file, which can help prevent attackers from tampering with your app’s locally compiled code.
You can enable this new security feature by adding the following to your Manifest’s <application> element:
android:useEmbeddedDex="true”You can then build an APK that contains uncompressed DEX code, by adding the following to your Gradle build file:
aaptOptions {
   noCompress 'dex'
}
New permissions for Activity recognition
Android Q introduces a new com.google.android.gms.permission.ACTIVITY_RECOGNITION runtime permission for applications that need to record the user’s step count or categorize their physical activity, such as running or cycling.
Android’s Activity Recognition API will no longer provide results unless your application has this new ACTIVITY_RECOGNITION permission. Note that if your app uses data from built-in sensors such as the gyroscope or accelerometer, then you don’t need to request the ACTIVITY_RECOGNITION permission.
Restrictions on Activity starts
To help minimize interruptions, Android Q places new restrictions on when your application can start an Activity. You’ll find a complete list of all the conditions that allow for Activity starts, over at the official Android docs.
System alert overlays removed from Android Go
If your app winds up on a device that’s running Android Q and Android Go, it’ll be unable to access the SYSTEM_ALERT_WINDOW permission. This change has been implemented to avoid the noticeable performance drops that can occur when Android Go devices attempt to draw the SYSTEM_ALERT_WINDOW overlay window.
Say goodbye to Android Beam
Android Q marks the end of Android Beam, as this data-sharing feature is now officially deprecated.
Keeping your users secure: Key privacy changes
Android Q introduces a number of privacy changes that give users greater control over their data and their device’s sensitive features.
Unfortunately, these changes can affect your app’s behavior and may even completely break your app. When testing your application against Android Q, you should pay particular attention to the following privacy changes:
1. Scoped storage: Android’s new external storage model
Android Q places new restrictions on how applications access external storage.
By default, if your app targets Android Q then it’ll have a “filtered view” into the device’s external storage (previously referred to as a “sandboxed view”), which only provides access to an app-specific directory.
With scoped storage, your application can access this app-specific directory and all of its contents, without having to declare any storage permissions. However, your app can only access files created by other applications if it’s been granted the READ_EXTERNAL_STORAGE permission and the file(s) are located in either Photos (MediaStore.Images), Videos (MediaStore.Video) or Music (MediaStore.Audio). If your app requires access to a file that doesn’t meet this criteria, then you’ll need to use the Storage Access Framework.
At the time of writing, it was possible to opt out of scoped storage by adding android:requestLegacyExternalStorage=”true” to your project’s Manifest, but according to the official Android docs scoped storage will eventually be required by all applications, so it’s recommended that you update your app as soon as possible.
2. Decide when an app can access your location
Android Q gives users more control over when an application can access their location.
When your app requires location information, Android Q will display a dialog asking whether the user wants to share this information:
- When your app is running in the foreground only.
- All of the time (i.e when your app is in the foreground and the background).
If the user grants your app all-of-the-time access, then Android Q will create regular notifications to remind the user that your app can access their location at any time.
To implement these changes, Android Q introduces a new ACCESS_BACKGROUND_LOCATION permission.
If your app requires access to location information while it’s in the background, you’ll need to request this new permission, alongside the existing ACCESS_COARSE_LOCATION or ACCESS_FINE_LOCATION permission. For example:
<manifest>
  <uses-permission android:name="android.permission.ACCESS_FINE_LOCATION" />
  <uses-permission android:name="android.permission.ACCESS_BACKGROUND_LOCATION" />
</manifest>
3. New restrictions on non-resettable system identifiers
If you require access to non-resettable system identifiers, such as IMEI and serial number, you’ll now need to request the READ_PRIVILEGED_PHONE_STATE permission.
Wherever possible, it’s recommended that you use alternative methods of tracking the user. For example, if you wanted to record user analytics, you could create an Android Advertising ID rather than requesting access to non-resettable device identifiers.
Make sure you’re ready for Android Q: Testing your app
The best way to ensure that your application provides a good user experience on Android Q, is to test it on a device that’s running Android Q.
While we’re waiting for the official release, there are three ways to test your app against the Android Q developer previews: enroll your device in the Android Beta program, manually flash an Android Q system image onto your device, or use an Android Virtual Device (AVD).
1. Install the Android Q beta on a physical device
If you own a compatible device (full list can be found here), you can get over-the-air Android Q updates by enrolling in the Android Beta program. At the time of writing, all Google Pixel phones are supported by the Android Beta program. That includes the Google Pixel, Pixel XL, Pixel 2, Pixel 2 XL, Pixel 3, Pixel 3 XL, Pixel 3a, and Pixel 3a XL.
If you don’t own a Pixel, the Android Q beta is also available on select devices from a handful of manufacturers, including ASUS, HUAWEI, LG, Xiaomi, and more. For the full list of supported devices, check out the list right here.
Once you’re enrolled, Google estimates that you’ll receive between three and six updates over the course of the program.
Before enrolling in the Beta program, there are several drawbacks you need to be aware of. Pre-release versions of Android may contain bugs and errors that could prevent your device from functioning normally, and there’s no official support available if you do encounter difficulties. Users who are running pre-release versions of Android also won’t receive separate monthly security updates, which could leave your device vulnerable to attacks and exploits.
Finally, although you can opt out of the program and revert to a stable version of Android at any time, all of the locally saved data on your device will be wiped when you revert to the stable release. Note that if you remain enrolled until the end of the beta program, then you’ll graduate and receive the final, public version of Android Q without losing any of your data.
If you want to start receiving over-the-air Android Q updates, head over to the Android Beta website for more information.
2. Manually flash an Android Q system image
If you don’t like the idea of receiving Android Q updates over-the-air, you can download and manually flash an Android Q system image to your Pixel device.
Google has published the system images for all compatible Pixel devices, along with instructions on how to flash a system image. This manual approach can be useful if you need to test against a specific release of Android Q, or if you want to start testing immediately rather than enrolling in the Beta program and potentially waiting up to 24 hours to receive your first update.
3. Use the Android emulator
If you don’t want the risks associated with installing beta software on a physical smartphone or tablet, or if you don’t own a compatible device, you can use an AVD instead.
To download the latest Android Q preview image, follow these steps:
- Launch Android Studio.
- Select Tools > SDK Manager from the Android Studio toolbar.
- Make sure the SDK Platforms tab is selected.
- Select Show Package Details.
- Select Google Play Intel x86 Atom System Image.
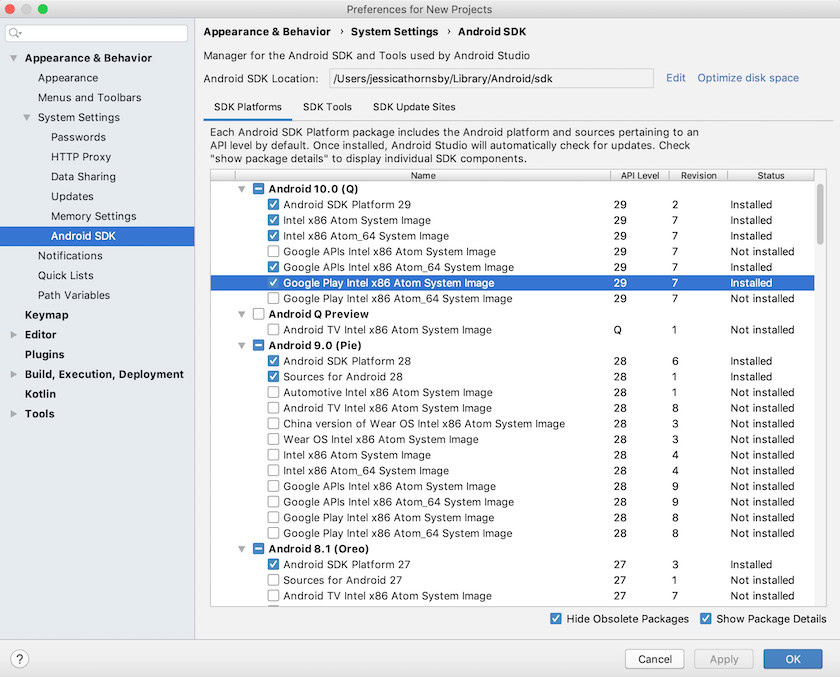
- Click OK.
- Create an AVD using this system image.
How do I test my app against Android Q?
Once you have a physical device or AVD that’s running Android Q, you should put your app through the same testing processes and procedures you use when preparing any release. During testing, you should also pay particular attention to Android Q’s privacy changes, as these have the potential to break your app.
Once you’ve verified that your application is providing a good user experience on Android Q, you should publish your Android Q-compatible app to Google Play as soon as possible. By releasing your app early, you can gather feedback before the majority of your user base move to Android Q.
Alternatively, you can use Google Play testing tracks to push your APK to a select group of testers, then perform a staged rollout to production when you’re happy with their feedback.
We hope this article helped you get your app ready for Android Q! Which Android Q feature are you most excited about?