Affiliate links on Android Authority may earn us a commission. Learn more.
AndroidManifest.xml: everything you need to know
Regardless of the kind of app you’re creating, every single Android application must contain a Manifest file.
AndroidManifest.xml is one of the most important files in your entire project, providing essential information to the Android build tools, the Android operating system and the Google Play store.
If your app’s AndroidManifest.xml isn’t setup correctly, then you can encounter a huge range of problems – maybe the Android system will be unable to locate all of your Activities and Services; perhaps the Google Play store will let people download your app to completely incompatible devices, or maybe your app will be unable to access the system features and information it requires, in order to provide a good user experience.
In this article, I’ll be exploring everything you need to know about the AndroidManifest.xml file, ranging from the Manifest attributes that are present in every single Android project, through to communicating with other applications via intent filters, and even how to merge multiple Manifests inside the same Android project.
Exploring Android Studio’s default Manifest
If you create an Android project using Android Studio, then a single Manifest file is generated for you automatically, and then populated with all the elements required for this project to run on an Android device.
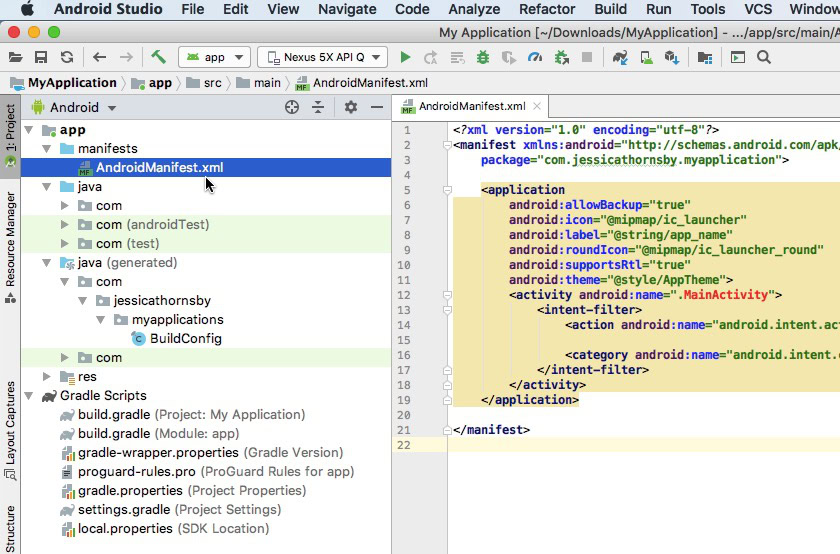
The following code is the automatically-generated Manifest for a project I created using Android Studio’s “Empty Activity” template:
<?xml version="1.0" encoding="utf-8"?>
<manifest xmlns:android="http://schemas.android.com/apk/res/android"
   package="com.jessicathornsby.myapplication">

   <application
       android:allowBackup="true"
       android:icon="@mipmap/ic_launcher"
       android:label="@string/app_name"
       android:roundIcon="@mipmap/ic_launcher_round"
       android:supportsRtl="true"
       android:theme="@style/AppTheme">
       <activity android:name=".MainActivity">
           <intent-filter>
               <action android:name="android.intent.action.MAIN" />

               <category android:name="android.intent.category.LAUNCHER" />
           </intent-filter>
       </activity>
   </application>

</manifest>
Most Manifest entries consist of an element and an attribute. If you need to specify more than one attribute for the same element, then you’ll typically repeat that element with different attributes, rather than adding multiple attributes to the same element. For example here we’re declaring multiple attributes for the <uses-feature> element:
<uses-feature android:name="android.hardware.sensor.proximity"
   android:required="true" />

<uses-feature android:name="android.hardware.sensor.relative_humidity"
   android:required="true" />

<uses-feature android:name="android.hardware.sensor.heartrate"
   android:required="true" />
The Android Manifest can support a huge range of different elements, but there’s a few that you’ll find in pretty much every single AndroidManifest.xml file:
1. Package name
The Manifest’s root element must specify your app’s package name, which typically matches your project’s directory structure, for example:
<?xml version="1.0" encoding="utf-8"?>

//Your Manifest’s root element//

<manifest xmlns:android="http://schemas.android.com/apk/res/android"

//The project’s package name//

   package="com.jessicathornsby.myapplication">
...
...
...
</manifest>
When it’s time to build your project into its final application package (APK), the Android build tools will use this package name as the namespace for your project’s generated R.java class. For example, in the above Manifest, the R class will be created at com.jessicathornsby.myapplication.R.
The build tools will also use this package name to resolve any classes that you declared in the Manifest file. For example <activity android:name=”.MainActivity”> will be resolved to com.jessicathornsby.myapplication.
After resolving the Manifest class names and namespacing the R class, the build tools will discard your package name and replace it with the “applicationID” property from your project’s build.gradle file.
android {
   compileSdkVersion 'android-Q'
   defaultConfig {
       applicationId "com.jessicathornsby.myapplication"
...
...
...
This “applicationID” is used to uniquely identify your app on both the device and in the Google Play store.
Initially, the application ID will match the package name you selected when you created your project, but you can change the application ID and package name manually, at any time.
If you do edit the package name, then the value defined in your Manifest must match the package name defined in your project directory. If there’s any discrepancy between these two values, then your Manifest will be unable to identify the app components, and the R class won’t be resolved correctly.
If you do need to change the package name, then you should use Android Studio’s refactoring tools, as this ensures the package name remains consistent across your Android project:
- In Android Studio’s “Project” pane, select the little “gear” icon.
- Deselect “Compact Empty Middle Packages.” Your package directory will now be displayed as individual directories.
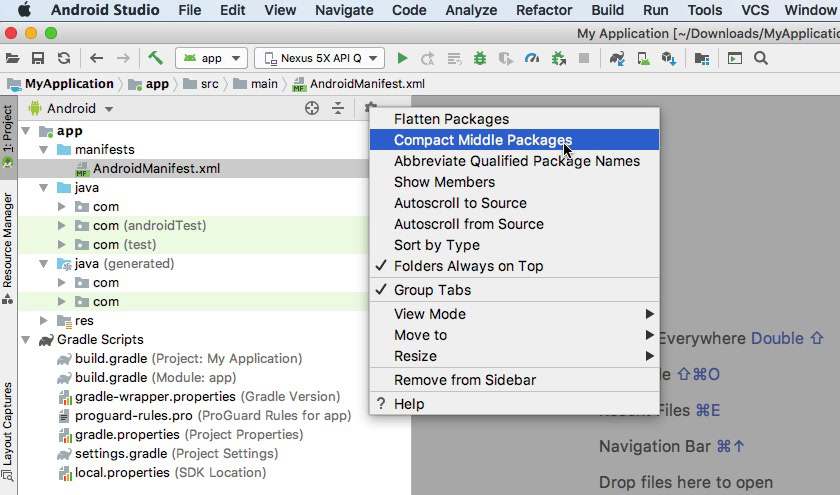
- Control-click each directory that you want to rename and then select “Refactor > Rename.”
- Select “Rename package.”
- In the subsequent popup, enter your new package name and then select “Refactor.”
- A new “Refactoring Preview” panel should now appear along the bottom of Android Studio; check its output carefully, and resolve any issues.
- When you’re happy to proceed, click “Do Refactor.” Your package will now be renamed.
Activities, Services, BroadcastReceivers, and more: Understanding the app components
The Manifest is where you’ll declare each of your application components, which are the various entry points into your app. As a general rule, if a component isn’t listed in the Manifest, then it won’t be seen by the Android system, and will never run.
In Android, there are four different types of app components: Activities, Services, BroadcastReceivers and Content Providers. In this section, I’ll show you how to register each of these frequently-used Android components, in your Manifest.
Activities: the main component of Android
To register an Activity, open your Manifest and add an <Activity> element as a child of the <application> element, for example:
<application ... >
    <activity android:name="com.jessicathornsby.myapplications.ShareActivity">
  </application ... >
The only required attribute for an <Activity> is android:name, which specifies the Activity’s class name. This class name should be fully qualified, although you can use “.” as a shorthand for your app’s package name. For example, in the following snippet “.ShareActivity” will be resolved to “com.jessicathornsby.myapplication.MyActivity.”
<?xml version="1.0" encoding="utf-8"?>
<manifest xmlns:android="http://schemas.android.com/apk/res/android"
   package="com.jessicathornsby.myapplication">
<application ... >
       <activity android:name=".ShareActivity">
       </activity>
  </application ... >
If your app contains components that reside in other sub-packages, then you must use the fully qualified package name.
Performing long-running operations: Services
A Service is a component that can perform long-running operations in the background, such as fetching data over the network, without blocking Android’s main UI thread. You can start a service and leave it running in the background, or you can bind a service to another component, which allows that component to interact with the service.
You declare a service in your app’s Manifest, by adding a <service> element as a child of your <application> element.
There’s a list of attributes that you can use to control a service’s behavior, but as a minimum you’ll need to provide the service’s name (android:name) and a description (android:description). This description should explain the work this service is responsible for, via a string resource that’ll be displayed to the user. Users can check which services are running on their device and can stop any service, at any time, so by providing a compelling description you can reduce the chances of the user deciding to stop your service.
In the following snippet, I’m registering a “MySevice” service with our Manifest:
</activity>
     <service
   android:description="@string/servicedesc"
   android:name=".MyService">
</service>
   </application>

</manifest>
If you don’t declare a Service in your Manifest, then it won’t be seen by the system, and will never run.
Receiving intents: BroadcastReceivers
A BroadcastReceiver is a component that allows your app to respond to broadcast messages from the Android system and other applications, outside of the normal user flow – even if your app isn’t currently running.
The Android system automatically routes a broadcast to all the applications that are setup to receive that broadcast’s particular type of intent. By implementing one or more BroadcastReceivers, your app can respond to events that are happening outside of the application context. For example, imagine your app occasionally needs to perform a battery-intensive task; you can provide a better user experience by delaying this task until the device is charging. By registering to receive the ACTION_POWER_CONNECTED broadcast action, your app will be notified whenever the device is connected to a power outlet, which is the ideal time to perform any battery-intensive operations.
To make a BroadcastReceiver known to the system, you’ll need to declare it in your Manifest using a <receiver> element. You can then use one or more intent filters to specify which broadcast actions the receiver should respond to. For example, here we’re declaring a “MyBroadcastReceiver” that responds to the ACTION_POWER_CONNECTED broadcast action.
<receiver android:name=".MyBroadcastReceiver”">
  <intent-filter>
    <action android:name="android.intent.action.ACTION_POWER_CONNECTED"/>
  </intent-filter>
</receiver>
Unlike the other app components, it’s possible to bypass the Manifest and register a BroadcastReceiver in your application code, by creating an IntentFilter and then calling registerReceiver(BroadcastReceiver, IntentFilter).
Performing inter-process communication: Content providers
A content provider is a consistent, standard interface that connects data in one process with code running in another process.
Content providers allow you to store data in any persistent storage location that your application can access, such as the file system or a SQLite database. This component also provides a consistent approach to sharing data with other applications, and defines mechanisms for data security. For example, you can use a content provider to make data accessible to your application only; configure different permissions for reading and writing data, and even allow third party applications to modify your data in a secure manner.
By using content providers in your app, you can abstract away a lot of the complexity typically associated with storing data, and sharing that data with other applications.
Before your app can retrieve data from a content provider, you’ll need to request read access permission for that particular provider. The name of the read access permission varies between content providers, so you’ll need to check the provider’s documentation for more information. For example, the User Dictionary Provider defines the permission android.permission.READ_USER_DICTIONARY, so if we wanted to read this provider, then we’d need to add the following <uses-permission> to our Manifest:
<uses-permission android:name="android.permission.READ_USER_DICTIONARY">More ways to launch your components: Implicit intents
When declaring an app component, you can define a wide range of additional capabilities, including intent filters, which describe how an Activity, Service or BroadcastReceiver can be started.
App components can be launched by components inside your application, or components outside of your application. For example, if you wanted to let your users upload a profile pic, then you could build your own camera Activity, but most people already have at least one camera app installed on their mobile device. Why not save yourself some time, by using implicit intents to launch an application that already has the necessary camera functionality?
Every time an app fires an intent, the Android system will search for one or more components that can handle this intent, by examining each app’s Manifest for intent filters. An intent filter specifies the type of intent that a component can handle, so if the Android system finds a match then it’ll launch the intent filter’s corresponding component. If a device has multiple apps that are capable of handling an intent, then the system will present a dialog box to the user, and they can choose which application they want to use.
You create an intent filter using a combination of action, data and category elements, depending on the kind of intent you want to handle. For example, here we’re creating an <intent-filter> that can handle an ACTION_CALL intent when the data type is text:
//This Activity is the main entry point into your app//

<activity android:name="MainActivity">
    <intent-filter>
        <action android:name="android.intent.action.MAIN" />
        <category android:name="android.intent.category.LAUNCHER" />
    </intent-filter>
</activity>

<activity android:name="CallActivity">
    <intent-filter>

//The action that this component will accept//

    <action android:name="android.intent.action.CALL"/>

//The intent category that this component will accept//

    <category android:name="android.intent.category.DEFAULT"/>

//The type of data this component will accept, such as scheme, host, port, or path//

        <data android:mimeType="text/plain"/>
    </intent-filter>
</activity>
In the above example, users can launch CallActivity by navigating through MainActivity. However, they can also launch CallActivity directly from any other application that issues a matching implicit intent.
Note that in order to receive implicit intents, you must include the CATEGORY_DEFAULT category in each of your intent filters. If you don’t declare this category in an intent filter, then no implicit intents will be resolved to the corresponding component.
Accessing protected features and information: Android’s Permissions model
Android helps protect the user’s privacy via a system of permissions. By default, no application can perform an operation that might negatively impact other apps, the Android operating system or the user, such as reading the user’s contacts or accessing the device’s camera.
If your app requires access to sensitive information or protected parts of the Android operating system, then you’ll need to ask permission.
The first step, is to declare each permission request in your app’s Manifest, via a <uses-permission> element. Android supports a long list of permissions, so you’ll also need to specify the permission’s unique label. For example, if your app requires access to the user’s precise location, then you’d add the following to your Manifest:
<?xml version="1.0" encoding="utf-8"?>
<manifest xmlns:android="http://schemas.android.com/apk/res/android"
   package="com.jessicathornsby.myapplication">

    <uses-permission android:name="android.permission.ACCES_FINE_LOCATION"/>
In Android 6.0 (API level 23) and higher, you also need to request each permission at runtime, as and when your app requires that particular permission. Every time your app issues a request, the system will display a dialog informing the user which permission group your application is trying to access.
If the user grants your permission request, then you’ll gain access to the associated feature or information. If the user denies your request, then you’ll need to handle this rejection gracefully, for example you might disable features that rely on the missing permission, or display a message explaining why this feature is unavailable, every time the user tries to access it.
If the device is running Android 5.1.1 (API level 22) or lower, then the system will ask the user to grant all the permissions listed in your application’s Manifest, at install time.
We cover Android’s runtime permissions model in detail, in What are Android App permissions, and how do devs implement them?
Not every permission triggers Android’s request dialog, as some permissions are deemed “normal,” including popular Internet permissions such as android.permission.INTERNET and android.permission.ACCESS_NETWORK_STATE.
If you declare a “normal” permission in your Manifest, then the system will automatically grant this request at install time, and the user will be unable to revoke it. Since the user doesn’t have the option to grant or deny “normal” permissions at runtime, you simply need to declare these permissions in your app’s Manifest.
You can check whether a particular permission is “normal” or “dangerous” by finding that permission over at the official Android docs, and then taking a look at its “Protection level.”
Just be aware that restrictions are sometimes added to new releases of the Android platform, so at some point your app may need to request a permission that it didn’t previously require. To avoid breaking your app on newer versions of Android, the system will check your app’s targetSdkVersion attribute and then apply any relevant new permissions to your Manifest.
While this isn’t something that’s immediately going to break your application on the latest version of Android, this isn’t an excuse not to update your app! To ensure you’re providing the best possible user experience, you should always test your app against the latest release and make any necessary changes, including adding any new permissions to your app’s Manifest.
Device compatibility: Control who downloads your app
It’s possible your application may require access to specific hardware or software. Since there’s such a huge variety of Android devices currently on the market, there’s no guarantee that your application will have access to any particular piece of hardware or software.
If your app requires a specific piece of hardware or software in order to deliver a good user experience, then it’s vital your app doesn’t wind up on a device that’s lacking this essential functionality.
You can specify your app’s hardware and software requirements, by adding <uses-feature> elements to your Manifest. For example, if your app cannot deliver its core functionality without having access to a heart rate sensor, then you’d need to add the following to your Manifest:
<?xml version="1.0" encoding="utf-8"?>
<manifest xmlns:android="http://schemas.android.com/apk/res/android"
   package="com.jessicathornsby.myapplication">

   <uses-feature android:name="android.hardware.sensor.heartrate"
       android:required="true" />
This app will then only appear in the Google Play store, to devices that feature a heart rate sensor.
There may also be some features that your application uses if available, but that aren’t required to deliver your app’s core functionality. In this scenario, you should still declare these hardware and software features, but mark them as android:required=”false” instead:
<?xml version="1.0" encoding="utf-8"?>
<manifest xmlns:android="http://schemas.android.com/apk/res/android"
   package="com.jessicathornsby.myapplication">

   <uses-feature android:name="android.hardware.sensor.heartrate"
       android:required="false" />
While it may seem strange to declare optional hardware and software features, this helps to ensure your app isn’t hidden from devices unnecessarily.
Some permissions carry implicit feature requirements, for example if your app requests the BLUETOOTH permission then Google Play will assume that your app requires the underlying android.hardware.bluetooth hardware. Unless you specify otherwise, Google Play will hide your application from all devices that are missing the necessary Bluetooth hardware. In this scenario, failing to list Bluetooth as optional, is exactly the same as listing Bluetooth as android:required=”true.”
Depending on how your app uses the android:required=”false” hardware or software, you may need to check whether certain system features are available at runtime. You can perform this runtime check, by calling PackageManager.hasSystemFeature() and then modifying your app’s behavior depending on the results, for example you might quietly disable parts of your app that require the heart rate sensor.
Android’s default behavior can change over time, so it’s best practice to be explicit about the kind of behavior you want. Ideally, you should declare every single hardware and software feature that your application uses, and then mark them as android:required=”false” and android:required=”true” accordingly.
Need to create product flavors or build types? How to merge multiple Manifests
Every Android Studio project must contain at least one Manifest file, but it’s also possible for a project to contain multiple Manifests, for example you might create different Manifests for each product flavor or build type.
Since your finished APK can only contain a single Manifest, Gradle will merge all of your Manifests during the build process, to create the single Manifest file that’s ultimately shipped with your application.
If your project contains multiple Manifests, then Android Studio’s merger tool will combine each file sequentially based on its priority, where the lowest priority Manifest gets merged into the next highest priority.
There’s three types of Manifests that Android Studio can merge. From highest priority to lowest priority, these are:
- The Manifest file for a build variant.
- The main Manifest for your application module.
- The Manifest file from any included library.
If an element from a lower-priority Manifest doesn’t match any elements in the higher-priority Manifest, then it’ll be added to the merged Manifest. However, if there is a matching element, then the merger tool will attempt to combine all the attributes into the same element. If two or more Manifests contain the same attributes with different values, then a merge conflict will occur. At this point, you’ll receive an error and will need to instruct the merger tool on how to resolve the conflict.
If your project contains multiple Manifest files and you’re unsure about the merged output, then you can preview the merged Manifest before building your APK:
- Open one of your Manifest files in Android Studio.
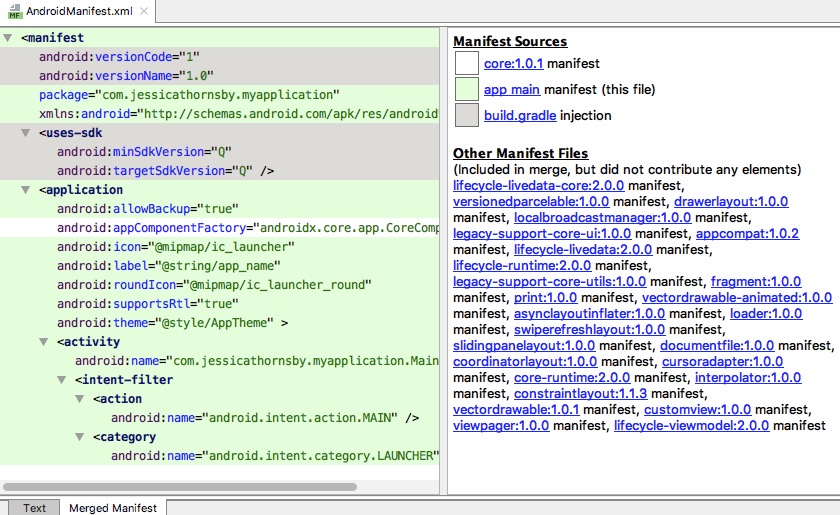
- Select the “Merged Manifest” tab (where the cursor is positioned in the following screenshot). This will open a “Merged Manifest” view.
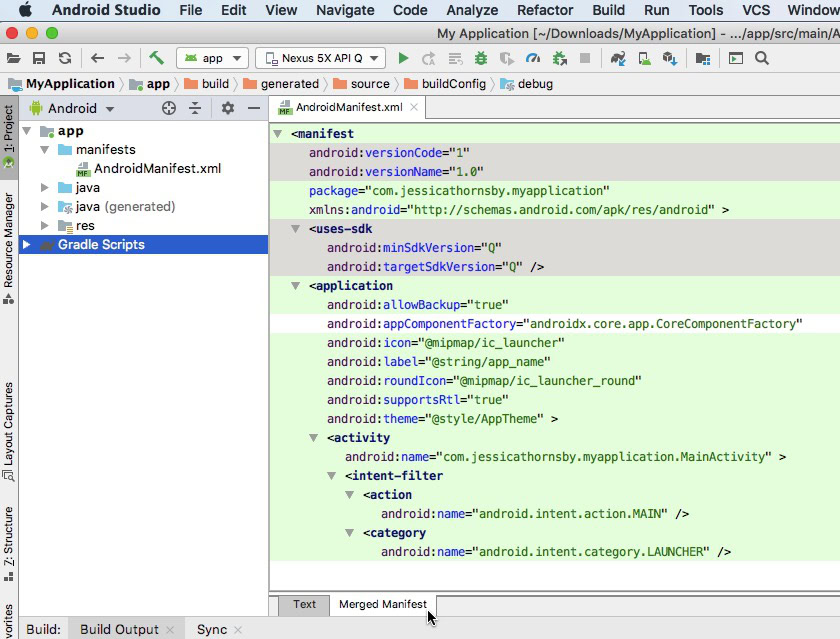
The Merged Manifest view displays the results of the merge on the left, and information about the merged Manifest file on the right.
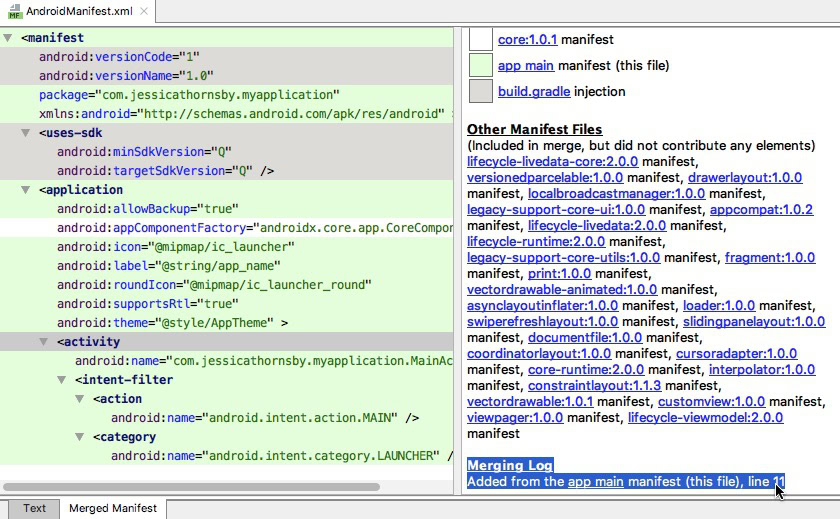
If you’re confused about any of the merged Manifest elements, then you can view more information about a specific element by selecting it in the left-hand pane, and then reading the “Manifest log” in the right-hand pane.
If any merge conflicts occur, then they’ll appear under “Merging Errors” towards the right-hand side of Android Studio, complete with some recommendations on how to resolve this particular conflict, using merge rule markers.
Wrapping up
In this article we took an in-depth look at one of Android’s most important files. We covered the elements and attributes that are present in every single AndroidManifest.xml file, and looked at some of the additional elements you can add, including permissions, intent filters, and hardware and software requirements.
Are there any other Android files you’d like us to cover? Let us know in the comments below!