Affiliate links on Android Authority may earn us a commission. Learn more.
What is the BBC micro:bit - Gary explains
Published onJanuary 16, 2017
The BBC micro:bit is part of an initiative to get kids coding, primarily in the UK, however its influence is starting to spread world wide. The micro:bit itself is a small credit card sized computer with an ARM Cortex-M0 microprocessor on it, plus a variety of sensors and LEDS. You can program it via MicroPython, JavaScript, a visual blocks editor, or in the C programming language. It is cheap, child friendly and has been given free to every child in year 7 or equivalent across the UK. So regardless of your age, if you find the prospect of learning to code interesting then read on to find out more in my full review of the BBC micro:bit.
History
There is a whole generation of computer scientists, software engineers, coders and hackers who first got into computing due to the home computer revolution of the mid-1980s and early 1990s. Machines such as the Sinclair ZX Spectrum, the Commodore 64 and the BBC Micro became the entry point for whole swathes of young people to learn about computing. Unfortunately as we entered the era of the PC and game consoles the “roll up your sleeves” attitude of the home computer revolution started to fade and in turn universities started to see a drop in the number of applications for computer science related studies.
This decline has been partly addressed by the great work of the Raspberry Pi foundation and now by the work of the Micro:bit foundation. You may have noticed the similarities between the name of the 1980s BBC Micro and the new BBC micro:bit. That is of course intentional. The British Broadcasting Corporation was a major partner in the release and the original BBC Micro and now the corporation is playing a significant role with the launch of the new micro:bit.
The micro:bit
The micro:bit itself measures 4 x 5 cm and includes 25 LEDs, 2 programmable switches, Bluetooth, an accelerometer, a compass, 5 ring type connectors and a 23-pin edge connector. This makes it ideal for not only learning about software but also for learning the fundamentals of electronics. The board can be programmed in a number of different ways including in Python and using JavaScript. The board is actually based on ARM’s mbed OS platform and the various programming environments offer higher level programming access. However the fundamental principle is the same: you write a program, compile it and then flash it onto the board. Once programmed the software on the board remains in the flash memory and will run whenever the board is powered on. This means that you can make standalone projects which just run whenever you power up the micro:bit.

Blocks
Probably the easiest introduction to coding for the micro:bit is using Microsoft’s micro:bit Programming Experience Toolkit (PXT). It supports both block-based coding and JavaScript. If you haven’t seen block-based coding before, the premise is very simple. The programmer uses drag-and-drop to pick blocks from a predefined set and stitch them together to make a program. Maybe picture will help:
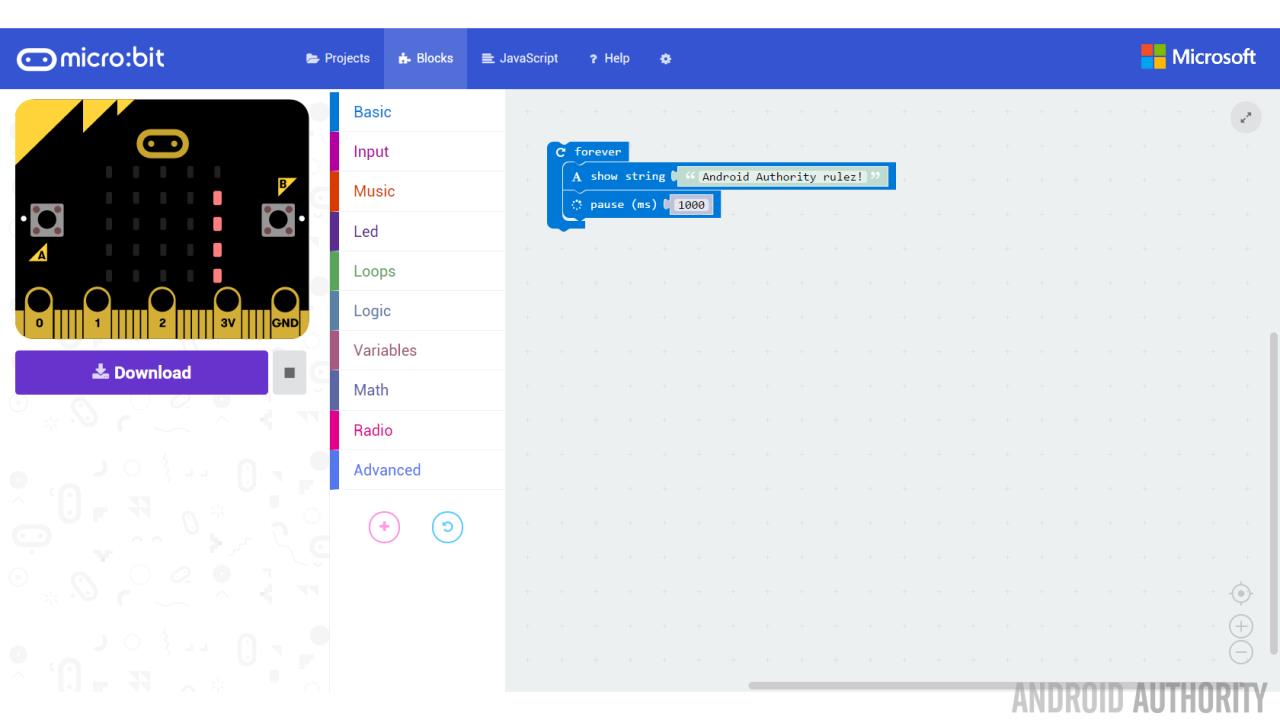
On the left is a micro:bit emulator which demonstrates how the program will run on a real micro:bit. On the right is the program. There is a forever loop with two blocks inside of it. The first tells the micro:bit to scroll the message “Android Authority rulez!” and the second tells the micro:bit to pause for 1 second after the message has finished. Then the program will loop back and do it all again.
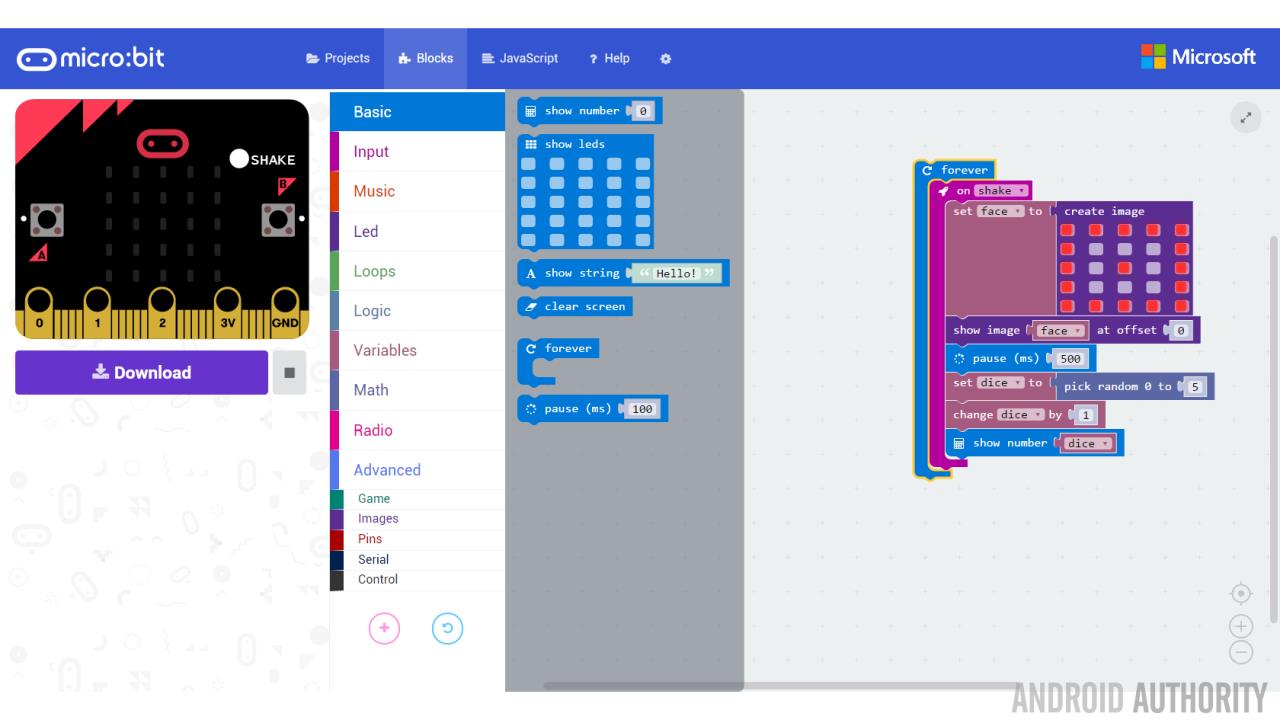
To add a new block you click on one of the menu items in the middle and then drag the desired block from the palette. The program in the screenshot above is for a very simple dice program (or should I say “die” as it is singular) that will display a random number between 1 and 6 when someone shakes the micro:bit.
There are blocks for controlling the LED matrix including showing strings, numbers and user-defined images. There are also blocks for reading the inputs like the compass and the accelerometer, plus blocks for all the normal programming stuff like conditions, loops, variables and simple arithmetic. On top of all that there are also blocks for controlling the input/output pins and even a way to do peer-to-peer communications using Bluetooth.
When you plug the micro:bit into your PC it will appear as a USB flash drive, called “MICROBIT.” To flash a blocks program onto the micro:bit you hit the download button and then drag-and-drop the resulting “.hex” file onto the MICROBIT drive. The micro:bit will automatically start the flashing process and then reboot when completed.
JavaScript
Microsoft’s micro:bit PXT also doubles as a Javascript editor. All block programs can be shown as JavaScript, in fact the block editor is just a front end to a JavaScript generator. If you modify the JavaScript the IDE will attempt to convert it back to blocks, however if it is too complex it won’t work and you need to continue in JavaScript only.
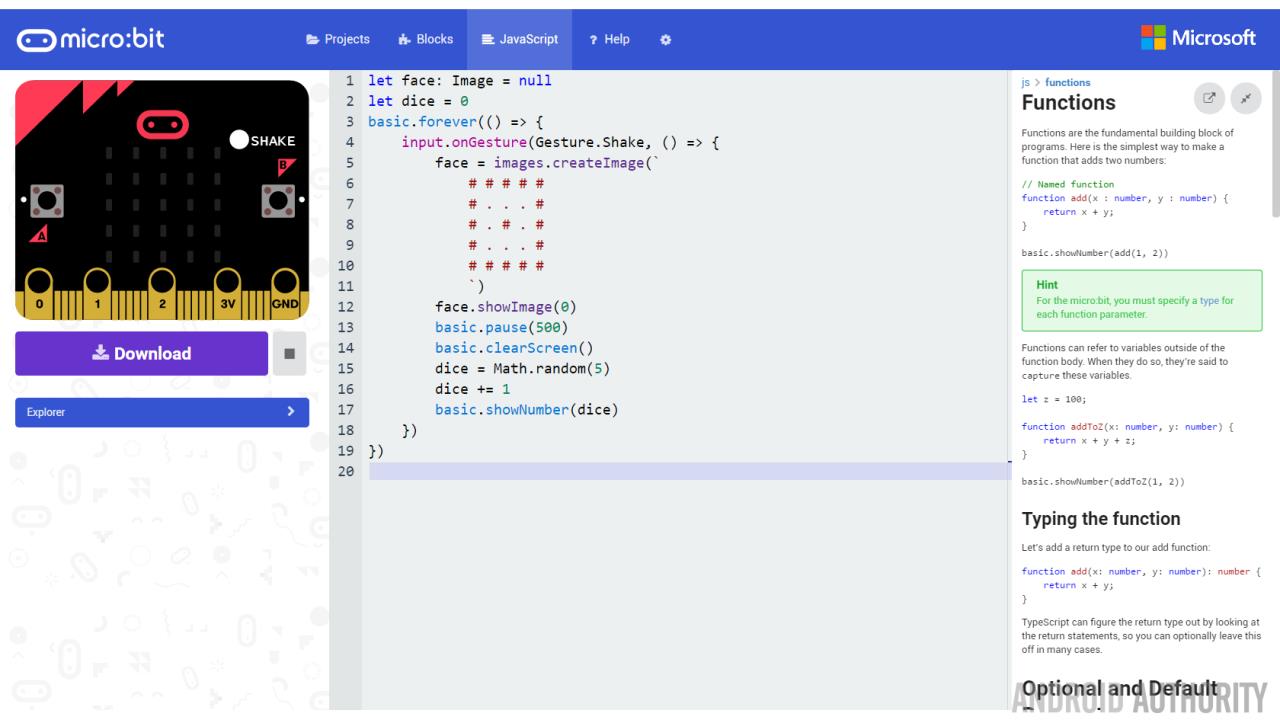
What this means is that if you are familiar with JavaScript, maybe because you have done some web development or maybe because you have used some of the popular JavaScript frameworks, then you can jump straight into micro:bit programming with little effort. It also means that if you have little or no programming skills then you can start to learn JavaScript using the micro:bit and you can use the blocks editor to help you get started. In either case it is a win-win situation!
Microsoft’s PXT editor isn’t the only way to write JavaScript for the micro:bit, you can also use the Code Kingdoms editor. Similar to Microsoft’s offering you can use blocks and JavaScript and switch between the two.
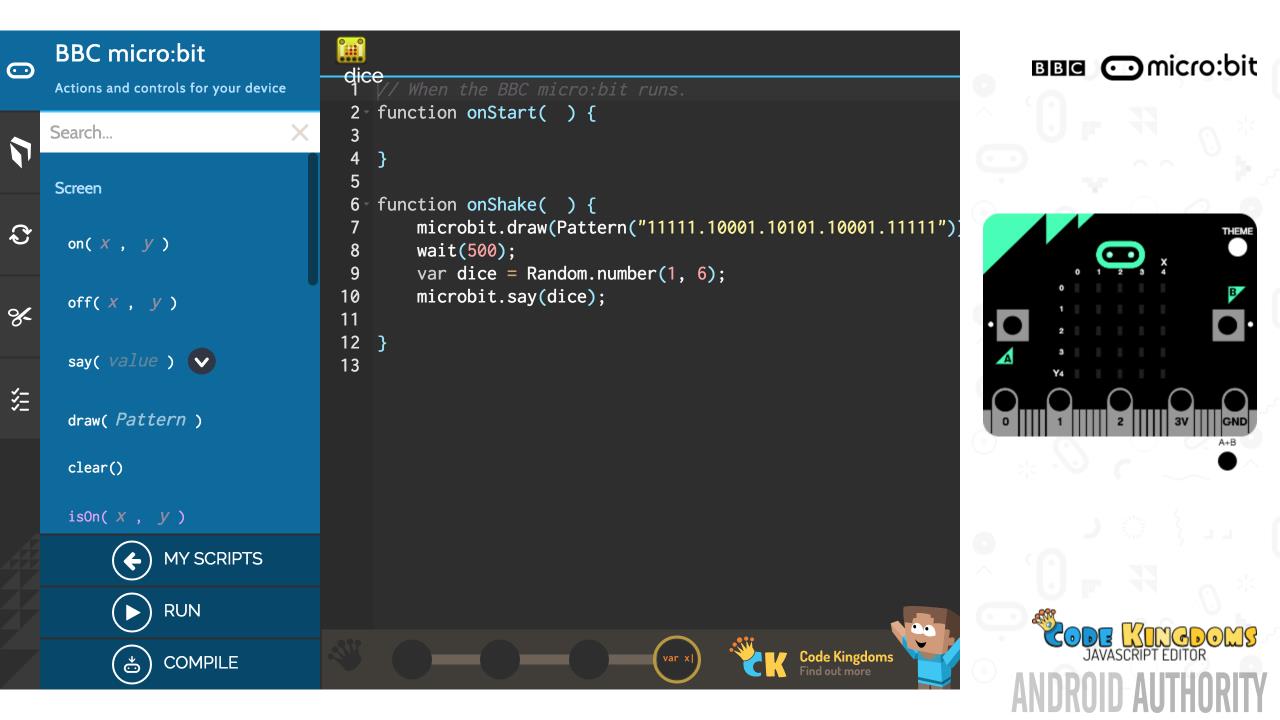
The only problem with the JavaScript approach is that the frameworks used by the two editors aren’t compatible. For example, to pause for 0.5 seconds under PXT you would use basic.pause(500) but under Code Kingdom’s IDE you need to use wait(500). The same thing applies to all the API calls related to the micro:bit including controlling the LED matrix, reading the button inputs, picking random numbers and even how to respond to events like shake.
This incompatibility will certainly be confusing to anyone just starting out and could cause frustration if an inexperienced user tries to switch from one environment to the other.
MicroPython
Python is a very popular high-level programming language that is often used to teach programming as it is simpler than languages like C and C++. MicroPython is a lean version of Python specifically designed to run on microcontrollers (like the ARM Cortex-M0 on the micro:bit).
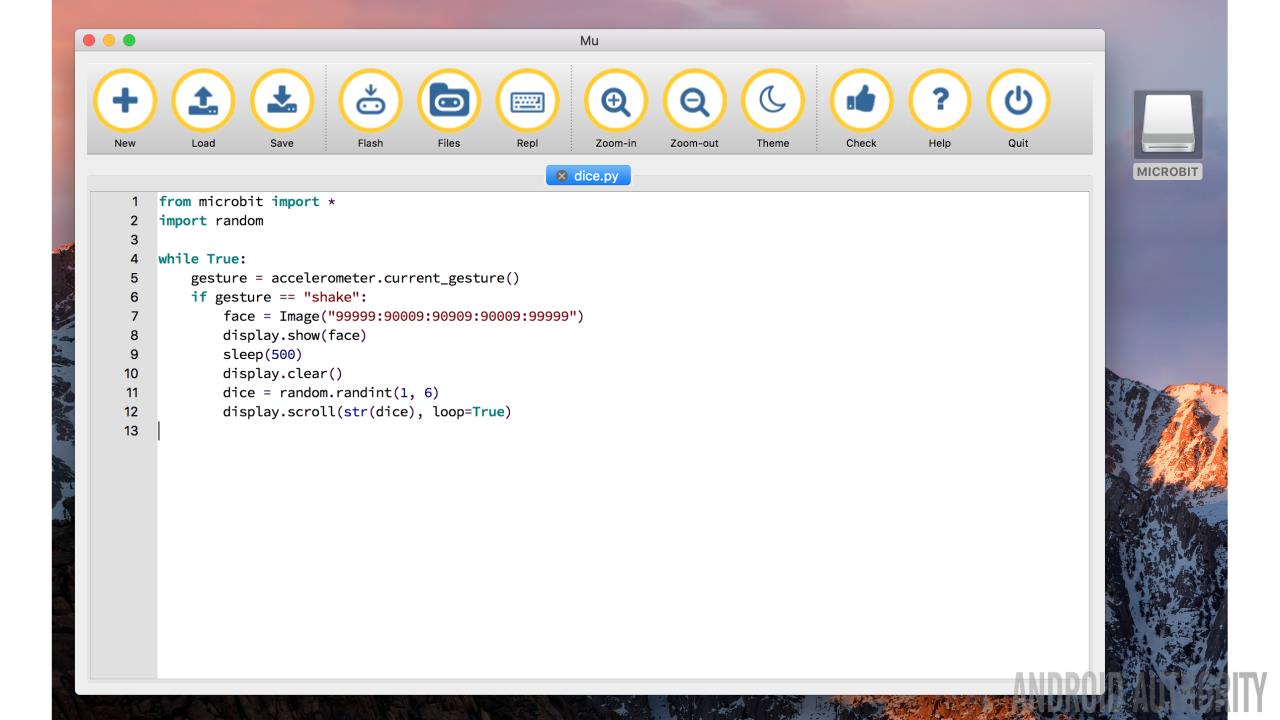
There are several ways to code in Python on the micro:bit. One is to use the web-based IDE on the official micro:bit website, another is to use an offline editor like Mu. Mu is itself written in Python and works on Windows, OS X, Linux and Raspberry Pi. It is designed specifically for the micro:bit and also includes a built-in flash tool. Like the blocks editors and the JavaScript implementations, MicroPython for the micro:bit includes an API for controlling the hardware like the LED matrix and reading the inputs like the buttons.
C
mbed OS is ARM’s open source microcontroller development platform. It allows developers to build microcontroller based solutions using C and C++. The platform also includes everything you need to build IoT products and has a full networking stack along with support for Bluetooth. The micro:bit is in fact a mbed OS product, so while it is designed to be used by the higher level programming languages like JavaScript and Python, you can in fact program it via mbed in C and C++.
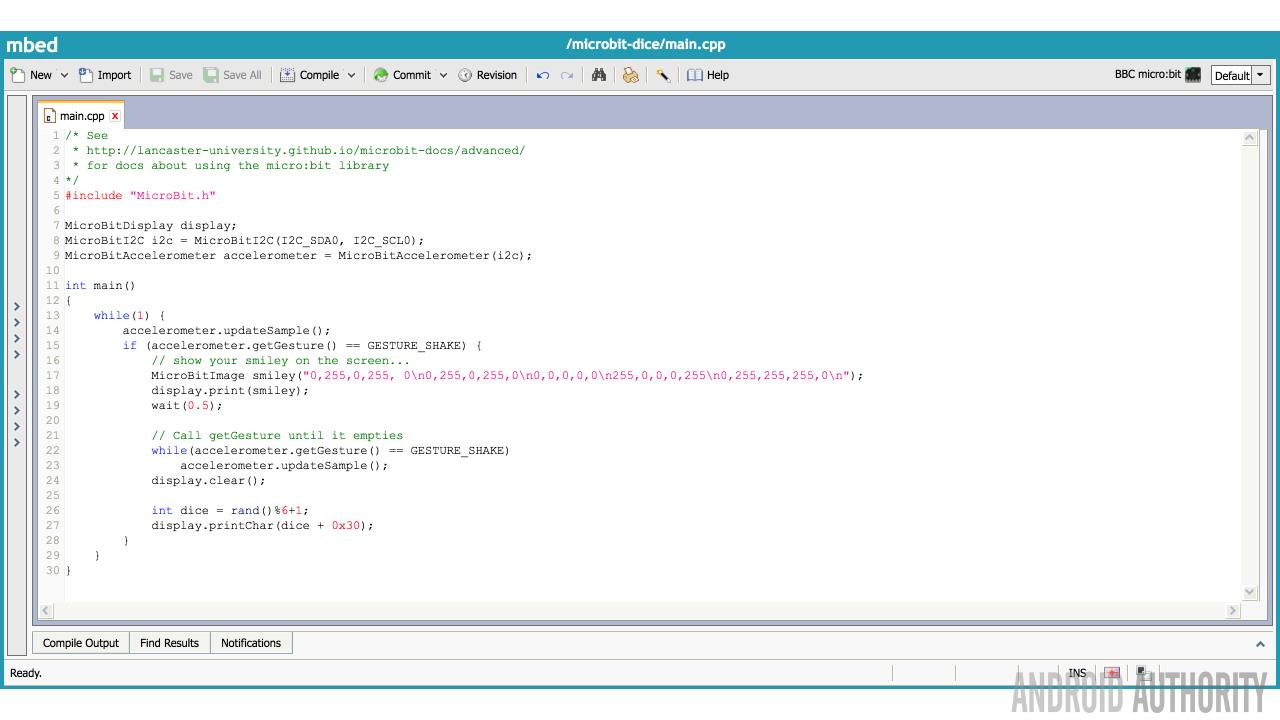
The screenshot above shows how to write the dice program in C++. As you can see it is a little longer than say the JavaScript version as you need to do more setup and handle things at a slightly lower level. This probably isn’t the best place for beginners to learn about the micro:bit. However if you have some C/C++ experience then this is a great way to explore the nitty-gritty of the platform.
Wrap-up
There is no doubt that the micro:bit is a excellent learning tool. It takes a different approach than the Raspberry Pi (which is also an excellent way to get into programming) since it doesn’t need a keyboard, mouse or monitor to use it. However you will need access to a PC for the coding and flashing. Well, actually that isn’t strictly true. It is possible to program the micro:bit from a smartphone or tablet. There are micro:bit apps available for Android and iOS. These apps basically take the place of the PC for the flashing process, which is done over Bluetooth rather than over a USB cable. However the programming environment offered within the app are actually just links to the online web environments.
The aim of the micro:bit is to encourage creativity in terms of software and hardware among young people and it certainly does just that. My kids are keen to play around with the micro:bit (now that the review is done) and I think that because the LED matrix is simpler to program than say sprites in a game on something like the Raspberry Pi then entry point is lower (which is a good thing).
If you are thinking about getting a young person a present which might actually be educational rather than just provide amusement, then you should certainly think about the micro:bit.