Affiliate links on Android Authority may earn us a commission. Learn more.
Create Location-Aware Android Apps with Google Maps
Published onNovember 25, 2016
Not too long ago, if you were traveling to a new or unfamiliar place then you had to bring a physical map along with you, or at the very least do some research beforehand and be prepared to ask for directions if you ended up getting lost.
Maps on mobile devices mean that getting lost is rapidly becoming a thing of the past, as not only does your typical smartphone put a map of the entire world at your fingertips, but it can also track and display your current location, so you can always see exactly where you are on that map.
Adding a map to your latest Android app project has the potential to greatly improve the user experience – whether you’re creating a Gallery app that lets the user see exactly where each photo was taken; an exercise app that displays the route you took on your morning run, or a memo app that lets users write themselves reminders that pop up automatically as soon as they reach a specific location.
In this article, I’ll show you how to use the Google Maps API to add maps to your Android applications. These maps are based on Google Maps data, and will have the same appearance and much of the same functionality as the maps you encounter in the official Google Maps for Mobile app.
We’ll start by using Android Studio’s built-in Google Maps template to quickly generate an application that displays a map, before adding localisation awareness so this app is able to track and display the user’s current location.
Create your project
The Google Maps Android API is distributed as part of the Google Play Services SDK, so the first thing you should do is launch your SDK Manager and make sure you have the latest version of Google Play Services installed – if an update is available, then now’s the time to install it.
Next, create an Android Studio project with the settings of your choice, but when you reach the ‘Add an Activity to mobile’ screen, make sure you select ‘Google Maps Activity.’
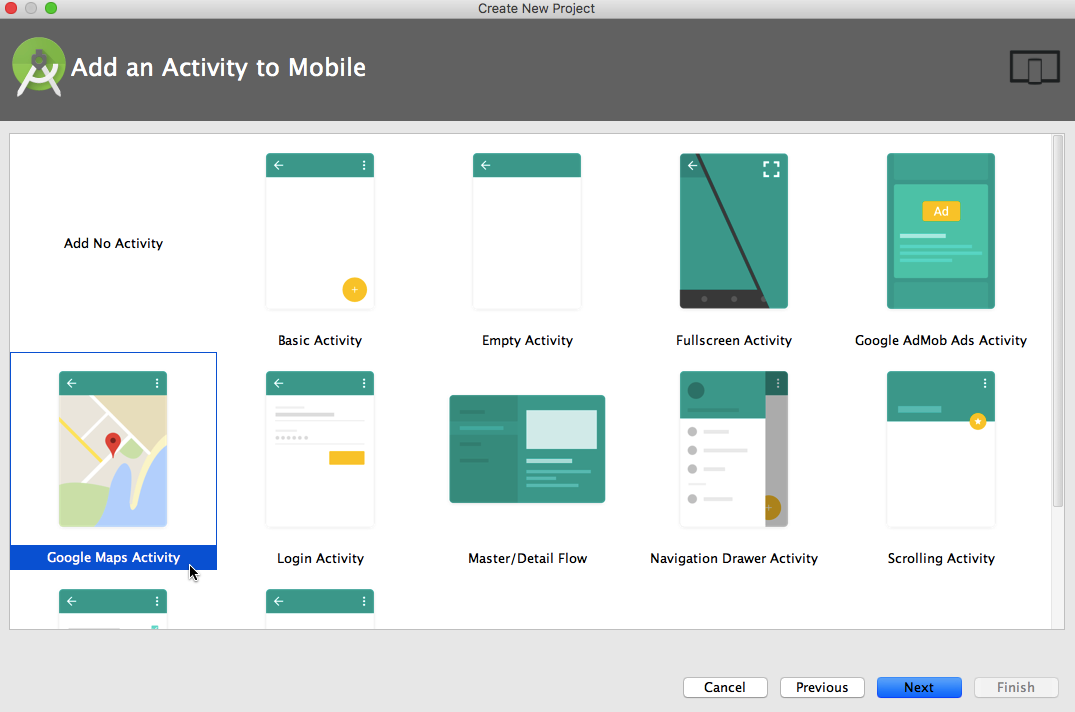
The benefit of using this template, is that most of the code needed to display a map gets generated automatically – you’ll only need to make a few tweaks and you’ll have an app that’s capable of displaying Google Maps data.
Before we make these changes, let’s take a closer look at this automatically-generated code, as it provides a pretty good example of how you should go about adding maps to your Android applications.
Let’s start with our project’s res/layout/activity_maps.xml file. Open this file and you’ll see that the map element is inserted into your layout via a MapFragment.
MapFragment functions much like your typical fragment – it represents a portion of your user interface, and you can combine it with other layouts to create a multi-pane layout. However, in addition to acting as a container for your map, MapFragment automatically handles all of your map’s lifecycle needs, making it one of the easiest ways of inserting a map into your application.
Your automatically-generated activity_maps.xml code should look something like this:
<fragment xmlns:android="http://schemas.android.com/apk/res/android"
xmlns:map="http://schemas.android.com/apk/res-auto"
xmlns:tools="http://schemas.android.com/tools"
android:id="@+id/map"

// If Android is going to recognize this fragment as a MapFragment, then you must set the
// fragment’s android:name attribute to "com.google.android.gms.maps.MapFragment”//

android:name="com.google.android.gms.maps.SupportMapFragment"
android:layout_width="match_parent"
android:layout_height="match_parent"
tools:context="com.jessicathornsby.myapplication.MapsActivity" />
Declaring your MapFragment via XML may be the most straightforward solution (and it’s the approach I’ll be using throughout this tutorial) but if you need to, you can add a MapFragment programmatically, by creating a MapFragment instance and then adding it to the current Activity, using FragmentTransaction.add:
mMapFragment = MapFragment.newInstance();
FragmentTransaction fragmentTransaction =
        getFragmentManager().beginTransaction();
fragmentTransaction.add(R.id.my_container, mMapFragment);
fragmentTransaction.commit();
The other automatically-generated file that’s worth exploring in detail, is your project’s MapsActivity.java file:
import android.support.v4.app.FragmentActivity;
import android.os.Bundle;
import com.google.android.gms.maps.CameraUpdateFactory;
import com.google.android.gms.maps.GoogleMap;
import com.google.android.gms.maps.OnMapReadyCallback;
import com.google.android.gms.maps.SupportMapFragment;
import com.google.android.gms.maps.model.LatLng;
import com.google.android.gms.maps.model.MarkerOptions;

// Since we’re adding our map via a fragment, this Activity needs to extend FragmentActivity.
// You’ll also notice that your project is implementing onMapReadyCallback, which gets
// triggered when the map is ready to use//

public class MapsActivity extends FragmentActivity implements OnMapReadyCallback {
// GoogleMap is the main class of the Maps API and is responsible for handling important
// operations such as connecting to the Google Maps service, downloading map tiles,
// and responding to user interactions//
private GoogleMap mMap;

@Override
protected void onCreate(Bundle savedInstanceState) {
    super.onCreate(savedInstanceState);
    setContentView(R.layout.activity_maps);

    // Obtain the map from the SupportMapFragment//
    SupportMapFragment mapFragment = (SupportMapFragment) getSupportFragmentManager()

    // Call FragmentManager.findFragmentById() and pass it the ID of the UI element where
    // you want to display your map, in this example that’s ‘map’//
    .findFragmentById(R.id.map);

    // You can’t instantiate a GoogleMap object directly, but you can use getMapAsync to set a
    // callback that’s triggered once the GoogleMap instance is ready to use//
      mapFragment.getMapAsync(this);
    }

@Override
// Set an instance of OnMapReadyCallback on your MapFragment. If the user doesn’t have
// Google Play Services installed,then at this point they’ll be prompted to install it
public void onMapReady(GoogleMap googleMap) {
    mMap = googleMap;

    // This sample app cannot access the user’s location, but it does emulate this functionality
    // by displaying a ‘you are here’-style marker that’s hard-coded to appear at Sydney,
    // Australia. Here, we’re defining the latitude and longitude coordinates this marker will
    // use
    LatLng sydney = new LatLng(-34, 151);

    // Add a marker to the map at the ‘Sydney’ coordinates. Unless you specify otherwise,
    // Android uses Google Maps’ standard marker icon, but you can customize this icon by
    // changing its colour, image or anchor point, if required.
    mMap.addMarker(new MarkerOptions().position(sydney).title("Marker in Sydney"));

    // Use CameraUpdate to move the map’s ‘camera’ to the user's current location - in this
    // example,that’s the hard-coded Sydney coordinates. When you’re creating your own apps,
    // you may want to tweak this line to animate the camera’s movements, which typically
    // provides a better user experience. To animate the camera, replace GoogleMap.moveCamera
    // with GoogleMap.animateCamera//
    mMap.moveCamera(CameraUpdateFactory.newLatLng(sydney));
    }
}
As already mentioned, Android Studio does a lot of the hard work for you, but in its current state this project isn’t quite capable of displaying Google Maps data. You still need to make a few tweaks to your code and acquire a Google Maps API key – which we’re going to cover in the next few sections.
Updating Project Dependencies
The first change you need to make, is declaring Google Maps and Google Location APIs as project dependencies. Open your project’s module-level build.gradle file and you’ll see that Android Studio has already added the Google Play Services SDK to the dependencies section:
apply plugin: 'com.android.application'
   ...
   dependencies {
       compile 'com.google.android.gms:play-services:9.8.0'
   }
The problem is that this will compile the entire package of Google Play Services APIs, which can make it more difficult to keep the number of methods in your app under control. Unless you plan on using a long list of features from this package, then it makes more sense to compile the specific parts of the Google Play Services API that you’re actually going to use.
For the sake of a more streamlined project, I’m going to remove this general Google Play Services dependency, and specify that my project uses the Google Maps and Location APIs only:
  dependencies {
       compile 'com.google.android.gms:play-services-maps:9.8.0'
       compile 'com.google.android.gms:play-services-location:9.8.0

   }
Note, however you declare your Google Play Services dependencies, you should update their corresponding version numbers every time you download a new version of the Google Play Services SDK.
Get a Google Maps API key
If your project is going to pull data from the Google Maps servers, then it’ll need a Google Maps API key, which you obtain by registering your project with the Google API Console.
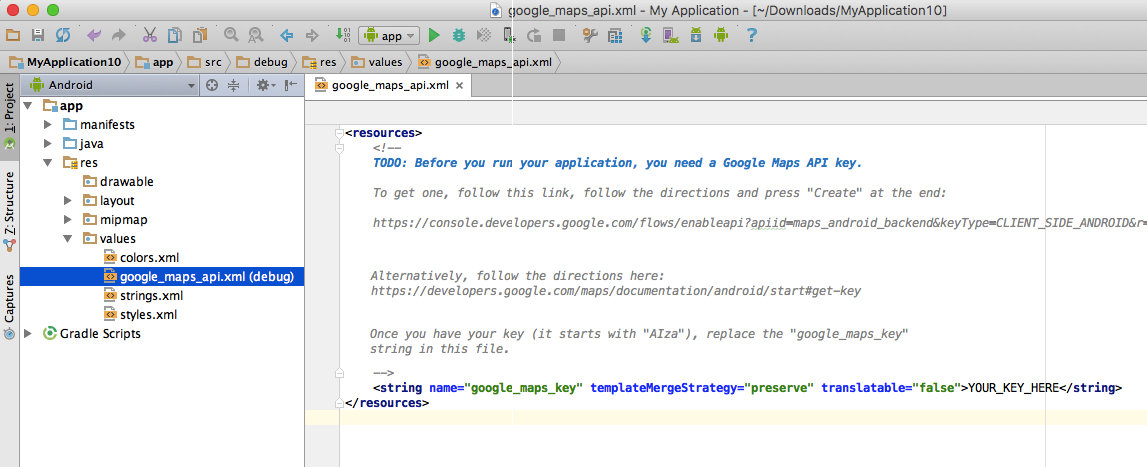
Once again, the ‘Google Maps Activity’ template has done a lot of the hard work for you. This template includes a google_maps_api.xml file that contains a URL you can use to generate a unique Google Maps API key. Although you can log into the Google API Console independently and generate API keys outside of this template, the benefit of using this URL is that most of the information about your project is already entered for you. In the interests of saving time, this is the method I’m going to use to generate my API key:
- Open your project’s res/values/google_maps_api.xml file.
- Copy the URL inside this file, and paste it into your web browser. This will take you directly to the Google API Console.
- Make sure ‘Create a project’ is selected from the dropdown menu, then click ‘Continue.’
- Check the terms and conditions, and if you’re happy to proceed click ‘Agree and continue.’
- When prompted, click the ‘Create API key’ button.
- At this point, you can choose between generating a generic API key that has no restrictions and can run on any platform, or a restricted API that can run on the specified platform only. Restricted APIs tend to be more secure, so unless you have a very good reason not to, you’ll typically want to generate a restricted API by clicking ‘Restrict key’ from the popup that appears.
- Under the ‘Key restrictions’ section, make sure ‘Android apps’ is selected.
- Click ‘Save.’
- You’ll now be taken to the ‘Credentials’ section of the Google API Console. Find the API key you just created, and copy it.
- Hop back to Android Studio and paste this key into your google_maps_api.xml file, specifically its <string name=”google_maps_key” element.
When you add the API key to your google_maps_api.xml file, Android Studio should automatically copy this key into your project’s Manifest. It’s a good idea to check that this has actually happened, so open your Manifest and make sure the following section is now displaying your unique API key:
 <meta-data
       android:name="com.google.android.geo.API_KEY"
       android:value="YOUR_API_KEY"/>
Updating your Manifest
While you have your project’s Manifest open, let’s make a few more changes to this file. Firstly, you’ll need to specify the version of Google Play Services that you’re using, for example:
<meta-data
   android:name="com.google.android.gms.version"
   android:value="@integer/google_play_services_version" />
If you’re targeting anything earlier than version 8.3 of the Google Play services SDK, then you’ll also need to add the WRITE_EXTERNAL_STORAGE permission:
<uses-permission
       android:name="android.permission.WRITE_EXTERNAL_STORAGE" />
Note, if you’re targeting Google Play Services 8.3 or later, then your app won’t need to explicitly request permission to write to external storage.
Next, since the Google Maps Android API uses OpenGL ES version 2 to render its maps, you should make sure your app won’t wind up on a device that doesn’t support OpenGL ES 2, by declaring android:glEsVersion 2 as a required feature:
<uses-feature android:glEsVersion="0x00020000" android:required="true" />Most apps that include some form of maps functionality also require the following permissions, so save yourself some time and add them to your Manifest now:
<uses-permission android:name="android.permission.ACCESS_NETWORK_STATE" />This permission allows your app to check the device’s network status, which means your app can determine whether it can currently download data from Google Maps.
<uses-permission android:name="android.permission.INTERNET" />This permission gives your app the ability to open network sockets, so it can download data from the Google Maps servers.
Even though this first version of our app won’t display the user’s current location, we’ll be adding this feature shortly, so you should take this opportunity to add one of Android’s location-based permission requests to your Manifest:
<uses-permission android:name="android.permission.ACCESS_COARSE_LOCATION"/>Gives your app the ability to access the user’s approximate location, using the device’s Wi-Fi, mobile cell data, or both.
<uses-permission android:name="android.permission.ACCESS_FINE_LOCATION"/>Gives your app the ability to determine the user’s precise location, using data from all the available location providers, including GPS, WiFi and mobile cell data.
After you’ve made these changes to your project’s Manifest, you’re ready to test your app. Either attach a physical Android device to your development machine or launch a compatible AVD, then select ‘Run’ from the Android Studio toolbar followed by the device you want to use. After a few moments the app should appear onscreen.
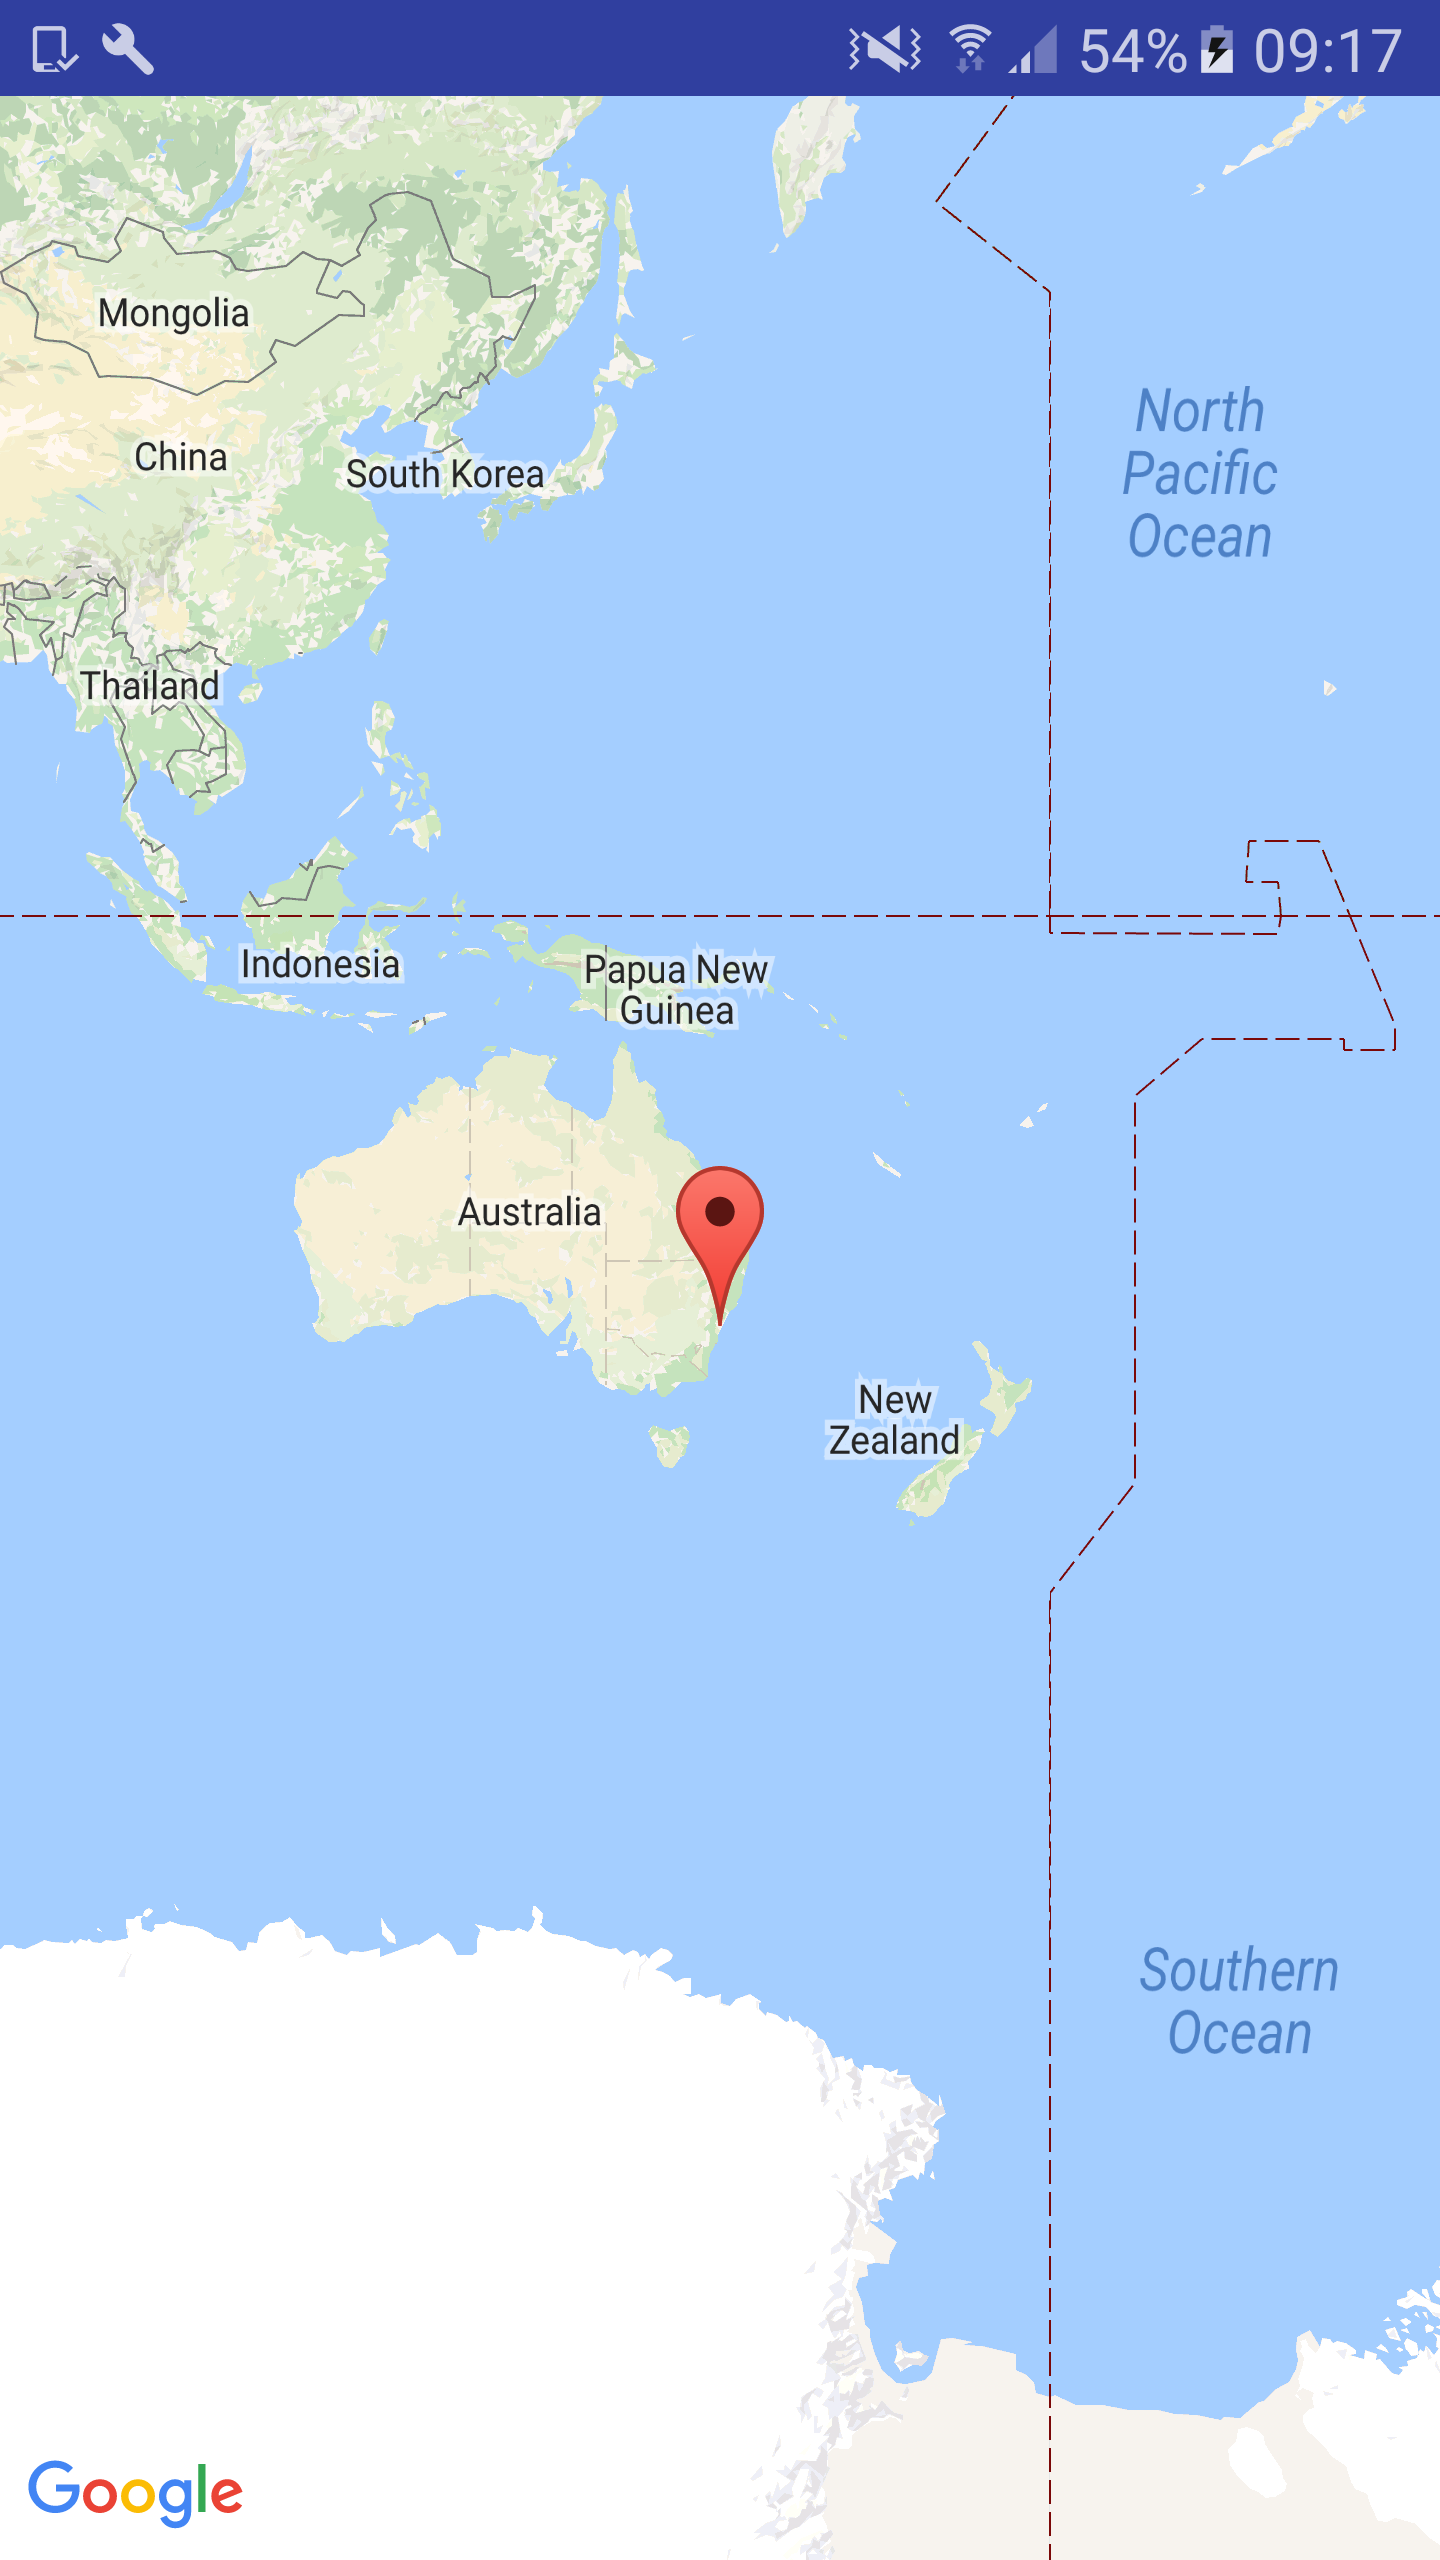
While you can interact with this map by dragging onscreen and pinching to zoom in, in its current state this map doesn’t detect your location. Since a map that has no idea where you are in the world isn’t particularly helpful (especially when compared to other location-aware apps), let’s give this project the ability to detect the user’s current location.
Accessing the user’s location
There’s several ways you can add location awareness to your app, but the easiest method is to use the Google Play Services Location API, which is distributed as part of the Google Play Services SDK.
In the following code, I’m still using the same API key and layout resource file, but I’ve updated my project’s MapsActivity.java file to determine the last known location of the user’s device, which most of the time will be roughly equviliant to the user’s current location:
package com.jessicathornsby.myapplication;
import android.support.v4.app.ActivityCompat;
import android.os.Build;
import android.os.Bundle;
import com.google.android.gms.common.api.GoogleApiClient;
import android.support.v4.content.ContextCompat;
import android.support.v4.app.FragmentActivity;
import com.google.android.gms.maps.GoogleMap;
import com.google.android.gms.maps.OnMapReadyCallback;
import com.google.android.gms.maps.model.Marker;
import com.google.android.gms.maps.SupportMapFragment;
import android.content.pm.PackageManager;
import android.location.Location;
import com.google.android.gms.location.LocationListener;
import com.google.android.gms.location.LocationRequest;
import com.google.android.gms.location.LocationServices;

// Since it’s the easiest way of adding a map to your project, I’m going to stick with using
// a MapFragment//

public class MapsActivity extends FragmentActivity implements OnMapReadyCallback,
GoogleApiClient.ConnectionCallbacks, LocationListener {
 private GoogleMap mMap;
 GoogleApiClient mGoogleApiClient;
 Marker mLocationMarker;
 Location mLastLocation;
 LocationRequest mLocationRequest;


 @Override   protected void onCreate(Bundle savedInstanceState) {
  super.onCreate(savedInstanceState);
  setContentView(R.layout.activity_maps);


  if (Build.VERSION.SDK_INT & gt; = Build.VERSION_CODES.M) {
   checkLocationPermission();
  }


  SupportMapFragment mapFragment =
           (SupportMapFragment) getSupportFragmentManager(.findFragmentById(R.id.map);
  mapFragment.getMapAsync(this);
 }

 public static final int MY_PERMISSIONS_REQUEST_LOCATION = 1;

 public boolean checkLocationPermission() {
  // In Android 6.0 and higher you need to request permissions at runtime, and the user has
  // the ability to grant or deny each permission. Users can also revoke a previously-granted
  // permission at any time, so your app must always check that it has access to each
  // permission, before trying to perform actions that require that permission. Here, we’re using
  // ContextCompat.checkSelfPermission to check whether this app currently has the
  // ACCESS_COARSE_LOCATION permission

  if (ContextCompat.checkSelfPermission(this,
             android.Manifest.permission.ACCESS_COARSE_LOCATION)
   // If your app does have access to COARSE_LOCATION, then this method will return
   // PackageManager.PERMISSION_GRANTED//
                  != PackageManager.PERMISSION_GRANTED) {
   if (ActivityCompat.shouldShowRequestPermissionRationale(this,
                   android.Manifest.permission.ACCESS_COARSE_LOCATION)) {
    // If your app doesn’t have this permission, then you’ll need to request it by calling
    // the ActivityCompat.requestPermissions method//
    requestPermissions(new String[] {
      android.Manifest.permission.ACCESS_COARSE_LOCATION
     },
     MY_PERMISSIONS_REQUEST_LOCATION);
   } else {
    // Request the permission by launching Android’s standard permissions dialog.
    // If you want to provide any additional information, such as why your app requires this
    // particular permission, then you’ll need to add this information before calling
    // requestPermission //
    requestPermissions(new String[] {
      android.Manifest.permission.ACCESS_COARSE_LOCATION
     },
     MY_PERMISSIONS_REQUEST_LOCATION);
   }
   return false;
  } else {
   return true;
  }
 }

 @Override
 protected void onResume() {
  super.onResume();
 }

 @Override
 protected void onPause() {
  super.onPause();
 }

 @Override
 public void onMapReady(GoogleMap googleMap) {
  mMap = googleMap;
  // Specify what kind of map you want to display. In this example I’m sticking with the
  // classic, “Normal” map

  mMap.setMapType(GoogleMap.MAP_TYPE_NORMAL);


  if (Build.VERSION.SDK_INT & gt; = Build.VERSION_CODES.M) {
   if (ContextCompat.checkSelfPermission(this,
                   android.Manifest.permission.ACCESS_COARSE_LOCATION)
                   == PackageManager.PERMISSION_GRANTED) {
    buildGoogleApiClient();
    // Although the user’s location will update automatically on a regular basis, you can also
    // give your users a way of triggering a location update manually. Here, we’re adding a
    // ‘My Location’ button to the upper-right corner of our app; when the user taps this button,
    // the camera will update and center on the user’s current location//

    mMap.setMyLocationEnabled(true);
   }
  }
  else {
   buildGoogleApiClient();
   mMap.setMyLocationEnabled(true);
  }
 }
 protected synchronized void buildGoogleApiClient() {
  // Use the GoogleApiClient.Builder class to create an instance of the
  // Google Play Services API client//
  mGoogleApiClient = new GoogleApiClient.Builder(this)
              .addConnectionCallbacks(this)
              .addApi(LocationServices.API)
              .build();

  // Connect to Google Play Services, by calling the connect() method//
  mGoogleApiClient.connect();
 }

 @Override
 // If the connect request is completed successfully, the onConnected(Bundle) method
 // will be invoked and any queued items will be executed//
 public void onConnected(Bundle bundle) {
  mLocationRequest = new LocationRequest();
  mLocationRequest.setInterval(2000);
  if (ContextCompat.checkSelfPermission(this,
               android.Manifest.permission.ACCESS_COARSE_LOCATION)
              == PackageManager.PERMISSION_GRANTED) {
   // Retrieve the user’s last known location//
   LocationServices.FusedLocationApi.requestLocationUpdates(mGoogleApiClient,
                                                     mLocationRequest, this);
  }
 }

 @Override
 public void onConnectionSuspended(int i) {
 }

 // Displaying multiple ‘current location’ markers is only going to confuse your users!
 // To make sure there’s only ever one marker onscreen at a time, I’m using
 // mLocationMarker.remove to clear all markers whenever the user’s location changes.

 @Override
 public void onLocationChanged(Location location) {
  mLastLocation = location;
  if (mLocationMarker != null) {
   mLocationMarker.remove();
  }

  // To help preserve the device’s battery life, you’ll typically want to use
  // removeLocationUpdates to suspend location updates when your app is no longer
  // visible onscreen//
  if (mGoogleApiClient != null) {
   LocationServices.FusedLocationApi.removeLocationUpdates(mGoogleApiClient, this);
  }
 }

 // Once the user has granted or denied your permission request, the Activity’s
 // onRequestPermissionsResult method will be called, and the system will pass
 // the results of the ‘grant permission’ dialog, as an int//

 @Override
 public void onRequestPermissionsResult(int requestCode,
  String permissions[], int[] grantResults) {
  switch (requestCode) {
   case MY_PERMISSIONS_REQUEST_LOCATION:
    {

     // If the request is cancelled, the result array will be empty (0)//
     if (grantResults.length > 0 && grantResults[0] == PackageManager.PERMISSION_GRANTED) {

      // If the user has granted your permission request, then your app can now perform all its
      // location-related tasks, including displaying the user’s location on the map//
      if (ContextCompat.checkSelfPermission(this,
        android.Manifest.permission.ACCESS_COARSE_LOCATION)
                      == PackageManager.PERMISSION_GRANTED) {
       if (mGoogleApiClient == null) {
        buildGoogleApiClient();
       }
       mMap.setMyLocationEnabled(true);
      }
     } else {
      // If the user has denied your permission request, then at this point you may want to
      // disable any functionality that depends on this permission//
     }
     return;
    }
  }
 }
}
Now it’s time to test your app by installing it on your Android device or a compatible AVD. Launch your app, and it should request access to your device’s location.
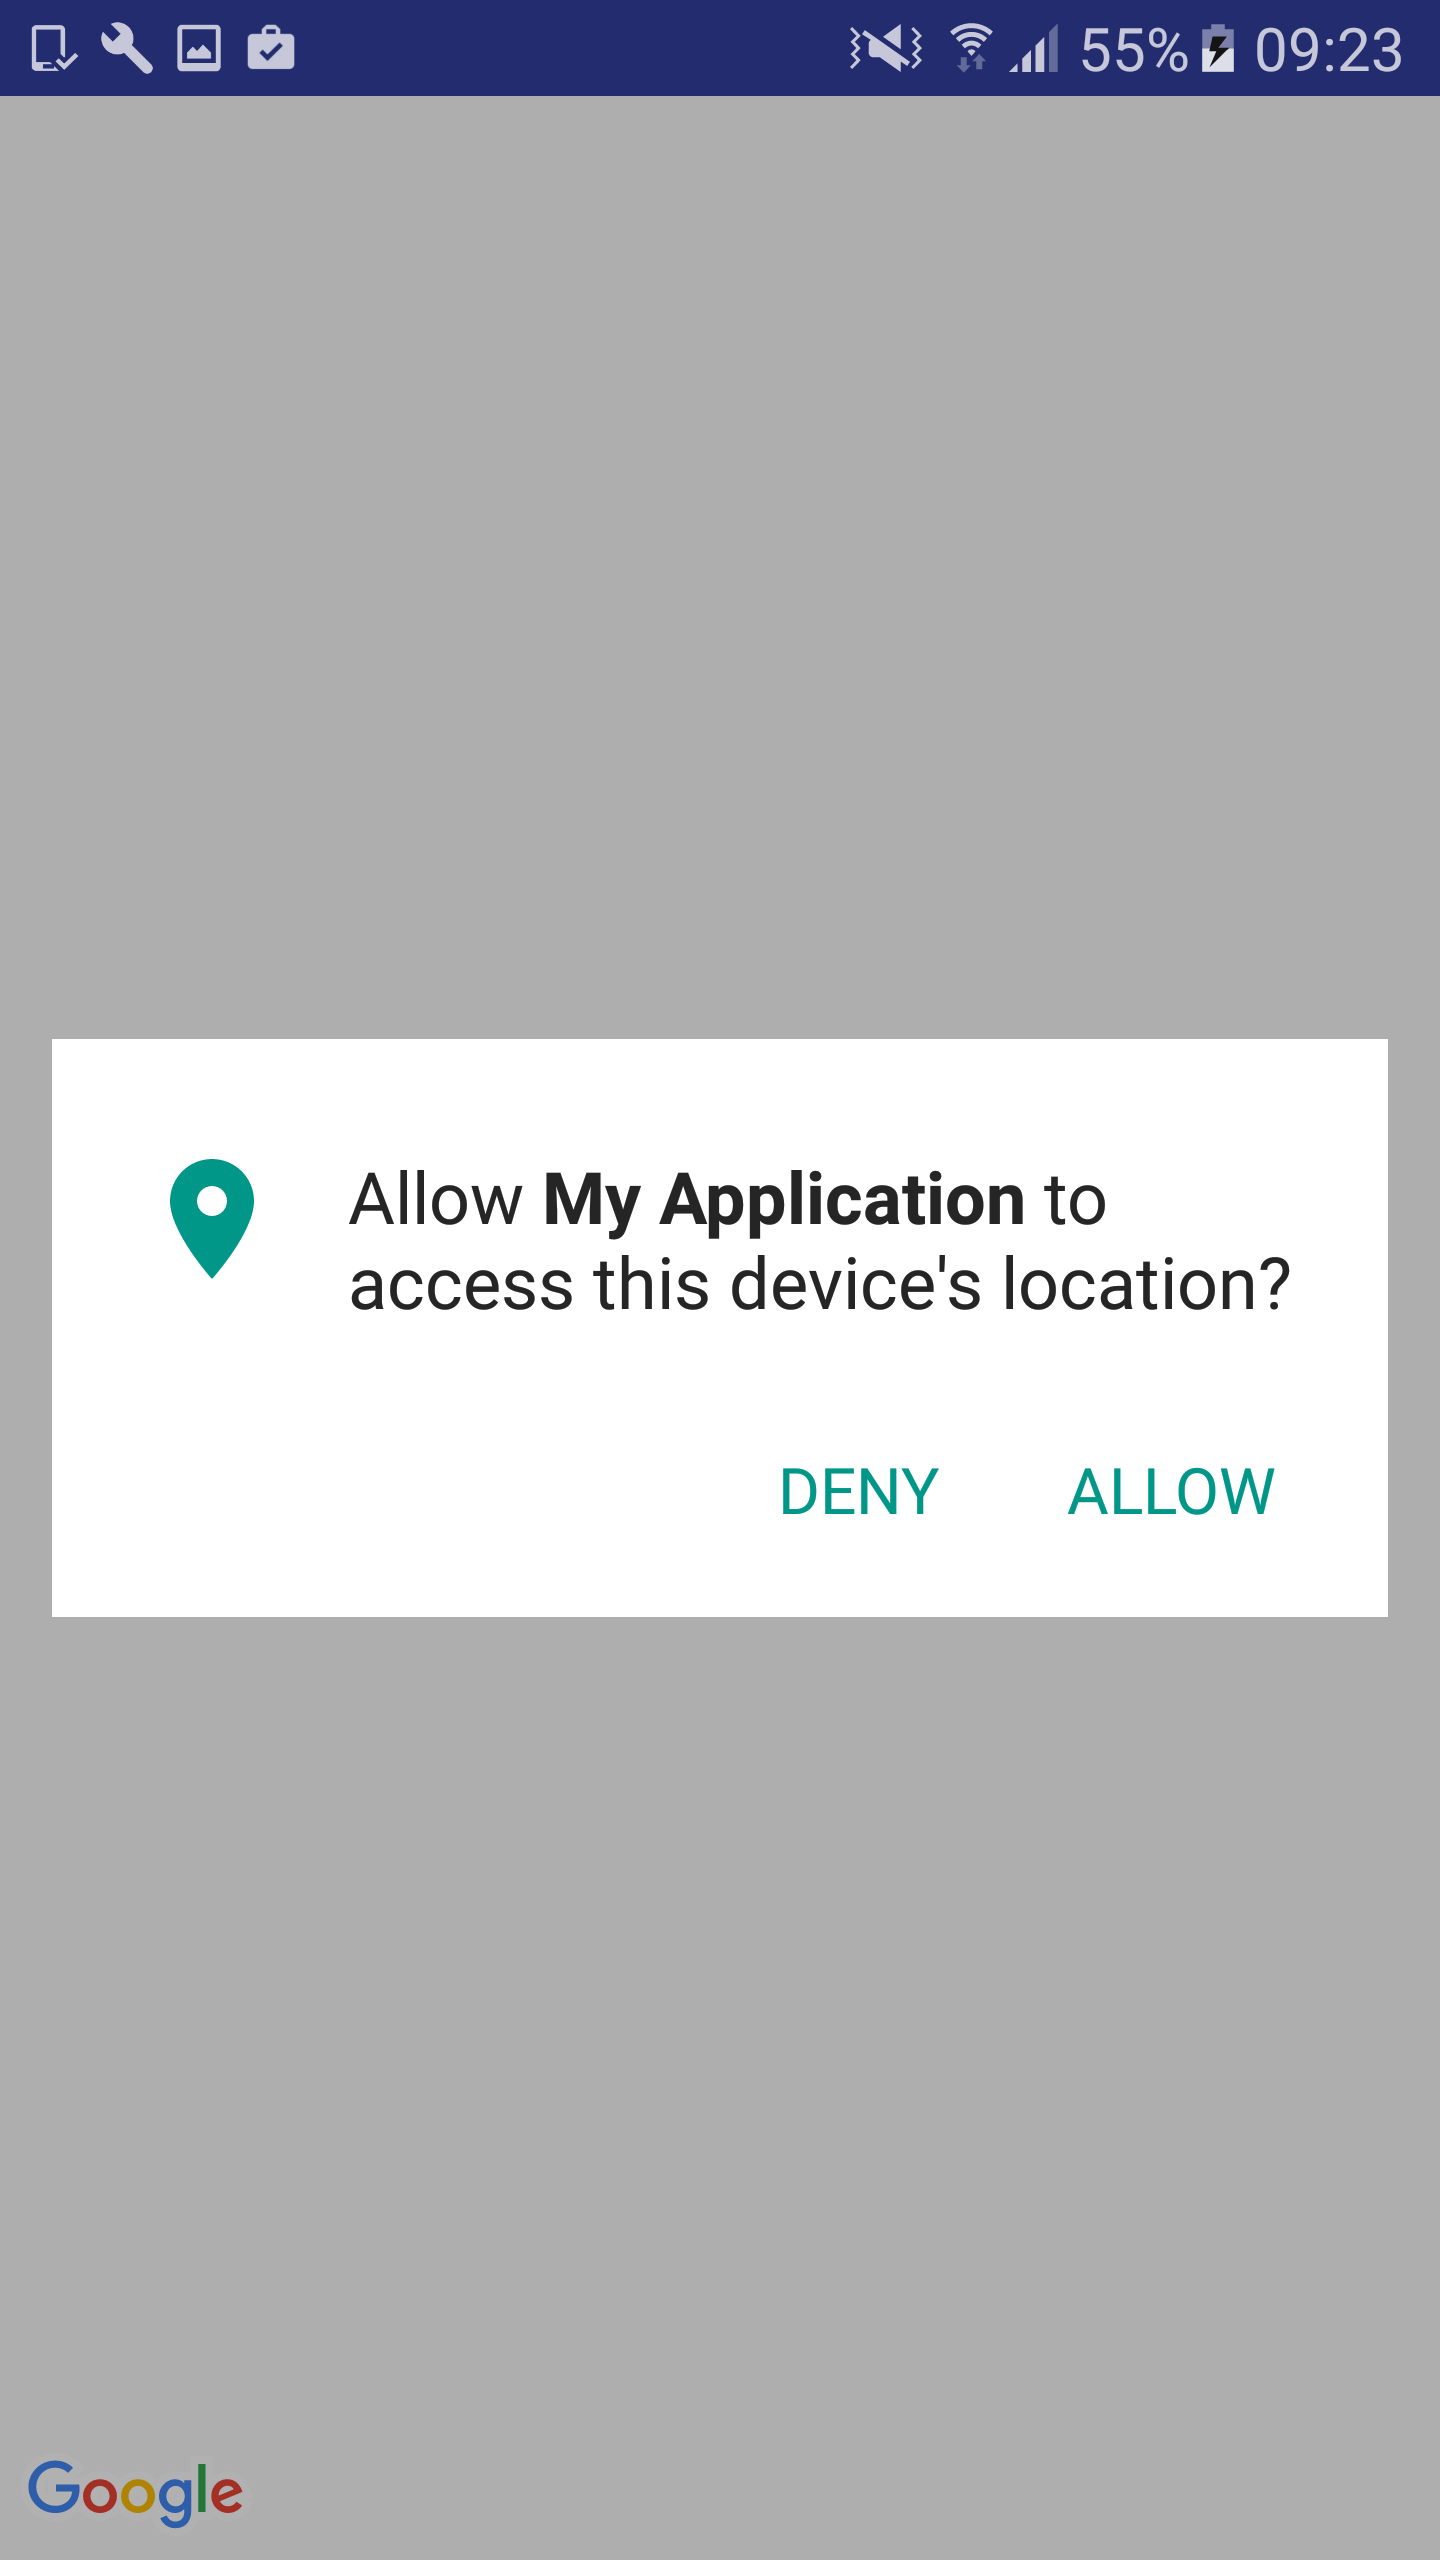
Grant this permission request and you should see the map – but this time it’ll be centered over your current location, complete with an accurate location marker.
Other map types
In this example, we set the map type to “normal,” however if you don’t like the look of the map that appears on your Android device, then you can always change it to any of the other maps supported by the Google Maps API:
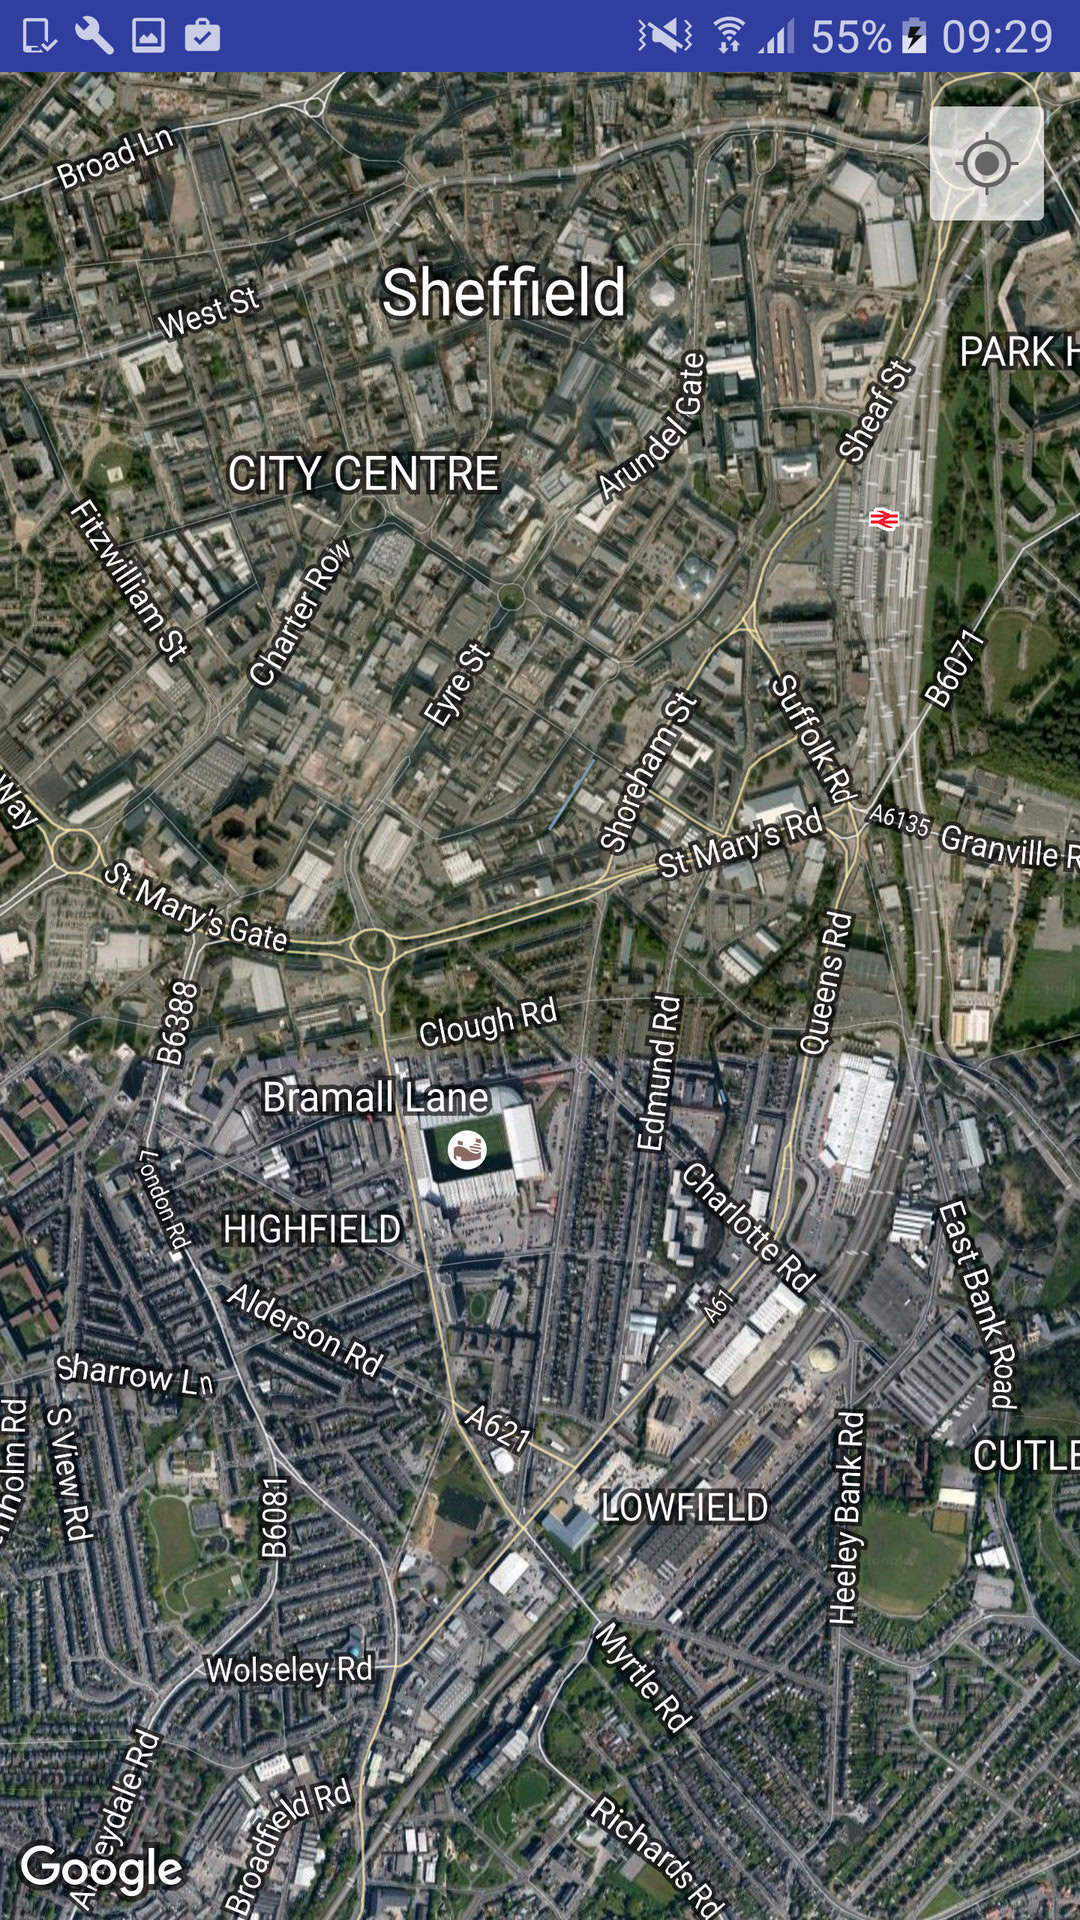
- MAP_TYPE_HYBRID. A satellite map with a transparent layer displaying major roads and feature labels.
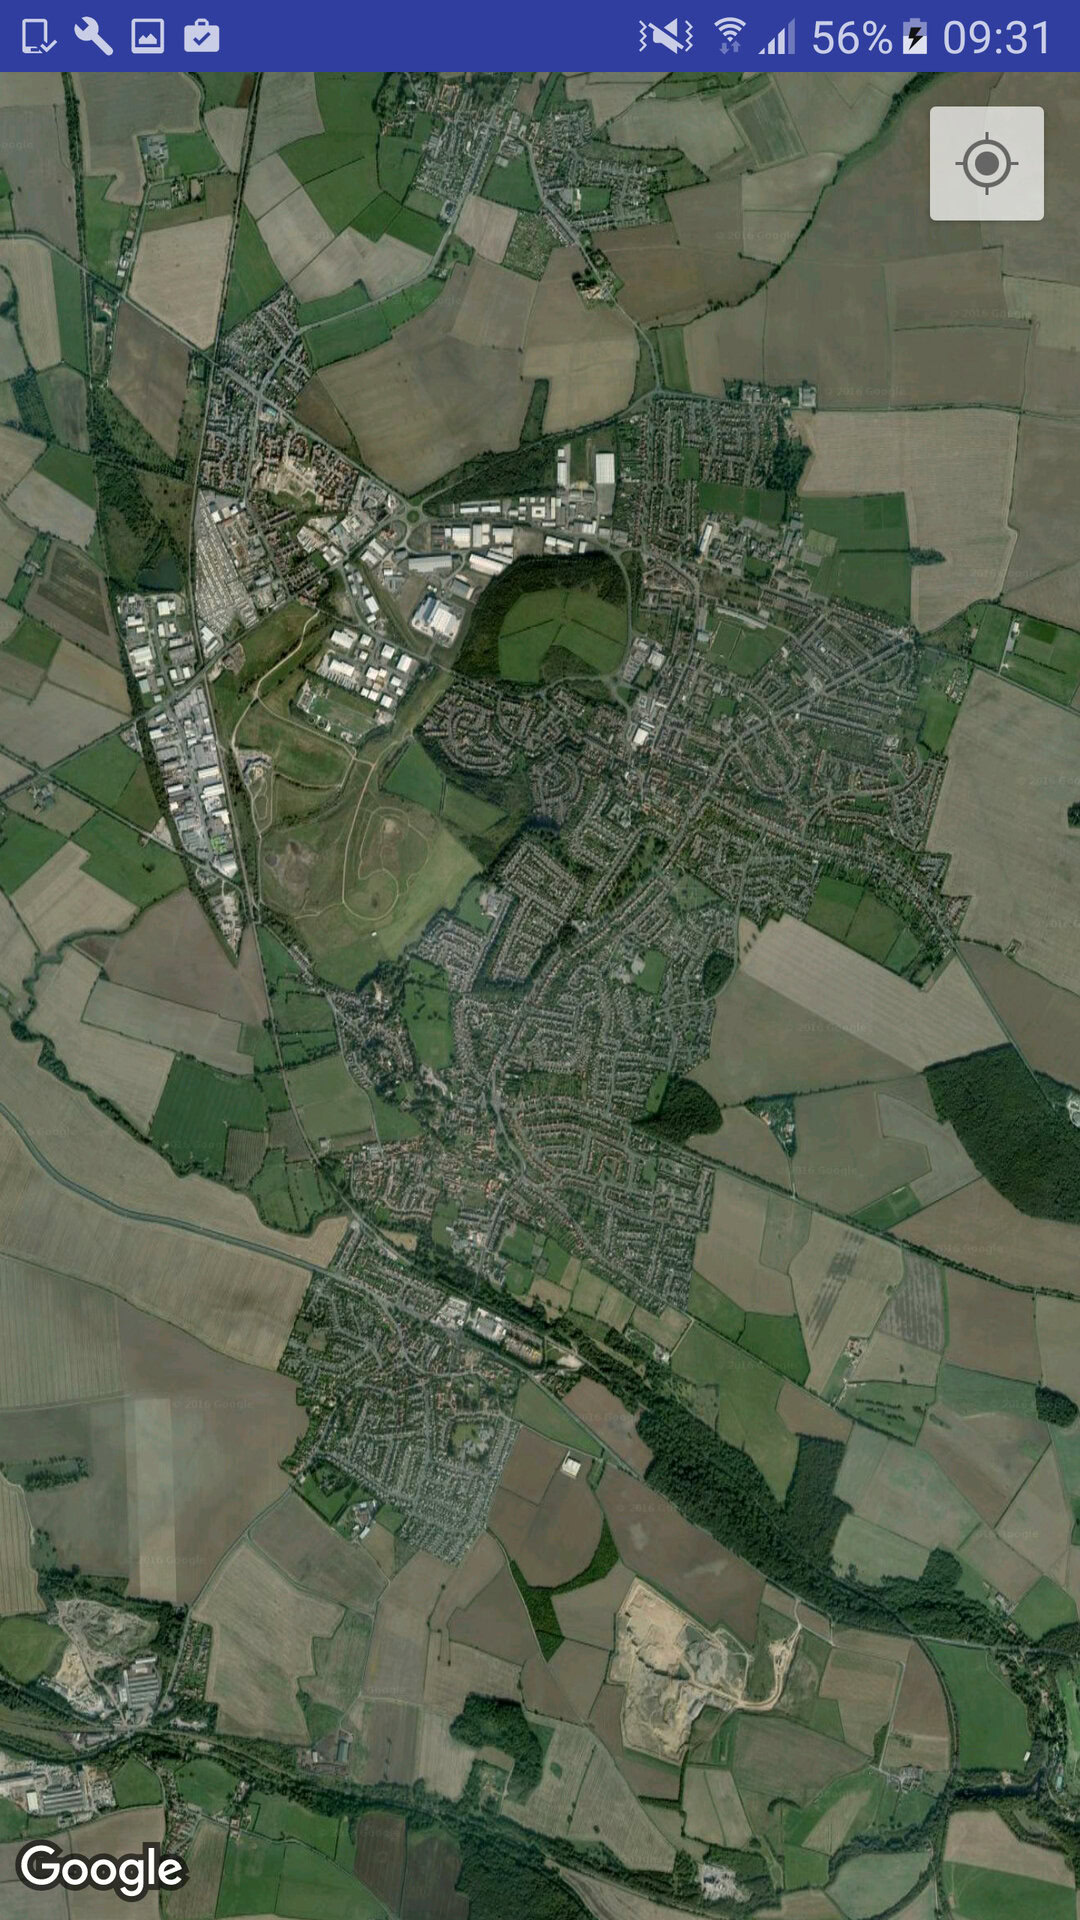
- MAP_TYPE_SATELLITE. A satellite map with roads, but no labels.
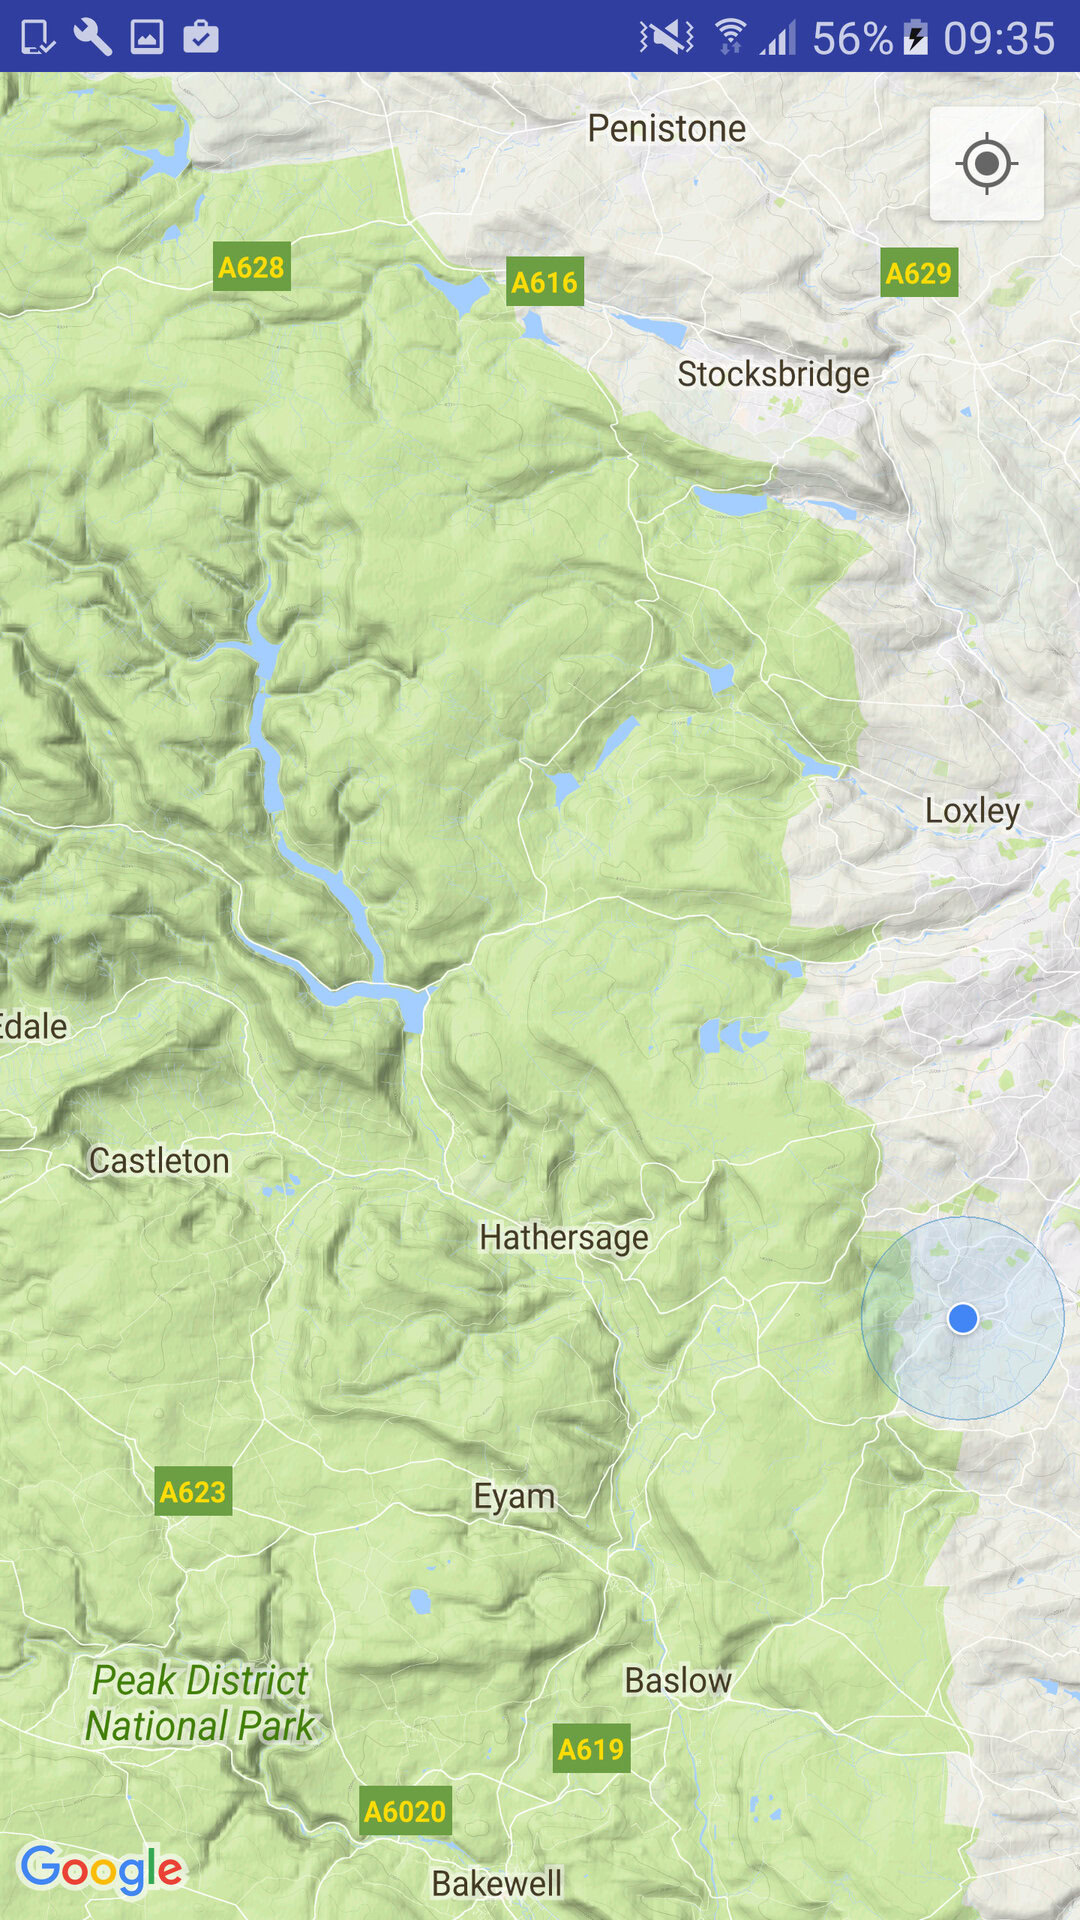
- MAP_TYPE_TERRAIN. A topographic map that includes contour lines, labels and perspective shading. Some roads and labels may also be visible.
Summary
In this article, we looked at how to use the Google Maps API to add map content to your application, and how to display the user’s current location on this map, using the new permissions model introduced in Android 6.0. If you’d like to try this project for yourself, you’ll find the full code over at GitHub.