Affiliate links on Android Authority may earn us a commission. Learn more.
How to flip an image in Google Docs
Published onMay 24, 2023
Once you upload an image or drawing into a Google Doc, it doesn’t need to stay in the same place. You can move it around, rotate it, and even download the image back from Google Docs. There are many things you can do with image placement in documents, so let’s start with how to flip an image in Google Docs.
QUICK ANSWER
To flip an image in Google Docs, copy or cut the image you want to mirror in your Google Doc. Then, click Insert → Drawing → + New. Paste your image in the drawing tool, then select it. Click the Actions button in the toolbar at the top. Hover your cursor over Rotate, then click either Flip horizontally or Flip vertically.
JUMP TO KEY SECTIONS
How to move images in Google Docs
Perhaps the best place to start is moving images around a page on Google Docs. If you are pasting an image or drawing onto Google Docs, chances are you’re doing so to accentuate something within the text. If you’re pointing out the fact that “some cats have yellow eyes,” you might want to add an image near it of a cat with yellow eyes.
When dragging an image around on a page, you have a few options to choose from in terms of “text wrapping:” In line, Wrap text, Break text, Behind text, and In front of text.
Inline with text
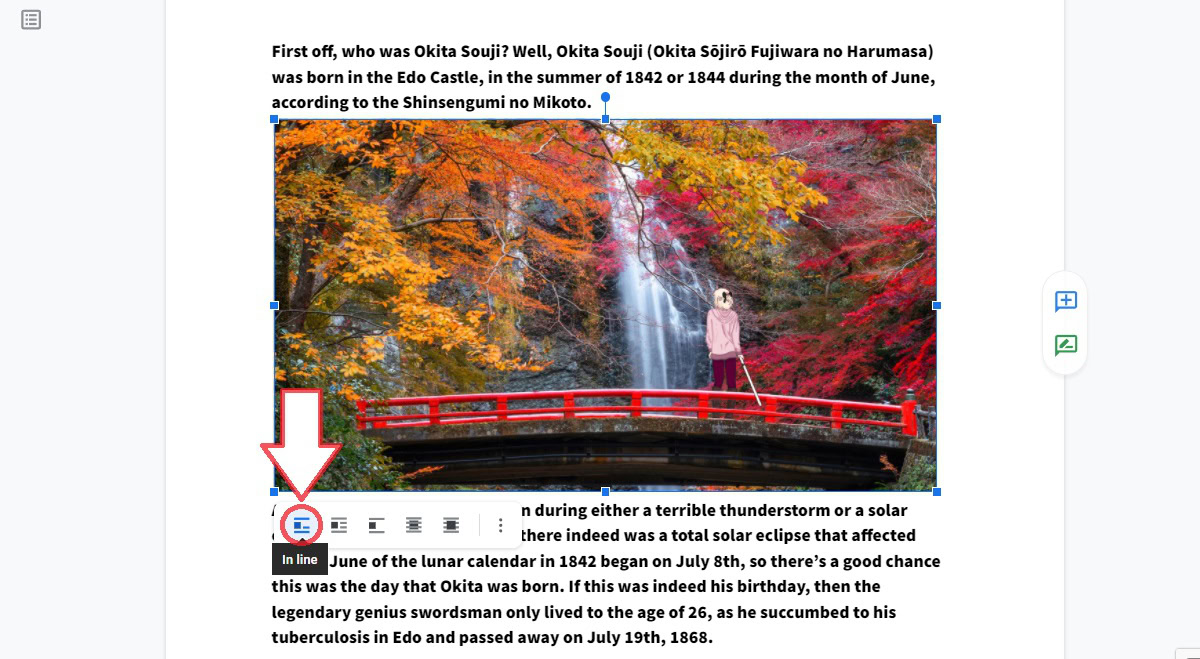
When uploaded to Google Docs for the first time, images are set to Inline with text, or In line, unless otherwise specified. This treats the image the same as a word or character within the text; when the surrounding text moves, the image moves with it to retain its location within the text.
Try it for yourself: insert a picture as In line within some text. Add or take away a few lines of text before the image, and watch as it shifts with the rest of the document.
Wrap text
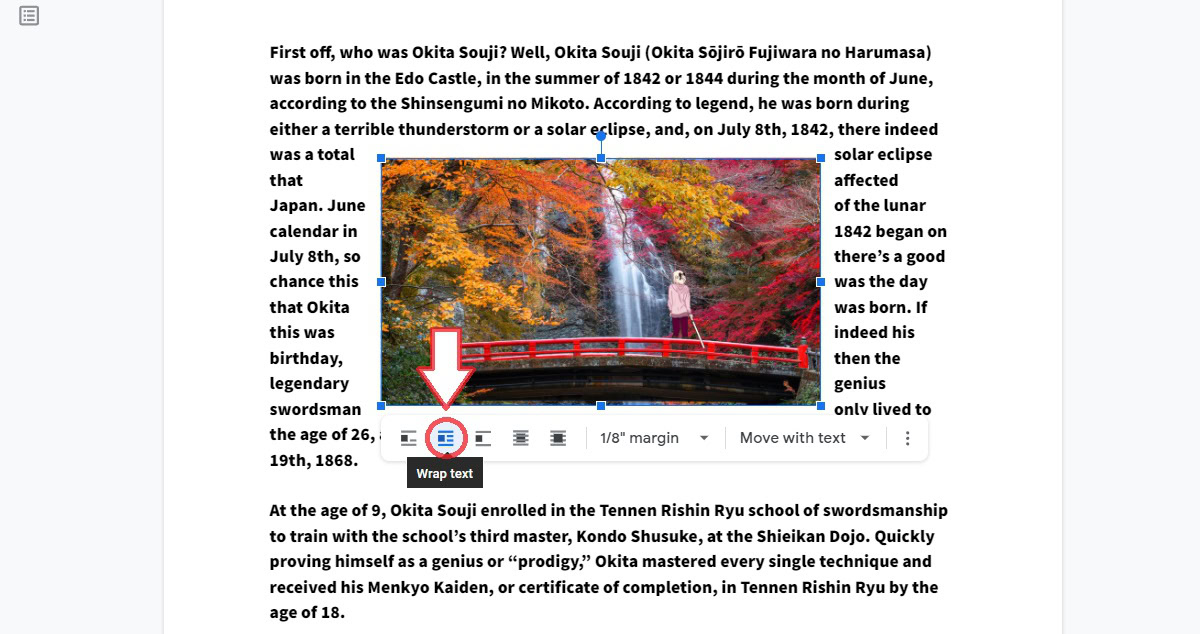
Click on your image and select the second button in the toolbar underneath to enable Wrap text as the text wrapping behavior. As you type more or take away text, the image will remain in the same place on the screen. Words will flow and “wrap” around the text.
Break text
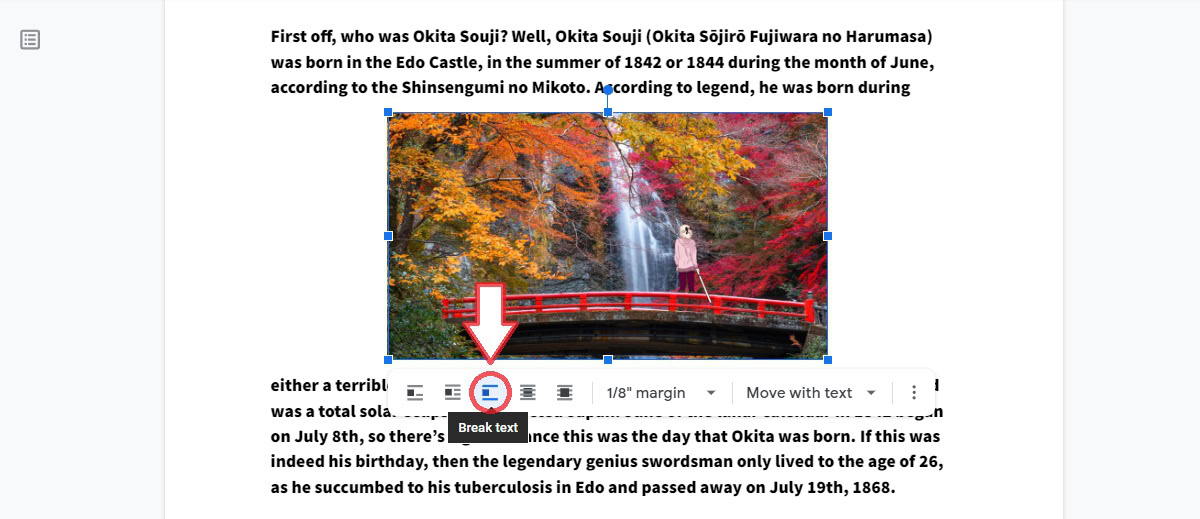
Click on your image and select the third button in the toolbar underneath to enable Break text as the text wrapping behavior. When enabled, the image will stay where you move it on the page and “break” the lines around it. Text will only appear above and below the image, not to the left or right of it.
Behind text
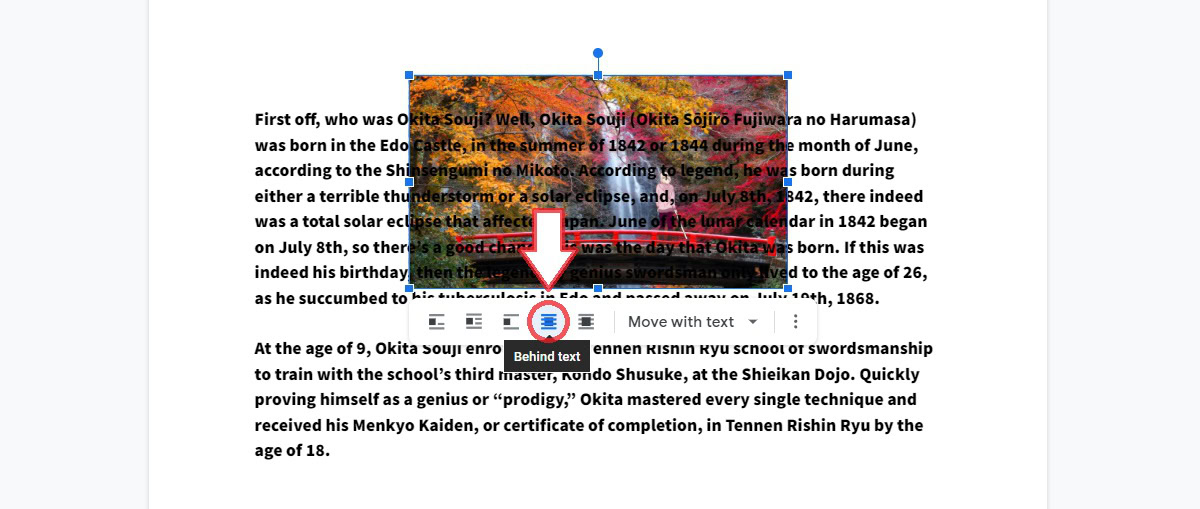
This is a fun one—and relatively new to Google Docs! For many years, this was one of the features that set Microsoft Word apart: the ability to have images formatted as Behind text. This feature now makes its way to Google Docs.
Click on your image and select the fourth button in the toolbar to enable Behind text as the text wrapping behavior. As its name implies, this will allow you to move your image behind words.
In front of text
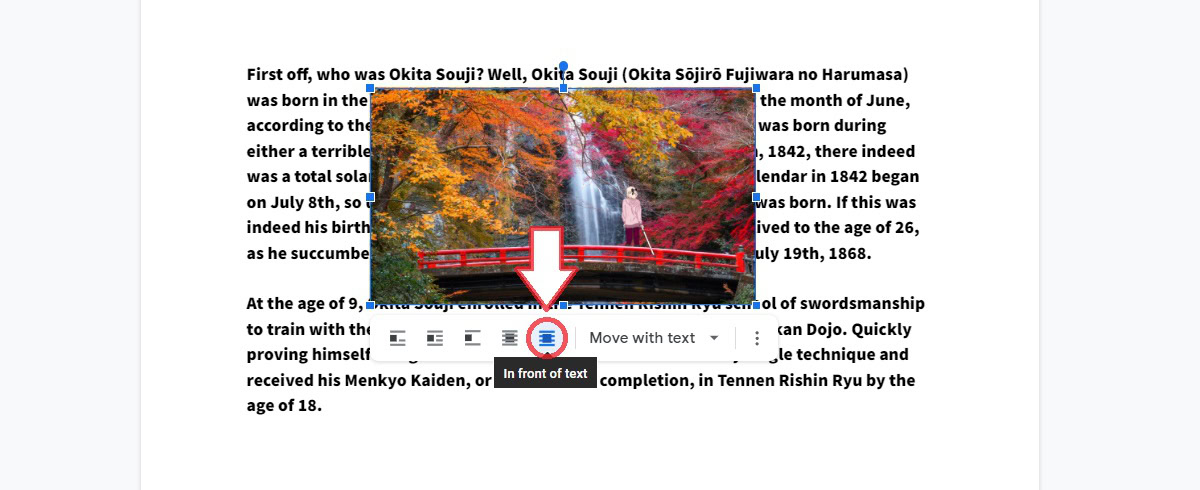
The last option in the text wrapping toolbar is to format the image as In front of text. Click the fifth button to enable, as its name implies, the ability to move the image in front of words.
How to flip or rotate an image in Google Docs
Google Docs makes it not only easy to move your image into place, but also manipulate the way it looks. You can flip and rotate your images once you’ve placed them onto your Google Doc.
How to flip an image in Google Docs
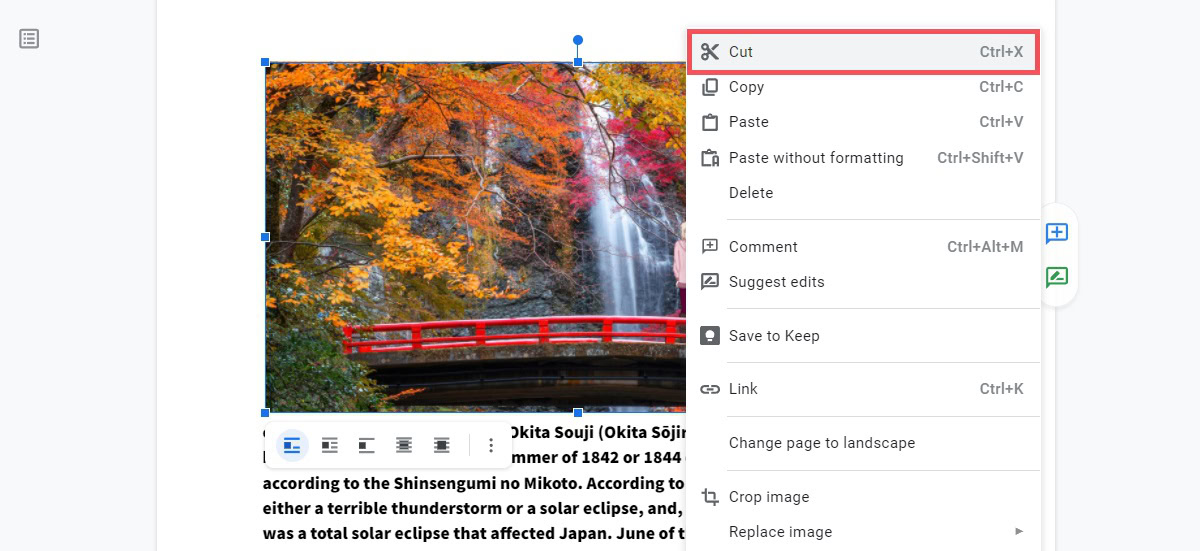
Step one is to find the image you want to flip on your Google Doc. Right-click it, and then click Cut. This will copy the image to your clipboard then remove it from the document.
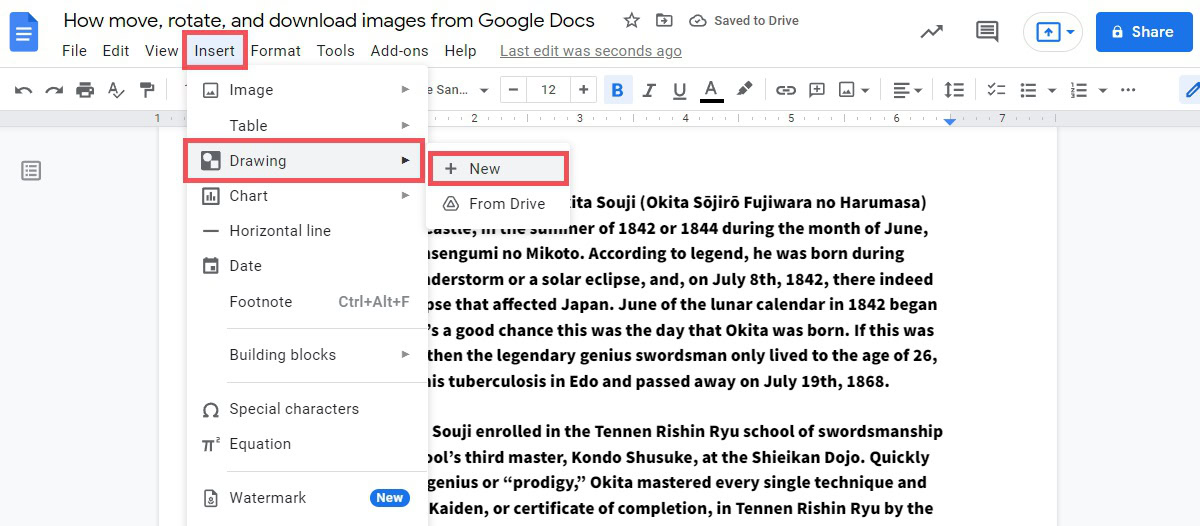
Next, to flip or mirror your image in Google Docs, you need to use the Drawing function. Click Insert → Drawing → + New.
In the Drawing window, paste your image. You can do this by pressing Ctrl + V on your keyboard, or right-clicking anywhere on the empty drawing space and clicking Paste.
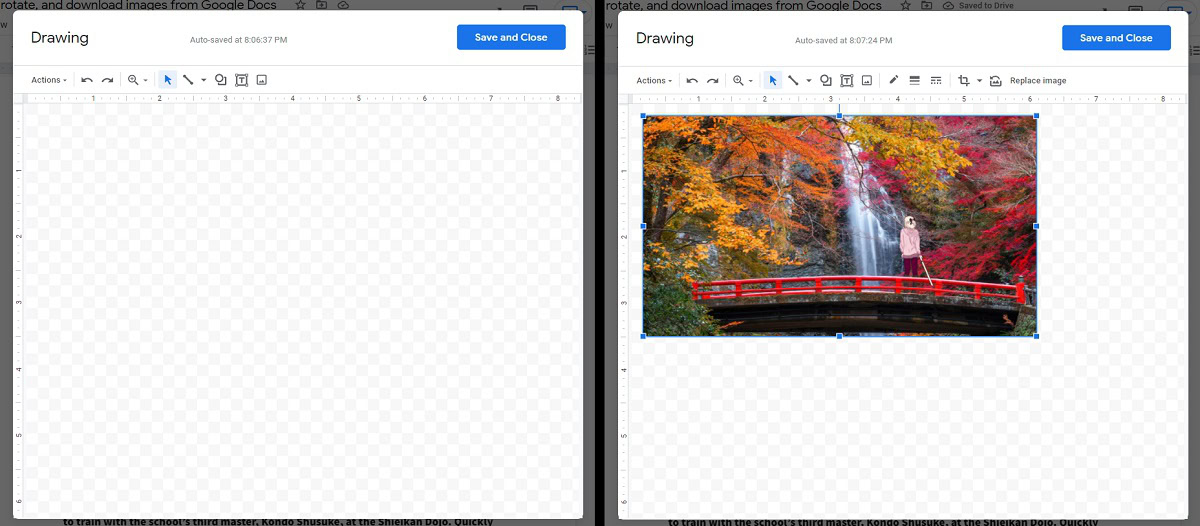
Finally, flip your image. To do this, click on your image to select it, then click the Actions button in the toolbar at the top. Hover your cursor over Rotate, then click either Flip horizontally or Flip vertically.
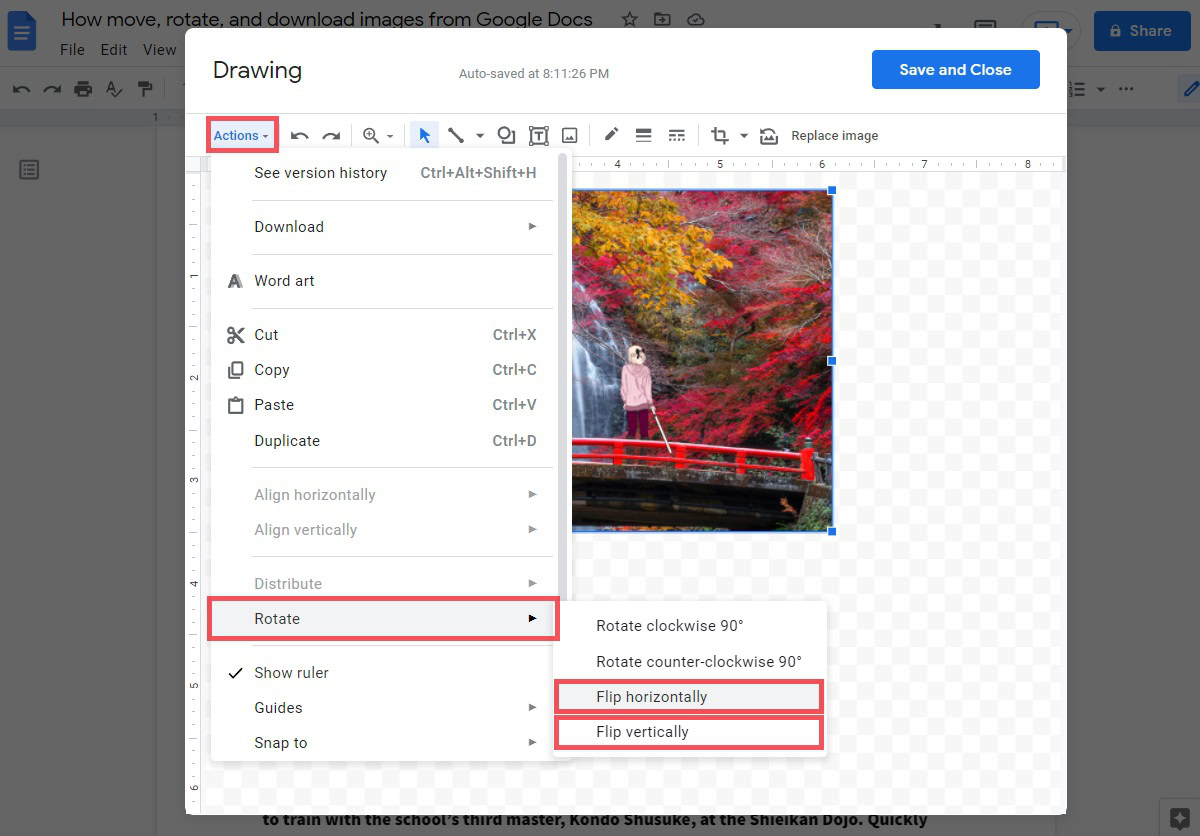
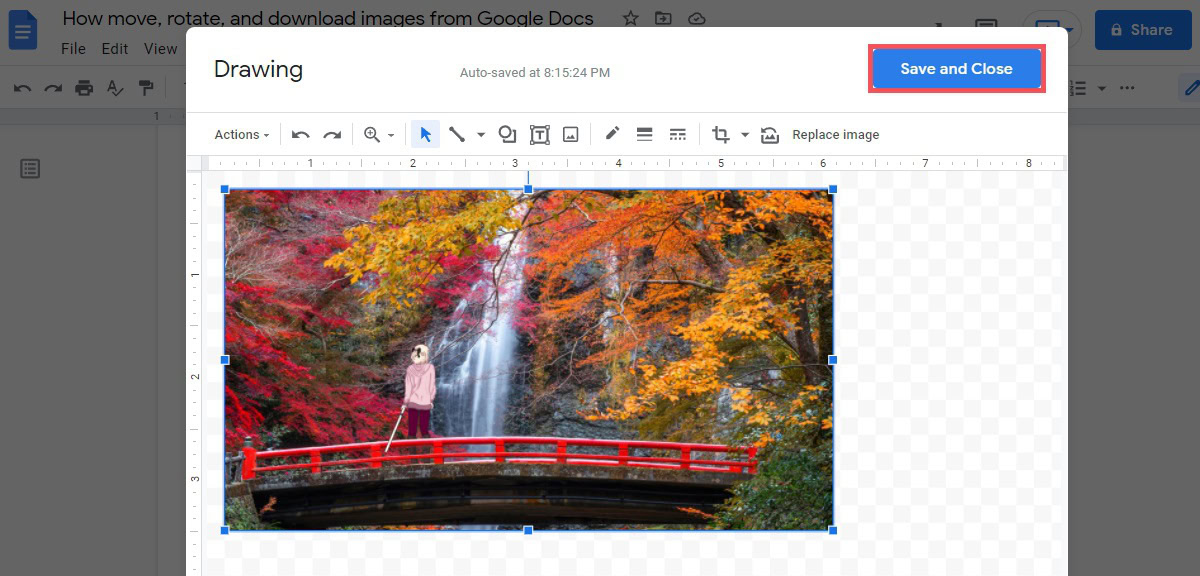
When you have successfully flipped your image, click the blue Save and Close button at the top to insert your image.
How to rotate an image in Google Docs
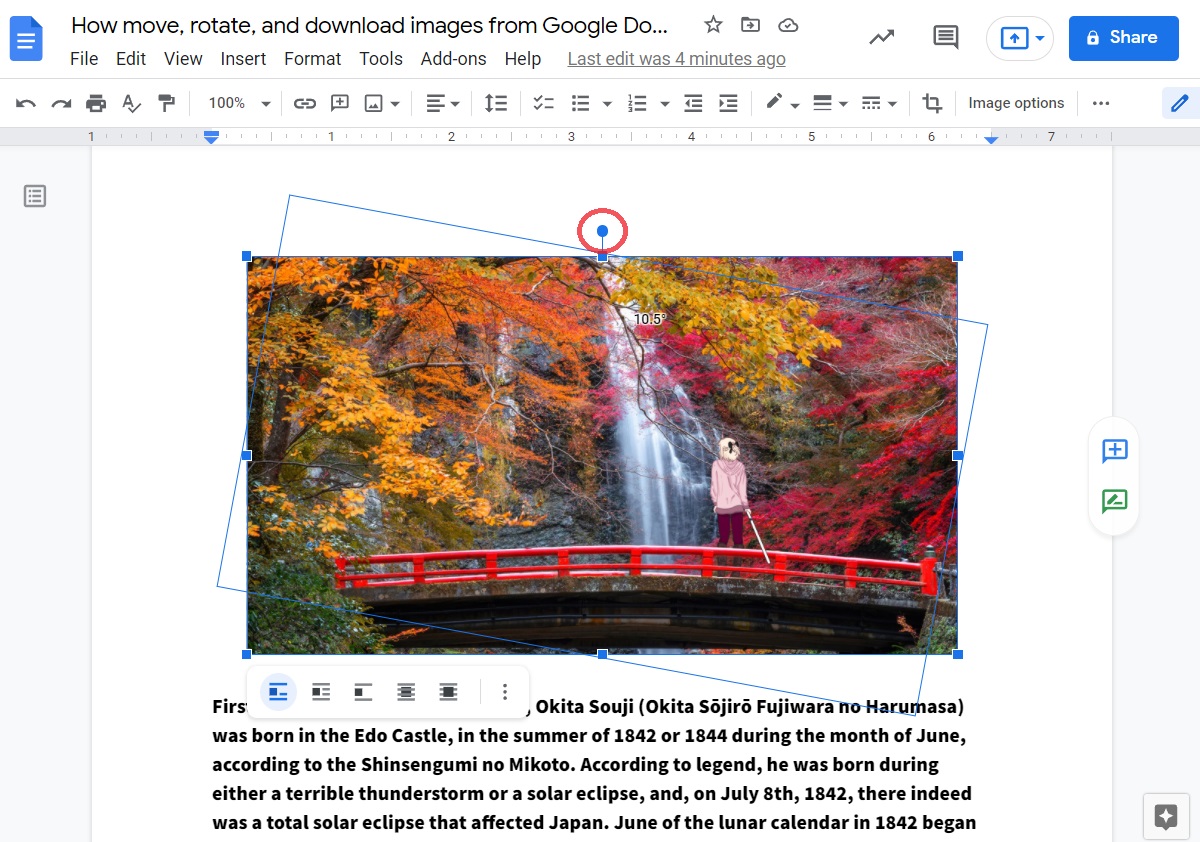
To rotate your image on Google Docs, click it once to select it. There will be eight blue squares around the image, plus one blue circle above the image.
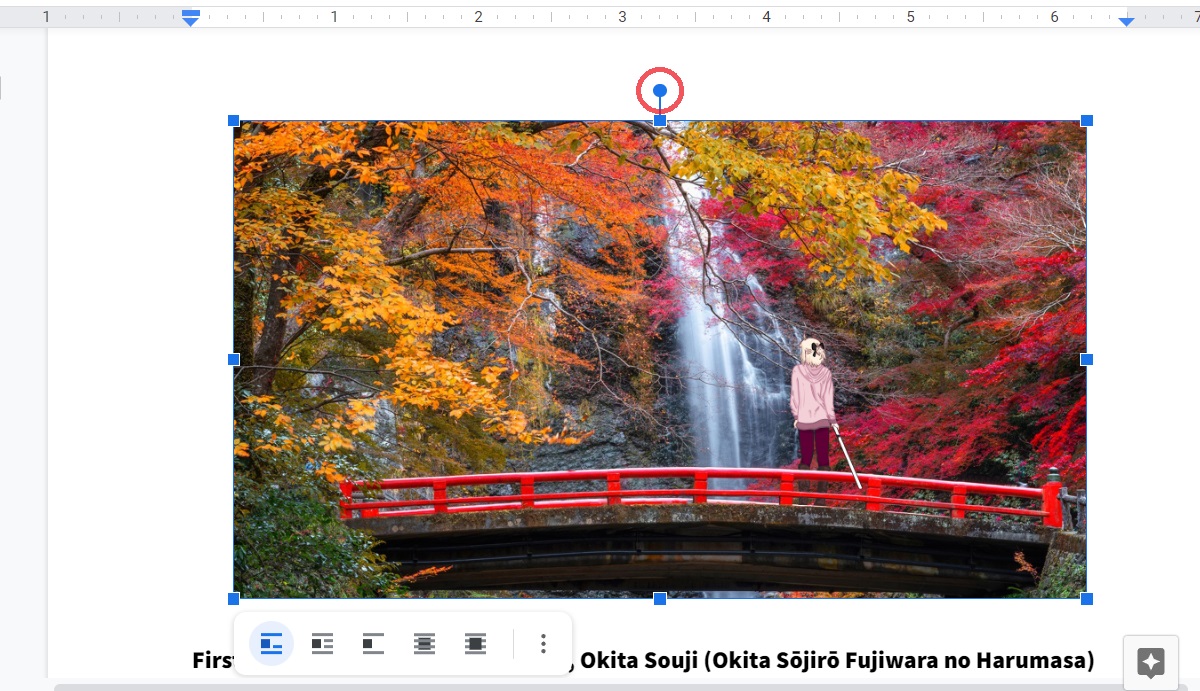
Click on the blue circle and drag it clockwise or counterclockwise to rotate the image.
How to download and save an image from Google Docs
If you want to download and save an image from Google Docs, it isn’t as simple as right-clicking it and saving it to your computer.
The “Publish to the web” method
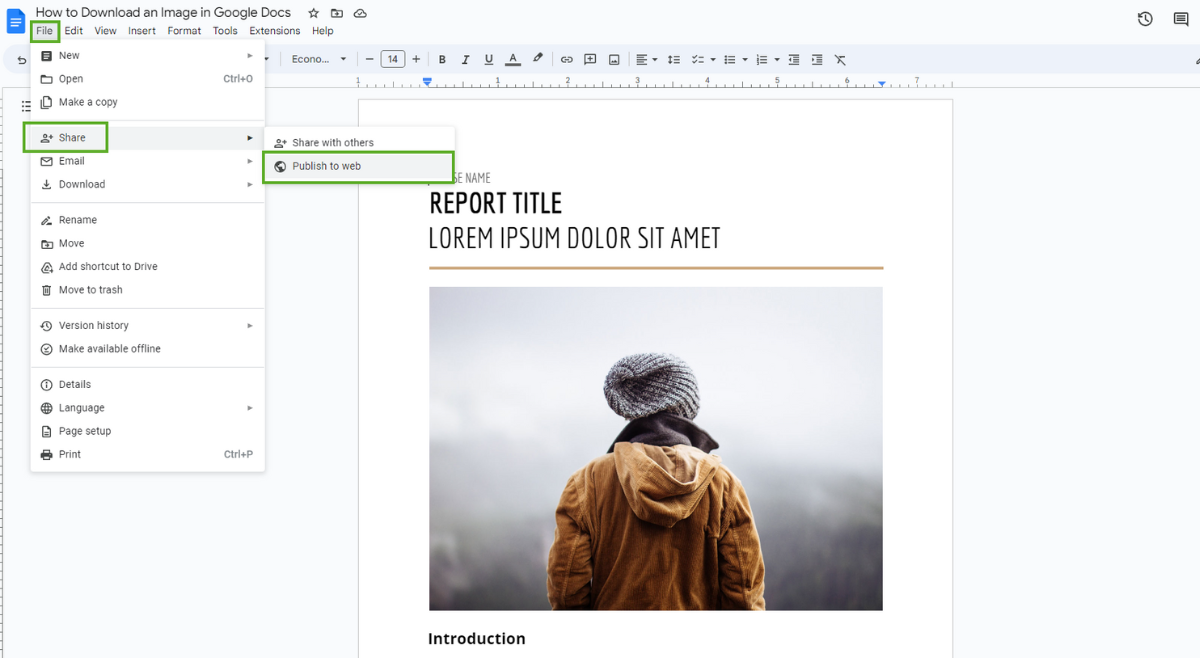
Click File–>Share–>Publish to web to publish your Google Doc to the web.
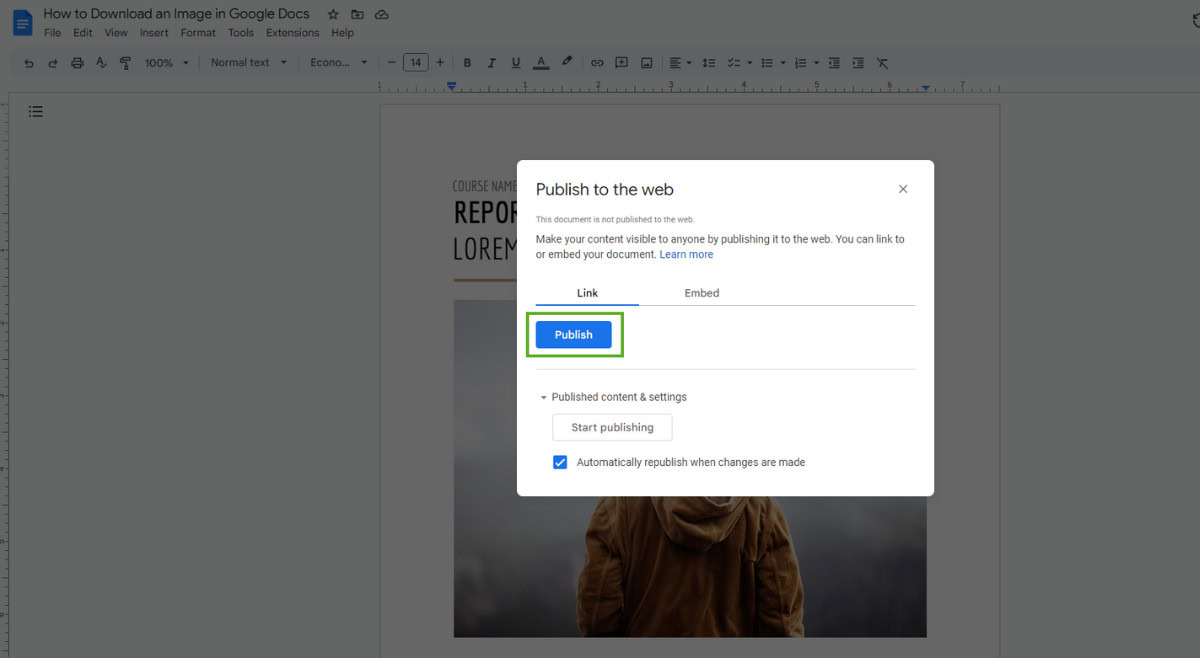
Click on the “Publish” button in the pop window.
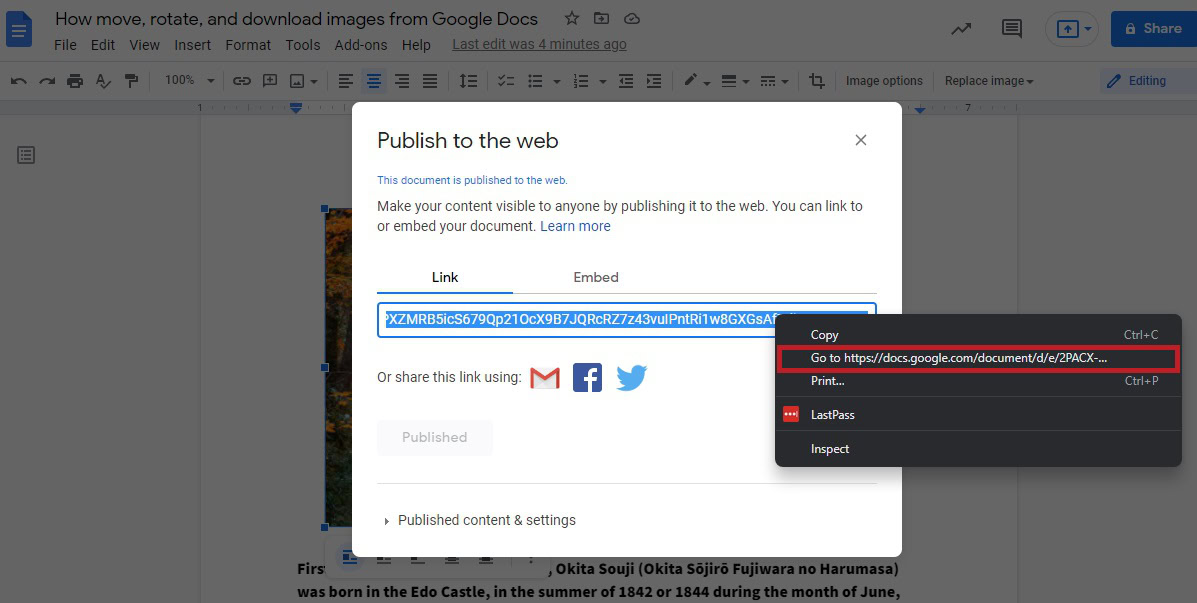
Right-click your link and visit your published document.
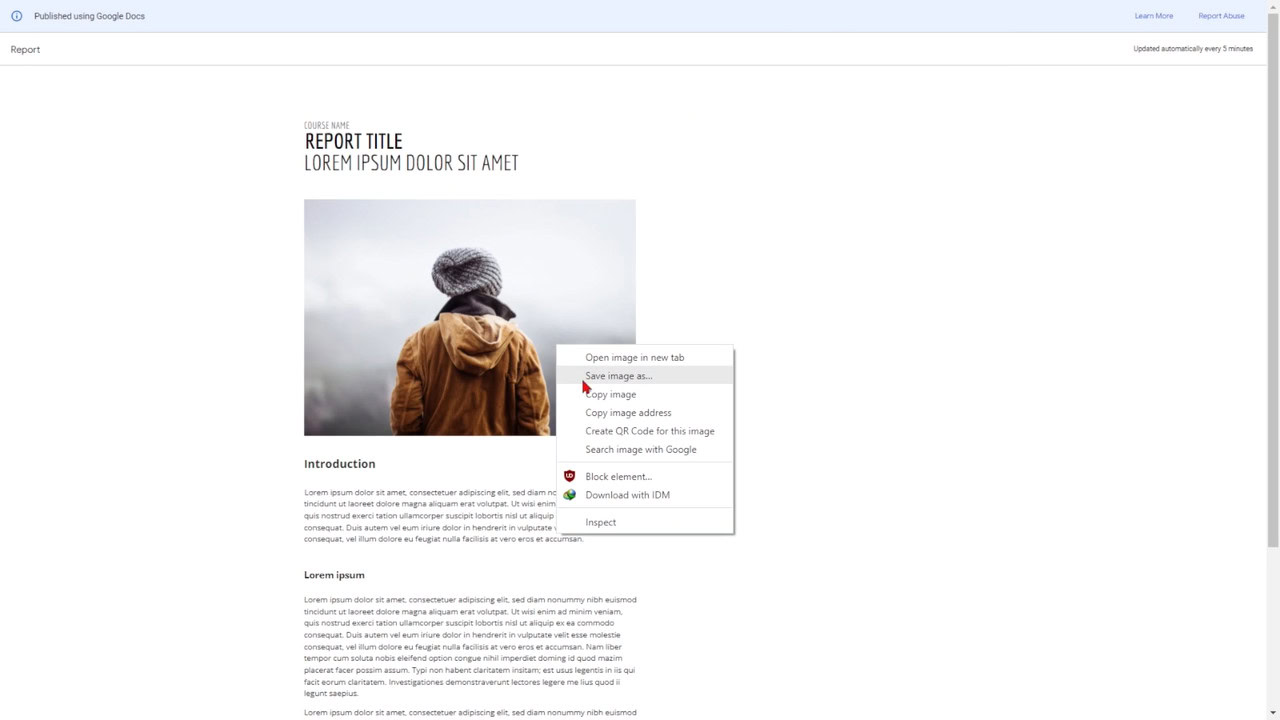
Right-click your image on the published page and then save it by clicking the Save image as… button.
Save an image to Google Keep
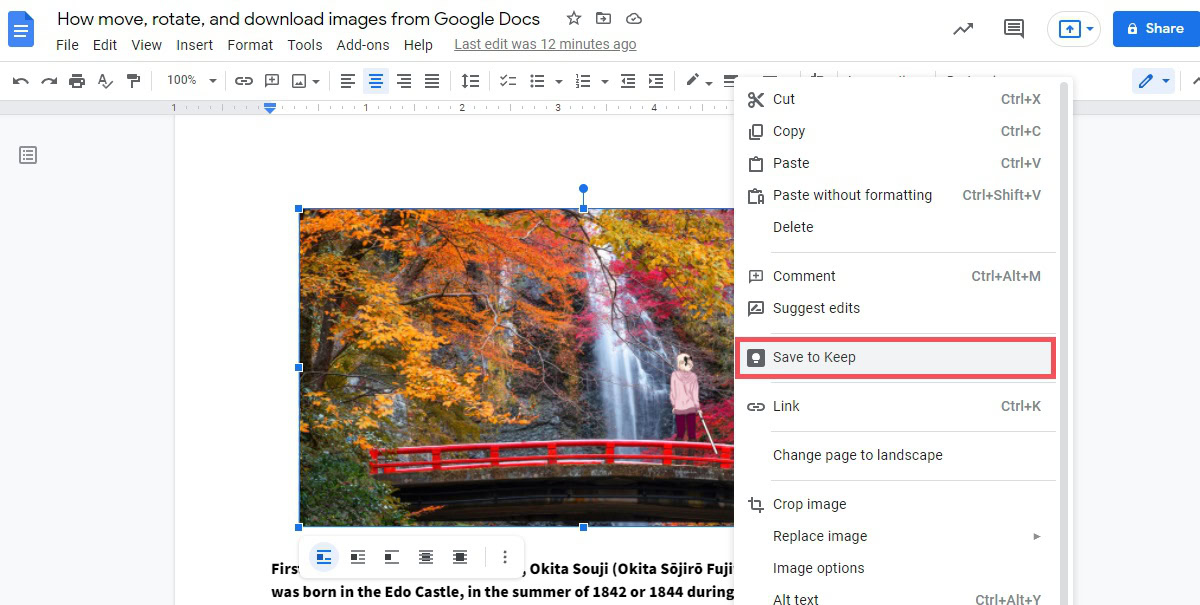
Alternatively, you can save images from Google Docs directly to Google Keep. To do this, right-click the image from within Google Docs and click Save to Keep.
FAQs
Yes, however, you can only draw lines over them. To do this, click Insert → Drawing → + New. Paste your image in the drawing tool, and then start adding lines over your image.
JPG, PNG, EMF, WMF, as well as larger images, images in less common formats (like TIFF), and images with non-RGB color profiles (like CMYK).
The best way to do this would be to format your image as Inline with text and then type underneath it. You can right-click your image and click Alt text to add alt text if needed.