Affiliate links on Android Authority may earn us a commission. Learn more.
How to format and partition an external hard drive or SSD on Windows
Published onMarch 14, 2023
Windows is pretty good with hard disk and SSD file systems. While you may think that you’re stuck with the same partitions and format your hard disk came with, Windows will let you change things up as per your preference. It’s not too complicated, either. Here’s how to format and partition an external hard drive or SSD on Windows.
QUICK ANSWER
To format an external hard drive on Windows, find it in Windows Explorer, right-click it, click Format, and follow the steps. To partition an external hard drive on Windows, open the Disk Management tool, right-click the external partition, and click Shrink Volume. Follow the steps to shrink it by as much as you need the new partition to be, then right-click the Unallocated space and click New Simple Volume, and follow the steps.
JUMP TO KEY SECTIONS
What you need to know about partitioning and formatting
You might have heard “partitioning” and “formatting” used in the context of hard drives and OS. But what do these terms actually mean?
What does partitioning mean?
“Partitioning” refers to the process of dividing a disk into several sub-devices, and allocating sub-devices to the OS to allow it to carry out functions in the rest of the sub-devices and computer. So, for instance, you can have one 500GB drive, and have it partitioned into one 100GB drive partition to boot Windows out of (and the OS will create all the other requisite partitions for recovery, etc.), and the other 400GB drive partition to store your programs and files.
Why should you partition a drive?
Before a drive is partitioned, the OS (Windows in this case) sees the entire drive as one large chunk of unallocated space which it cannot really use. Partitioning the drive creates smaller blocks that are allocated to specific uses, and this allocation makes the drive usable to the OS. Note that partitioning a drive will delete your data from that drive, so ensure that you back up your files before you attempt a disk partition.
So partitioning is useful as one of the first steps towards making the drive useful to your computer. You could have every hard drive or SSD be its own single partition, using the entire space to hold your personal files. Or, you can have many partitions per hard drive or SSD, depending on how you want to arrange your data.
For beginners, we recommend creating a separate partition for your Windows installation with adequate free space for future updates, while your personal data can rest in a separate partition. This way, if you ever need to reinstall Windows, you can only work with the Windows partition and not need to touch the other partition for your personal files. And you can also set up backups for your personal data partition without backing up your OS installation.
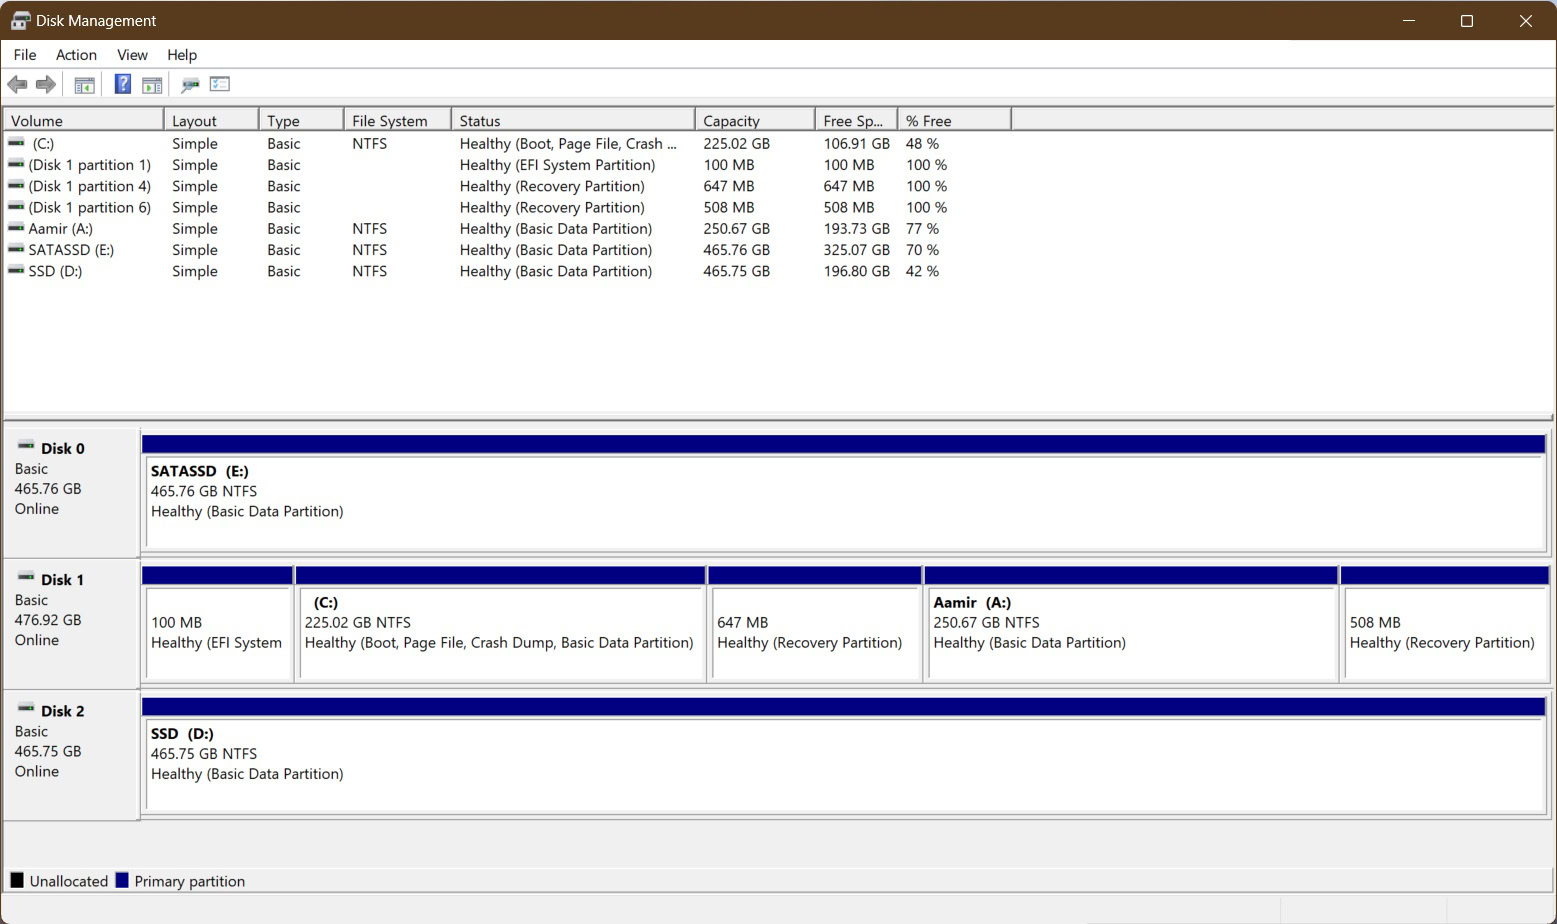
In the screenshot above, you can see that the computer has a total of three ~500GB SSDs to use. Of them, two are used completely for storage (Disk 0 and Disk 2) with a single NTFS partition. Disk 1 contains several partitions: the C: partition is used for the Windows OS installation, while the A: partition is used as another storage partition. There is also an EFI system partition as well as a recovery partition.
Partitions also come in handy when you want to install multiple OSs on the same computer. They also come in handy if you want to have different file systems on the same drive.
What does formatting mean?
“Formatting” refers to the process of preparing a storage disk for its initial data storage use. More commonly, formatting refers to the process of generating a new file system for that particular storage disk. Think of the file system as an index that figures out what file can and will be stored where — without this index, the OS would be unable to see empty and used spaces. So formatting a drive essentially tells the drive where it can and cannot store data, and that it is ready to accept data in the first place.
Difference between format and quick format
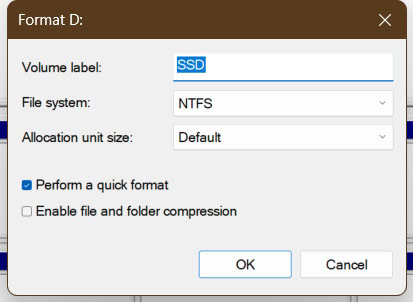
When you start a formatting operation, you will often see the option to do a quick format. A quick format essentially removes the index but not the files. As a result, one cannot see the files that exist on the drive, but the files still continue to exist and can be recovered through specialized software. In other words, the files on the disk are just marked “safe to overwrite” without actually being overwritten. A quick format also skips scanning of bad sectors on the disk, but this concept is outside the scope of this article.
A regular format or full format is different from a quick format in that it overwrites the files with blank data in addition to removing the index. This ensures that it becomes almost impossible to recover the file. A full format also scans the drive for bad sectors. Because of the wider scope of the task, a full format takes significantly longer than a quick format.
Why should you format a drive?
As mentioned, formatting a drive is a step towards using a drive for storage. Different OSs use different file systems for storage. So formatting your drive with the correct Windows-supported filesystem will allow you to use the drive on your computer without any further hassle. Without the correct file system in place, your Windows computer likely won’t see the drive as available for storage. Note that formatting a drive will delete your data, and a full format will make the data almost irrecoverable.
How to format an external hard drive on Windows
Formatting an external hard drive or SSD on Windows is quite simple.
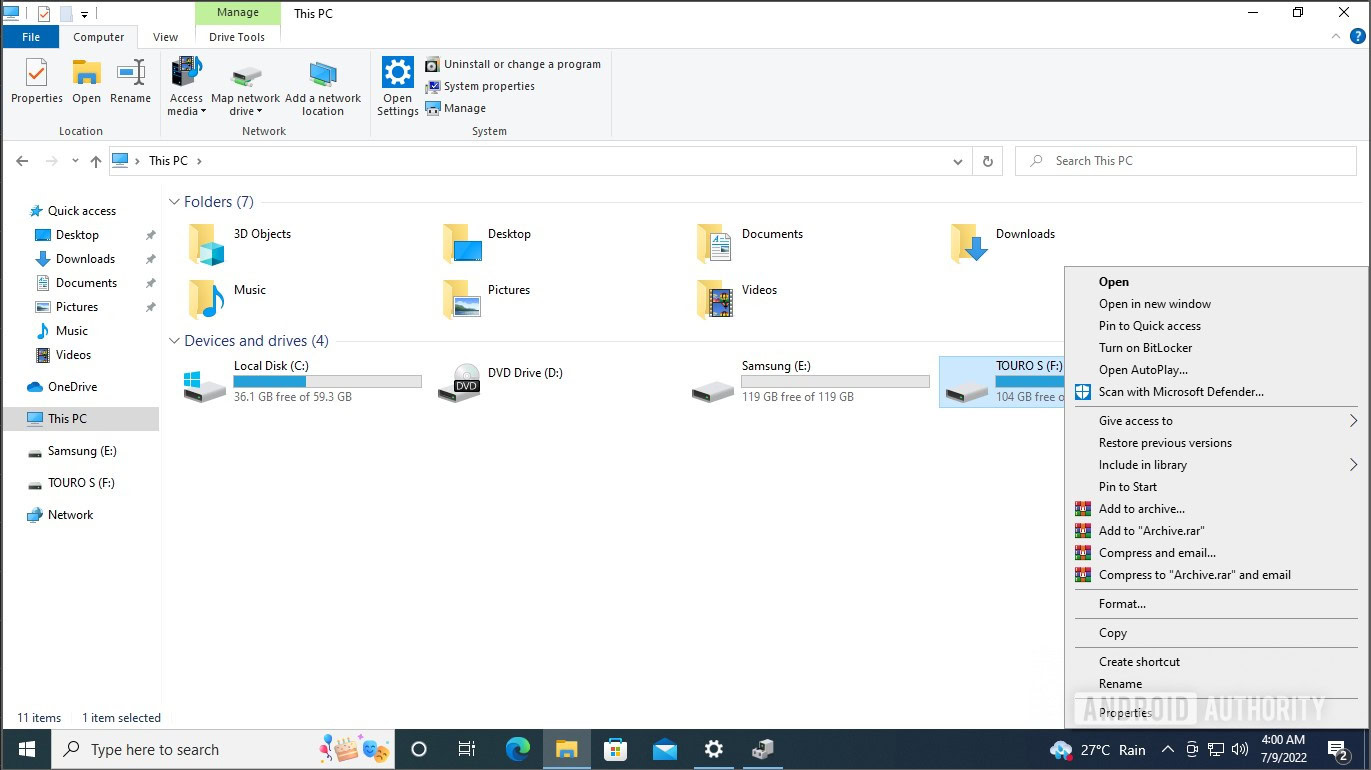
- Connect the external drive to your PC and open Windows Explorer.
- Click This PC from the left navigation pane to show all the available drives.
- Right-click the external drive, and click Format.
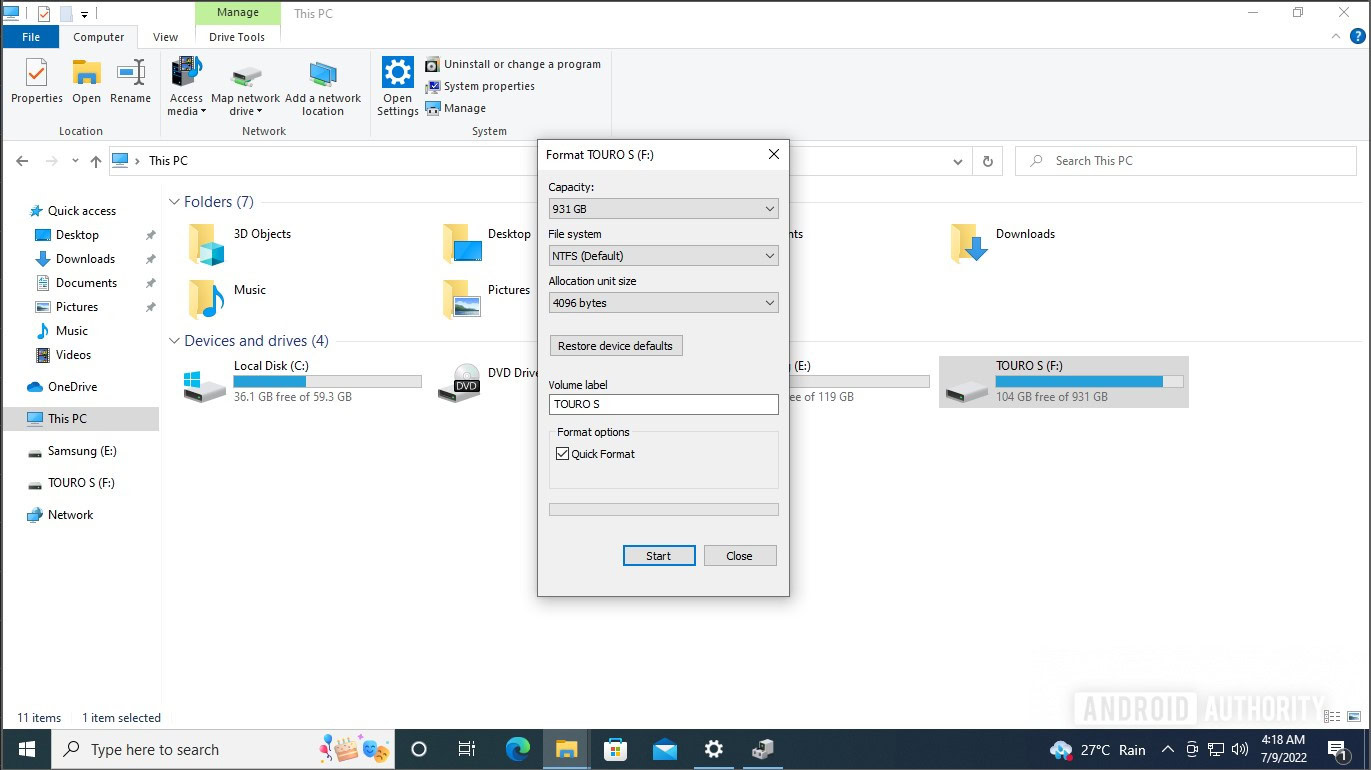
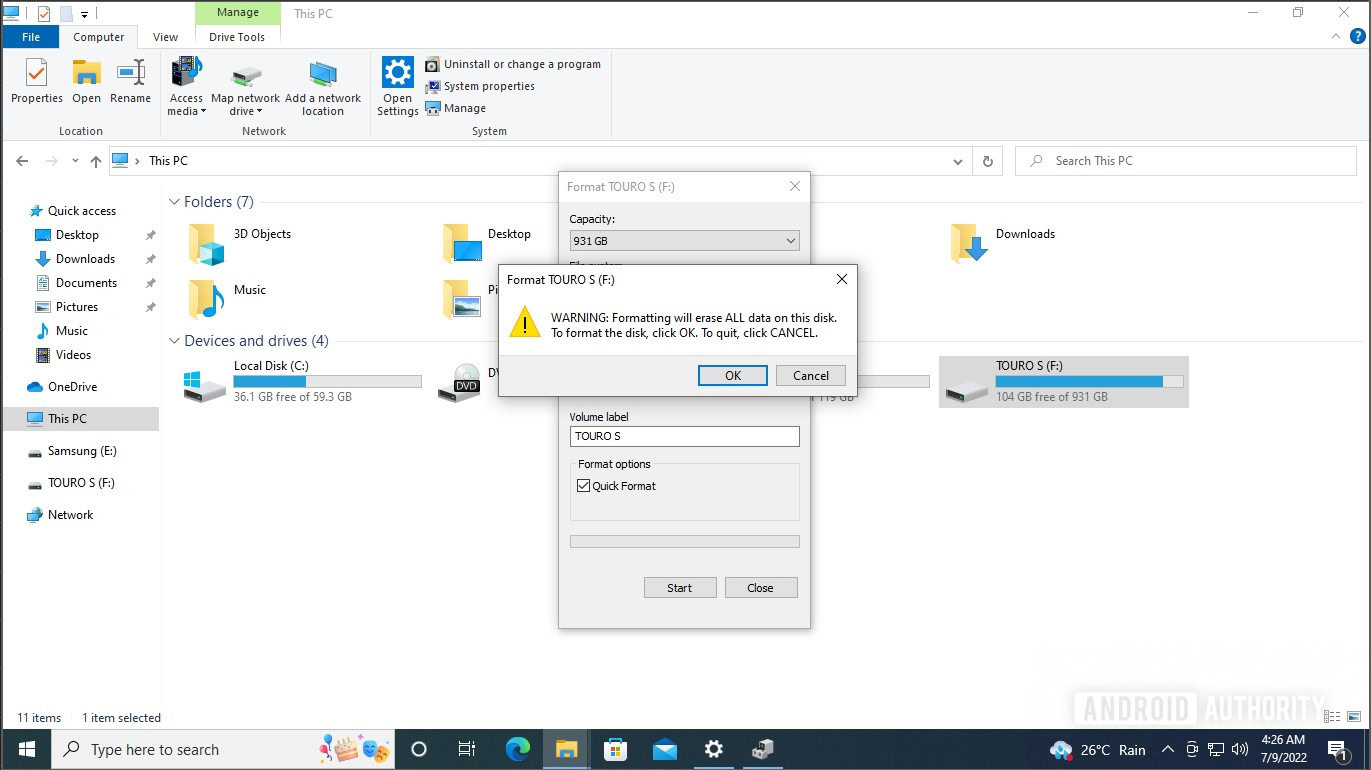
- The Format tool will pop up. Click the drop-down menu under File system, and click the preferred one between NTFS and exFAT.
- Rename the drive under Volume label, if you wish to.
- If you want the drive to be formatted more thoroughly, uncheck the Quick Format box.
- Click Start.
- Click OK when the warning pops up.
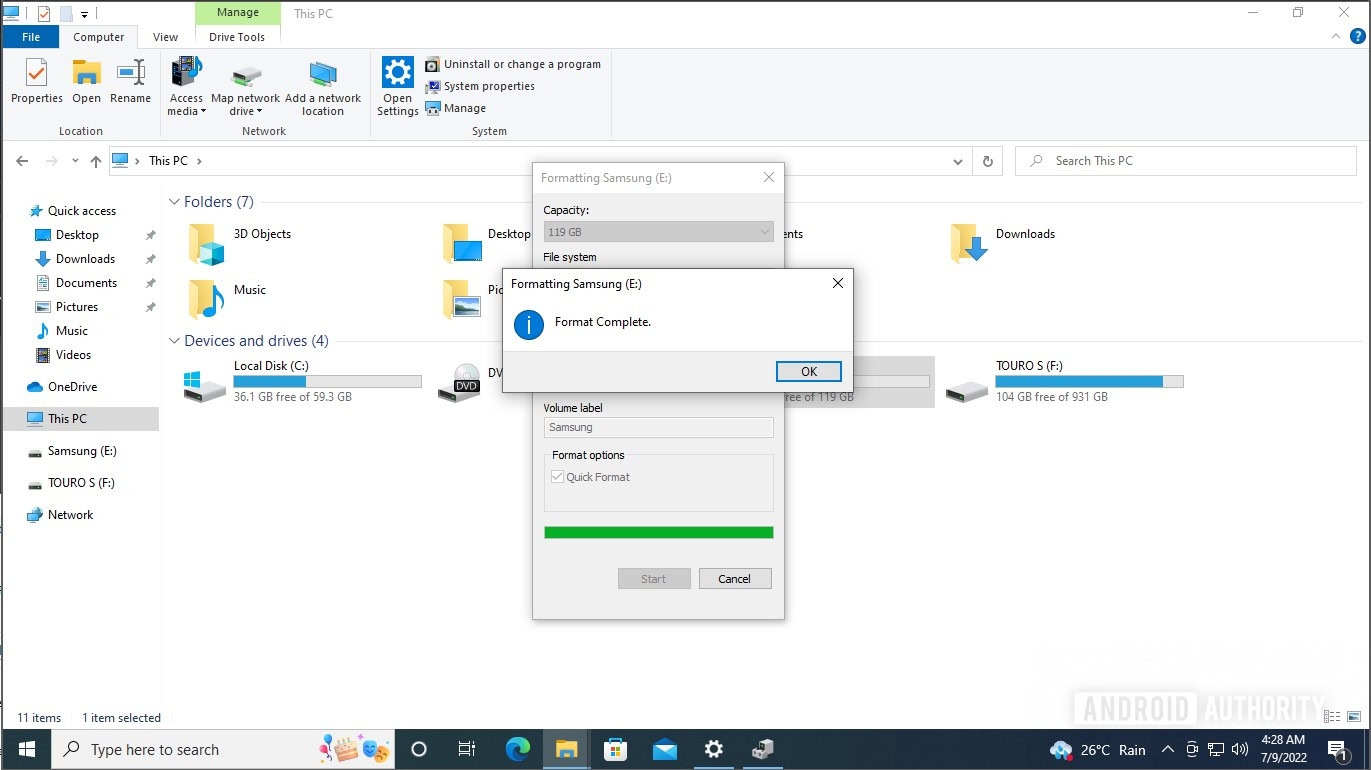
- Windows will format your external drive, and give you a confirmation dialog box when the formatting is complete.
How to partition an external hard drive on Windows
To partition an external drive on Windows, you’ll need to use the Disk Management tool.
- Search for Disk Management in Windows search. Click the top search result labeled Create and format hard disk partitions.
- Find your external drive listed in the grid view in the bottom half.
- To create a new partition, you will need unallocated space. You will see this under a black header in the Disk Manager.
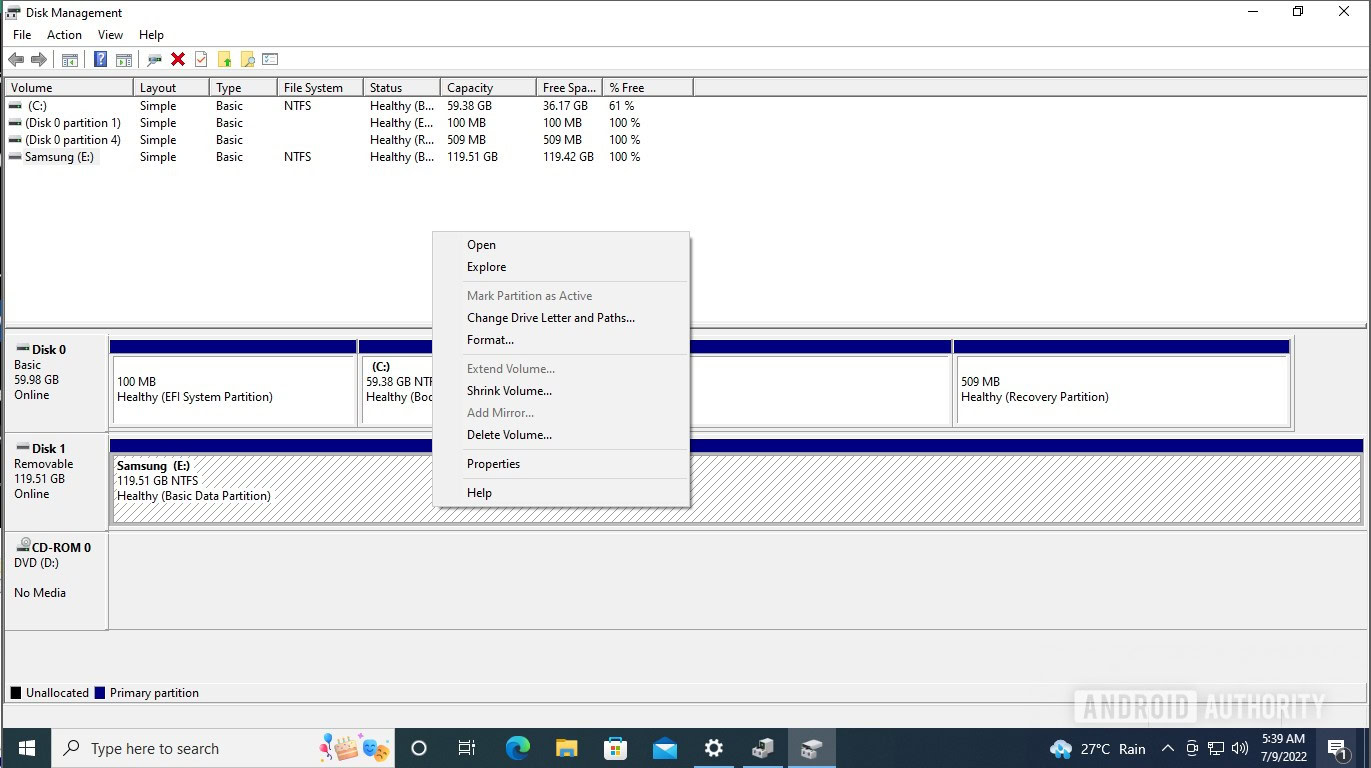
- If you don’t have unallocated space already, and want to partition your external drive, right-click the external drive’s existing partition in the grid view, and click Shrink Volume…
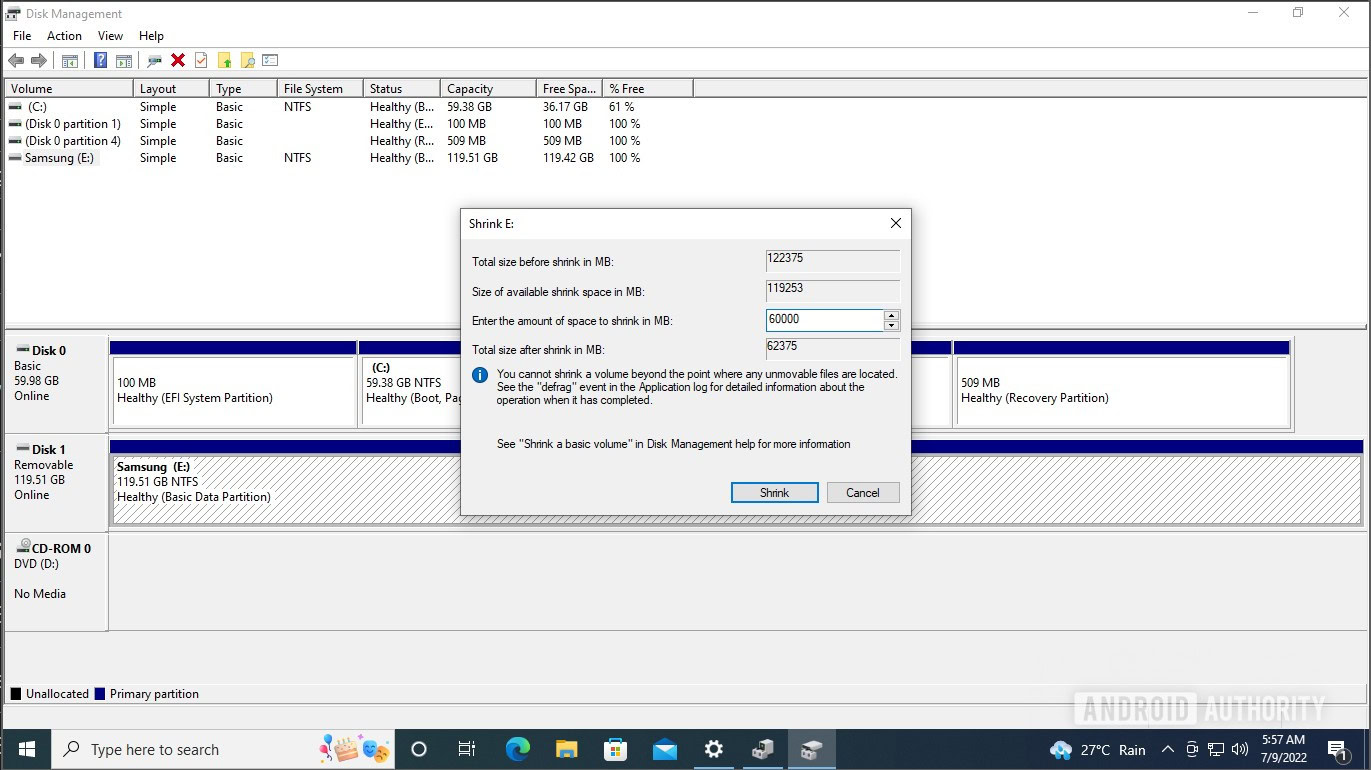
- The Shrink Volume dialog box will pop up. In the box next to Enter the amount of space to Shrink in MB, type in how much space you want for your new partition(s).
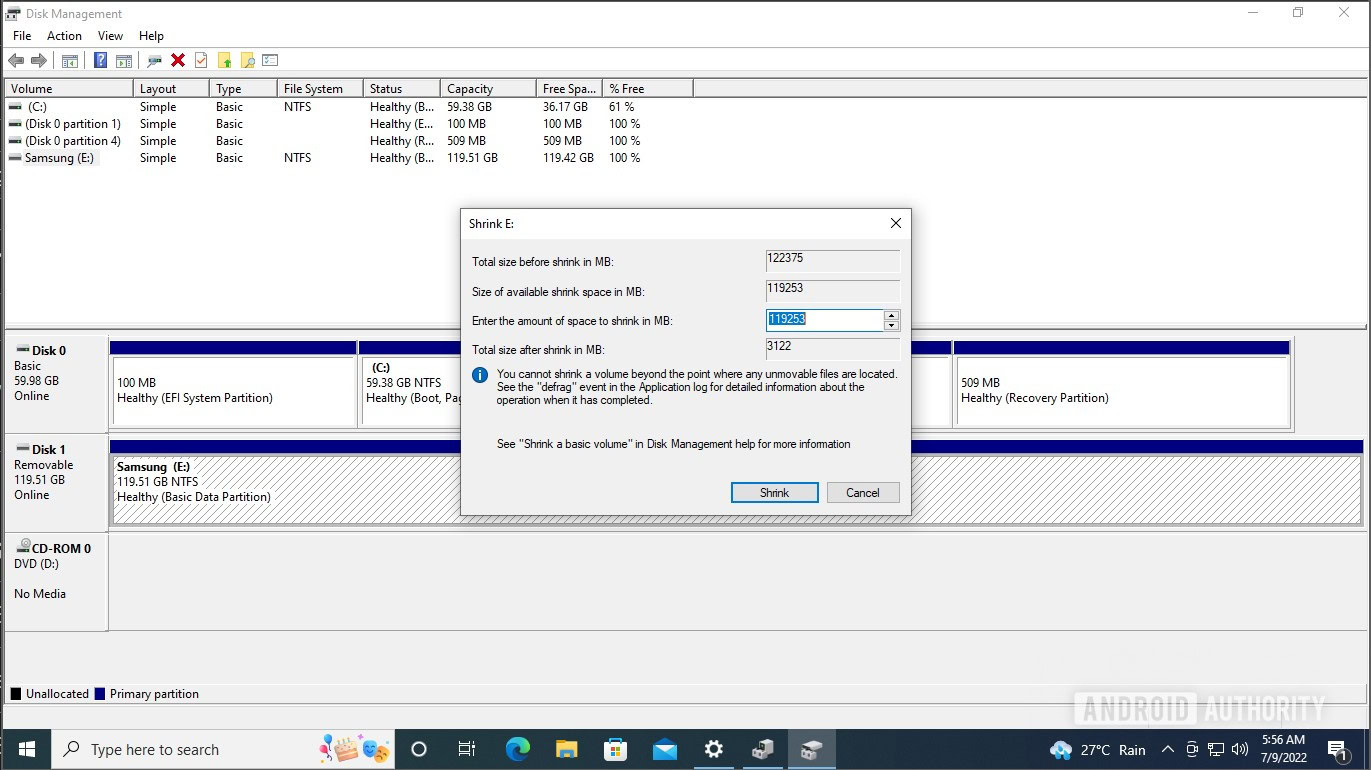
- The default figure here will be the maximum available, but we recommend you leave some breathing room for the current partition. Once you’ve entered the figure, click Shrink.
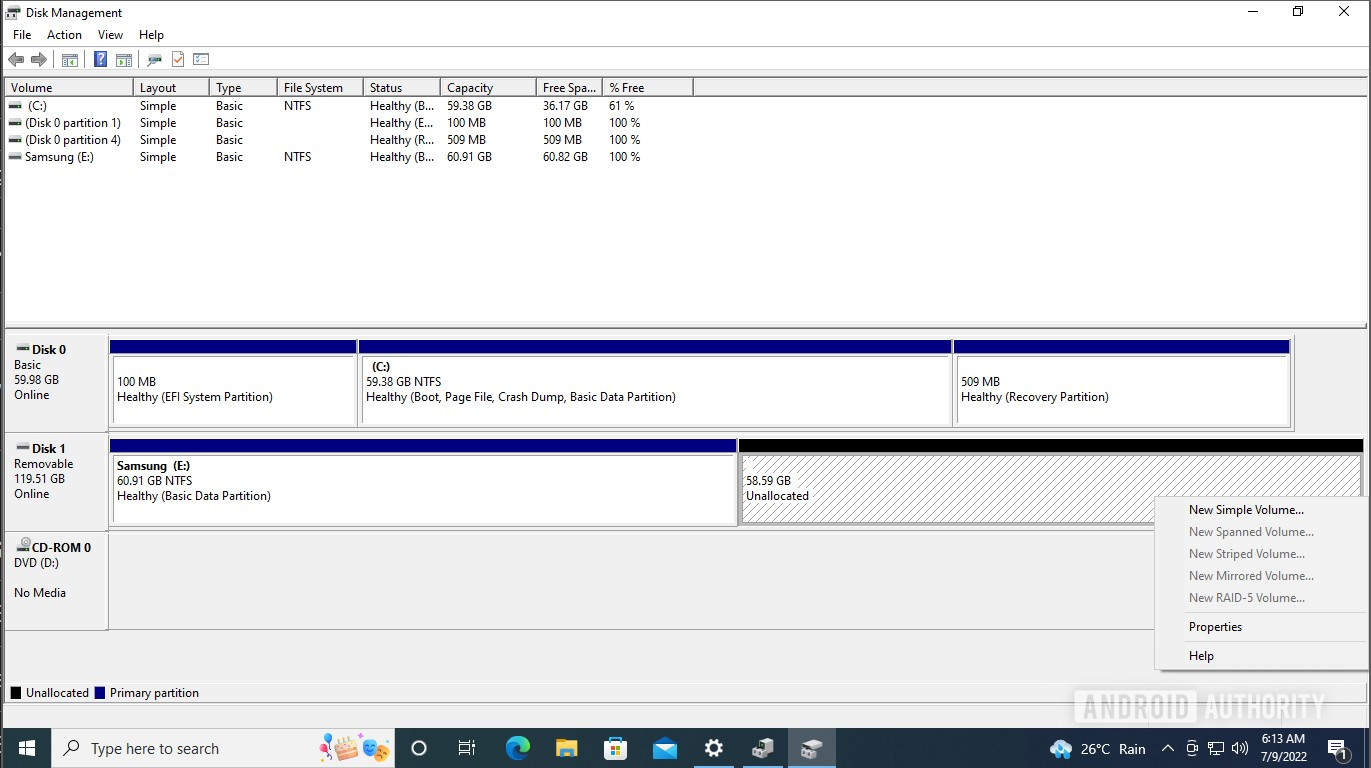
- It’ll take a couple of seconds, and your drive will now show the unallocated space with a black header. Right-click it, and click New Simple Volume.
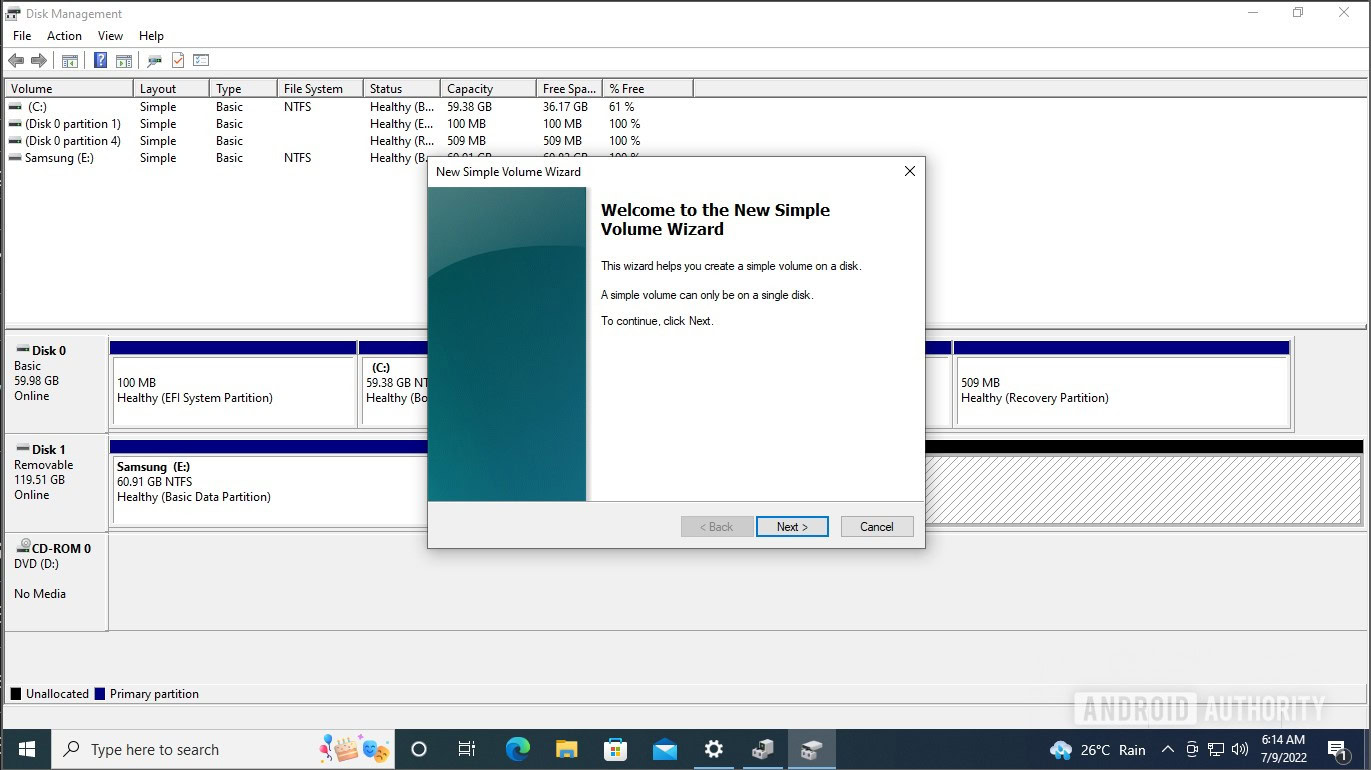
- The New Simple Volume Wizard will pop up. Click Next.
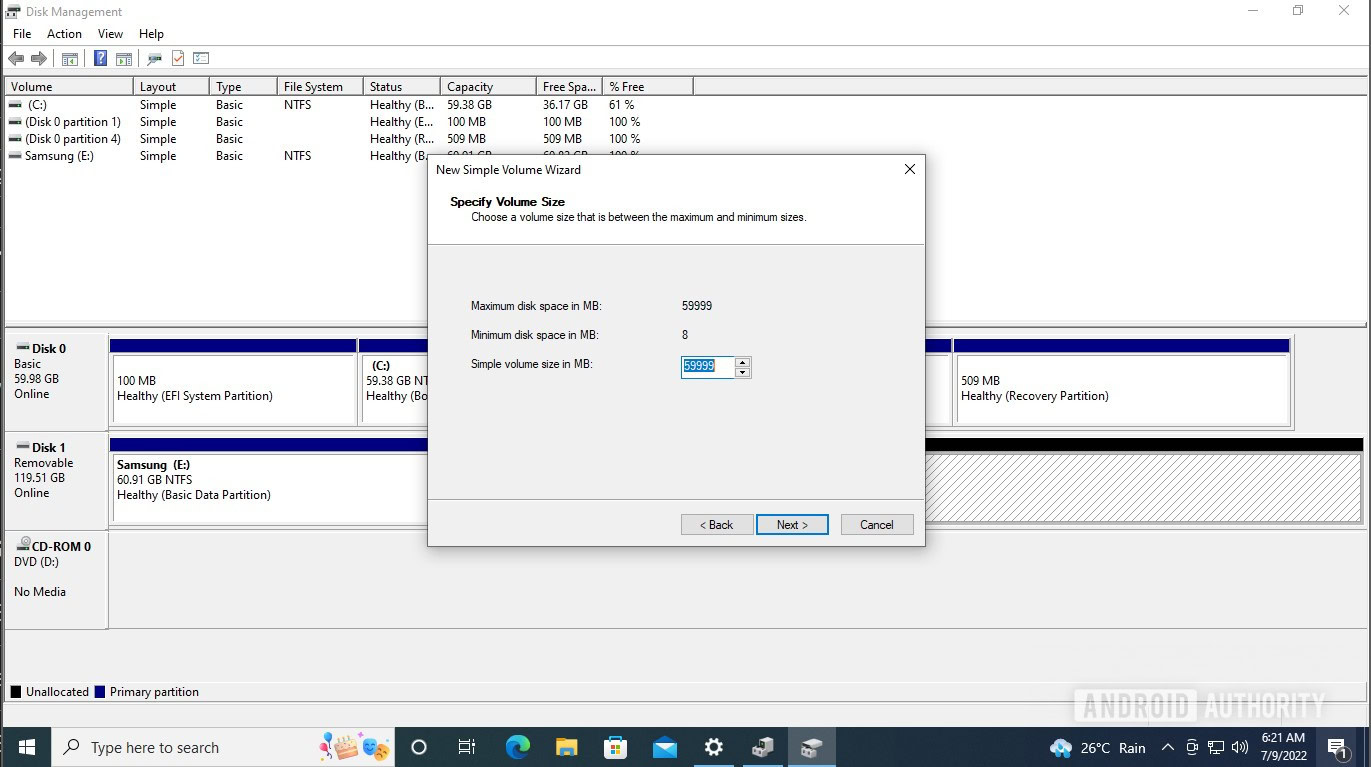
- In the box next to Simple volume size in MB, the default figure will be the maximum available space. You can reduce it by typing in a lower figure in the box if you want another partition, or leave it as is if you just want to make one partition, and click Next.
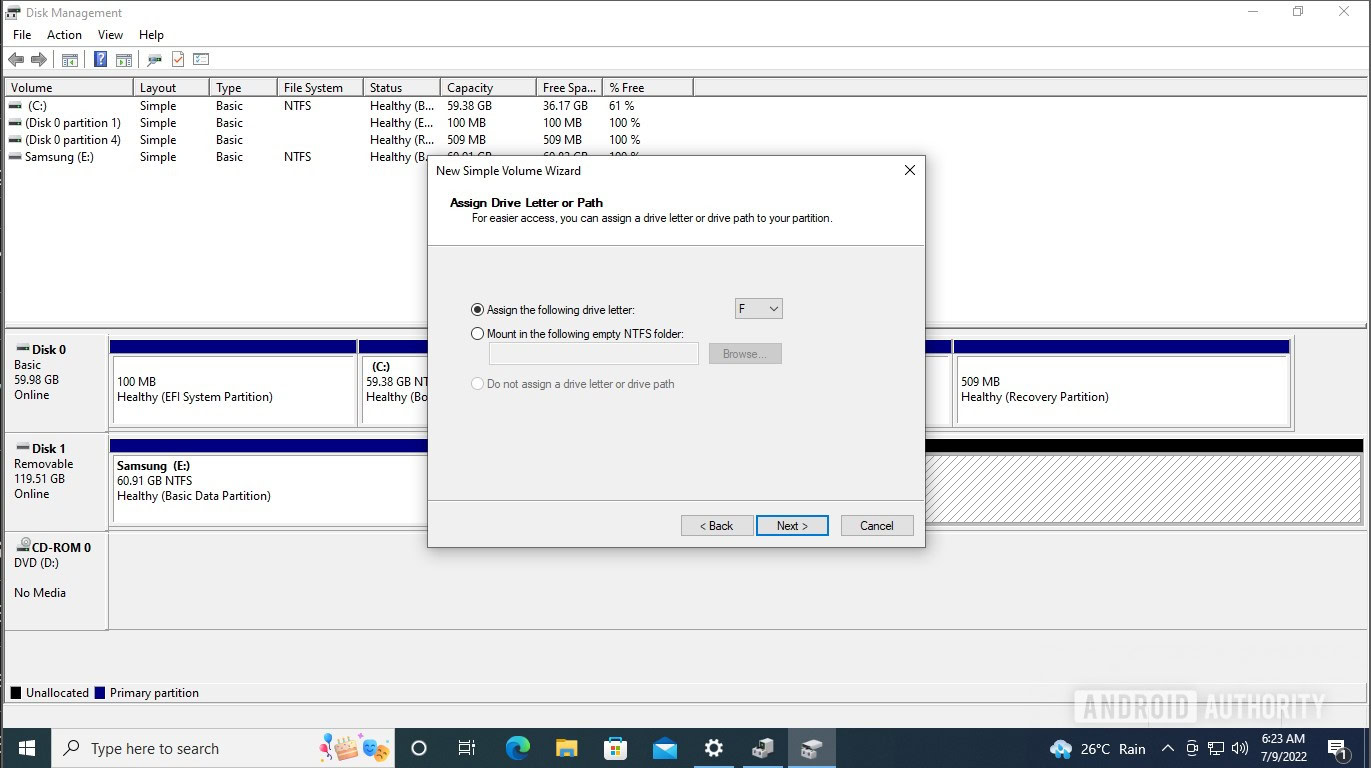
- You can assign a different letter on this screen using the drop-down, or just stick to the default one and click Next.
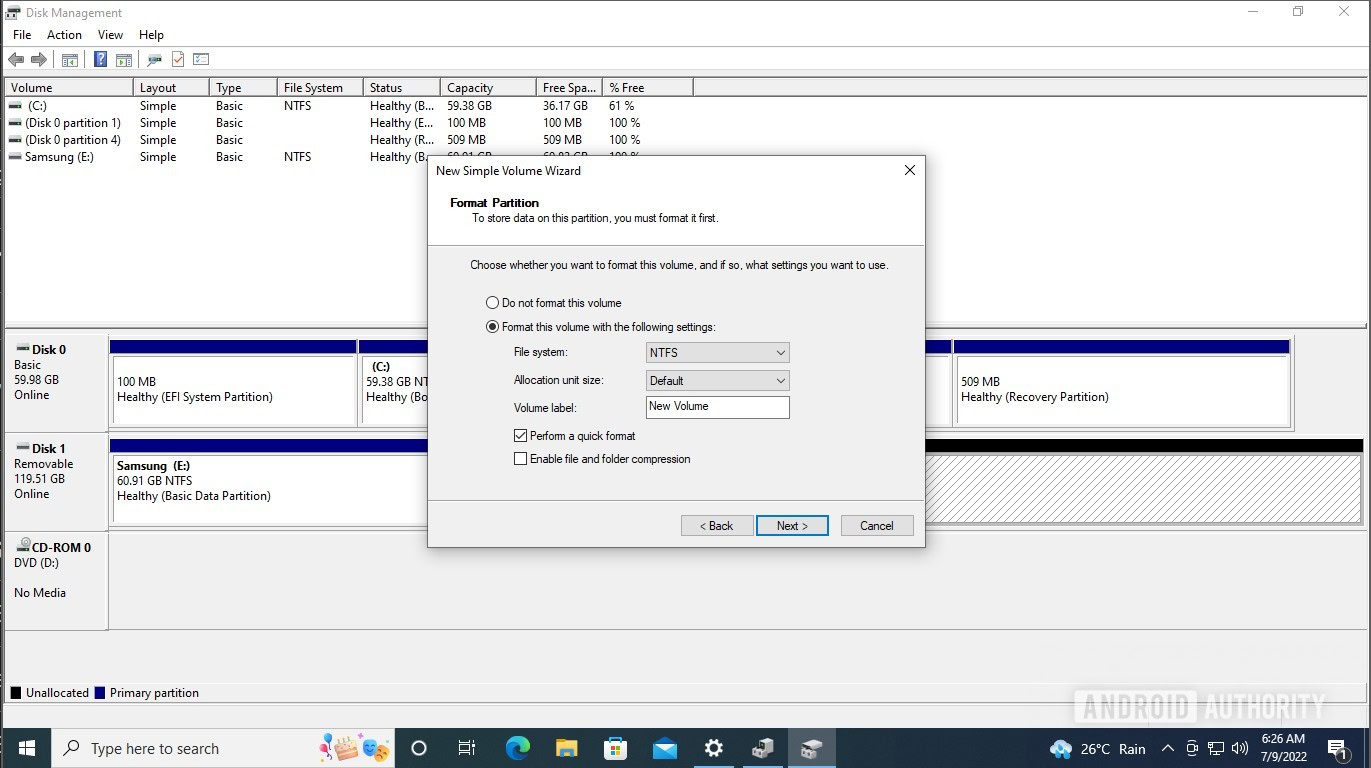
- On the next screen, you can choose the file system and name for the partition. Configure it as per your needs, and click Next.
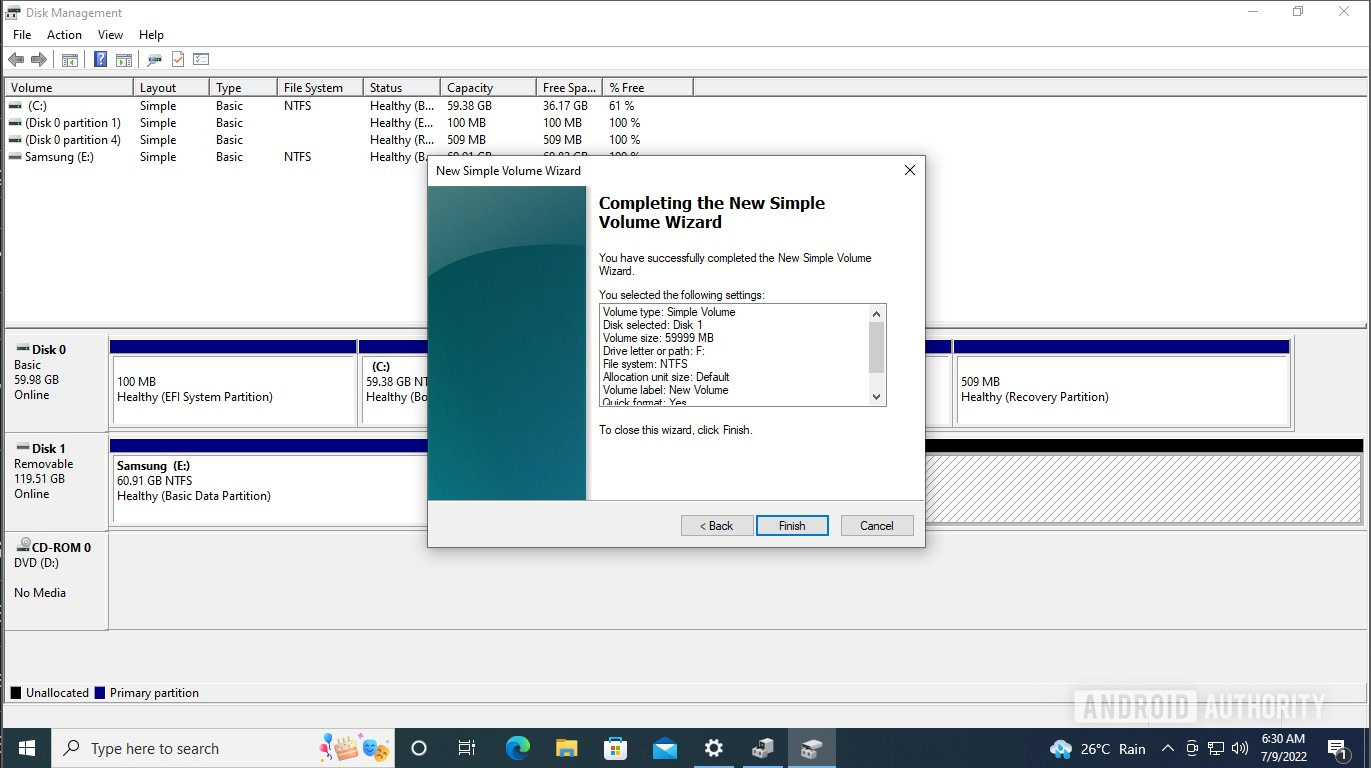
- Take a final look, and click Finish to create the new partition.
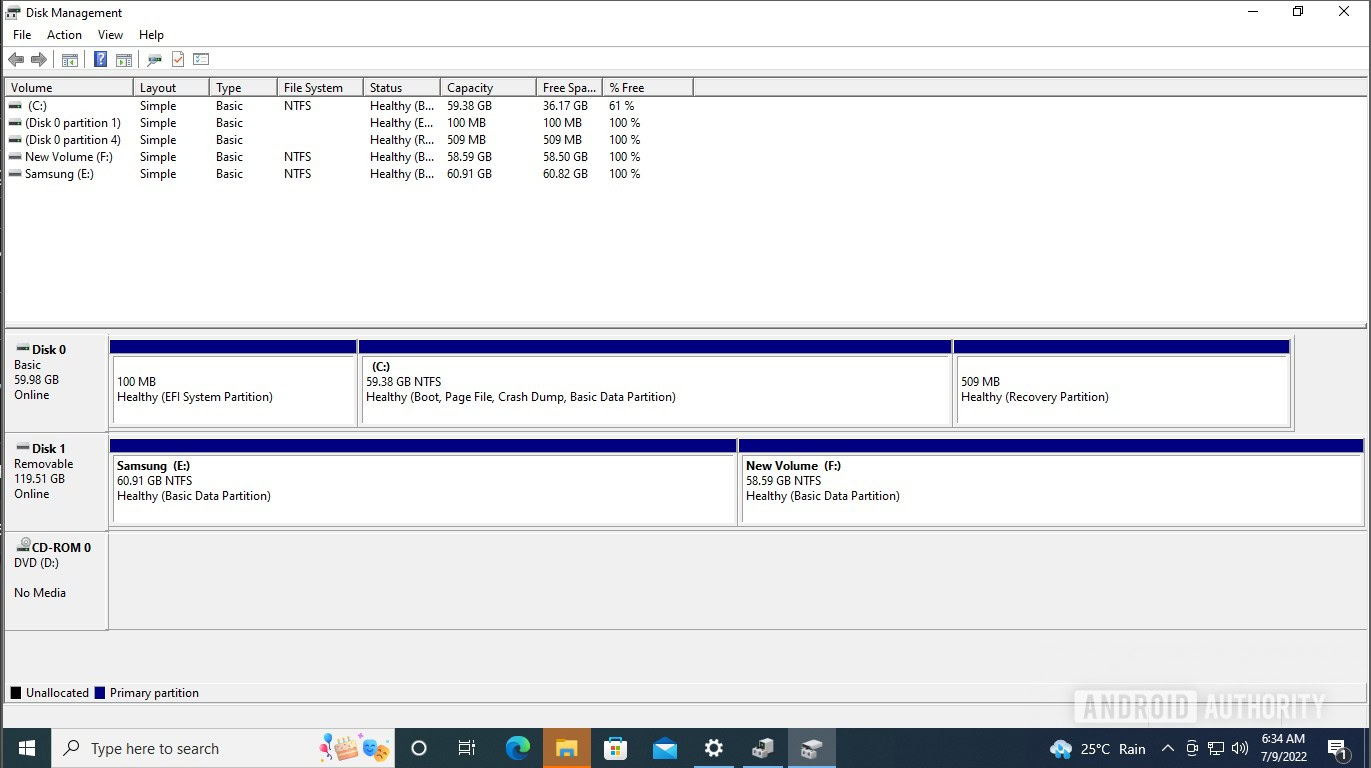
- It will take a couple of seconds, but the partition will show up in the grid view of your external disk in Disk Manager.
If you want to create another partition, you can repeat the process to create a new volume with the allocated space you left before, or repeat the whole process by shrinking existing partitions.
FAQs
There are no downsides to partitioning your external hard disk. It depends upon what kind of usage you want from your external hard disk. It’s good to partition it if you want to use the hard disk for two different purposes and don’t want to mix up your files.
It’s not a necessary thing. It solely depends upon your usage and whether the usage warrants having partitions for different purposes.
Yes, Disk Management in Windows lets you do that. You will need unallocated space available if you want to extend a partition, and if you’re shrinking a partition, it will leave you with unallocated space that you can use to extend other partitions.
A full format of the hard drive erases the data on it irrecoverably. However, a quick format merely deletes the files, leaving them recoverable with specialized software.
You should check if your hard drive has any partitions for an OS you no longer need, through disk management. This will also bring to light any unallocated space. Then partition the drive as needed for the new usage, and format it with the filesystem needed.