Affiliate links on Android Authority may earn us a commission. Learn more.
Start sharing your code: Everything you need to know about Git and GitHub
Published onJune 13, 2019
If you’ve ever explored the world of software development, then chances are you’ve heard of GitHub.
This code hosting platform is one of the most popular ways for developers to host their projects and share them with others. Today, some of the best-known open source projects use GitHub, including Firebase, React Native, and TensorFlow. Google even have their own GitHub repositories, where you can find all of the Android sample apps.
There’s lots of different reasons why you might be interested in getting to grips with GitHub. Maybe you’ve seen a great project but are unsure how to get its source code from the GitHub website and onto your local machine, or maybe you’ve developed your own Android app and want to share it with the world. Perhaps you’ve fixed a bug in a project that’s hosted on GitHub and want to contribute your code back to the original project.
In this tutorial, I’ll provide a complete introduction to both GitHub and Git (and explain the differences between the two!) By the end of this tutorial, you’ll have created a repository on your local machine and a remote repository on the GitHub website, connected the two, and will have pushed multiple files from your local repository, to a publicly-available GitHub repository.
Since collaboration is a huge part of GitHub, I’ll also show you how to create multiple branches within the same repository, and how to submit a pull request, so you can start contributing to any project that’s currently hosted on GitHub.
What is GitHub?
GitHub is a website of repositories where developers can store and share their projects, and contribute to other people’s projects.
GitHub supports all programming languages, and all file types including images, videos, spreadsheets and text files. Although we tend to think about GitHub in the context of software development, you could use GitHub to host a project that doesn’t contain any code, for example Microsoft store all of their Azure docs over at GitHub.
GitHub can also help developers collaborate on a project, whether that’s working with other members of your development team or collaborating with people who simply like your project and want to help out. Anyone can use GitHub to raise issues, suggest new features, and even contribute code to another person’s project, so by hosting your project on GitHub you could find yourself with a whole new team of contributors!
By promoting this kind of collaboration, GitHub has developed strong ties with the open source community, which is a method of software development where a project’s source code is freely available.
When you can view a project’s source code, you can also fix bugs, add new features, and use the code as the basis for your own projects – and GitHub is ideally suited to each of these tasks!
Depending on how the original open source project is licensed, you may even be able to use it as the basis for commercial products, for example there’s countless commercial Linux distributions available (although whether that includes Android is still up for debate!)
What’s the difference between Git and GitHub?
GitHub and Git are often used alongside each other, and sometimes the terms are even used interchangeably, but they are two distinct tools.
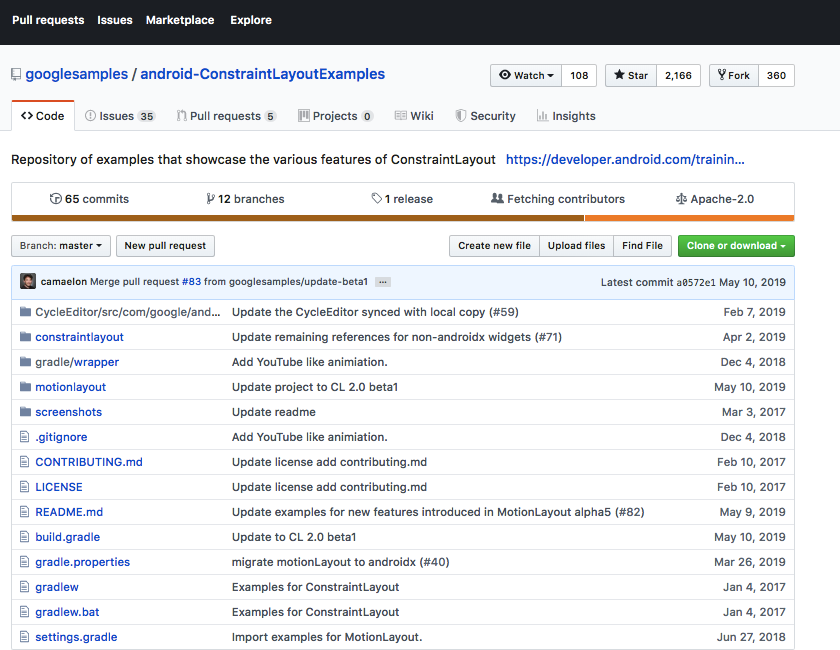
Git is a distributed version control tool that runs locally on your computer, and that you can use to manage your project’s source history. GitHub is a cloud-based platform built around the Git tool. The following screenshot shows an example of a GitHub repository.
Typically, you’ll use Git to connect to GitHub, and then use Git to perform tasks such as pushing your code to GitHub, and pulling code from GitHub.
While cloud-based hosting services such as GitHub are frequently used with Git, Git doesn’t require GitHub to function. You could potentially use Git to perform version control and work collaboratively, without ever creating a GitHub account.
Getting started: Git, GitHub.com or GitHub Desktop?
There’s several ways that you can interact with GitHub, including some methods that don’t require you to issue any Git commands.
To give you the best possible overview, I’ll be covering three major methods:
- Installing Git and issuing Git commands from your Mac’s Terminal, or the Command Prompt if you’re a Windows user.
- Heading over to GitHub.com, and navigating its various menus. as shown in the following screenshot.
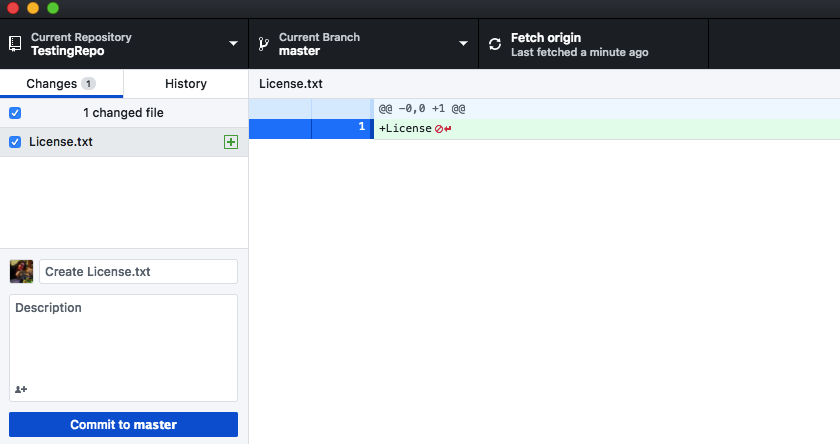
- Using the popular GitHub Desktop app, as shown in the following screenshot.
By the end of this tutorial, you’ll have performed some essential Git and GitHub tasks using each of the above methods, so you’ll be in a position to choose which approach works the best for you.
Setting up Git and GitHub tutorial
To start, you’ll need to create a GitHub account and install the Git version control tool.
Open your web browser and head over to the GitHub website, select “Sign Up” and then follow the onscreen instructions to create your GitHub account.
Assuming you’re not a student, you can choose between a Free or a Pro account. If you opt for the free account, then you’ll be limited to three collaborators for any private repositories you create. If you invest in a Pro account ($7 per month at the time of writing) then you’ll have unlimited collaborators plus access to some additional tools and insights.
If you’re a student, then it’s worth looking into the free GitHub Student Developer Pack, which provides access to some additional tools, including Amazon Web Services, Heroku, Unreal Engine, and Microsoft Azure.
Next, you need to install and configure the Git version control system:
- Head over to the Git website and download the latest version for your operating system.
- Once Git has downloaded, launch the file and follow the onscreen instructions to install.
- You now need to configure Git, so launch a Terminal (macOS) or Command Prompt, if you’re a Windows user.
- Copy/paste the following command into the Terminal/Command Prompt window, making sure to replace “Name” with your GitHub username:
git config -- global user.name "Name"- Press the “Enter” key on your keyboard.
- Copy/paste the next command into the Terminal or Command Prompt – don’t forget to replace user@example.com with your own email address!
git config --global user.email user@example.com- Press the “Enter” key.
Understanding GitHub projects
Every GitHub project is stored in its own repository, which is typically divided into multiple files and folders.
Although GitHub users can technically structure their projects however they want, there’s a few files that you should incorporate into every GitHub project.
If you navigate to pretty much any repository on GitHub.com, then you’ll almost always find one or both of the following files:
- README.md. This should contain essential information about your project, including how to build it on your local machine. Since a README file is usually just plain text, throughout this tutorial we’ll be creating dummy README files and then committing them to different remote GitHub repositories.
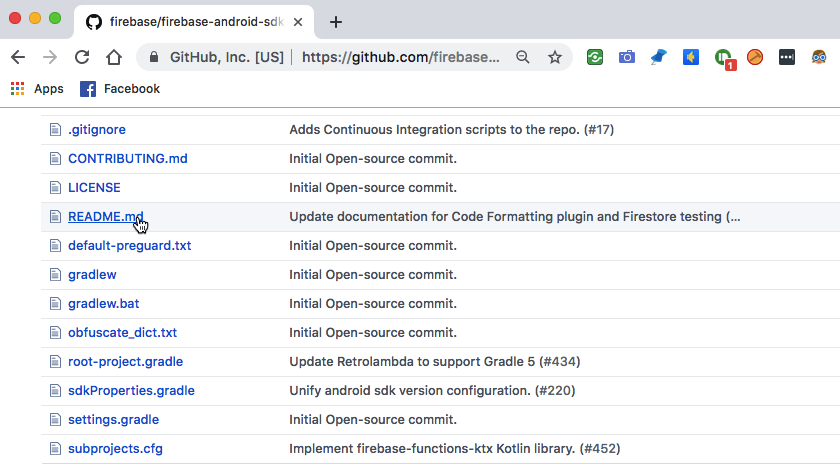
- LICENSE.md. Just because a project is open source, doesn’t automatically mean you can do whatever you want with it! The term open source covers a wide range of different licenses, and some of these licenses have very strict rules about how you can use, modify and redistribute the project’s code. Before doing anything with a project, you should read its accompanying LICENSE.md carefully, to ensure you’re not going against the developer’s wishes. If a GitHub project doesn’t contain a LICENSE.md file, then you may be able to find some licensing information in its README file instead. If in doubt, then you can always reach out to the project’s owner for clarification.
Creating your first GitHub repository
GitHub provides a way to share your work without any of the time, effort or cost typically associated with maintaining your own website or code-hosting platform: simply upload your project to GitHub, and anyone will be able to download and contribute to it.
To host a project on GitHub, you’ll need to create two repositories:
- A local repository, which is essentially just a regular folder on your local machine. This should contain all the files and folders that you want to push to GitHub.
- A remote repository on the GitHub.com website.
Your local and remote repositories will communicate with one another via Git.
Once you’ve connected these two repositories, you can continue to work on your project as normal on your local machine, while periodically pushing your changes to GitHub, as and when required.
Let’s start by creating a remote repository. We can complete this task without issuing any Git commands, by using the GitHub.com website:
- In your web browser, head over to GitHub.com and log into your GitHub account, if you haven’t already.
- In GitHub’s toolbar, select the “+” icon, followed by “New Repository.”
- Give your repository a name and provide a description.
- Decide whether your repository should be public, or private. Unless you have a specific reason not to, you should make your repository public so that other people can download it, and perhaps even contribute to your project at some point.
- You now have the option to automatically generate an empty README file, by selecting the “Initialize this repository” checkbox. Since we’ll be creating this file manually, make sure you leave “Initialize this repository” deselected.
- When you’re happy with the information you’ve entered, click “Create Repository.”
GitHub will now create a remote repository, ready and waiting for your first commit.
Creating a local repository with “git init”
Next, you’ll need to create a local repository and connect it to your remote repository. For this step, we need to delve into Git commands:
- On your local machine, create a folder in any location. I’m going to create a “TestRepo” folder on my Desktop.
- Launch your Mac’s Terminal, or Command Prompt if you’re a Windows user.
- We now need to change directory (cd) so that the Terminal or Command Prompt is pointing at the local repository you just created, which for me is “/Desktop/TestRepo.” In the Terminal or Command Prompt, type “cd” followed by the complete file path of your local repository. For example, here’s my command:
cd /Users/jessicathornsby/Desktop/TestRepo- Run this command by pressing the “Enter” key on your keyboard.
- To transform “TestRepo” into a local GitHub repository, you’ll need to create a .git subdirectory containing all your repository’s metadata. To create this subdirectory, type the following command into your Terminal or Command Prompt, and then press the “Enter” key:
git init- At this point, your “TestRepo” folder is an initialized repository that can communicate with your remote GitHub repository. You just need to let Git know which remote repository it should be communicating with! Copy/paste the following command into the Terminal or Command Prompt, but don’t press the “Enter” key just yet:
git remote add origin- You need to specify the URL of your remote repository, followed by the .git suffix. For example, I’m connecting my local repo to https://github.com/JessicaThornsby/TestRepo, so here’s my command:
git remote add origin https://github.com/JessicaThornsby/TestRepo.git- Press the “Enter” key on your keyboard.
From this point onwards, your local repository will remember which remote repository it needs to send its changes to.
Uploading a file to your GitHub repo
Now we’ve connected our local and remote repositories, let’s look at how we can use this connection to send a file from our local machine, to the GitHub servers.
I’ll be using an empty README text file, but you can use any file you want. Just be aware that by the end of this section, your file will be publicly available on GitHub.com, so make sure it doesn’t contain any personal information.
- Create or find the file that you want to push to GitHub.com, and then drag and drop this file into your local repository i.e the folder on your local machine.
- Now, we need to prepare our commit, by picking and choosing which items we want to “add” to Git’s staging area. Every item placed in Git’s staging area, will be bundled into your next commit, and eventually pushed to GitHub. In the Terminal or Command Prompt window, type “git add” followed by the name and extension of each item that you want to add to Git’s staging area, for example:
git add ReadMe.txt- Press the “Enter” key on your keyboard.
- You can now prepare your commit, using the “git commit” command. At this point you can also add an optional commit message describing all the changes included in this commit. By providing a message for each commit, you’ll create a complete history of your project, which can be invaluable for other members of your team, but can also be useful if you ever need to pinpoint when a particular change occurred. You provide a commit message using an “-m” flag, which is exactly what I’m doing with the following command:
git commit -m "creating a README file"- Press the “Enter” key on your keyboard.
- Now you’re ready to push this commit to your remote GitHub repository. We’ll be exploring multiple branches in the next section, so for now just be aware that we’re pushing this commit to our repository’s master branch. Copy/paste the following command, and then press the “Enter” key:
git push -u origin master- When prompted, enter your GitHub username and password, and then press “Enter.” Git will now push your commit to GitHub’s servers.
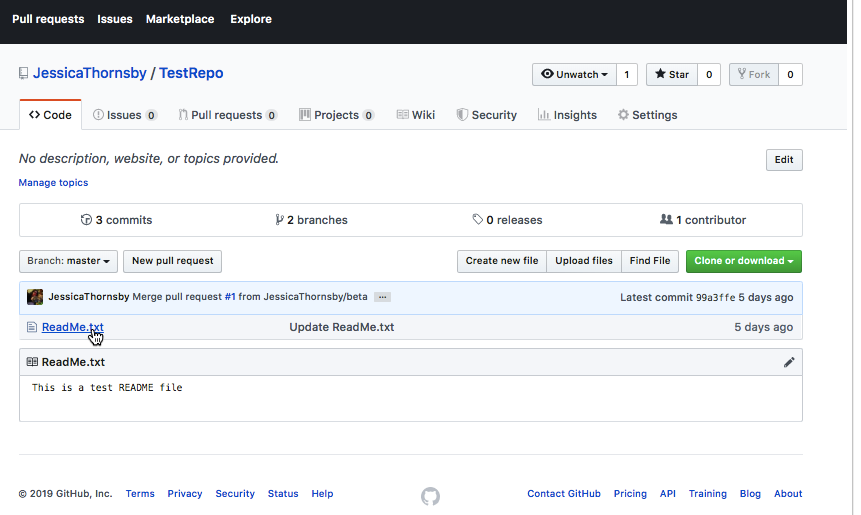
- In your web browser, head over to GitHub; the README file should now be appearing in your remote repository.
Branching and merging
Branching is a core concept of Github, as it allows you to maintain multiple versions of the same project simultaneously.
Branching is often used to experiment with new features and code before committing this work to the project’s master branch, which is generally considered its stable branch. For example, if you take a look at the repository for Google’s cross-platform Flutter SDK, then you’ll find branches such as “dev” and “beta” which contain code that isn’t currently considered stable, but may at some point be pulled into the stable master branch.
By publishing experimental code to GitHub, you can get feedback from your users, collaborate with other developers, or simply have the added security of knowing that even if your local machine crashes, you won’t lose that experimental code you’ve been working on.
Branches can also be used to develop versions of your project that are tailored for a particular client, user demographic, or operating system.
Since branching is such a huge part of GitHub, let’s add a branch to our repository:
- In your web browser, navigate to your remote GitHub.com repository.
- Find the “Branch: Master” button (where the cursor is positioned in the following screenshot) and give it a click.
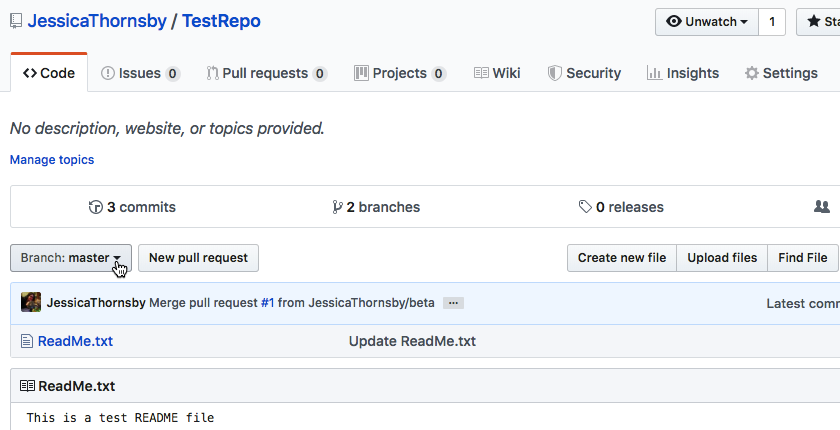
- In the subsequent window, type the name of the branch that you want to create. I’m naming mine “beta.”
- Select “Create branch.”
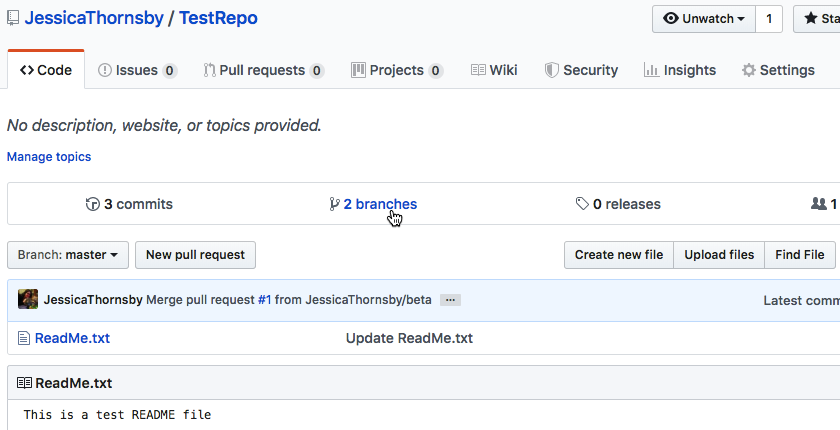
You now have two branches, and can navigate between them by selecting your repository’s “branches” tab.
Working with multiple branches
Currently, our two branches contain exactly the same README file.
To get an overview of how you’d typically use branching in your real-world projects, let’s make some changes to the “beta” version of README, as if this is the experimental version of this file. We’ll then assume these changes have been approved, and merge the beta README with the version in our stable branch.
To make things easier, I’m going to edit the README directly in GitHub’s text editor:
- Switch to your “beta” branch by selecting your remote repository’s “branches” tab, followed by “beta.”
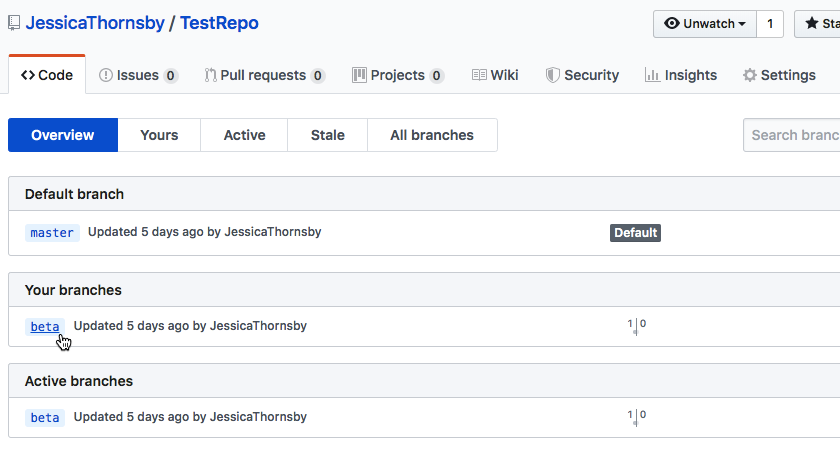
- Find the little pencil icon that appears alongside the README file, and give it a click.
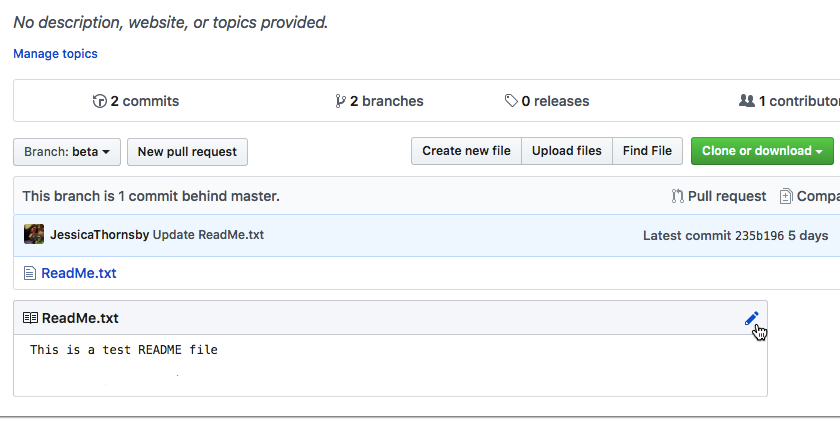
- You should now be viewing README in GitHub’s text editor. Make some changes so this version of the file is noticeably different to the version in your master branch.
- Once you’re happy with your changes, scroll to the bottom of the page and make sure the following checkbox is selected: “Commit directly to the beta branch.”
- Click the green “Commit changes” button.
At this point, you’ll have different versions of README in your master and beta branch.
Merging your changes: Making a pull request
You merge changes from one branch into another branch by opening a pull request.
When you open a pull request for a third party project, you’re essentially asking the project’s owner to review your branch and (hopefully) pull your work into their branch. However, you also need to submit a pull request if you’re the owner of both branches, which is exactly what we’re doing in this section.
When you create a pull request, GitHub will highlight all the differences (referred to as “diffs”) between these branches, so you can preview the finished result before going ahead with the merge.
Let’s submit a pull request, to merge the beta README into the stable README:
- In your web browser, select GitHub’s “Pull requests” tab.
- Click the green “New pull request” button.
- In the “Example comparisons” box, select the branch that you just created, which in my instance is “beta.”
- GitHub will now highlight all the “diffs” between this branch and the master branch. Review these differences, and if you’re happy to proceed then click the “Create pull request” button.
- Give your pull request a title and provide some text describing your changes. If you’re submitting this pull request to a third party then it’s particularly important to provide as much information as possible. Where appropriate, you can also attach files such as screenshots and videos, to help illustrate your proposed changes.
- When you’re happy with the information you’ve entered, click “Create pull request.”
Reviewing GitHub merge requests
Since we’re working within the same project, we’ve essentially sent a pull request to ourselves.
In this section, we’ll review and accept the pull request, which will merge the beta README into our stable branch:
- Select the “Pull requests” tab. This screen displays all the pull requests you’ve received over the lifetime of your project.
- Find the pull request you just submitted, and give it a click.
- Review the information about this pull request, including any potential conflicts that GitHub has identified.
- If you’re happy to proceed, then find the “Merge pull request” button and click its accompanying arrow. At this point, you can choose to “Squash and merge,” “Rebase and merge,” or “Create a merge commit.” To merge all the commits from the beta branch into the master branch, select “Create a merge commit.”
- Select “Confirm merge,” and all the changes from your beta README file will be merged into the master README file.
GitHub Desktop tutorial: Using an app
Throughout this tutorial, we’ve used a combination of Git commands and the GitHub website, but you can also interact with GitHub using a dedicated app. Applications can be particularly useful when you’re first getting to grips with GitHub, as they allow you to perform complex tasks without having to know a tonne of Git commands.
In this final section, I’ll show how to setup the popular GitHub Desktop app, and then use it to perform some essential GitHub actions.
- Head over to the GitHub Desktop website and download the latest version.
- Launch the resulting ZIP file.
- Launch GitHub Desktop, and when prompted select “Sign into GitHub.com”
- Enter your GitHub username and password. You should now be taken to the main GitHub Desktop user interface.
Creating local and remote repositories, without Git commands
You can use GitHub Desktop to connect to an existing repository, but this application makes it particularly easy to create a pair of connected local and remote repositories.
In this section, I’ll show you how to create two new repositories, and then push a file from your local machine to the remote GitHub servers, using the GitHub Desktop app.
- Launch GitHub Desktop, if you haven’t already.
- Inside the app, select “File > New Repository” from the menu bar.
- Give your repository a name and provide a description.
- Specify where this local repository should be created on your computer, either by typing the complete file path or by selecting “Choose…” and then navigating to the desired location.
- When you’re happy with the information you’ve entered, click “Create repository.”
- To create a corresponding remote repository, select the “Publish repository” button.

- Head over to GitHub, and you should notice that a new, empty repository has been created for your account.
Push to origin: Building your commit
If you followed this GitHub and Git tutorial correctly you can now work on a project inside your local repository, as normal, and commit your work as and when required. As before, let’s try pushing a dummy README to our remote repository:
- Navigate to the location where you created your local repository. If you’ve forgotten where this is, then GitHub Desktop has a helpful “Show in Finder” button, or you can select “Repository > Show in Finder” from the GitHub Desktop menu bar.
- Create or find the file that you want to commit to GitHub. Remember that this file will be publicly available, so make sure it doesn’t contain any personal information! I’ll be using a README text file.
- Drag and drop your chosen file into your local repository. The GitHub Desktop app should now update to display all the changes you’ve made to the local repository.

- Towards the bottom-left of GitHub Desktop, enter a summary and a description explaining the work that’s included in this commit.
- To prepare your commit, click the “Commit to master” button.
- When you’re ready to push your changes to GitHub, select “Push origin” from the GitHub Desktop toolbar.
- Head back over to GitHub.com – your file should now be available in your remote repository.
GitHub Desktop can perform a wide range of additional tasks, so if you prefer interacting with GitHub using an application, then you should check out GitHub Desktop’s docs for more information.
Wrapping up with this Github and Git tutorial
This tutorial covered everything you need to know, in order to start using Git and GitHub. We looked at how you can complete all the essential GitHub tasks, including creating local and remote repositories, submitting pull requests, and merging multiple branches.
To help provide an overview of all the different ways that you can interact with GitHub, we moved between using Git commands, the GitHub.com website, and the GitHub Desktop application. Which method do you prefer? Let us know in the comments!