Affiliate links on Android Authority may earn us a commission. Learn more.
Poly API: Retrieving 3D assets for your VR and AR Android apps
Published onJanuary 15, 2019
Do you have a great idea for a Virtual Reality (VR) or Augmented Reality (AR) mobile app, but no idea how to bring your vision to life?
Unless you’re an Android developer who also happens to be an experienced 3D artist, then creating all the assets required to deliver an immersive, 360 degree experience, can be a daunting process.
Just because you don’t have the time, resources or experience necessary to create 3D models, doesn’t mean you can’t build a great VR or AR mobile app! There’s a huge range of 3D resources freely available on the World Wide Web, plus all the APIs, frameworks and libraries you need to download and render these assets in your Android applications.
Read Next: You can now visit any website using Daydream VR. Even that one.
In this article, we’re going to be looking at Poly, an online repository and API that puts thousands of 3D assets at your fingertips. By the end of this article, you’ll have created an app that retrieves a 3D Poly asset at runtime, and then renders it using the popular Processing for Android library.
Displaying 3D assets with Poly
If you’ve ever dabbled in Unity development, then the Poly repository is similar to the Unity Asset Store – except that everything in Poly is free!
Many of Poly’s 3D models are published under the Creative Commons license, so you’re free to use, modify and remix these assets, as long as you give the creator appropriate credit.
All of Poly’s 3D models are designed to be compatible with Google’s VR and AR platforms, such as Daydream and ARCore, but you can use them wherever and however you want – potentially, you could even use them with Apple’s ARKit!
When it comes to retrieving and displaying Poly assets, you have two options. Firstly, you can download the assets to your computer and then import them into Android Studio, so they ship with your application and contribute towards its APK size, or you can retrieve these assets at runtime using the Poly API.
The cross-platform, REST-based Poly API provides programmatic, read-only access to Poly’s huge collection of 3D models. This is more complicated than bundling assets with your APK, but there’s several benefits to retrieving Poly assets at runtime, most notably that it helps to keep your APK size under control, which can affect how many people download your application.
You can also use the Poly API to give your users more choice, for example if you’re developing a mobile game then you could let your users choose from a range of character models.
Since you’re free to modify the Poly models, you could even let your users tweak their chosen character, for example by altering the hair or eye color, or by combining it with other Poly assets, such as different weapons and armour. In this way, the Poly API can help you deliver an impressive range of 3D assets, with lots of scope for personalizing the experience – and all for comparatively little work. Your users will be convinced that you’ve spent a tonne of time, meticulously crafting all of these 3D models!
Creating a 3D modelling project
We’re going to create an application that retrieves a particular Poly asset when the application is first launched, and then displays that asset in fullscreen mode, at the user’s request.
To help us retrieve this asset, I’ll be using Fuel, which is a HTTP networking library for Kotlin and Android. Start by creating a new project with the settings of your choice, but when prompted opt to “Include Kotlin support.”
All calls you make to the Poly API must include an API key, which is used to identify your app and enforce usage limits. During development and testing, you’ll often use an unrestricted API key, but if you have any plans to release this app, then you must use an Android-restricted API key.
To create a restricted key, you’ll need to know your project’s SHA-1 signing certificate, so let’s get this information now:
- Select Android Studio’s “Gradle” tab (where the cursor is positioned in the following screenshot). This opens a “Gradle projects” panel.
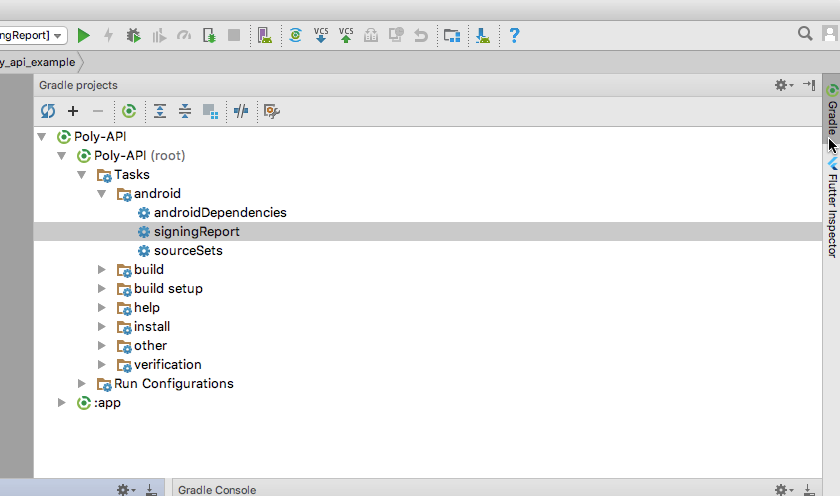
- In the “Gradle projects” panel, double-click to expand your project’s ‘root,’ and then select “Tasks >Android > Signing Report.” This opens a new panel along the bottom of the Android Studio window.
- Select the ‘Toggle tasks executions/text mode” button (where the cursor is positioned in the following screenshot).
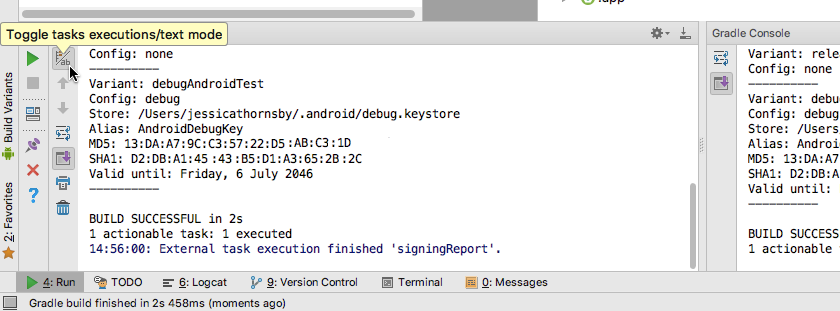
The “Run” panel will now update to display lots of information about your project, including its SHA-1 fingerprint.
Create a Google Cloud Platform account
To acquire the necessary API key, you’ll need a Google Cloud Platform (GPC) account.
If you don’t have an account, then you can sign up for a 12 month free trial by heading over to the Try Cloud Platform for free page, and following the instructions. Note that a credit card or debit card is required, but according to the Frequently Asked Questions page, this is merely used to verify your identity and “you will not be charged or billed during your free trial.”
Get your Poly API key
Once you’re all signed up, you can enable the Poly API and create your key:
- Head over to the GCP Console.
- Select the lined icon in the upper-left corner, and choose “APIs & Services > Dashboard.”
- Select “Enable APIs and services.”
- In the left-hand menu, choose “Other.”
- Select the “Poly API” card.
- Click the “Enable” button.
- After a few moments, you’ll be taken to a new screen; open the side-menu and choose “APIs & Services > Credentials.”
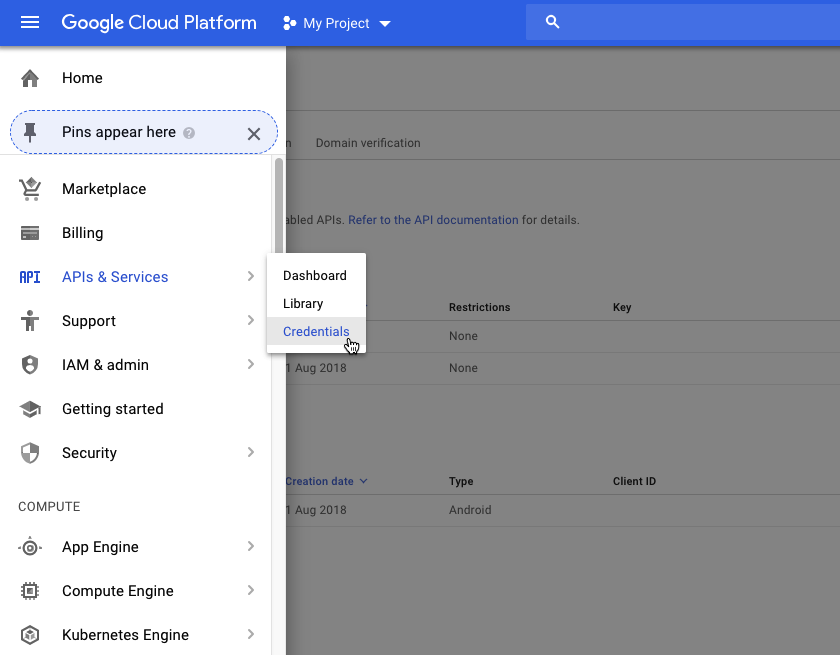
- In the subsequent popup, select “Restrict key.”
- Give your key a distinctive name.
- Under “Application restrictions,” select “Android apps.”
- Select “Add package name and fingerprint.”
- Copy/paste your project’s SHA-1 fingerprint into the “Signing-certificate fingerprint” field.
- Enter your project’s package name (it appears in your Manifest and at the top of every class file).
- Click “Save.”
You’ll now be taken to your project’s “Credentials” screen, which contains a list of all your API keys – including the Poly-enabled API key that you just created.
Project dependencies: Fuel, P3D and Kotlin extensions
In order to retrieve and display Poly assets, we’ll need a helping hand from some additional libraries:
- Fuel. Poly currently doesn’t have an official Android toolkit, so you’ll need to work with the API directly using its REST interface. To make this process simpler, I’ll be using the Fuel HTTP networking library.
- Processing for Android. I’ll be using this library’s P3D renderer to display the Poly asset.
Open your project’s build.gradle file, and add these two libraries as project dependencies:
dependencies {
   implementation fileTree(include: ['*.jar'], dir: 'libs')
   implementation "org.jetbrains.kotlin:kotlin-stdlib-jre7:$kotlin_version"
   implementation 'com.android.support:appcompat-v7:27.1.1'

//Add the Fuel library//

   implementation 'com.github.kittinunf.fuel:fuel-android:1.13.0'

//Add the Processing for Android engine//

   implementation 'org.p5android:processing-core:4.0.1'
}
To make our code more concise, I’ll also be using Kotlin Android extensions, so let’s add this plugin while we have the build.gradle file open:
apply plugin: 'kotlin-android-extensions'Finally, since we’re retrieving the asset from the Internet, our app needs the Internet permission. Open your Manifest and add the following:
<uses-permission android:name="android.permission.INTERNET"/>Adding your API key
Every time our app requests an asset from Poly, it needs to include a valid API key. I’m using placeholder text, but you must replace this placeholder with your own API key if the application is ever going to work.
I’m also adding a check, so that the application will display a warning if you forget to replace the “INSERT-YOUR-API-KEY” text:
import android.os.Bundle
import android.support.v7.app.AppCompatActivity

class MainActivity : AppCompatActivity() {

   companion object {
      const val APIKey = "INSERT-YOUR-API-KEY"
   }

   override fun onCreate(savedInstanceState: Bundle?) {
       super.onCreate(savedInstanceState)
       setContentView(R.layout.activity_main)

//If the API key begins with “INSERT”...//

       if (APIKey.startsWith("INSERT")) {

//then display the following toast….//

           Toast.makeText(this, "You haven't updated your API key", Toast.LENGTH_SHORT).show()

       } else {
...
...
...
Retrieving the asset
You can choose any asset on the Google Poly site, but I’ll be using this model of planet Earth.
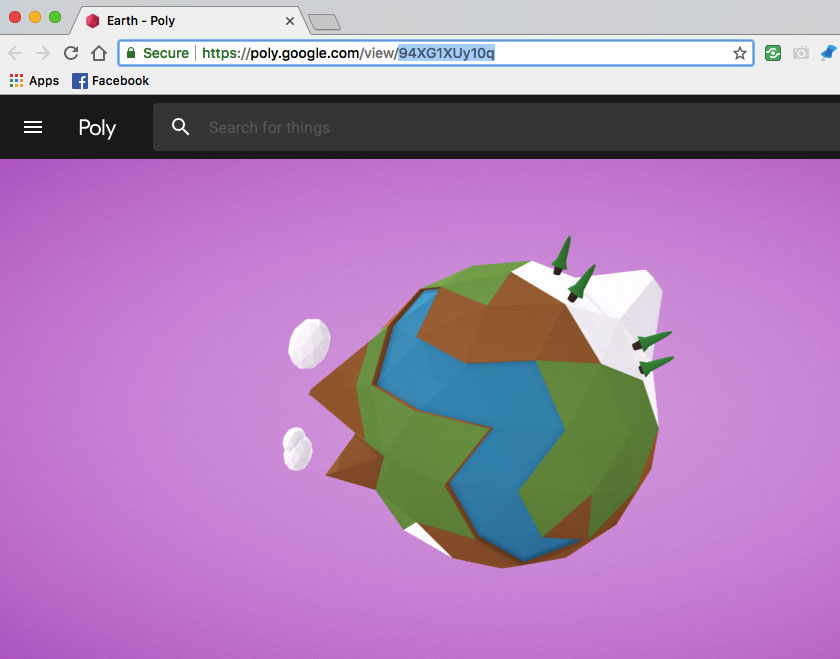
You retrieve an asset using its ID, which appears at the end of the URL slug (highlighted in the previous screenshot). We combine this asset ID, with the Poly API host, which is “https://poly.googleapis.com/v1.”
import android.content.Intent
import android.os.Bundle
import android.support.v7.app.AppCompatActivity
import android.widget.Toast
import com.github.kittinunf.fuel.android.extension.responseJson
import com.github.kittinunf.fuel.httpDownload
import com.github.kittinunf.fuel.httpGet
import kotlinx.android.synthetic.main.activity_main.*
import java.io.File

class MainActivity : AppCompatActivity() {

   companion object {
       const val APIKey = "INSERT-YOUR-API-KEY"
       val assetURL = "https://poly.googleapis.com/v1/assets/94XG1XUy10q"
   }

   override fun onCreate(savedInstanceState: Bundle?) {
       super.onCreate(savedInstanceState)
       setContentView(R.layout.activity_main)
       if (APIKey.startsWith("INSERT")) {
          Toast.makeText(this, "You haven't updated your API key", Toast.LENGTH_SHORT).show()
       } else {
Next, we need to make a GET request to the asset URL, using the httpGet() method. I’m also specifying that the response type must be JSON:
import android.content.Intent
import android.os.Bundle
import android.support.v7.app.AppCompatActivity
import android.widget.Toast
import com.github.kittinunf.fuel.android.extension.responseJson
import com.github.kittinunf.fuel.httpDownload
import com.github.kittinunf.fuel.httpGet
import kotlinx.android.synthetic.main.activity_main.*
import java.io.File

class MainActivity : AppCompatActivity() {

   companion object {
       const val APIKey = "INSERT-YOUR-API-KEY"
       val assetURL = "https://poly.googleapis.com/v1/assets/94XG1XUy10q"
   }

   override fun onCreate(savedInstanceState: Bundle?) {
       super.onCreate(savedInstanceState)
       setContentView(R.layout.activity_main)
       if (APIKey.startsWith("INSERT")) {
           Toast.makeText(this, "You haven't updated your API key", Toast.LENGTH_SHORT).show()
       } else {

//Make a server call, and then pass the data using the “listOf” method//

          assetURL.httpGet(listOf("key" to APIKey)).responseJson { request, response, result ->

//Do something with the response//

               result.fold({
                   val asset = it.obj()
The asset might have several formats, such as OBJ, GLTF, and FBX. We need to determine that the asset is in the OBJ format.
In this step, I’m also retrieving the name and URL of all the files we need to download,
including the asset’s primary file (“root”), plus any associated material and texture files (“resources”).
If our application is unable to retrieve the asset correctly, then it’ll display a toast informing the user.
import android.content.Intent
import android.os.Bundle
import android.support.v7.app.AppCompatActivity
import android.widget.Toast
import com.github.kittinunf.fuel.android.extension.responseJson
import com.github.kittinunf.fuel.httpDownload
import com.github.kittinunf.fuel.httpGet
import kotlinx.android.synthetic.main.activity_main.*
import java.io.File

class MainActivity : AppCompatActivity() {

   companion object {
       const val APIKey = "INSERT-YOUR-API-KEY"
       val assetURL = "https://poly.googleapis.com/v1/assets/94XG1XUy10q"
   }

   override fun onCreate(savedInstanceState: Bundle?) {
       super.onCreate(savedInstanceState)
       setContentView(R.layout.activity_main)
       if (APIKey.startsWith("INSERT")) {
           Toast.makeText(this, "You haven't updated your API key", Toast.LENGTH_SHORT).show()
       } else {

//Make a GET request to the asset URL//

           assetURL.httpGet(listOf("key" to APIKey)).responseJson { request, response, result ->

//Do something with the response//

               result.fold({
                   val asset = it.obj()

                   var objectURL: String? = null
                   var materialLibraryName: String? = null
                   var materialLibraryURL: String? = null

//Check the asset’s format, using the “formats” array//

                   val assetFormats = asset.getJSONArray("formats")

//Loop through all the formats//

               for (i in 0 until assetFormats.length()) {
                   val currentFormat = assetFormats.getJSONObject(i)

//Use formatType to identify this resource’s format type. If the format is OBJ….//

                   if (currentFormat.getString("formatType") == "OBJ") {

//...then retrieve this resource’s ‘root’ file, i.e the OBJ file//

                        objectURL = currentFormat.getJSONObject("root")
                                 .getString("url")

//Retrieve all the root file’s dependencies//

                       materialLibraryName = currentFormat.getJSONArray("resources")
                               .getJSONObject(0)
                               .getString("relativePath")

                       materialLibraryURL = currentFormat.getJSONArray("resources")
                               .getJSONObject(0)
                               .getString("url")
                      break
                   }
               }

               objectURL!!.httpDownload().destination { _, _ ->
                   File(filesDir, "globeAsset.obj")
               }.response { _, _, result ->
                   result.fold({}, {

//If you can’t locate or download the OBJ file, then display an error message//

                       Toast.makeText(this, "Unable to download resource", Toast.LENGTH_SHORT).show()
                  })
                }

               materialLibraryURL!!.httpDownload().destination { _, _ ->
                   File(filesDir, materialLibraryName)
               }.response { _, _, result ->
                   result.fold({}, {
                       Toast.makeText(this, "Unable to download resource", Toast.LENGTH_SHORT).show()
                   })
               }

           }, {
              Toast.makeText(this, "Unable to download resource", Toast.LENGTH_SHORT).show()
         })
       }

       }

   }
At this point, if you install the project on your Android smartphone or tablet, or Android Virtual Device (AVD), then the asset will download successfully, but the app won’t actually display it. Let’s fix this now!
Creating a second screen: Adding navigation
We’re going to display the asset in fullscreen mode, so let’s update our main_activity.xml file to include a button that, when tapped, will launch the fullscreen Activity.
<?xml version="1.0" encoding="utf-8"?>
<RelativeLayout xmlns:android="http://schemas.android.com/apk/res/android"
   xmlns:app="http://schemas.android.com/apk/res-auto"
   xmlns:tools="http://schemas.android.com/tools"
   android:layout_width="match_parent"
   android:layout_height="match_parent"
   tools:context=".MainActivity">

   <Button
       android:id="@+id/displayButton"
       android:layout_width="wrap_content"
       android:layout_height="wrap_content"
       android:layout_alignParentStart="true"
       android:layout_alignParentTop="true"
       android:layout_marginStart="23dp"
       android:text="Display asset" />

</RelativeLayout>
Now let’s add the onClickListener to the end of the MainActivity.kt file:
import android.content.Intent
import android.os.Bundle
import android.support.v7.app.AppCompatActivity
import android.widget.Toast
import com.github.kittinunf.fuel.android.extension.responseJson
import com.github.kittinunf.fuel.httpDownload
import com.github.kittinunf.fuel.httpGet
import kotlinx.android.synthetic.main.activity_main.*
import java.io.File

class MainActivity : AppCompatActivity() {

   companion object {
       const val APIKey = "INSERT-YOUR-API-KEY"
       val assetURL = "https://poly.googleapis.com/v1/assets/94XG1XUy10q"
   }

   override fun onCreate(savedInstanceState: Bundle?) {
       super.onCreate(savedInstanceState)
       setContentView(R.layout.activity_main)
       if (APIKey.startsWith("INSERT")) {
           Toast.makeText(this, "You haven't updated your API key", Toast.LENGTH_SHORT).show()
       } else {

           assetURL.httpGet(listOf("key" to APIKey)).responseJson { request, response, result ->

               result.fold({
                   val asset = it.obj()

                   var objectURL: String? = null
                   var materialLibraryName: String? = null
                   var materialLibraryURL: String? = null

                   val assetFormats = asset.getJSONArray("formats")

              for (i in 0 until assetFormats.length()) {
                   val currentFormat = assetFormats.getJSONObject(i)

                   if (currentFormat.getString("formatType") == "OBJ") {
                       objectURL = currentFormat.getJSONObject("root")
                               .getString("url")

                   materialLibraryName = currentFormat.getJSONArray("resources")
                               .getJSONObject(0)
                               .getString("relativePath")

                   materialLibraryURL = currentFormat.getJSONArray("resources")
                               .getJSONObject(0)
                               .getString("url")
                   break
                  }
             }

               objectURL!!.httpDownload().destination { _, _ ->
                  File(filesDir, "globeAsset.obj")
               }.response { _, _, result ->
                  result.fold({}, {
                     Toast.makeText(this, "Unable to download resource", Toast.LENGTH_SHORT).show()
                   })
               }

               materialLibraryURL!!.httpDownload().destination { _, _ ->
                   File(filesDir, materialLibraryName)
               }.response { _, _, result ->
            result.fold({}, {
                        Toast.makeText(this, "Unable to download resource", Toast.LENGTH_SHORT).show()
                  })
               }

          }, {
               Toast.makeText(this, "Unable to download resource", Toast.LENGTH_SHORT).show()
        })
   }

//Implement a button//

       displayButton.setOnClickListener {

           val intent = Intent(this, SecondActivity::class.java)
           startActivity(intent);

       }

   }
}
Building a 3D canvas
Now, let’s create the Activity where we’ll display our asset in fullscreen mode:
- Control-click your project’s MainActivity.kt file, and select “New > Kotlin File/Class.”
- Open the “Kind” dropdown, and select “Class.”
- Give this class the name “SecondActivity,” and then click “OK.”
In order to draw a 3D object, we need a 3D canvas! I’m going to use the Processing for Android’s library’s P3D renderer, which means extending the PApplet class, overriding the settings() method and then passing P3D as an argument to the fullScreen() method. We also need to create a property that represents the Poly asset as a PShape object.
private fun displayAsset() {
   val canvas3D = object : PApplet() {

       var polyAsset: PShape? = null

       override fun settings() {
           fullScreen(PConstants.P3D)
       }
Next, we need to initialize the PShape object, by overriding the setup() method, calling the loadShape() method, and then passing the absolute path of the .obj file:
override fun setup() {
   polyAsset = loadShape(File(filesDir, "globeAsset.obj").absolutePath)
}
Drawing on P3D’s canvas
To draw on this 3D canvas, we need to override the draw() method:
override fun draw() {
       background(0)
       shape(polyAsset)
   }
}
By default, many of the assets retrieved from the Poly API are on the smaller side, so if you run this code now, then you may not even see the asset, depending on your screen configuration. When creating 3D scenes, you’ll typically create a custom camera so that the user can explore the scene and view your 3D assets from the full 360 degrees. However, this is beyond the scope of this article so I’ll be changing the asset’s size and position manually, to make sure it fits comfortably onscreen.
You can increase the asset’s size, by passing a negative value to the scale() method:
scale(-10f)You can adjust the asset’s position in the virtual 3D space using the translate() method and the following coordinates:
- X. Positions the asset along the horizontal axis.
- Y. Positions the asset along the vertical axis.
- Z. This is the “depth/height” axis, which transforms a 2D object into a 3D object. Positive values create the impression that the object is coming towards you, and negative values create the impression that the object is moving away from you.
Note that transformations are cumulative, so everything that happens after the function accumulates the effect.
I’m using the following:
translate(-50f,-100f, 10f)Here’s the completed code:
override fun draw() {
       background(0)

       scale(-10f)
       translate(-50f,-100f)

//Draw the asset by calling the shape() method//

       shape(polyAsset)
   }
}
Next, we need to create the corresponding layout file, where we’ll add the 3D canvas as a FrameLayout widget:
- Control-click your project’s “res > layout” folder.
- Select “Layout resource file.”
- Give this file the name “activity_second,” and then click “OK.”
<?xml version="1.0" encoding="utf-8"?>
<RelativeLayout xmlns:android="http://schemas.android.com/apk/res/android"
   xmlns:tools="http://schemas.android.com/tools"
   android:layout_width="match_parent"
   android:layout_height="match_parent"
   tools:context=".MainActivity">

   <FrameLayout
       android:layout_width="match_parent"
       android:layout_height="match_parent"
       android:id="@+id/asset_view">

   </FrameLayout>

</RelativeLayout>
Now we have our “asset_view” FrameLayout, we need to let our SecondActivity know about it! Flip back to the SecondActivity.kt file, create a new PFragment instance, and point it in the direction of our “asset_view” widget:
import android.os.Bundle
import android.support.v7.app.AppCompatActivity
import kotlinx.android.synthetic.main.activity_second.*
import processing.android.PFragment
import processing.core.PApplet
import processing.core.PConstants
import processing.core.PShape
import java.io.File

class SecondActivity : AppCompatActivity() {

   override fun onCreate(savedInstanceState: Bundle?) {
       super.onCreate(savedInstanceState)
       setContentView(R.layout.activity_second)

       displayAsset()
   }

   private fun displayAsset() {
       val canvas3D = object : PApplet() {

           var polyAsset: PShape? = null

           override fun settings() {
                fullScreen(PConstants.P3D)
           }

           override fun setup() {
               polyAsset = loadShape(File(filesDir, "globeAsset.obj").absolutePath)
           }

           override fun draw() {
               background(0)

               scale(-10f)
               translate(-50f,-100f)

               shape(polyAsset)
            }
     }

//Add the following//

       val assetView = PFragment(canvas3D)
       assetView.setView(asset_view, this)
   }
}
The final step, is adding the SecondActivity to your Manifest:
<?xml version="1.0" encoding="utf-8"?>
<manifest xmlns:android="http://schemas.android.com/apk/res/android"
   package="com.jessicathornsby.poly_api_example">

   <uses-permission android:name="android.permission.INTERNET"/>

   <application
       android:allowBackup="true"
       android:icon="@mipmap/ic_launcher"
       android:label="@string/app_name"
       android:roundIcon="@mipmap/ic_launcher_round"
       android:supportsRtl="true"
       android:theme="@style/AppTheme">
       <activity android:name=".MainActivity">
           <intent-filter>
               <action android:name="android.intent.action.MAIN" />

               <category android:name="android.intent.category.LAUNCHER" />
           </intent-filter>
       </activity>

//Add the following//

       <activity android:name=".SecondActivity">
       </activity>
   </application>

</manifest>
Testing your project
We’re now ready to test the finished project! Install it on your Android device or AVD, and make sure you have an active Internet connection. As soon as the app launches, it’ll download the asset, and you can then view it by giving the “Display Asset” button a tap.
Wrapping up
In this article, we looked at how to use the Poly API to retrieve a 3D asset at runtime, and how to display that asset using the Processing for Android library. Do you think that the Poly API has the potential to make VR and AR development accessible to more people? Let us know in the comments below!
Related
- Google will bring AR apps to “hundreds of millions” of Android devices in 2018
- Google will teach you about AI and machine learning for free
- 15 best VR games for Google Cardboard
- 10 best VR apps for Google Cardboard
- What is Google Fuchsia? Is this the new Android?
- What is Google Duplex? — features, release date, and more
- How to create a VR app for Android in just 7 minutes
- Mobile VR headsets – what are your best options?