Affiliate links on Android Authority may earn us a commission. Learn more.
How to play Pokemon Go (and everything else you need to know)
Published onOctober 1, 2016
Pokemon Go has launched and we have plenty of trainers roaming the streets, looking for their next catch (not always a great one). You have probably seen all the memes and heard about it plenty of times. Everyone and their mom is on it! Even we have been playing around with the app and can see how some things may be a bit confusing.
Want to learn the ins and outs of the game? Keep reading and we will explain how everything works!
What is Pokemon Go?
If you have been following Google’s ventures, you probably know of Ingress, an augmented reality game in which you interact with your surroundings to accomplish certain goals. It was made by Niantic Labs and the same company has partnered with The Pokémon Company to bring Pokemon Go.
In this interactive game you can move through the real world and find Pokemon around you. The user becomes a Pokemon Trainer and can catch these monsters with using Poke Balls. Like in the anime and other games, you can train these pocket monsters to grow stronger and evolve. The fun part is that the game reacts to the environment around you. Different Pokemon can spawn depending on your location, terrain and time of the day.
You can also interact with PokeStops and Gyms, which we will explain more about below. And of course, you can catch tons of Pokemon!
Getting started
The initial process is rather simple. Go to the Google Play Store, download Pokemon Go and launch the app. Enter your date of birth and you will be presented with a couple ways of signing up; through Google or the game’s own Pokemon Trainer Club system. Choose your method and get started creating your character.
Once your avatar is finished, go on to choose your starter Pokemon. You can pick between the classics: Bulbasaur, Charmander and Squirtle.
How to catch a Pokemon
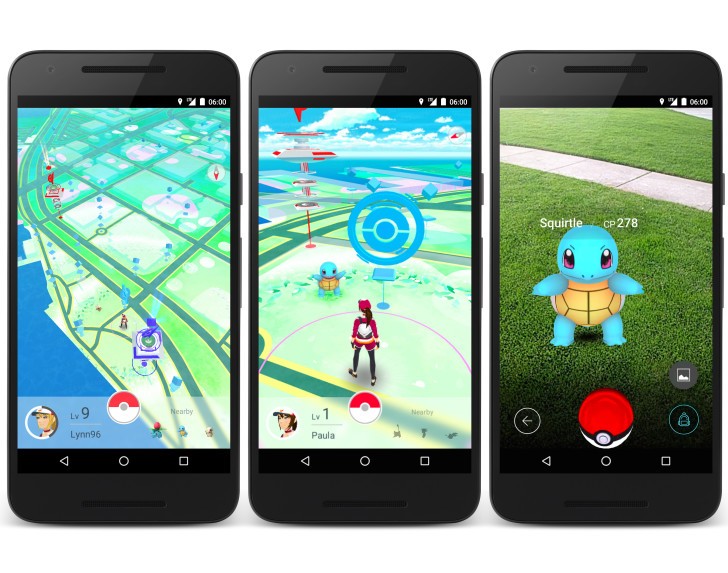
Now it’s time to catch your first Pokemon. After the initial set up is done, the app will use GPS data to pinpoint your location in what looks like a customized version of Google Maps. A ring will appear around your character, showcasing your range. You can only interact with objects and Pokemon within this circular area.
You may see moving grass around you. This signals the location of a Pokemon. Click on the bottom-right corner to see which Pokemon are near you. Move around until you get close enough to a Pokemon and it should appear in your map. Tap on it to launch the catching experience.
This is where things get a bit more wild. In other Pokemon titles one had to battle the wild monster to weaken it before catching it. Such is not the case in Pokemon Go. What matters here is factors such as your throwing technique, the Pokemon’s CP (combat power) and the type of Poke Ball in use. Catching a Pokemon will be simple at first, but things will certainly be more complicated as you start running across stronger monsters.
If you land throws inside of the provided circles, you’ll get “good” or “excellent” throws that result in more experience and a higher chance of catching the Pokemon. You can also spin the ball with your finger to throw a curveball. Curveballs also give you additional experience and a higher chance to catch the Pokemon. Worst case, you can use Razz Berries to make catching them even easier!

When in this catching screen, you can activate AR to be able to move around and see where the Pokemon is in real life. Otherwise, it can be deactivated to keep the Pokemon centered in the screen. Either way, the Poke Ball will be placed on the bottom part of the screen. Simply look at the Pokemon, then press and hold on the Poke Ball.
Rings should appear around the Pokemon. These are different colors and usually showcase how hard it is to catch a Pokemon (green is easy and red is hard). One of the rings will get smaller as you continue to hold; the goal is to try and throw the ball as the circle gets smaller. If you have good aim and hit the target, chances of you catching the Pokemon are greater.
Powering up, evolving and transferring
You want your Pokemon to be as strong as they can be; items are an important part of the powering up and evolving system in Pokemon Go. Each Pokemon has its own type of candy.
Let’s take Charmander as an example. You will receive a few Charmander candies every time you catch a Charmander. Then you can get an extra one by transferring a Charmander to the professor. You won’t be able to use the Pokemon again, but that is the reason why you continue catching the same Pokemon over and over – to get the candies.
When in the main page, hit the Poke Ball button in the bottom of the screen. This will open up a menu with a few options. Pick “Pokemon” and a list of your current Pokemon will appear. Select one of them.
In here you will find options to power up and evolve, along with the requirements for each action. You will need Stardust to power up, which you get every time you catch a Pokemon. Alternatively, scroll all the way down to find the “Transfer” button and send the Pokemon over to the professor. This will give you candy that you can use to level up or evolve Pokemon later.
You can also assign Pokemon as your “buddy” and you will get free candy after walking so many steps. It’s the easiest way to get it, especially if you have rare Pokemon.
PokeStops
You have probably seen them. PokeStops are the blue towers usually found in key places within your city. Think of PokeStops as places to get free items, as that is really their main purpose. Once you get within interactive range to these PokeStops, you can tap on them and flip the icon over in order to find you freebies. These can include Poke Balls, Eggs and more.
Sometimes you will find them empty, but they refresh every five minutes. Wait around and you should get your fair share of free items.
Gyms
Now, Gyms are the fancy red-shaded areas that you should see erected in special landmarks within your city. This is where all the fun happens. In Ingress you can take over portals; in Pokemon Go you can take over Gyms.
After hitting level 5 the user gets the option to choose a team: red (Valor), blue (Mystic) or yellow (Instinct). Pick any. There is no real benefits to choosing one over the other. Once a team has been selected, one can place a Pokemon in Gyms captured by team members. This Pokemon is sent here to train and battle against your team members’ Pokemon. Defeat them and the Gym’s prestige will go up.
Prestige determines the level of your Gym. A higher prestige makes it more difficult for enemies to take over your gym. Likewise, you can take over another team’s Gym once the prestige has depleted. Make sure to continue training your Pokemon so they can effectively defend those Gyms!
Healing and reviving
Pokemon stationed at Gyms are sure to take a beating, so you will need to check on them and make sure they are healthy. Go to the Items section and select “Potion” if you simply need to cure your Pokemon. You can also select “Revive” if they are completely down. You will be presented with a list of your injured Pokemon, which you can then easily heal.
Trading Pokemon
While Pokemon Go is already a very complex game, the team is not stopping there. Niantic Labs CEO John Hanke recently talked to Tech Insider and mentioned one of the key upcoming features is the ability to trade Pokemon. No details have been revealed yet, but he claims it will encourage interaction between players.
Pokemon Go Plus
Niantic Labs and The Pokémon Company take things to the next level by giving you some freedom from your device with the Pokemon Go Plus. If you have been playing Pokemon Go, you know you have to pull out your phone very often to check for Pokemon, Gyms, PokeStops and more.
The Pokemon Go Plus is a cute little wearable that connects to your smartphone via Bluetooth. It has a single button through which you can communicate with a smartphone and make certain actions simpler. You can easily use it to collect items, catch Pokemon and more… all without pulling out your phone excessively.
This accessory launched in October 2016. You can currently purchase it from Amazon.

In-app purchases
Pokemon Go is free-to-play, so it only makes sense that they offer some in-app purchases for those who really want to get ahead in the game. You can purchase multiple items with in-game currency, which they are calling PokeCoins. You can buy 100 Pokecoins for $0.99, 550 for $4.99, 1,200 for $9.99, 2,500 for $19.99, 5,200 for $39.99 or 14,500 for $99.99.
Once you have some PokeCoins of your own, go ahead and purchase Poke Balls, Incense, Lucky Eggs, Lure Modules and Egg Incubators. Alternatively, it’s possible to upgrade your bag storage to carry more items, or upgrade the Pokemon Storage to… well, carry more Pokemon around.
Stay safe
When you play Pokemon Go – and other games like it – always keep in mind that the world can be dangerous. Use some caution. You don’t want to end up robbed at gunpoint or picked up by police suspecting you’re dealing drugs. Just exercise some basic caution and your common sense and you’ll be fine!
Go “catch ’em all”!
There you have it, guys! Those are the basics of Pokemon Go. Now you are ready to take on this adventure and try to “be the very best”. Just try to not get lost in the game. Remember there is traffic and other unexpected dangers out there! You can also check out some of our more in-depth tutorials here:
- Here’s how to use Incense!
- How to use Razz Berries!
- How to take down and level up Gyms!
- And here’s how to power up and evolve Pokemon!
- How to use Lures!
- How to gain XP and level up faster!
- Here’s how to get free Pokecoins!
- How to properly evolve Eevee!
- Learn how to battle Pokemon here!
- How to find Pokemon
- What is Pokémon Home and how does it work?