Affiliate links on Android Authority may earn us a commission. Learn more.
How to uninstall apps and programs on Windows 10
Published onMay 28, 2019
You installed an app or program on Windows 10 but it’s now causing problems. Rather than troubleshoot the issue(s) or revert the PC back to a previous working state, you simply want to uninstall the offending software. In this guide we’ll show you how to uninstall apps and programs on Windows 10.
This guide splits software into two groups: Desktop programs and Windows apps. Desktop programs are manually downloaded from third-party platforms and installed on your PC. They’re packaged differently than apps, placing components into your Program Files and Windows folders. These programs typically provide a larger feature list than mobile-focused apps.
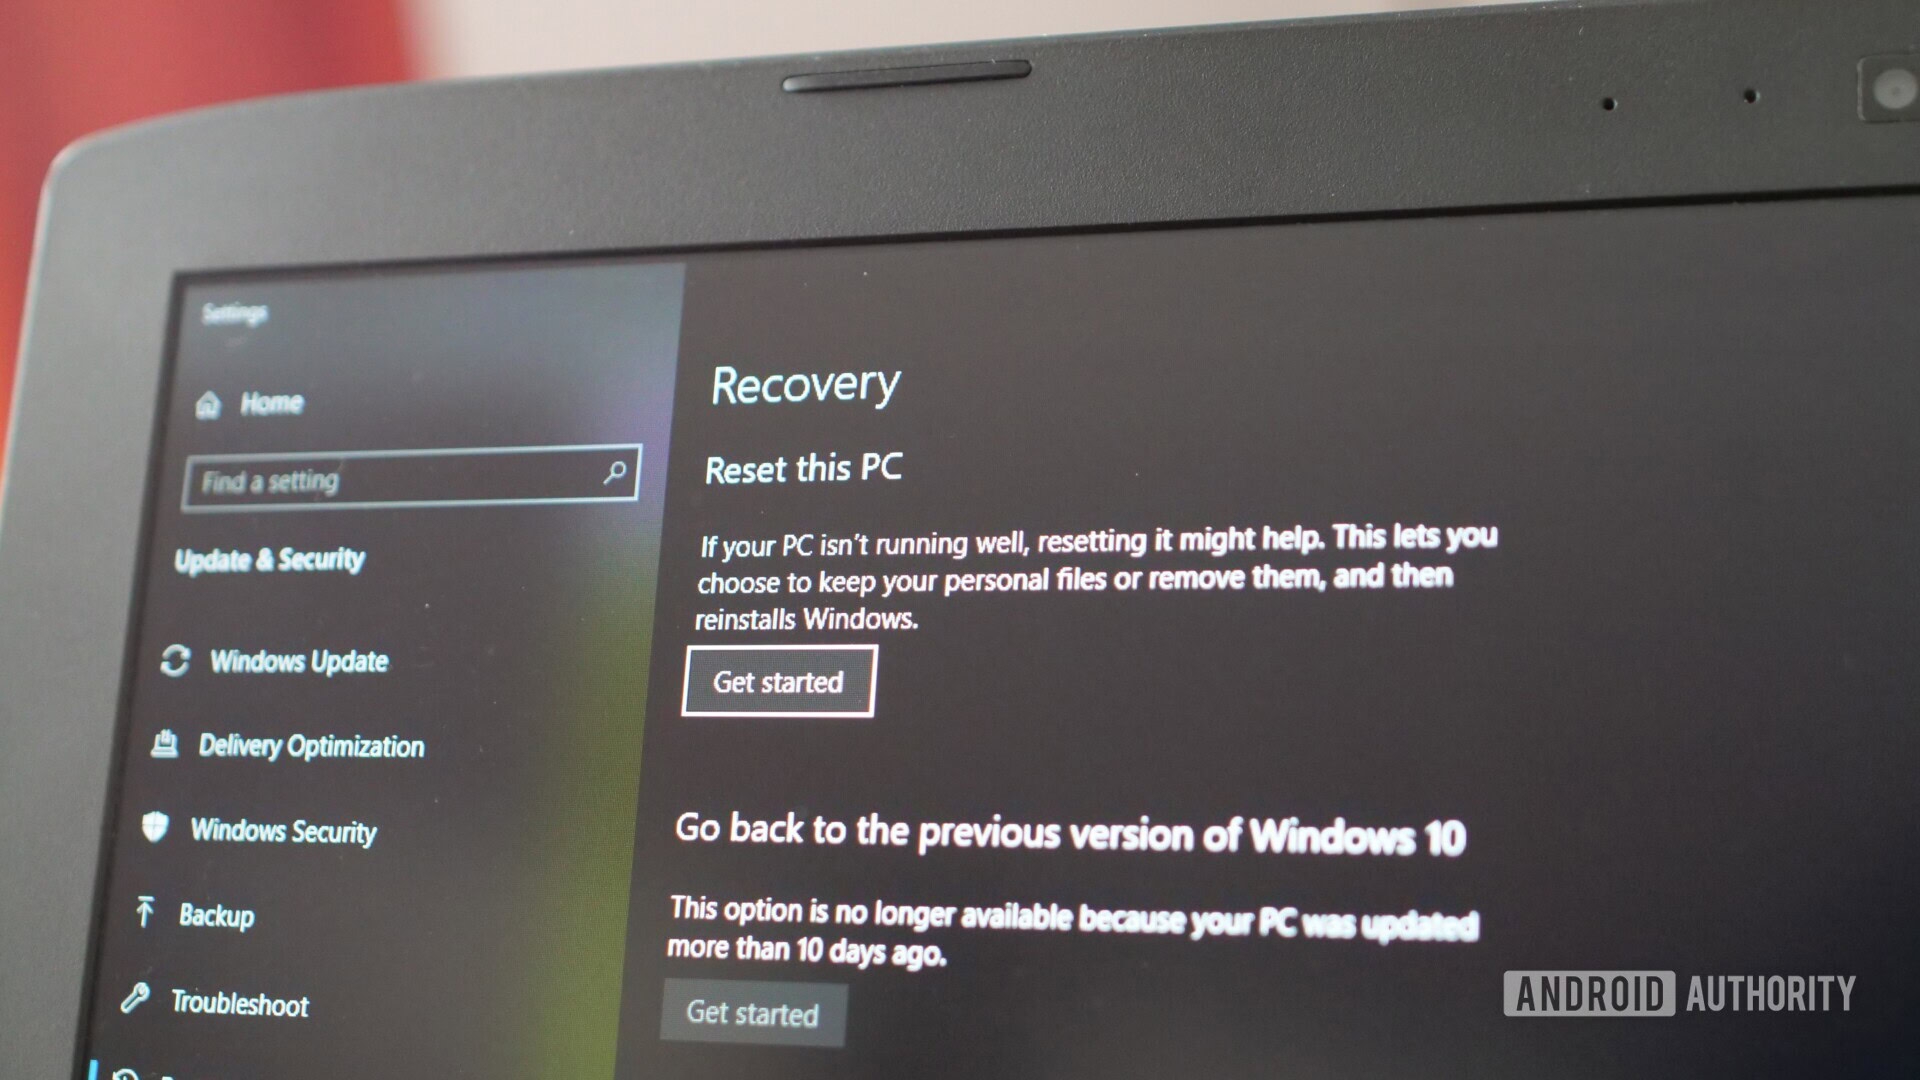
Meanwhile, Windows apps are only acquired through the Microsoft Store. They rely on components baked into Windows 10 and are typically packaged like a single zip file. Apps provide better security due to their all-in-one design and have touch-focused functionality but offer fewer features than desktop programs.
In this guide, we explain how to uninstall apps and programs in Windows 10 1809 (October 2018 Update) using specific methods tied to their base design.
From the Settings app
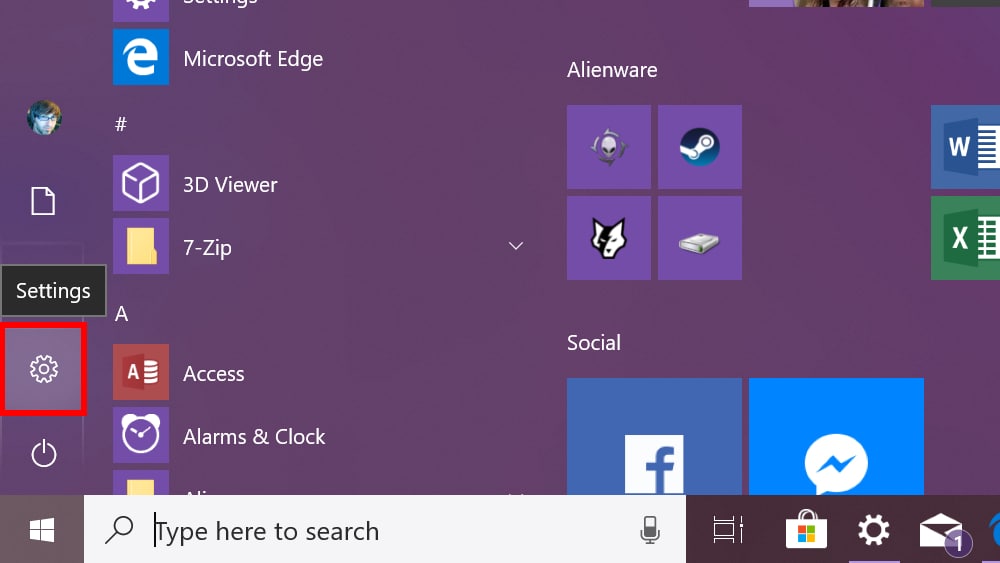
1. Click Start and select the “gear” icon on the Start Menu. This opens the Settings app.
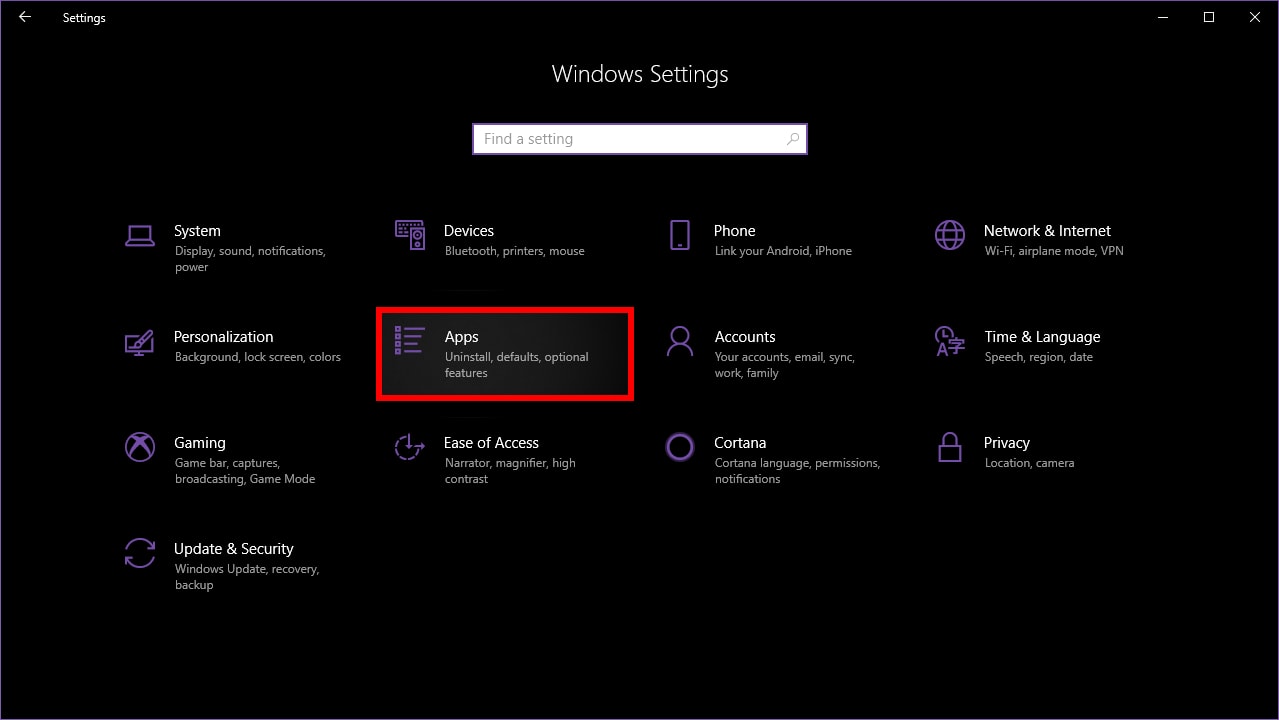
2. Select Apps.
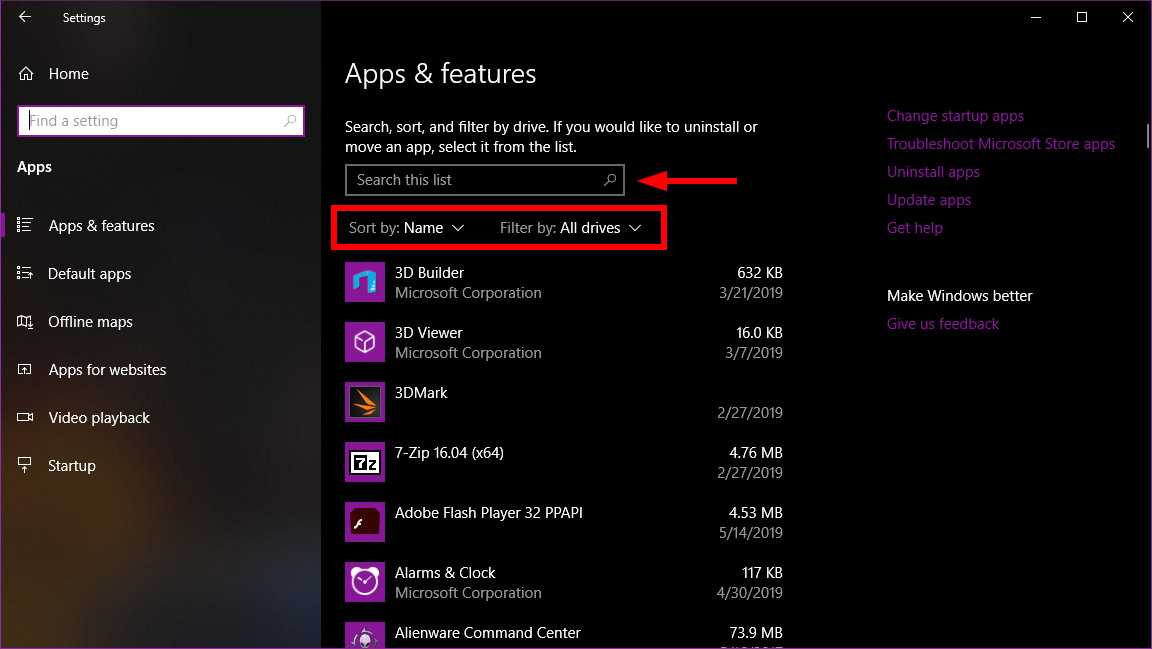
3. As an option, click the down button next to Sort by to filter your installed apps and programs by Name, Size, or Install Date. You can also select all drives or a specific drive on multi-storage PCs. Another option is to type the app or program name into the search box.
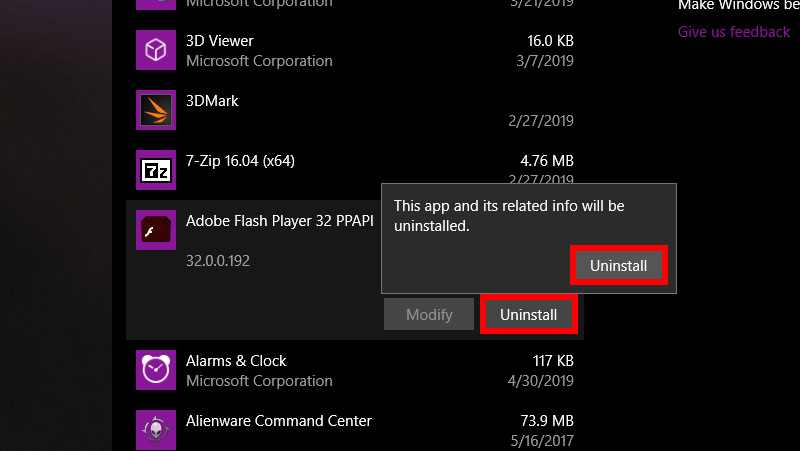
4. Select the app or program you want to uninstall.
5. Click the Uninstall button.
6. Click another Uninstall button in the following pop-up window.
In some cases, you’ll have the option to repair troublesome apps and programs by clicking the Modify button. You may also see an Advanced options link leading to app-specific tasks like Repair, Reset, Terminate, and uninstalling add-ons.
Using Cortana
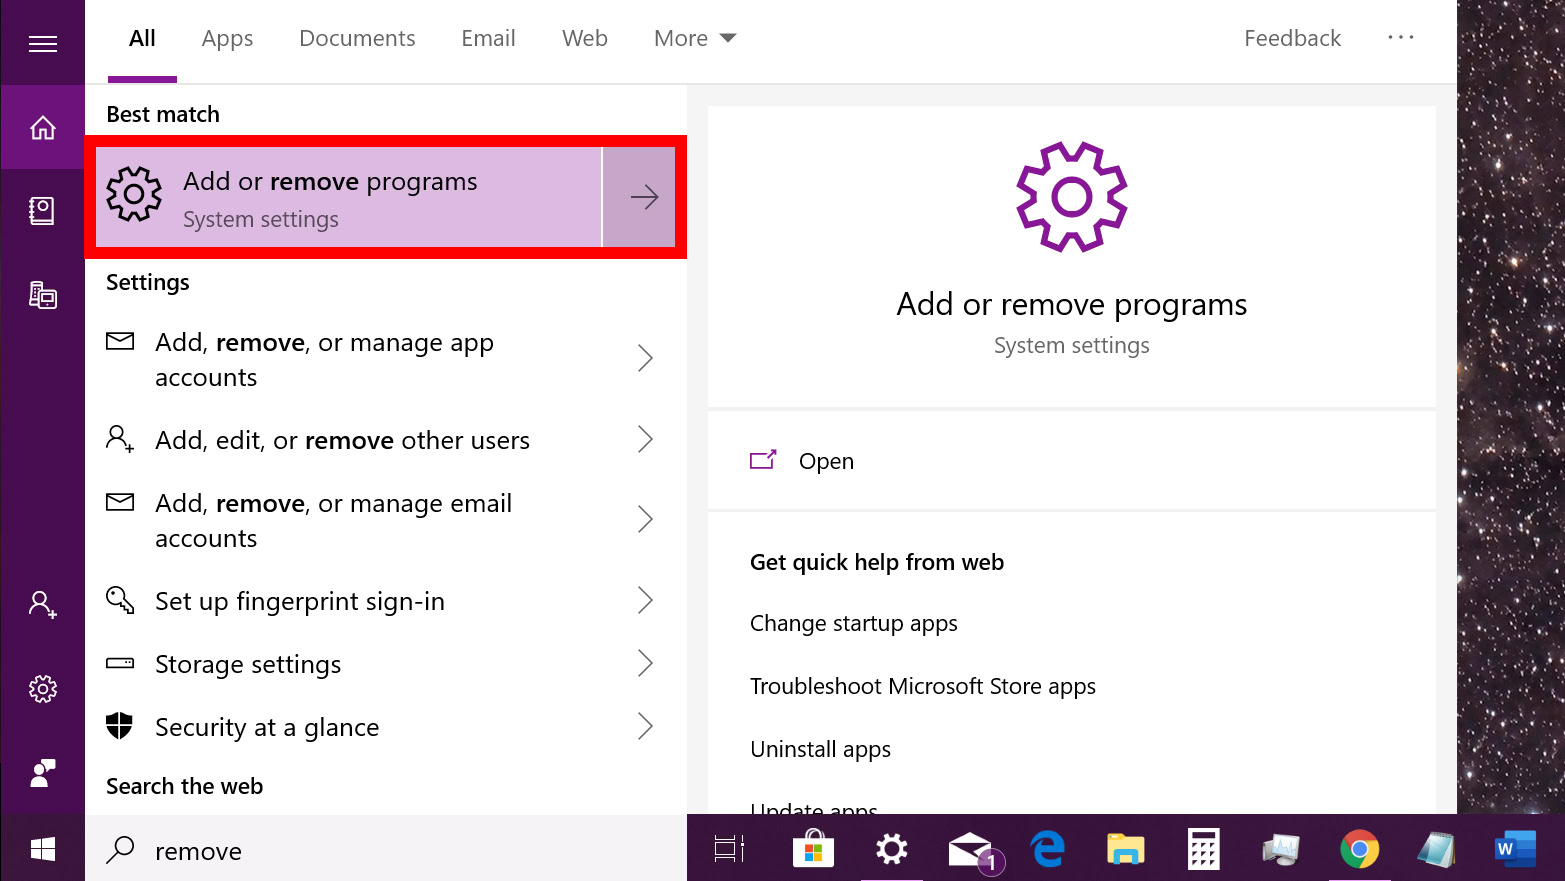
1. Type Remove in Cortana’s search field on the taskbar.
2. Select Add or remove programs in the search results.

3. As an option, click the down button next to Sort by to filter your installed apps and programs by Name, Size, or Install Date. You can also select all drives or a specific drive on multi-storage PCs. Another option is to type the app or program name into the search box.

4. Select the app or program you want to uninstall.
5. Click the Uninstall button.
6. Click another Uninstall button in the following pop-up window.
Related: How to boot Windows 10 in Safe Mode
From the Control Panel
This method only uninstalls programs, not Windows apps. To uninstall the latter, you must use the Settings app.
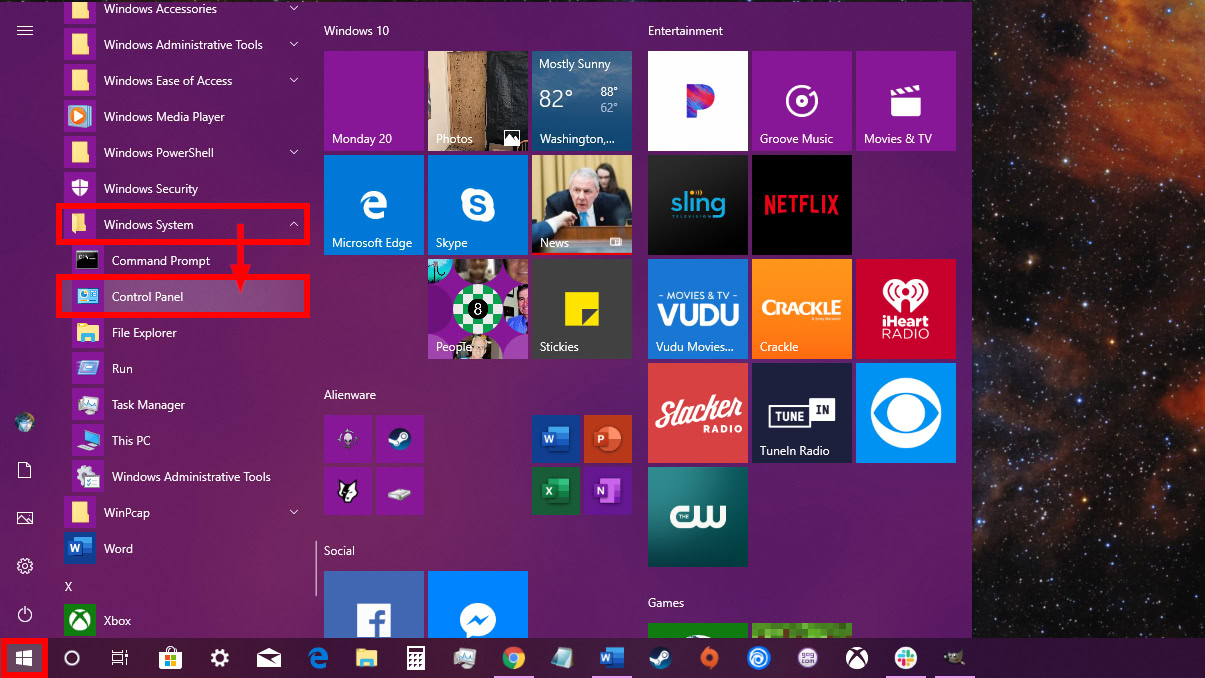
1. Click Start and expand the Windows System shortcut folder listed on the Start Menu.
2. Select Control Panel.
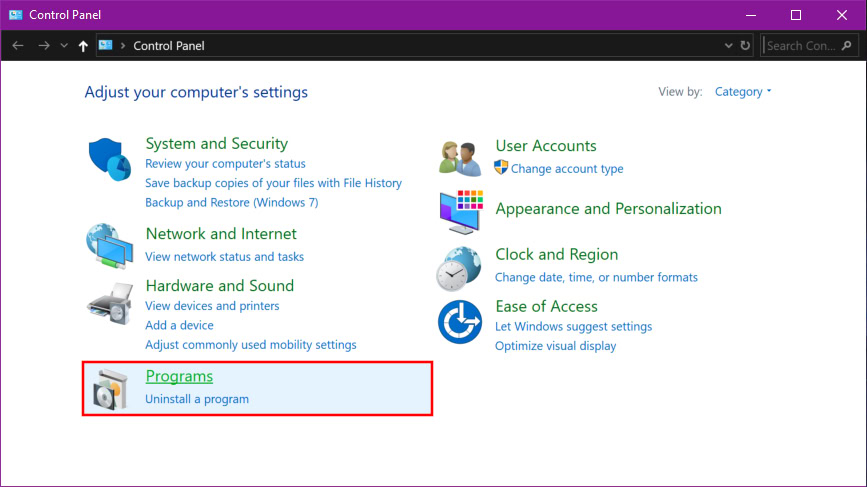
3. Select Programs.
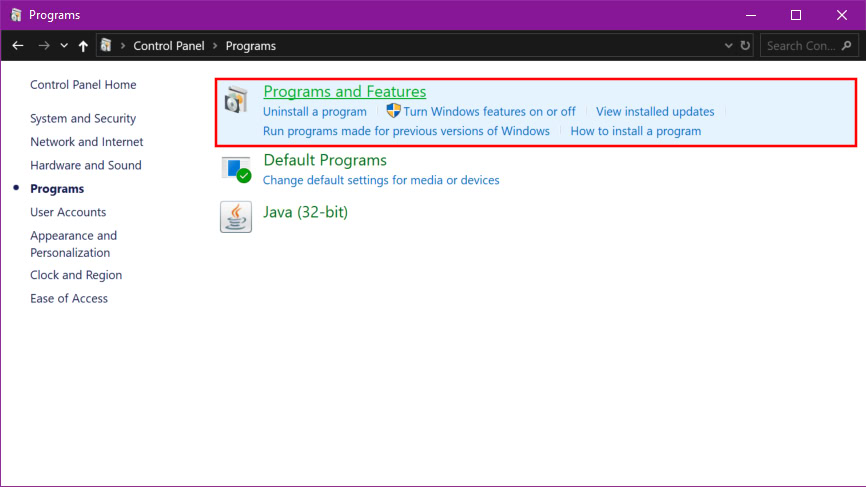
4. Select Programs and Features.
Note: You can also click the Uninstall a program link under Programs on the main Control Panel menu.
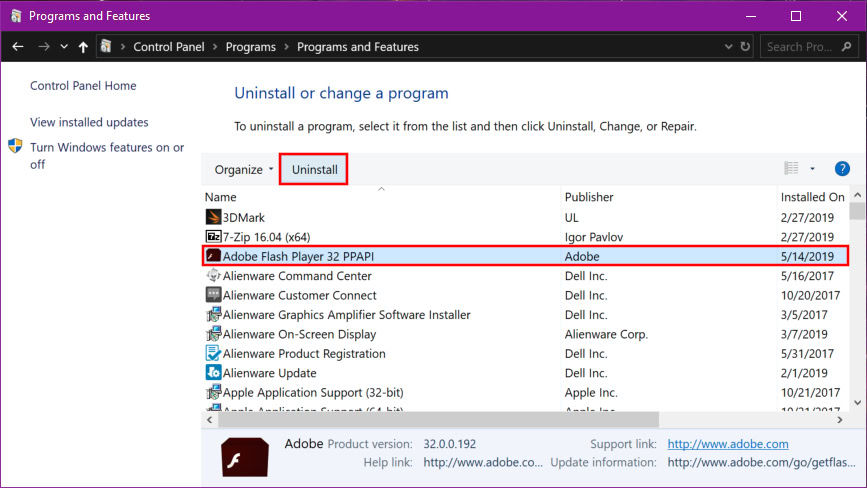
5. Click the Publisher or Installed On column header if needed to quickly find the program you want to uninstall.
6. Click the program you want to remove.
7. Click the Uninstall link that appears at the top of the programs list.
8. Click Yes if the User Account Control pop-up box appears on your screen.
In addition to the Uninstall link, you may also see Change and Repair links appear at the top of your programs list. Use either link to repair the program if you experience troublesome issues and don’t want to completely remover the program.
Right-click to uninstall
This method is the quickest way to remove apps and programs from your PC, but it can’t be used to remove Microsoft’s baked-in Windows 10 apps, like Mail and Calendar.
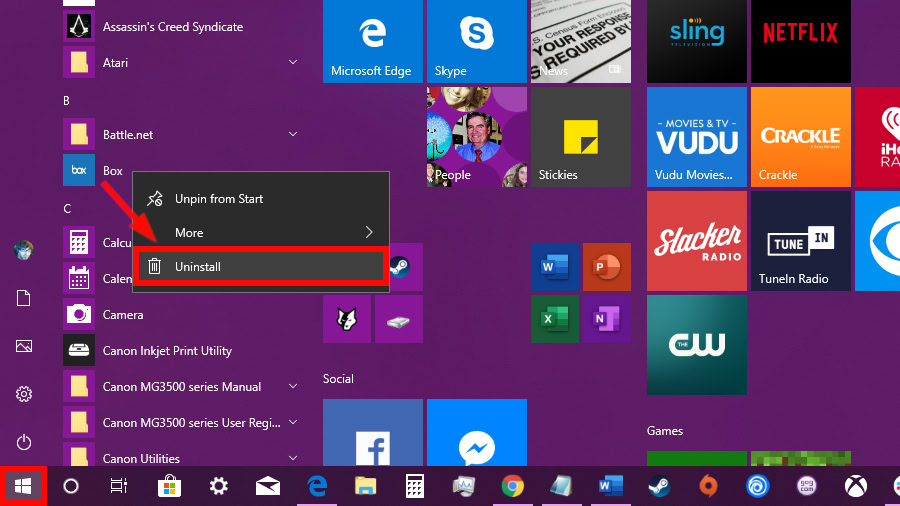
1. Click Start.
2. Locate the Windows app or program listed on the Start Menu that you want to uninstall.
3. Right-click on the app or program listing.
4. Select Uninstall.
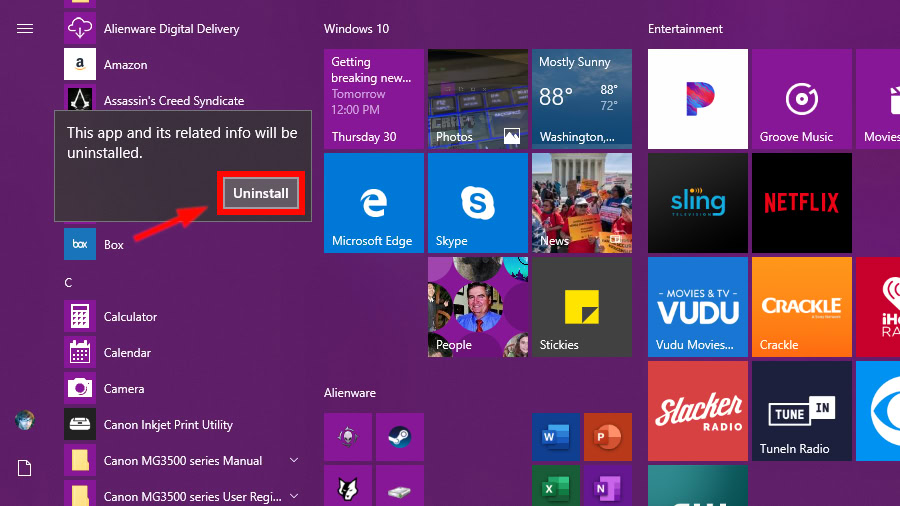
5. For Windows apps, click Uninstall again in the pop-up box.

6. For programs, the Control Panel will appear. Select the program you want to remove and then click Uninstall.
Use the supplied uninstaller
Most of the programs installed on our test PC doesn’t include an uninstaller. Developers typically let Windows 10 handle the process through the Settings app and the Control Panel. But you may find a program here or there that still provides a stand-alone uninstaller. Here’s how to access an uninstaller:
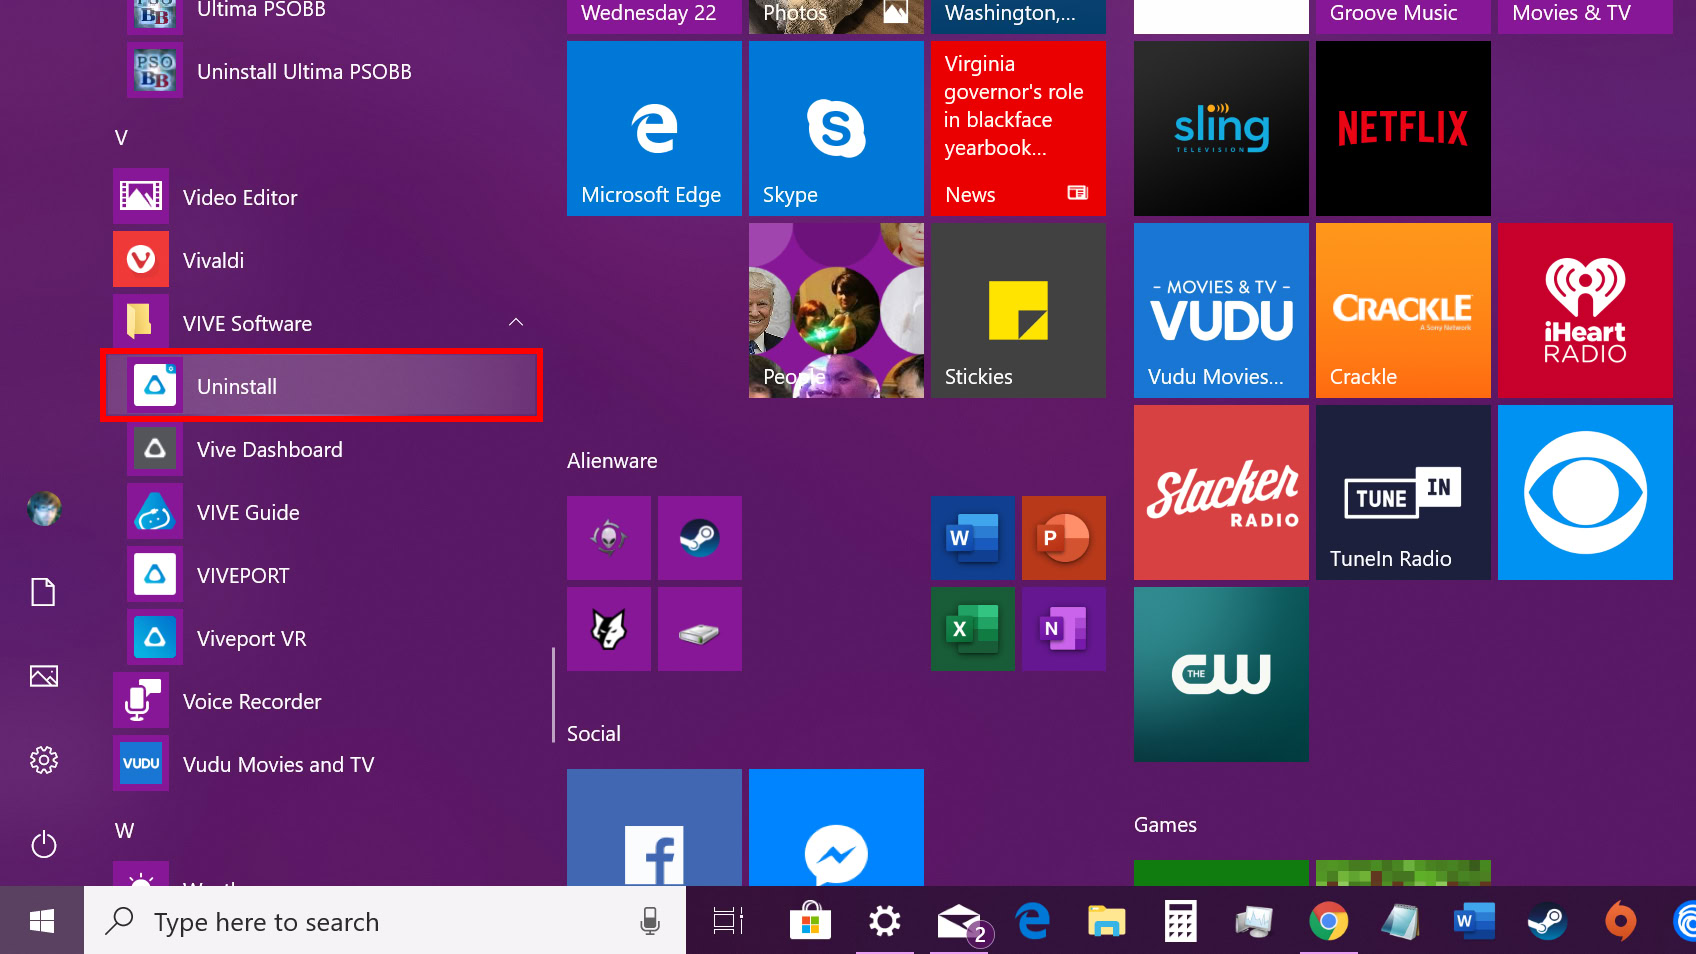
1. Click Start.
2. Locate the folder on the Start Menu containing the program you want to uninstall.
3. Click the Uninstall shortcut contained within the folder.
From within Steam (gaming only)
PC gamers needing space for new games can use the Settings app or the Control Panel to start the uninstall process, but this method still leads you back to Steam. Our instructions show you how to remove PC games if you’re already in the desktop client.
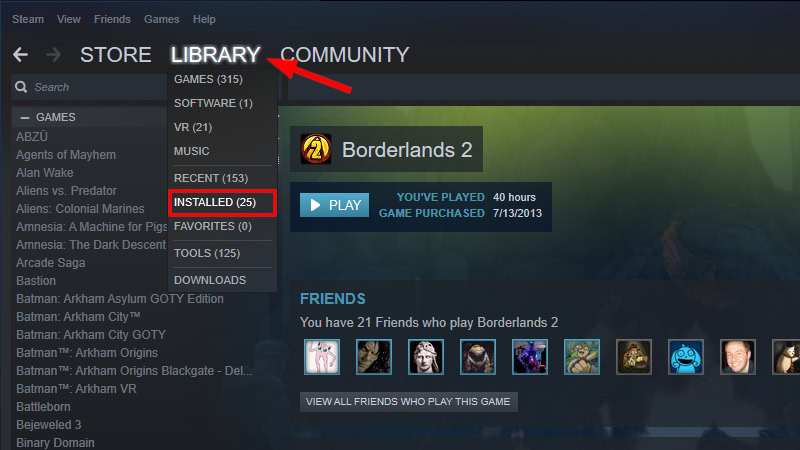
1. Place the cursor over Library and wait for the drop-down menu to appear.
2. Select Installed to filter out your library’s uninstalled games.
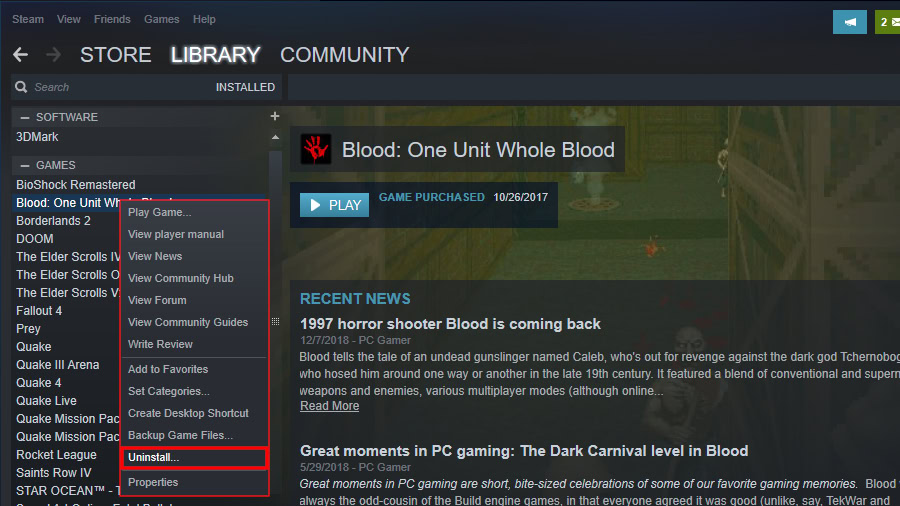
3. Select a game listed on the left that you want to remove.
4. Right-click on the listing.
5. Select Uninstall on the pop-up menu.
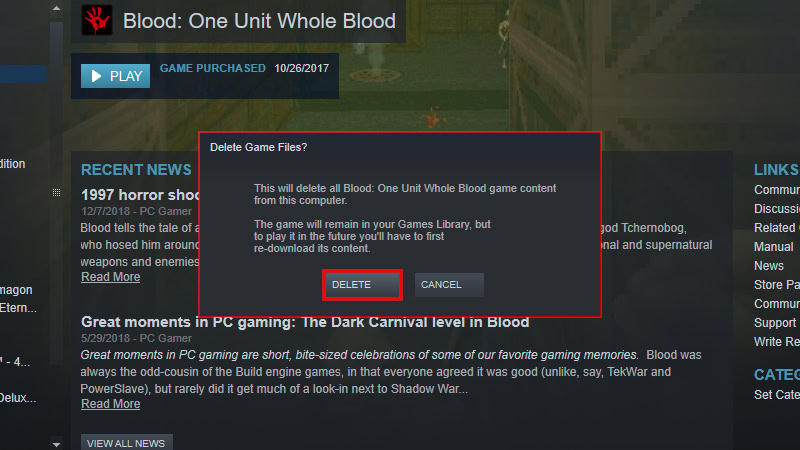
6. Click Delete in the pop-up window.
If your PC has more than one drive, don’t delete games to make room for new games. Just move a few from one drive to the other if you have the room.

1. Place the cursor over Library and wait for the drop-down menu to appear.
2. Select Installed to filter out your library’s uninstalled games.
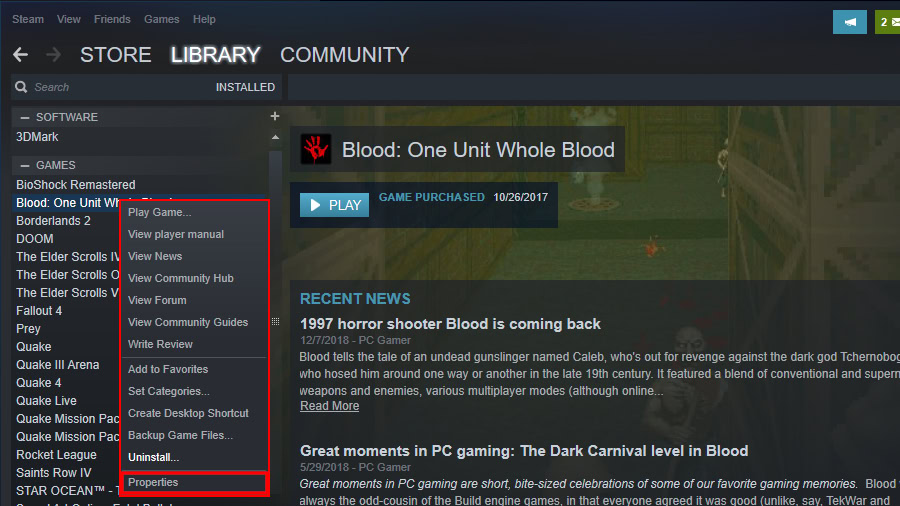
3. Select a game listed on the left that you want to remove.
4. Right-click on the listing.
5. Select Properties in the pop-up menu.
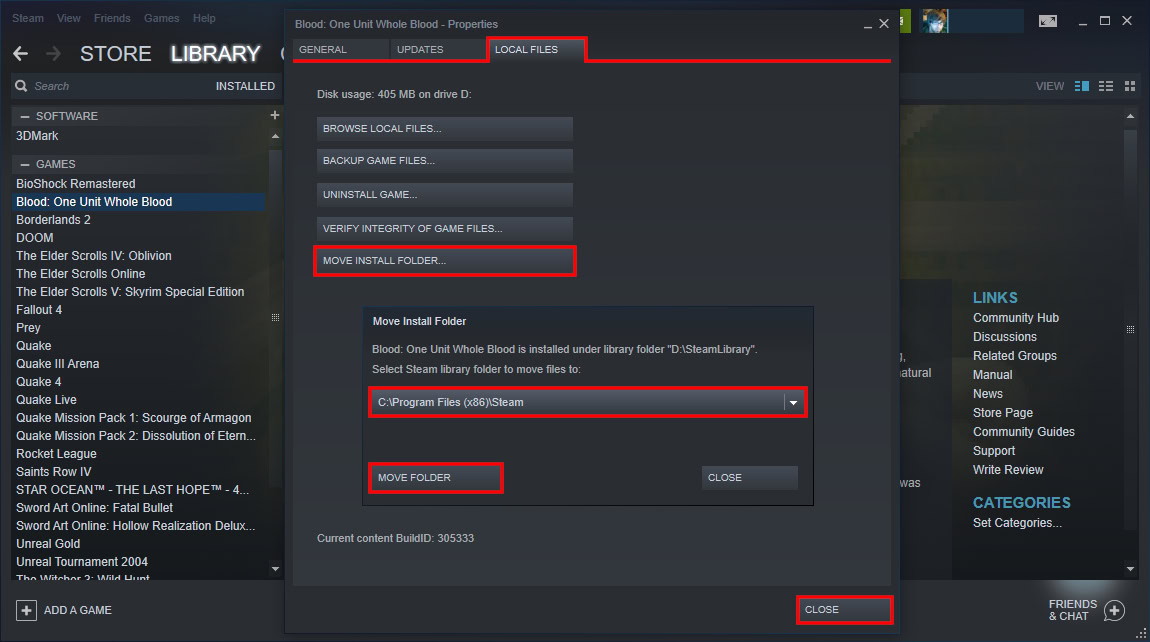
6. Click the Local Files tab on the Properties panel.
7. Select Move Install Folder.
8. Select the destination on the drop-down menu.
9. Click Move Folder.
10. Click Close when done.
That concludes our guide on how to uninstall apps and programs on Windows 10. For additional tips and tricks, check out these three guides: