Affiliate links on Android Authority may earn us a commission. Learn more.
Problems with Kodi not working and how to fix them
Published onJune 4, 2022
Kodi is a free, open-source media streaming tool that you can use to play any video, audio, or digital media file across almost any format, codec, or platform, including Android, iOS, Windows, Linux, and macOS. What makes Kodi standout though is the availability of add-ons that allow you to watch or listen to a variety of media streams from the Internet, making it a highly versatile media streaming app. However, users come across issues with Kodi not working from time to time. We take a look at some of these problems and offer potential solutions on how to fix them!
Problem #1 – Kodi crashes, freezes, or has strange bugs
Users have sometimes found Kodi not working as expected. There have been complaints of strange bugs, random crashes, and freezing.
Potential solutions:
- First, make sure that the apps are updated to the latest version. In the case of the Android and iOS apps, you should be able to keep the apps automatically updated via the Google Play Store and Apple App Store respectively. In the case of Windows, the app can be updated automatically if you install Kodi via the Windows Store. If not, you will have to manually download the installer from the Kodi download page here, where you will also find the installer for macOS and an installation guide for Linux.
- Hardware acceleration is one of the main reasons that cause problems with Kodi not working. Disabling it may be enough to fix any issues you are facing. Go to the Settings menu by clicking or tapping on the gear icon found in the menu on the left. Open Player Settings. You will see a gear icon at the bottom left with the word Basic or Standard next to it. Toggle through the options and set it to Expert. Now under the Video settings, scroll down to “Allow hardware acceleration” and disable it (or both in the case of the Android app). Keep in mind that this disabling hardware acceleration fix for Kodi not working is mostly for issues with the Android app but may work on other platforms as well.
- You can also try clearing the cache and see if that fixes any issues. If you have an Android device, go to Settings – Apps and tap on Kodi. Tap on Storage and then tap on Clear Cache. Unfortunately, the process isn’t as simple when it comes to a Windows, macOS, or Linux installation. However, useful and detailed guides are available online and a step-by-step rundown will be below.
Problem #2 – “Failed to install a dependency” error
If you’ve used Kodi for a while, a common error that you may have come across is “failed to install a dependency.” There are often necessary dependent files that need to be installed along with a Kodi add-on or build. You see this error when these files aren’t downloaded and installed, resulting in Kodi not working as expected.
Potential solutions:
- Clearing the cache might do the trick. Follow the steps above to clear the cache on an Android device and you can find the instructions on how to do so for Windows and macOS below.
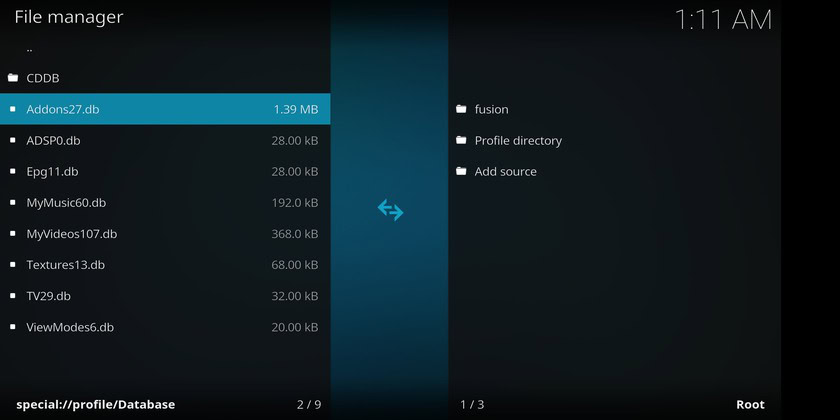
- The Addons27.db file may become corrupted and result in this error. Go to Settings (Gear icon in the main menu) – File Manager – Profile Directory – Database. Select the Addons27.db file and delete it. Return to the home screen and exit the application. Open the app again and you can now try installing the add-on or build that resulted in the error. Keep in mind that you will also have to go to Add-ons – My Add-ons and re-enable any add-ons that were already installed.
- If all else fails, you may have to clear app data or uninstall and re-install the application. This may fix the issue, but you will need to re-install all your favorite add-ons from scratch. to clear data on an Android device, go to Settings – Apps, find Kodi and tap on Storage. Then tap on Clear Data. The instructions to clear data on Windows and macOS will be below.
Problem #3 – Add-ons causing problems with Kodi not working, running slow, or crashing
Some add-ons, particularly those that haven’t been updated in a while, may cause issues and result in Kodi not working properly, running slow, or crashing all the time.
Potential solutions:
- Deleting add-ons, repositories, and sources that you no longer use or haven’t been updated in a while can help speed up Kodi.
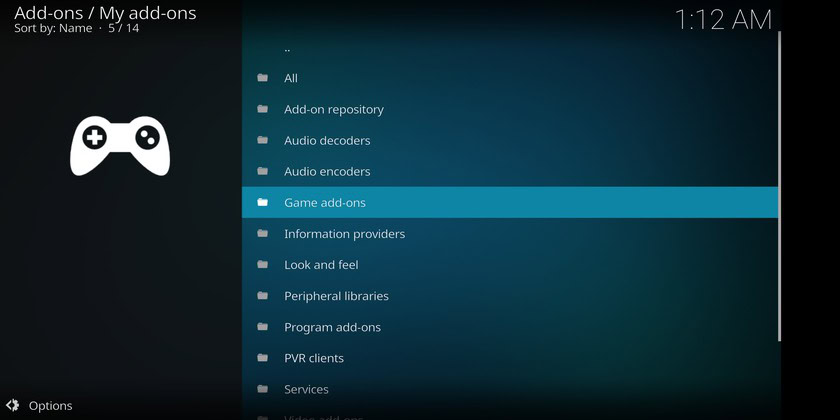
- Deleting an add-on – Go to Add-ons and tap/click on the icon that looks like an open box, found around the top left corner of the app. Open My Add-ons and tap on All. You will see the complete list of add-ons. Tap on one that you want to remove and tap on uninstall on the next page that opens.
- Deleting a repository – Follow the same steps listed above and after opening My Add-ons, tap on Add-on Repository. Once again tap on the one that you want to remove and uninstall it.
- Deleting a source – Go to Settings (gear icon on the main screen) – File Manager. Find the source you want to remove and tap/click on it, then tap on Remove Source. Choose Yes to confirm.
Problem #4 – Video buffering for a long time, playback not smooth
Some users have come across issues when playing videos using Kodi. There is a lot of buffering, and then instances of lag and stutters when a video eventually starts playing.
Potential solutions:
- If you find a video takes a long time to load, it could be because of network connection issues that you may be facing. Ensure that you are getting the speed that you are supposed to, by running a speed test using the Ookla Speed Test. Contact your ISP if you are seeing speeds that are slower than normal.
- Some ISPs may also attempt to throttle or block access to streaming via Kodi, giving the appearance of Kodi not working properly. In this case, your only option will be to use a VPN to circumvent ISP throttling. A VPN will also let you overcome any geo-restrictions that you may come across.
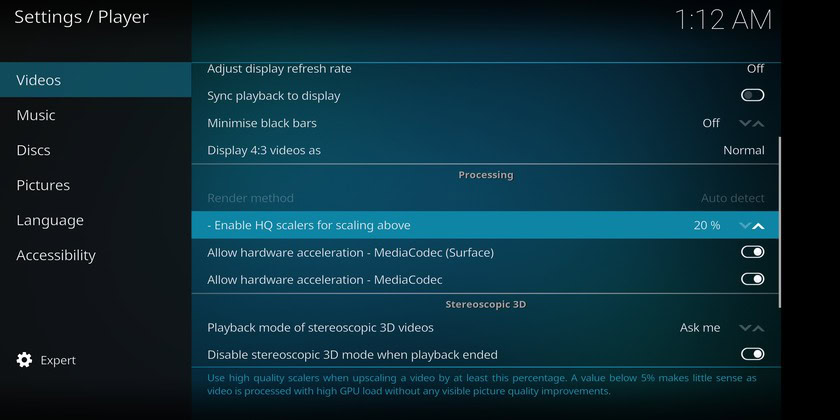
- Kodi automatically scales up a low-quality stream into a high-quality video. This video scaling can give the appearance of stutter when watching a video. To reduce the amount of video scaling go to the Settings menu by clicking or tapping on the gear icon found in the menu on the left. Open Player Settings. You will see a gear icon at the bottom left with the word Basic or Standard next to it. Toggle through the options and set it to Expert. Now under the Video settings, and scroll down to “Enable HQ scalers for scaling above.” Try reducing that value to 10% (the default should be 20%) and see if reduces the stuttering. If not, you will have to disable video scaling by setting it to zero.
- Follow the same steps above and at the same last screen, scroll down to “Allow hardware acceleration” and disable it. That could also help reduce any stuttering that you may see.
Guides – Clearing the cache, clearing data, reporting an issue
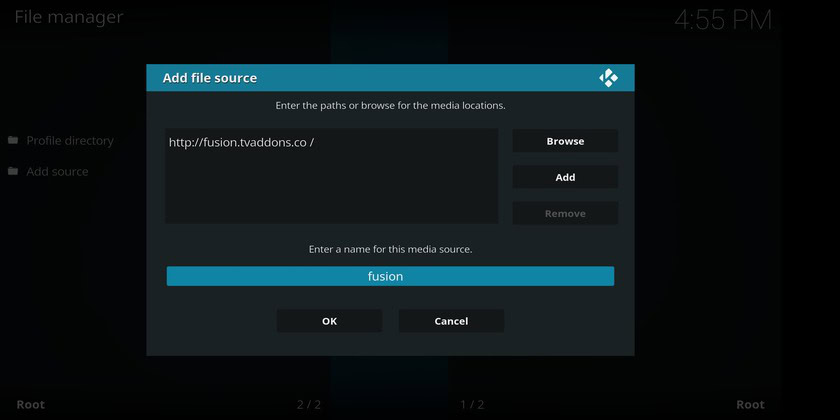
A lot of issues with Kodi not working can be fixed by simply clearing the cache. Unfortunately, there isn’t an easy way to clear the cache or clear data if you are using Kodi on Windows or macOS. However, a useful add-on called Indigo is available that you will need to first install.
Indigo installation
- Go to the Settings menu (gear icon in the menu on the left side) – File Manager.
- Click on Add Source.
- Click on the box where it says <none>. Enter the URL http://fusion.tvaddons.co
- Make sure that you type the address exactly, or it will not work.
- Give the source a name and click on OK.
- Go back to the home screen and click on Add-ons.
- Click on the icon at the top left that looks like an open box.
- Click on Install from Zip File – (name you gave the source) – kodi-repos – English and click on repository.xmbchub-3.0.0.zip.
- Once you get the notification that the source has been installed, click on Install from Repository.
- Click on TVADDONS.CO Add-on Repository and open Program Add-ons.
- Find Indigo and click on it. On the next screen, click on Install.
Cache cleanup
Now the Indigo add-on has been installed. To clear the cache or data, here is what you need to do.
- At the home screen, go to Add-Ons, then click on Program Add-ons.
- Open Indigo and look for and click on Maintenance Tools.
- You will now see a lot of options, including clear cache, clear data, clear thumbnails (that can be done to reduce the space used), and more. Click on the tool you want and confirm your selection.
Reporting an issue
- If you run into any Kodi problems, the best way to get help is to start a thread on the Kodi forum.
- To ensure that you get the assistance you need, you will need to create a full debug log. You can find the required steps on how to do so here.
There you have it for this look at some issues that result in Kodi not working as expected. For something that is as complicated as Kodi can be, it is relatively easy to troubleshoot any problems that you may come across. In most cases, simply wiping the cache seems to do the trick more often than not.
If you have come across any other problems with Kodi not working, do let us know in the comments section below and we’ll try our best to find an answer for you!
Disclaimer: Because of its open-sourced nature, Kodi and its developers, the XBMC Foundation, have run into some trouble with many add-ons offering illegal, pirated, and torrented content. A lot of illegal streaming services have been shutting down recently following increasing pressure from content providers and Kodi itself, but there are still a lot of approved add-ons to pick from. How you choose to use Kodi is entirely up to you. Neither Android Authority nor Kodi support piracy in any form, and bear no responsibility for what you decide to do with the contents of this article. Depending on how you use Kodi, we do recommend considering a VPN, however.