Affiliate links on Android Authority may earn us a commission. Learn more.
Create richer location-aware Android apps with the Google Places API
Published onFebruary 12, 2018
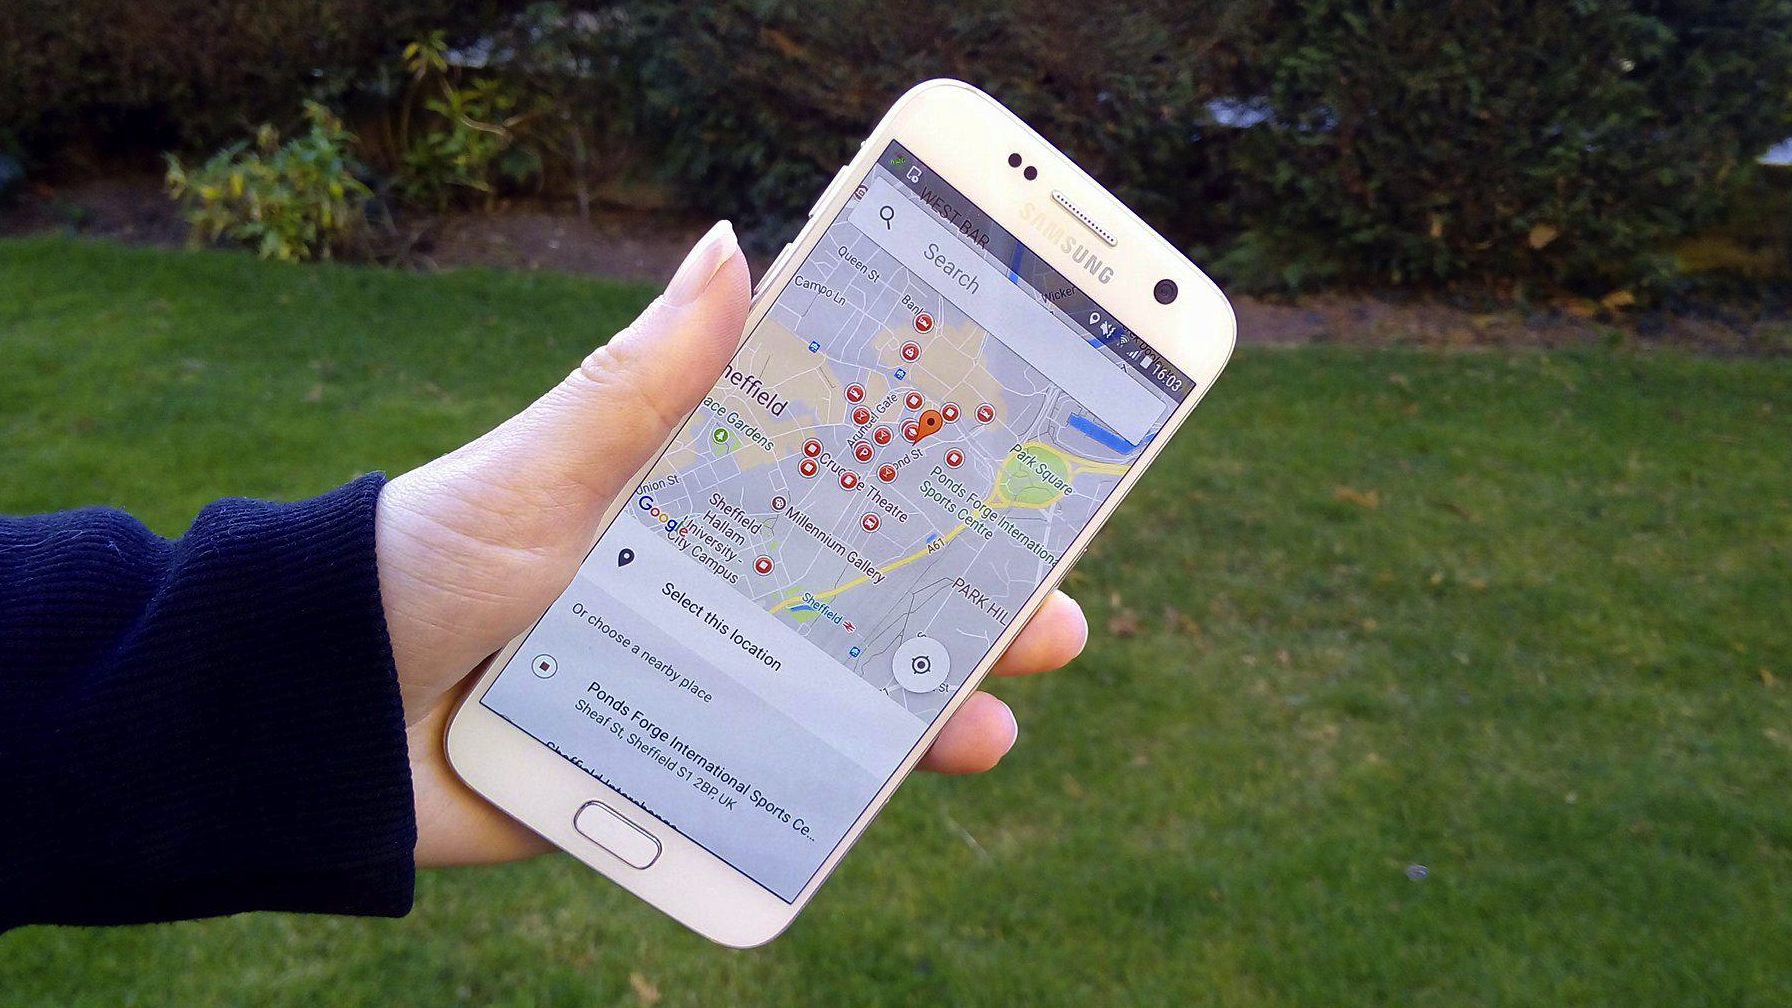
Google Play Service’s Location APIs give you an easy way of displaying the user’s current location, but there’s only so much value you can get out of a “You Are Here”-style marker on a Google Map! The Google Places API is a powerful tool which can add an extra layer of functionality to your location-aware apps by giving you access to detailed information about a huge range of places, located all across the globe.
You can use this information as the basis for all kinds of functionality. You might add a Facebook-style check-in feature to your app, or create an app that lets users browse all the take-out spots that’ll deliver to their current location.
Even if you look at the classic location-aware example of a navigation app, cross-referencing user queries against a directory of places means users won’t always have to enter full street addresses. Being able to ask “can you show me the fastest route to the Googleplex?” is a far better user experience than “can you show me the fastest route to 1600 Amphitheatre Parkway, Mountain View?”
In this article we’ll be using the Google Places API to create a location-aware app where the user can explore and gather information about places of interest in their immediate area, and anywhere in the world.
Is Google Places free?
Yes, but it’s complicated — especially if you’re using other APIs in your project.
The Google Places API for Android is free to use, but limited to 1,000 requests per 24 hours by default. Once you’ve setup this API, you can monitor how many requests it’s processing in the Google API Console. Your app will start to fail if it ever exceeds 1,000 requests in a 24 hour period. If your project is approaching this limit you’ll need to increase your quota.
You can increase the limit to 150,000 requests per 24 hours, free of charge, by creating a billing profile in the Google API Console. This requires you to enter your credit card details and mark the project as billable. Although the Google Places API is free to use, at this point your entire project is billable. If you use any billable APIs in your project, you may be charged based on their usage.
If you’re using any other APIs, carefully check their documentation and terms and conditions before increasing your Google Places limit.
If you get caught out, you can disable billing at any time in the Billing pane. This will restrict all your APIs to their courtesy usage limit, and you’ll no longer be charged for any APIs in this project.
Do you have the latest version of Google Play Services?
With that disclaimer out of the way, let’s create our application! The first step is make sure you have the latest version of Google Play services installed:
- Launch Android Studio’s SDK Manager.
- Select the SDK Tools tab.
- Find ‘Google Play services’ and install any available updates.
Get your project’s fingerprint
Create a new project with the settings of your choice, using the Empty Activity template.
In order to access the Google Places API, you need to generate an API key with Android restrictions. This means linking the API key to your project’s package name and certificate fingerprint (SHA-1).
There’s several ways to find your project’s SHA-1 fingerprint, but the easiest method is via the Gradle Console:
- Select the Gradle tab along the right-hand side of the Android Studio window.
- Select your application’s root, followed by Tasks >Android > signingReport.
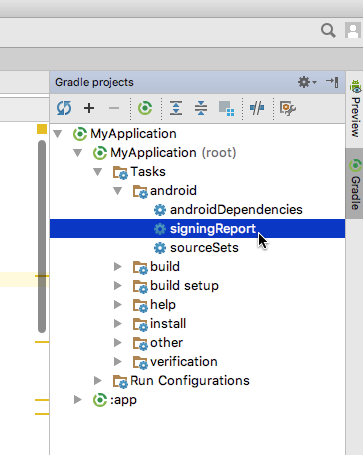
- Open the Gradle Console tab that appears towards the bottom-right of the screen.
- The Gradle Console will open automatically. Find the SHA-1 value in this window, and make a note of it.
We’re using the debug certificate fingerprint, which is generated automatically when you create a debug build. This certificate is only suitable for testing your applications, so before publishing an app you should always generate a new API key based on the release certificate.
Generating your API key
Open a web browser, and complete the following steps:
- Head to the Google API Console.
- Create a new project by clicking the API Project item in the menu bar, and then selecting the + button.
- Give your project a name, and then click Create.
- Click Enable APIs and Services and select Google Places API for Android.
- Read the onscreen information, and if you’re happy to proceed then click Enable.
- Select Credentials from the left-hand menu, and then select Create credentials > API key.
- Click Restrict key.
- Select Android apps, and then click Add package name and fingerprint.
- Paste your project’s SHA-1 fingerprint and package name into the subsequent fields. If you’re unsure about the package name, you’ll find this information in your project’s Manifest.
- Click Save.
- Back in the Credentials screen, find the API key you just created, and copy it.
- Switch back to Android Studio and paste the API key into your project’s Manifest. While we have the Manifest open, I’m also adding the ACCESS_FINE_LOCATION permission, which our app will need to get a lock on the device’s location:
<?xml version="1.0" encoding="utf-8"?>
<manifest xmlns:android="http://schemas.android.com/apk/res/android"
   package="com.jessicathornsby.myapplication">

//Add the ACCESS_FINE_LOCATION permission//

   <uses-permission android:name="android.permission.ACCESS_FINE_LOCATION" />

   <application
       android:allowBackup="true"
       android:icon="@mipmap/ic_launcher"
       android:label="@string/app_name"
       android:roundIcon="@mipmap/ic_launcher_round"
       android:supportsRtl="true"
       android:theme="@style/AppTheme">

//Add your API key. Make sure you replace the “YOUR_API_KEY_HERE” text!//

       <meta-data
           android:name="com.google.android.geo.API_KEY"
           android:value="YOUR_API_KEY_HERE"/>
       <activity android:name=".MainActivity">
           <intent-filter>
               <action android:name="android.intent.action.MAIN" />
               <category android:name="android.intent.category.LAUNCHER" />
           </intent-filter>
       </activity>
   </application>

</manifest>
Add the Places API as a project dependency
Open your project’s module-level build.gradle file and add the latest version of the Google Places API as a dependency:
dependencies {
   implementation fileTree(dir: 'libs', include: ['*.jar'])
   implementation 'com.android.support:appcompat-v7:26.1.0'
   implementation 'com.google.android.gms:play-services-places:11.8.0'
...
...
...
Picking a place: Creating your layout
The Google Places API includes a ready-made place picker widget, which will form the basis of our application.
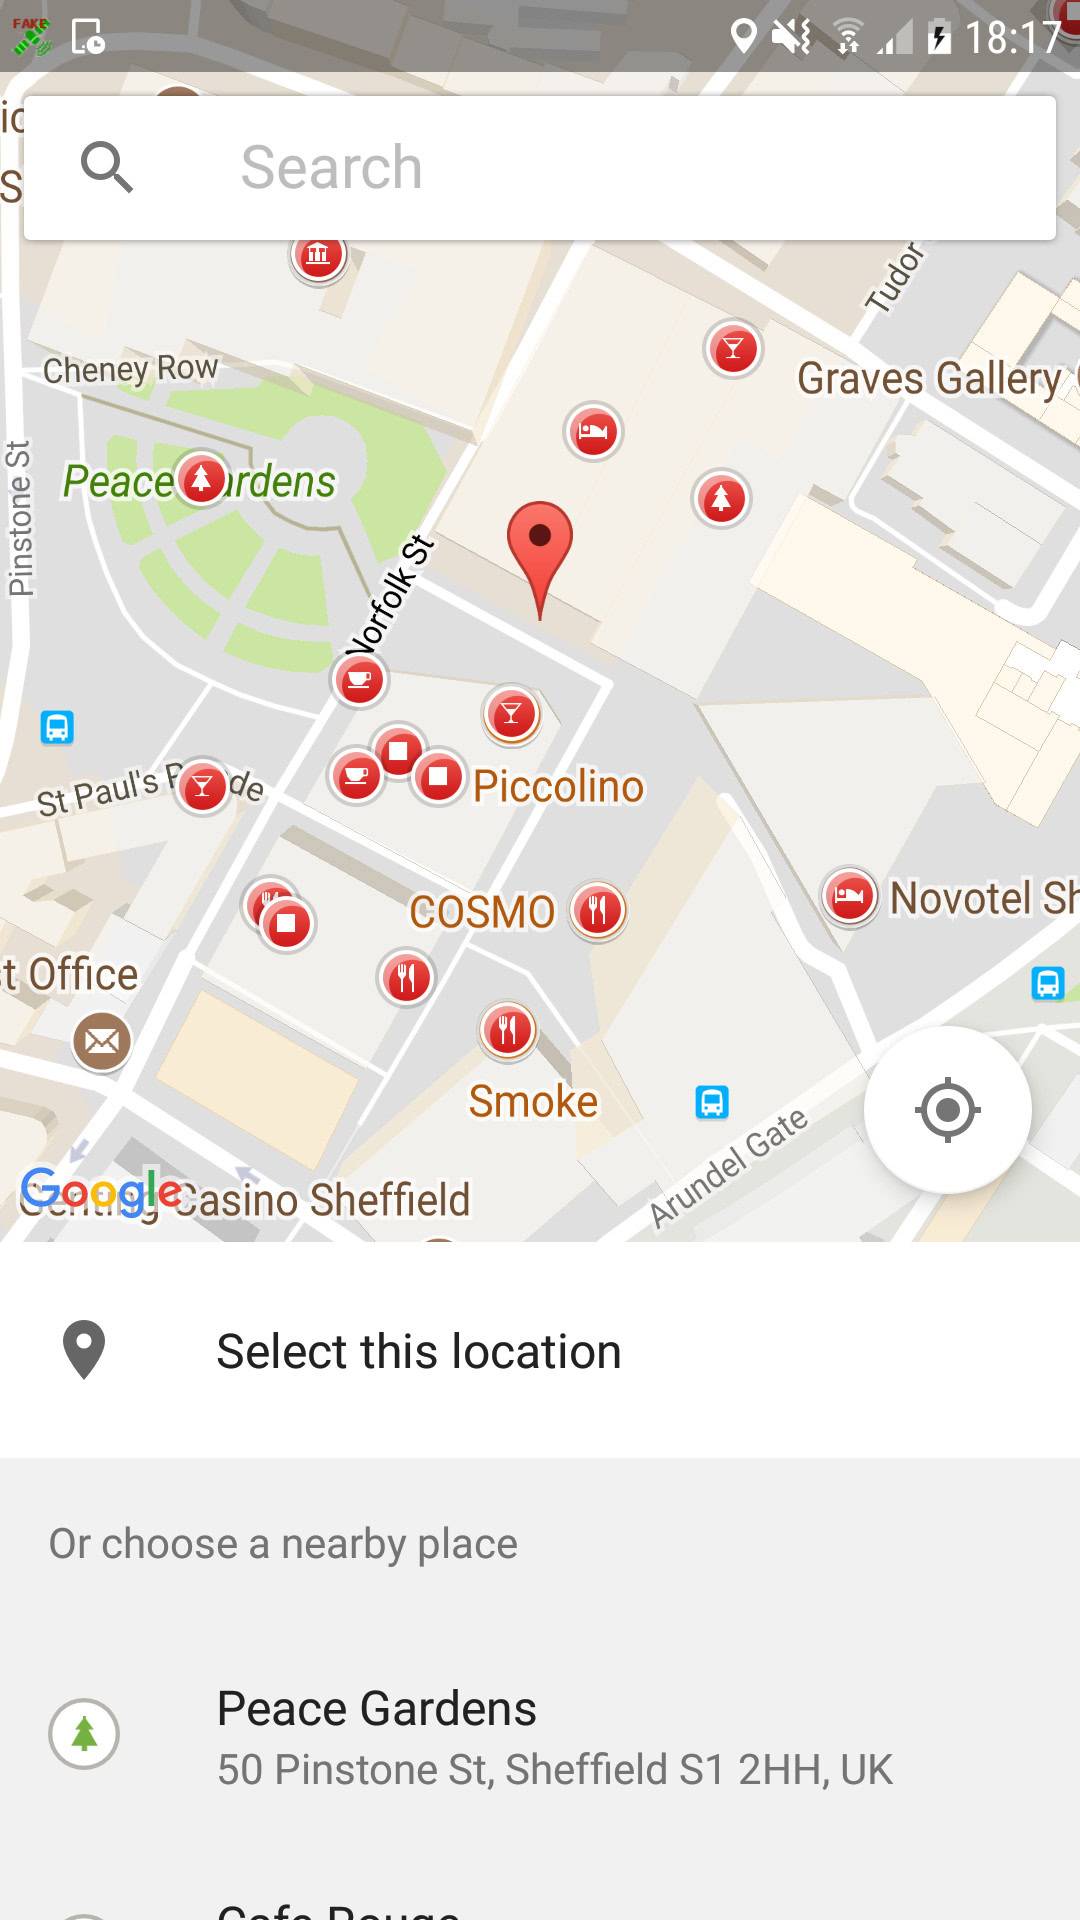
The place picker displays this kind of information:
- The device’s location on an interactive Google Map.
- Nearby places of interest, shown as markers on the map.
- A list of nearby places.
- A Google search bar.
When selecting a place, the dialog gives you several options:
- Drag around the Google Maps fragment, and tap any of the place markers.
- Tap any of the places that appear in the Choose a nearby place list. This list isn’t tied to the user’s current location, so if they drag around the map, the list will update to display different places.
- Tap the “Powered by Google” search bar and type the name or address of the place you have in mind. The search bar has built-in autocomplete support, so it’ll display a list of suggested places based on the text you’ve entered so far.
Once you find a place you want to learn more about, just give it a tap and choose Select from the popup that appears. The place picker reacts by creating a Place object containing a range of information. In our application, we’re going to retrieve the place’s name and street address, and display that information on a subsequent screen.
By using the ready-made place picker dialog, you ensure your application is consistent with every other app that features this dialog, including Google’s own applications. This consistency means some of your users may immediately know how to interact with this part of your application, having encountered this dialog many times before in other applications. Using ready-made components wherever possible just makes sense! Why waste time recreating functionality that already exists?
When the user selects a location using the place picker, this data doesn’t persist, so if they rotate their device after selecting a location, the app will return to its initial state.
We’ll be implementing the place picker widget programmatically, so in our activity_main.xml file we just need to do this:
- Give the user a way to launch the place picker dialog.
- Display the name and street address of whatever place the user selects in the place picker dialog. If this information isn’t available, our app should display the place’s latitude and longitude values instead.
- Provide the necessary “Powered by Google” attribution.
That last point requires some explanation. On every screen where an app uses data sourced from the Google Places API, it must display either a Google Map or “Powered by Google” logo.
Since we’ll be displaying the place’s name and address in our activity_main.xml file, we need to include a “Powered by Google” logo.
The Google Play services library provides two versions of this image:
- For light backgrounds, use @drawable/powered_by_google_light
- For dark backgrounds, use @drawable/powered_by_google_dark
You can’t resize or modify these images in any way.
Here’s the finished layout:
<?xml version="1.0" encoding="utf-8"?>

<RelativeLayout xmlns:android="http://schemas.android.com/apk/res/android"
   xmlns:app="http://schemas.android.com/apk/res-auto"
   xmlns:tools="http://schemas.android.com/tools"
   android:id="@+id/activity_main"
   android:layout_width="match_parent"
   android:layout_height="match_parent"
   android:paddingBottom="20dp"
   android:paddingLeft="20dp"
   android:paddingRight="20dp"
   android:paddingTop="20dp"
   tools:context="com.jessicathornsby.myapplication.MainActivity">

   <TextView
       android:id="@+id/placeName"
       android:layout_width="wrap_content"
       android:layout_height="wrap_content"
       android:layout_alignParentTop="true"
       android:text="Place Name"
       android:textSize="20sp" />

   <TextView
       android:id="@+id/placeAddress"
       android:layout_width="wrap_content"
       android:layout_height="wrap_content"
       android:layout_below="@+id/placeName"
       android:text="Address"
       android:textSize="20sp" />

   <Button
       android:id="@+id/pickPlaceButton"
       android:layout_width="wrap_content"
       android:layout_height="wrap_content"
       android:layout_alignParentBottom="true"
       android:text="Pick a Place" />

   <ImageView
       android:id="@+id/imageView"
       android:layout_width="wrap_content"
       android:layout_height="wrap_content"
       android:layout_alignParentBottom="true"
       android:layout_alignParentEnd="true"
       android:layout_marginEnd="23dp"
       app:srcCompat="@drawable/powered_by_google_light" />

</RelativeLayout>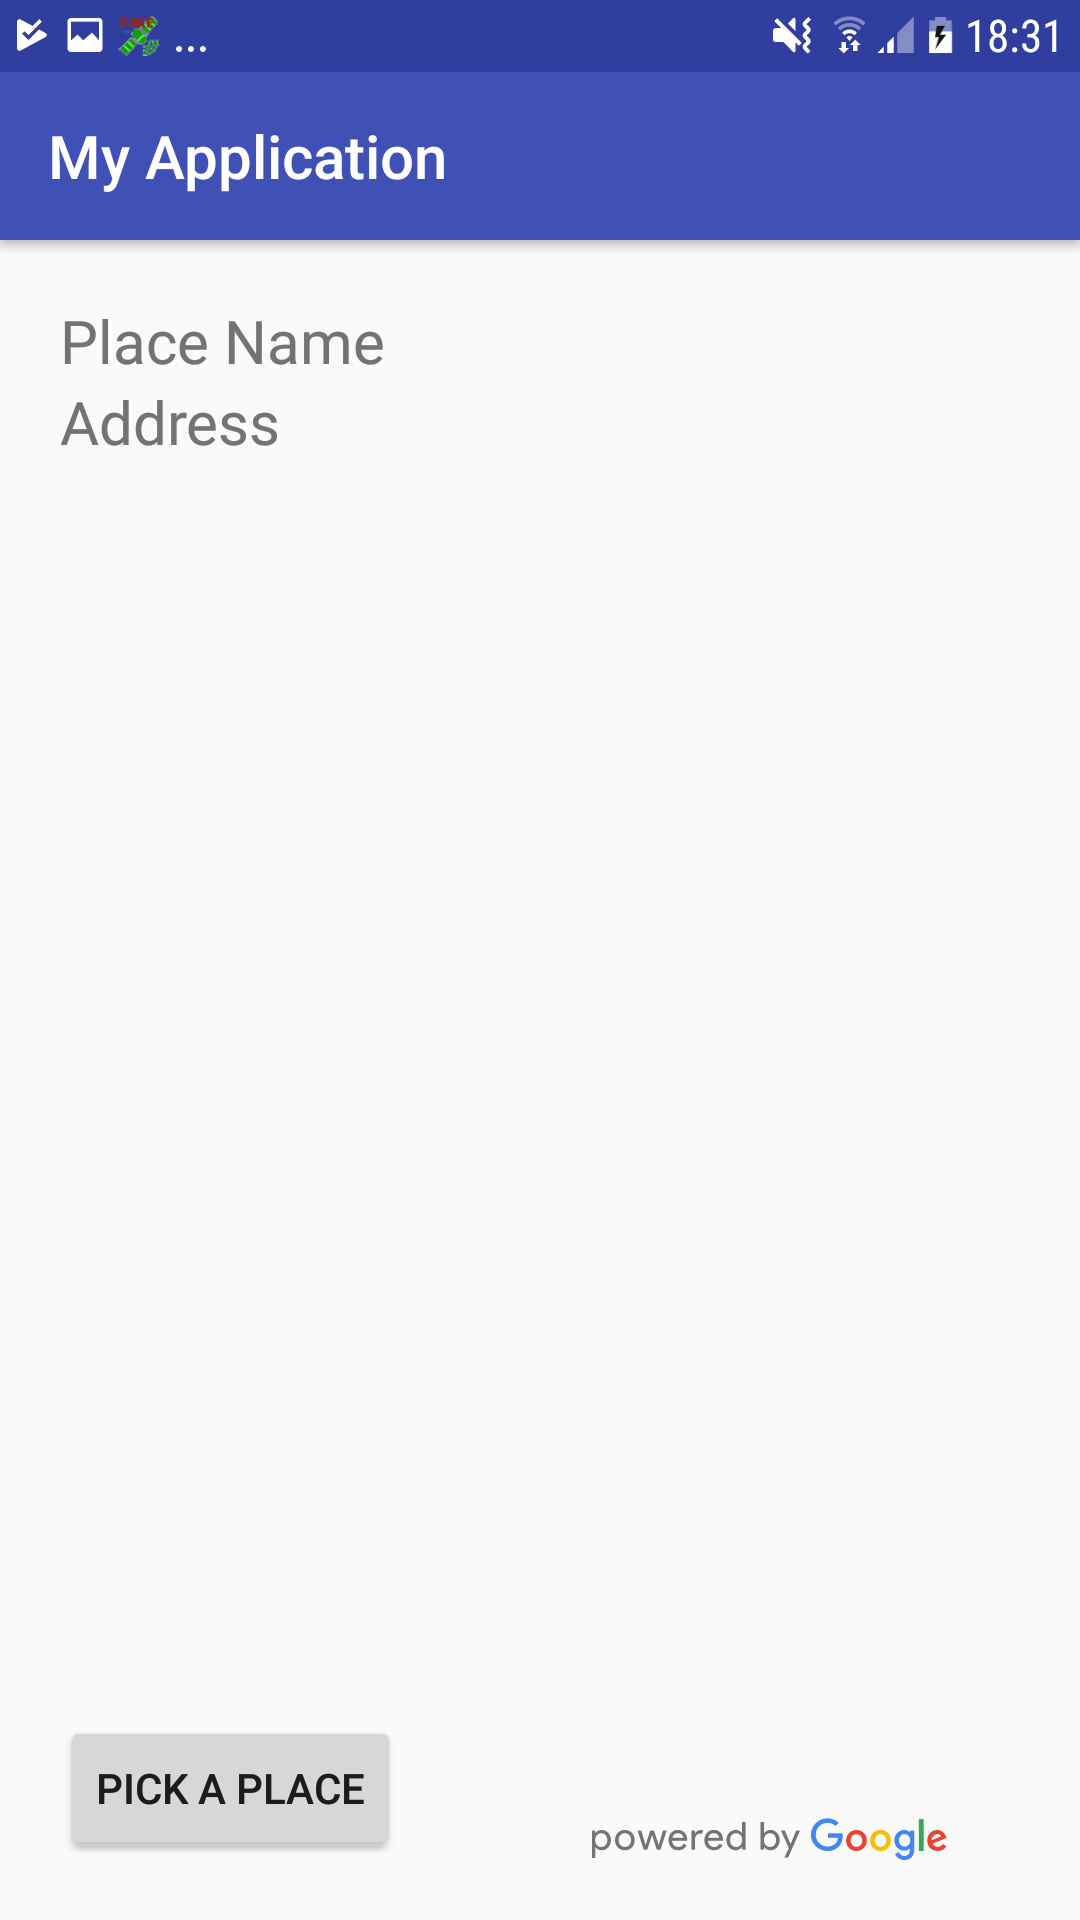
Launch the Place Picker dialog
In our MainActivity, we need to perform the following:
- Request the ACCESS_FINE_LOCATION permission. We declared this permission in our Manifest, but in Android 6.0 and higher applications need to request permissions as and when they’re required at runtime. If the user denies a permission request, make sure they understand the impact this will have on the user experience. If the user denies the ACCESS_FINE_LOCATION permission, our app will respond by displaying a toast.
- Launch the place picker dialog, by passing an Intent created with PlacePicker.IntentBuilder().
- Whenever the user selects a place, the place picker returns a Place instance. Our app needs to retrieve this instance, using the PlacePicker.getPlace() method, and then extract the necessary information i.e the place name and place address.
- If the user exits the place picker without selecting a place, display an error message.
Here’s the completed MainActivity:
import android.support.annotation.NonNull;
import android.support.v4.app.ActivityCompat;
import android.support.v7.app.AppCompatActivity;
import android.os.Build;
import android.os.Bundle;
import android.widget.Button;
import android.content.Intent;
import android.Manifest;
import android.content.pm.PackageManager;
import android.widget.TextView;
import android.widget.Toast;
import android.view.View;

import com.google.android.gms.common.GooglePlayServicesNotAvailableException;
import com.google.android.gms.common.GooglePlayServicesRepairableException;
import com.google.android.gms.location.places.Place;
import com.google.android.gms.location.places.ui.PlacePicker;

public class MainActivity extends AppCompatActivity {

   TextView placeName;
   TextView placeAddress;
   Button pickPlaceButton;
   private final static int FINE_LOCATION = 100;
   private final static int PLACE_PICKER_REQUEST = 1;

   @Override
   protected void onCreate(Bundle savedInstanceState) {
       super.onCreate(savedInstanceState);
       setContentView(R.layout.activity_main);
       requestPermission();

       placeName = (TextView) findViewById(R.id.placeName);
       placeAddress = (TextView) findViewById(R.id.placeAddress);
       pickPlaceButton = (Button) findViewById(R.id.pickPlaceButton);
       pickPlaceButton.setOnClickListener(new View.OnClickListener() {

//Add a click handler that’ll start the place picker//

           @Override
           public void onClick(View view) {

//Use PlacePicker.IntentBuilder() to construct an Intent//

              PlacePicker.IntentBuilder builder = new PlacePicker.IntentBuilder();
              try {
                  Intent intent = builder.build(MainActivity.this);

//Create a PLACE_PICKER_REQUEST constant that we’ll use to obtain the selected place//

                 startActivityForResult(intent, PLACE_PICKER_REQUEST);
             } catch (GooglePlayServicesRepairableException e) {
                    e.printStackTrace();
             } catch (GooglePlayServicesNotAvailableException e) {
                    e.printStackTrace();
             }

          }
       });
   }

   private void requestPermission() {

//Check whether our app has the fine location permission, and request it if necessary//

       if (ActivityCompat.checkSelfPermission(this, Manifest.permission.ACCESS_FINE_LOCATION) != PackageManager.PERMISSION_GRANTED) {
           if (Build.VERSION.SDK_INT >= Build.VERSION_CODES.M) {
               requestPermissions(new String[]{Manifest.permission.ACCESS_FINE_LOCATION}, FINE_LOCATION);
          }
       }
   }

//Handle the result of the permission request//

   @Override
   public void onRequestPermissionsResult(int requestCode, @NonNull String[] permissions, @NonNull int[] grantResults) {
       super.onRequestPermissionsResult(requestCode, permissions, grantResults);
       switch (requestCode) {
          case FINE_LOCATION:
               if (grantResults[0] != PackageManager.PERMISSION_GRANTED) {
                    Toast.makeText(getApplicationContext(), "This app requires location permissions to detect your location!", Toast.LENGTH_LONG).show();
                   finish();
              }
              break;
       }
   }

//Retrieve the results from the place picker dialog//

   @Override

   protected void onActivityResult(int requestCode, int resultCode,
                       Intent data) {

//If the resultCode is OK...//

      if (resultCode == RESULT_OK) {

//...then retrieve the Place object, using PlacePicker.getPlace()//

          Place place = PlacePicker.getPlace(this, data);

//Extract the place’s name and display it in the TextView//

          placeName.setText(place.getName());

//Extract the place’s address, and display it in the TextView//

          placeAddress.setText(place.getAddress());

//If the user exited the dialog without selecting a place...//

       } else if (resultCode == RESULT_CANCELED) {

//...then display the following toast//

            Toast.makeText(getApplicationContext(), "No place selected", Toast.LENGTH_LONG).show();

      }
   }
}
You can download the complete Google Places API application, minus the API key, from GitHub.
Testing your application
Install your project on an Android device. As soon as you launch the app, it should ask for access to your location. Grant this request and then tap the Pick a Place button to launch the place picker dialog.
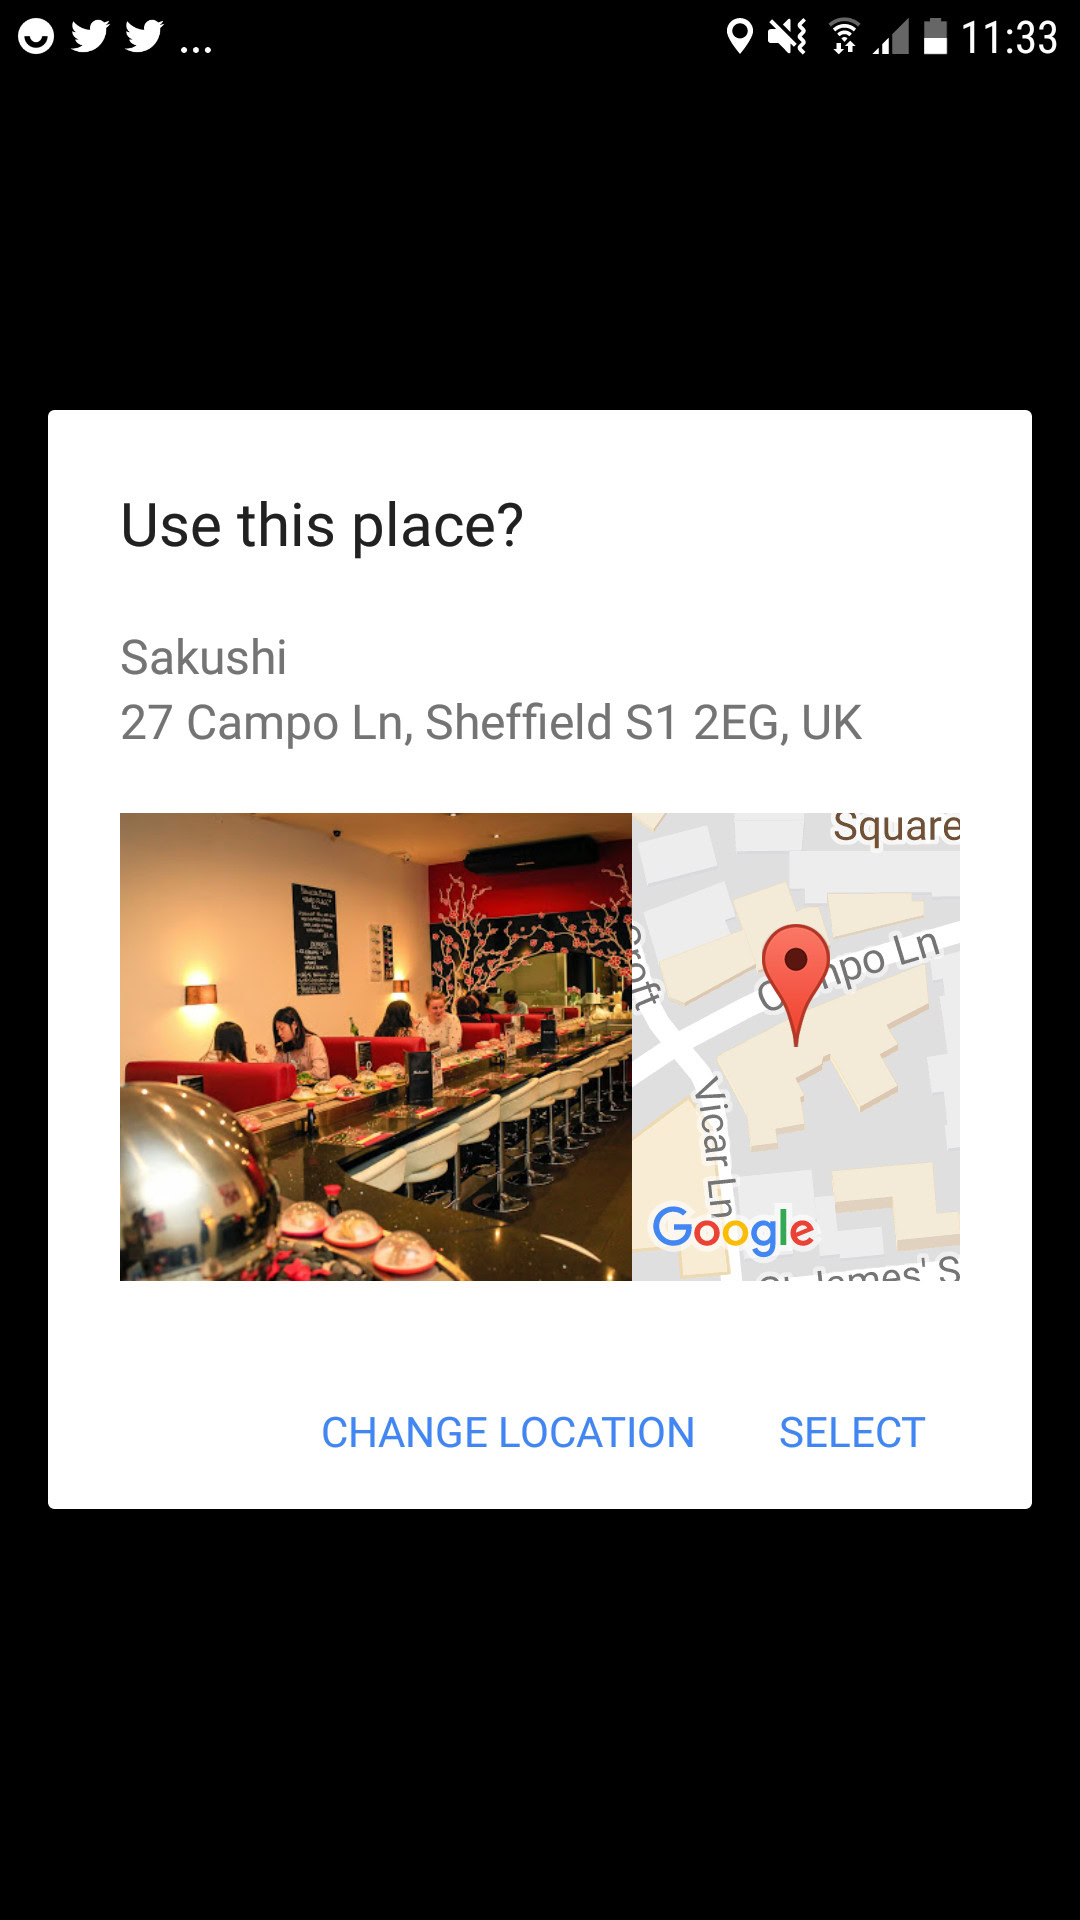
Select a place using the place picker’s integrated Google Map, the list, or the search bar, and a Use this place? dialog will appear. This dialog will display different information, depending on the location you’ve selected, ranging from the place’s full name, address, and photo, to a simple string of GPS coordinates if Google Places doesn’t have any information about your chosen location.
If you want to use this place, tap Select or choose a new location by tapping Change location.
Once you’ve selected a place, the activity_main layout will update to display the place’s name and address, or a string of GPS coordinates if that information isn’t available.
What other information can I display?
The great thing about the Places API is once you’ve retrieved a Places object, the hard part is done! Your app can extract a range of information from this object:
- getID. The place’s textual identifier. Your app may use this information to uniquely identify a place, but you typically won’t display this ID to the user.
- getPhoneNumber. The place’s phone number.
- getWebsiteUri. The place’s website, if known, for example the website associated with a business or school.
- getLatLng. The place’s geographical coordinates.
- getViewport. A viewport, returned as a LatLngBounds object.
- getPlaceTypes. A list of the place types associated with this place, such as TYPE_AIRPORT, TYPE_CLOTHING_STORE or TYPE_MOVIE_THEATER.
- getLocale. The locale for which the name and address are localized.
- getPriceLevel. The place’s price level, ranging from 0 (cheapest) to 4 (most expensive).
- getRating. An aggregated rating, ranging from 1.0 to 5.0.
Since our app already has access to the Places object, we can display any of the above details, just by changing a few lines of code. Here we’re displaying the phone number and price level of the selected place:
public class MainActivity extends AppCompatActivity {

   TextView placePhone;
   TextView placePrice;
   Button pickPlaceButton;
   private final static int FINE_LOCATION = 100;
   private final static int PLACE_PICKER_REQUEST = 1;

   @Override
   protected void onCreate(Bundle savedInstanceState) {
       super.onCreate(savedInstanceState);
       setContentView(R.layout.activity_main);
       requestPermission();

       placePrice = (TextView) findViewById(R.id.placePrice);
       placePhone= (TextView) findViewById(R.id.placePhone);
       pickPlaceButton = (Button) findViewById(R.id.pickPlaceButton);
       pickPlaceButton.setOnClickListener(new View.OnClickListener() {

           @Override
           public void onClick(View view) {

               PlacePicker.IntentBuilder builder = new PlacePicker.IntentBuilder();
               try {
                   Intent intent = builder.build(MainActivity.this);
                   startActivityForResult(intent, PLACE_PICKER_REQUEST);
             } catch (GooglePlayServicesRepairableException e) {
                   e.printStackTrace();
             } catch (GooglePlayServicesNotAvailableException e) {
                   e.printStackTrace();
             }

           }
       });
   }

 private void requestPermission() {
       if (ActivityCompat.checkSelfPermission(this, Manifest.permission.ACCESS_FINE_LOCATION) != PackageManager.PERMISSION_GRANTED) {
           if (Build.VERSION.SDK_INT >= Build.VERSION_CODES.M) {
               requestPermissions(new String[]{Manifest.permission.ACCESS_FINE_LOCATION}, FINE_LOCATION);
           }
        }
   }

   @Override
   public void onRequestPermissionsResult(int requestCode, @NonNull String[] permissions, @NonNull int[] grantResults) {
       super.onRequestPermissionsResult(requestCode, permissions, grantResults);

       switch (requestCode) {
           case FINE_LOCATION:
                if (grantResults[0] != PackageManager.PERMISSION_GRANTED) {
                     Toast.makeText(getApplicationContext(), "This app requires location permissions to detect your location!", Toast.LENGTH_LONG).show();
                finish();
               }
               break;
        }
   }

   @Override

   protected void onActivityResult(int requestCode, int resultCode,
Intent data) {

        if (resultCode == RESULT_OK) {

            Place place = PlacePicker.getPlace(this, data);

//Display the phone number//

            placePhone.setText(place.getPhoneNumber());

//Display the price level//

            placePrice.setText(String.valueOf(place.getPriceLevel()));

       } else if (resultCode == RESULT_CANCELED) {

           Toast.makeText(getApplicationContext(), "No place selected", Toast.LENGTH_LONG).show();

       }
   }
}
Wrapping up
In this article, I showed you how to add an extra layer of detail to your location-aware apps, using the Google Places API. It’s also easy to pull extra information from the Places API once you’ve retrieved that all-important Places object.
Have you seen any apps using Places information in interesting ways? Let us know in the comments below!