Affiliate links on Android Authority may earn us a commission. Learn more.
Android customization - save battery by managing Location services (without root)
Last week on our Android customization series, we took a little detour from our regularly scheduled battery saving tips with Tasker to show off a battery management tip with Zooper Widget. Today, we continue to look at reducing battery consumption on your Android device by getting back to those Location services we had on deck for last week.
Along with the display on your device, Location services and their use specifically of your GPS antenna are easy ways to drain your battery. While we do not think that turning off Location services permanently is the best idea, there are times that it is just not needed. Let’s head back to Tasker and look at managing Location services to save you some juice.
Today we will focus on Android 4.4 KitKat. The steps below may not work on other version of Android.
Before we get started

How should we manage Location services?
Before diving in, please take stock of your specific needs of your Location services. For today’s tutorial we will be assuming that you do not want Location services turned on at all, except if certain apps are active, like Maps or Ingress.
We have taken great care within our Android customization series to ensure that all tutorials and apps presented will work for as many of you as possible. Specifically, we have avoided root apps and tools, as we do not want you to root your phone for our behalf. To that end, you will find that today’s tutorial lacks a little finesse, this is due to the limitations of non-root devices running current generation Android. We will revisit this exact tutorial but with root abilities coming soon.
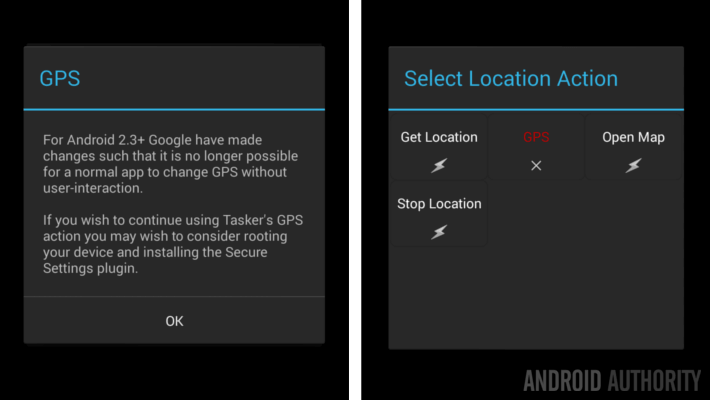
As mentioned, we will look at having Location services turned off by default and only turning it on when you have certain apps running. Truth is, Tasker is not able to bypass the newest security features of Android to access Location services, or even just the GPS settings. In the end, without rooting your device, all we can do is have Tasker open up Location services for us so that we can turn on or off GPS and the rest manually.
To keep this as clean and elegant as possible, we will simply fire up a notification that asks you if you want to head to Location settings and make those changes. I admit that this offers no advantage over the quick settings on most devices, but it is just a starting point to leap from.
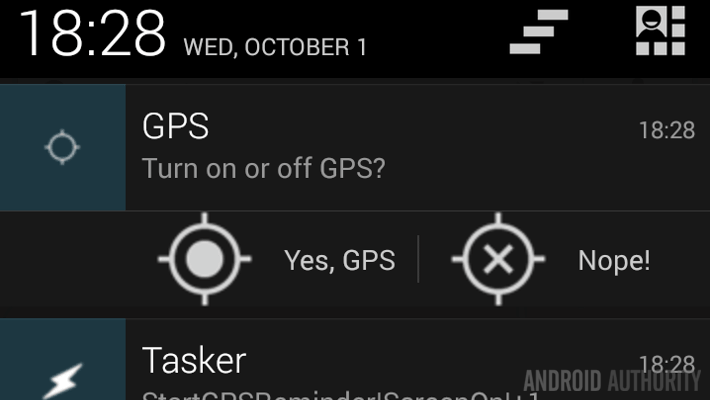
As with all things good in this world, it is going to take a bit of work to create our Tasker project today. We need several Tasks to pull this all together, and we’ll need to create them in a certain order, but it’s all pretty simple stuff, don’t worry.
You will need to create four Tasker Tasks in total. I’ll leave it to you to create a new Task for each, named appropriately for your needs, and I’ll show you what actions to add to each as we go. Some of the Tasks will not make sense until the end, please follow along in order.
If you are not ready to tackle Task creation on your own, head back to a previous Tasker tutorial to see how it’s done.
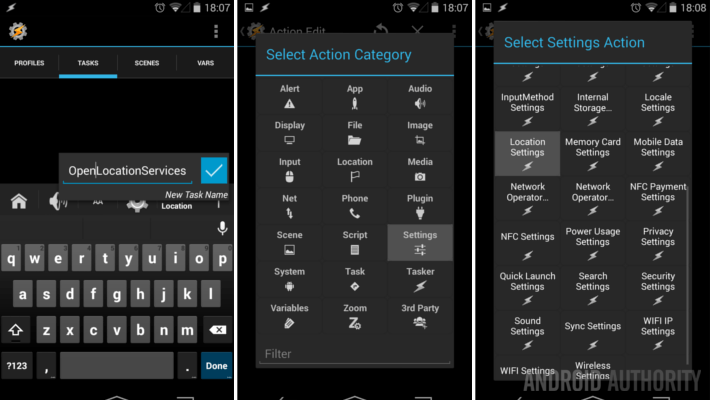
I’ve called mine “OpenLocationServices.”
Of course, you’ll tap the “+” button to add the first Action to this Task.
Choose Settings.
Choose Location Settings.
Tap the system Back button to save and exit back to the Task.
Tap “+” again to add Action two.
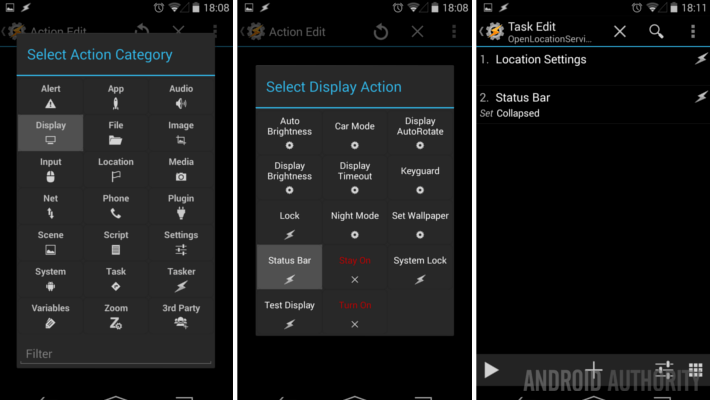
Choose Display.
Choose Status Bar.
Change the setting to Collapsed.
Tap the system Back button to save and exit all the way out of this Task.
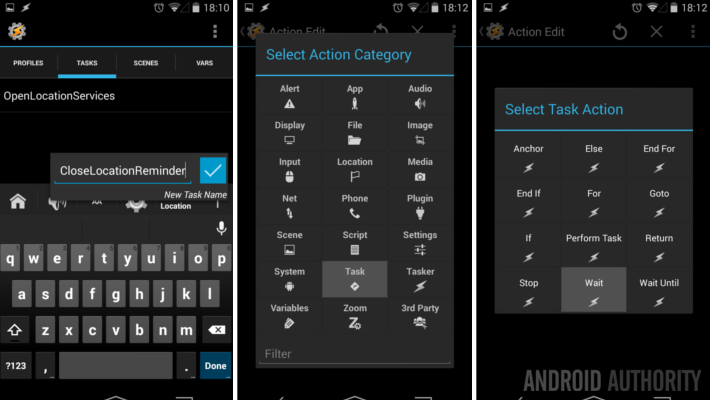
I’ve called mine “CloseLocationReminder.”
Tap the “+” button to add our first Action.
Choose Task.
Choose Wait.
Set a time value of about 10 seconds. This is the amount of time you will have after closing an app that the notification will remain active. You can always come back here later and change things up.
Tap the system Back button to save and exit back to the Task.
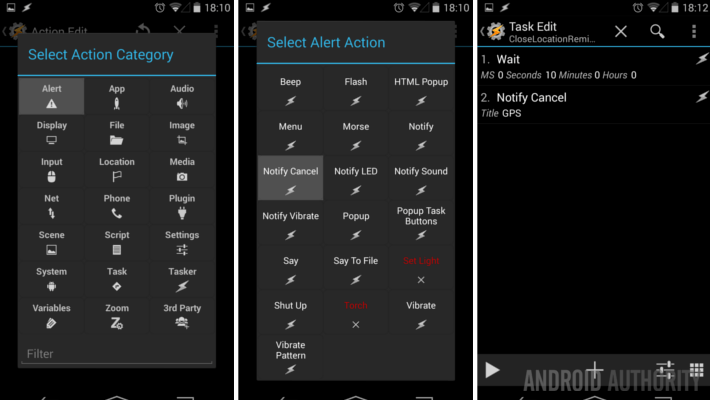
Tap the “+” to add Action two.
Choose Alert.
Choose Notify Cancel.
In the Title section, enter “GPS” (without the quotes.)
Tap the system Back button to save and exit all the way out of this Task.
This one is pretty simple, and just combines two of the above Actions in a different configuration. Trust me, we need it.
I’ve called mine “ClearLocationNotification.”
Tap the “+” button to add our first Action.
Choose Alert.
Choose Notify Cancel.
In the Title section, enter “GPS” (without the quotes.)
Tap the system Back button to save and exit back to the Task.
Take a deep Breath! And continue.
Tap the “+” button to add our second Action.
Choose Display.
Choose Status Bar.
Change the setting to Collapsed.
Tap the system Back button to save and exit all the way out of this Task.
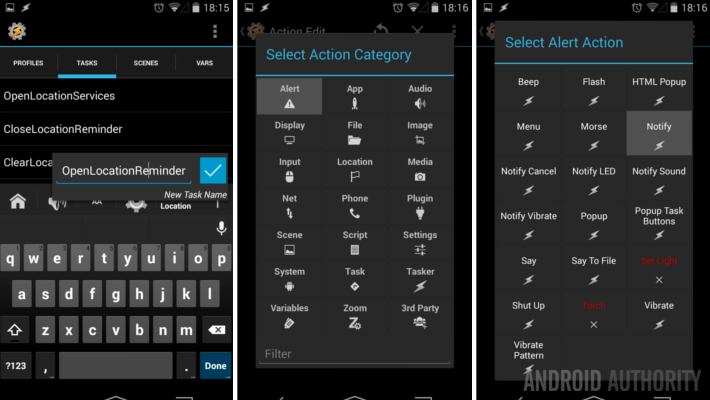
Tap the “+” button.
Choose Alert.
Choose Notify.
Change Title to be “GPS” (without the quotes.) It is crucial that this matches exactly the term you used in the Notify Cancel actions above. You do not have to use the term GPS, but do make sure that whatever you use matches in all of the Tasks.
For Text, give yourself a quick message, as you can see, I’ve written “Turn on or off GPS?”
Add an Icon. I’ve chosen the built-in icon for non-connected GPS, but there is no requirements here, whatever you want to add is fine, just keep in mind that this is the icon you will see in your Notification bar at the top of the screen.
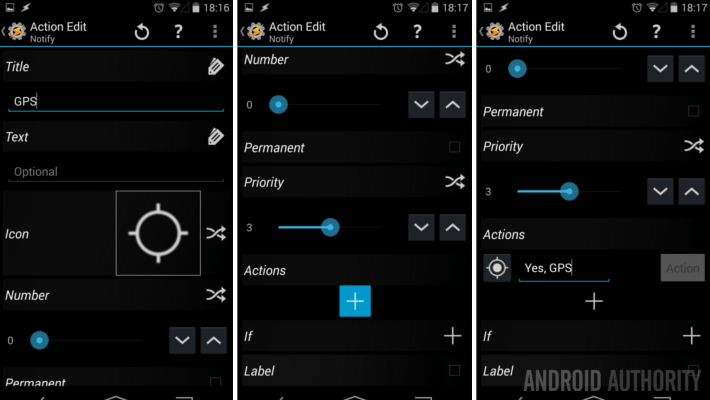
Under Actions, tap the “+” button to add a slot, then tap the Action button on the right.
Beside Name, tap the magnifying glass icon.
Choose your “OpenLocationServices” Task.
Tap the system Back button to save and go back.
Tap the Icon on the left and choose another icon, I’ve gone with the built-in GPS locked icon.
Tap on the text in the center and change it to a very short message, no more than eight characters, to signify the Action. You see I’ve put “Yes, GPS.”
We need another Action here.
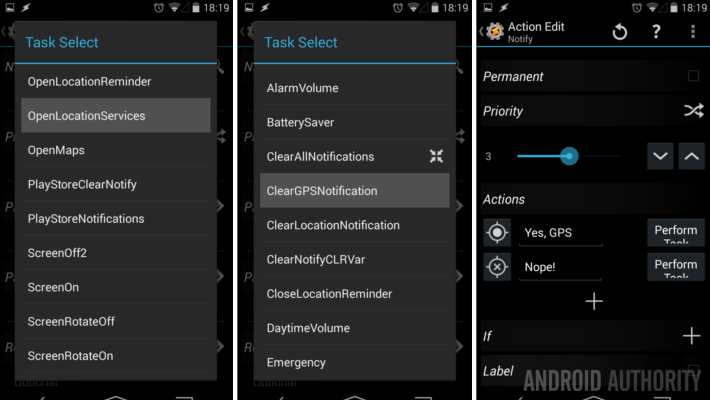
Follow the same steps starting with the “+” button to add another Action.
This time you’ll choose your “ClearLocationNotification” Task. (Which I have highlighted as “ClearGPSNotification” in the screenshot, sorry.)
Assign another Icon and enter text, such as “Nope!”
Tap your system Back button to save and exit all the way out of the Task.
That concludes the dirty work here folks. Now we need to put this all to good use. For that, we use a Tasker Profile. Head back to our previous Tasker tutorials if you need to brush up on Profiles.
What we are going to do here is create a Profile that fires up when specified apps are open, and closes down when the apps close. More specifically, we’ll trigger the Location reminder notification when we open apps like Maps, Ingress and Camera. Hold on, did you forget that most Camera apps can use your GPS to tag your images? No worries, I’ve got some other reminders for you later.
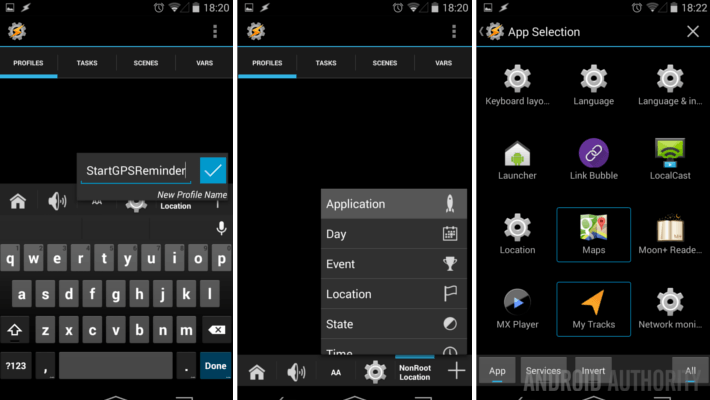
Create your new Profile and name it appropriately, I’ve gone with “StartGPSReminder.”
Choose Application.
Run through the list and select all of the appropriate apps that you wish to let use your location services. As mentioned, Maps and camera are good starters. The Google Search app includes Google Now, so you’ll probably want that. Google+ has location services, if you want them. Street View is a separate app from maps, don’t forget that. Speedtest needs your location, as does Torque, for the car. Finally, Google’s Wallet app should be on your list, if you are an active Wallet user, of course. I’m sure you’ll have more, go ahead and choose them too.
Tap the system Back button to save your selection of apps.
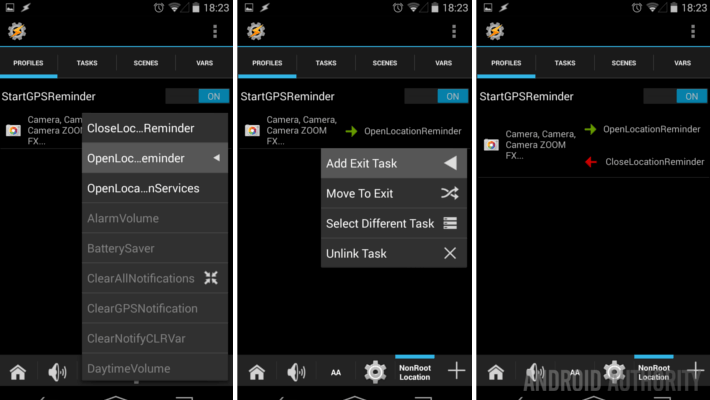
Choose your “OpenLocationReminder” Task.
Now, long press your “OpenLocationReminder” Task and choose Add Exit Task.
Choose your “CloseLocationReminder” Task.
Tap the system Back button to save and exit Tasker.
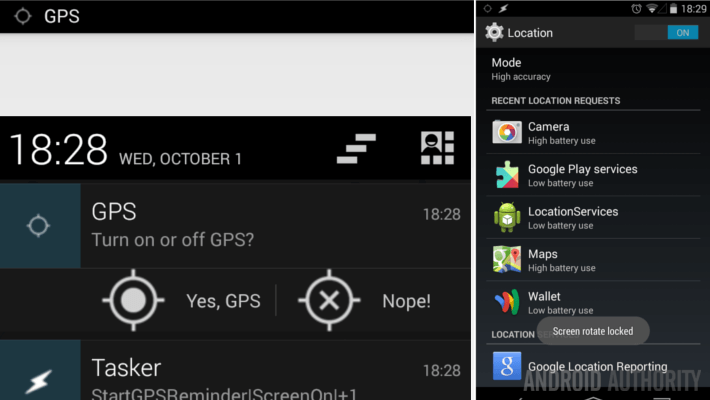
You’ve done it! Go ahead and open one of those apps you chose above. See that, a notification popped up asking you if you want to enable or disable GPS.
From the notification, you can tap your yes or no buttons. By tapping the yes button, you will be taken to the Location Settings on your device where you can manually enable or disable Location services.
What’s next
As you likely already know, you can control more than just the GPS in Location settings. I will mention that many users are reporting that by simply changing to Battery Saving mode, which just turns off the GPS, the majority of battery drain is eliminated. You’ll have to play with the settings to see what works best for you.
Now, you already reminded me that this specific notification offers no advantage over the quick settings on your device. Well, I challenge you to take this project to the next level. Perhaps you would have an on-screen popup that offers these options. Perhaps you want to mess with variables and make it so that Location settings opens automatically without your input. Hint: you could utilize the IF parameter and look for GPS Status, which will equal ‘on’ or ‘off’.
If you take this project to the next level, be sure to come back here and show off your settings in the comments below.
Finally, if you are like me, this is just not good enough, you want more and better automation of the Location services on your Android device. Well, we will need to root our devices to gain this control. We may take a little while, but I guarantee that we’ll revisit this with root instructions at some point. For now, I’ll remind you that you’ll need Secure Settings installed, and there is an Xposed module to get passed that Location services agreement. Good luck.
Next week
As always, I hope you enjoyed following along our Android customization series and found value in the Tasker project you built. As compared to our previous projects, you really rocked Tasker today. I mean, the Tasks individually were easy enough, but if you can see how that all pulled together, you are well on your way to becoming a Tasker master.
It’s starting to get colder out there in the northern hemisphere, perhaps it is time we started looking at some weather warning options you can quickly put to use using Zooper Widget. We’ll show you a simple weather warning, then unleash you to make it your own.
How do you like this method of handling Location Services, can you recommend something a little easier for the non-root users out there?