Affiliate links on Android Authority may earn us a commission. Learn more.
Top rookie Android developer mistakes
Published onJuly 23, 2015

Android is a fantastic platform to develop for. Its development tools are free, easy to come by, and available for Windows, MAC and Linux computers. Android has excellent developer documentation, it is the dominant mobile operating system, and it is available on phones, tablets, watches, TVs and cars. Developing and publishing an Android app is also incredibly easy and straight forward, considering that there are multiple Android app stores available, unlike the single app store for iOS and Windows.
The Android platform has matured quite a lot since September 2008, when version 1.0 was released. The first version of the SDK was released in November 2007, using Eclipse IDE and the ADT plugin. The tools available to developers has grown in leaps and bounds, as has the API, and today, the preferred (and officially sanctioned) method is using the Android Studio IDE. Android Studio is based on the IntelliJ IDE, and is designed to ease android app development. It achieves this in many ways, a few of which include
- Tools to catch performance, compatibility and usability problems during design/development
- Ability to preview layout designs for multiple devices during design/development
- Support for Google Cloud Messaging and App Engine integration with an Android app
- Templates to create and manage android projects
- Templates to create and manage smartphone, tablet, watch, TV and Auto apps
and a whole lot more.
Android Studio has been designed to alert developers to issues with their code, and helps alert beginner coders to a lot of the most common errors they can make. But the IDE can only do so much to protect new (and sometimes even experienced) developers from themselves.
In this article, we discuss some of the most common mistakes made by a rookie Android developers, in no particular order. Even some experienced developers fall prey to some of these mistakes sometimes, so hopefully you will find this rundown useful. Let’s begin!
Using iOS design language

This is relatively (comparatively) rare, but many developers coming from an iOS background tend to design their apps like iOS apps, rather than like Android apps. Both platforms are incredibly similar, but awfully different. An Android app should fit in with the Android system of doing things, while an iOS app should fit in with the iOS way of doing things. If you intend to develop for the Android platform, you must read the Android design guidelines first. At the very least peruse the document, so that you have a general understanding of the Android ecosystem. You do not want to confuse users with a jarring interface, different from every other app they use daily. Differentiate your app with features and functionality, and personalize with colors and logos.
Not using Intents
Intents are a key part of the Android system. They are a means of requesting for data or an action from another app component (could be the same app, or another, completely different app). There are loads of actions your app might want to perform, and rather than re-implementing these actions, you simply ask the Android system to pick the best suited app for that task. For example, an app requires to pick a contact, with phone number, from the device. Rather than reading the contacts database, and implementing a List to show the user all contacts that have a phone number, and then implementing the logic to select a contact, an experienced developer would simply use the following code snippet
private void pickContact() {
    Intent pickContactIntent = new Intent(Intent.ACTION_PICK, ContactsContract.Contacts.CONTENT_URI);
    pickContactIntent.setType(ContactsContract.CommonDataKinds.Phone.CONTENT_TYPE);
    startActivityForResult(pickContactIntent, PICK_CONTACT_REQUEST);
}
There are a ton of actions that can be performed using Intents, including taking pictures/videos, sharing content, playing videos, setting reminders and alarms, and much more. Developers can even define their own filters for intents.
Not using fragments
During the dark days of Android development, before Honeycomb (Ice Cream Sandwich for phones), Android apps were built using only activities and services. After the great awakening, the concept of fragments was introduced to the API. A fragment is a mini activity, that can be embedded (and combined with other fragments) in an activity. This enables developers build UIs that able to easily adapt and switch between tablet and phone sized devices.
Developing for the current Android version

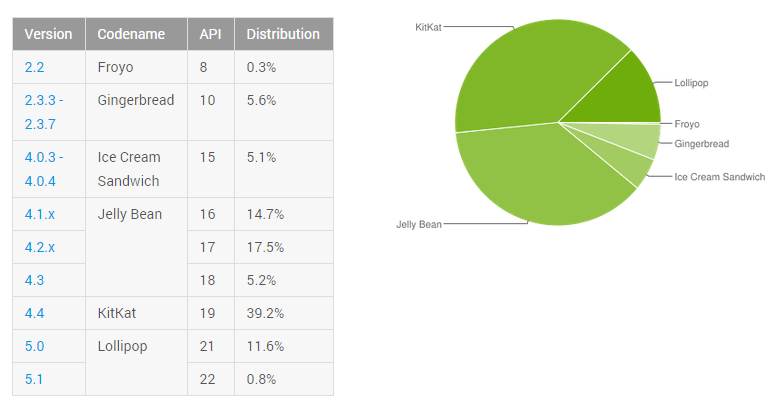
Android has a well discussed fragmentation problem. The current version of Android, as of writing, is Lollipop version 5.1.1. Lollipop version 5.0 was released on November 12 2014, and over eight months later, Lollipop adoption stands at a measly 12%. Android M, the next version of Android is already available to developers and beta testers, and it is expected to be released around November 2015. Each version of Android introduces new APIs and a rookie Android developer would be tempted to immediately use the new APIs for apps. Doing this would greatly reduce the number of potential users for your app.
An experienced Android developer, on the other hand, would check for the availability of the new APIs in the Android Support Library, and use that instead. The Android Support Library package is a set of code libraries that provide backward-compatible versions of Android framework APIs as well as features that are only available through the library APIs.
At the other extreme, be wary of attempting to support really old devices. Supporting devices with Ice Cream Sandwich and above covers close to 95% of all current android devices.
Developing for a single (or two) screen

There are literally thousands of different Android devices in the market today, with different screen sizes and resolutions, and app widgets scale and look different on devices. The Android design specs contains guidelines on best practices for designing layouts. When designing for Android, developers should use dp (density independent pixels) for specifying image and widget sizes, and sp (scaleable pixels) for fonts. Check out our previous articles on why you should test on a range of devices, and how to economically test your app on a range of devices.
Experienced Android developers will switch between preview devices in Android Studio during design/development. Rookie Android developers, on the other hand, are more likely to assume that since it works great on their Samsung Galaxy S6 and/or LG G4, it would look equally good on the Galaxy Ace 2 and Moto G (or vice versa).
Blocking the main (UI) thread
For every Android application, on launch, the system creates a thread of execution, called the main (or UI) thread. This thread is in charge of dispatching touch/tap events to the app widgets, drawing and updating widgets, and general interactions with the user. By default, all code executed by an app is executed on the main thread. This used to pose a problem – when long running operations are performed on this thread, the app appears to be frozen or hung. This was such a problem, especially with apps that attempted to fetch network resources, that on newer versions of Android, apps cannot make network calls on the main thread. Other possibly long running tasks that shouldn’t be performed on the main thread include
- Loading bitmaps
- Writing/Reading from database/file
- Complex calculations
Below is a sample code for downloading an image from a separate thread and displaying it in an ImageView in response to a click event.
public void onClick(View v) {
    new Thread(new Runnable() {
        public void run() {
            final Bitmap bitmap =
                    loadImageFromNetwork("http://example.com/image.png");
            mImageView.post(new Runnable() {
                public void run() {
                    mImageView.setImageBitmap(bitmap);
                }
            });
        }
    }).start();
}
An experienced developer never wants his app to appear to be frozen. Also, the Android system alerts users with an Application Not Responding (ANR) if the main thread is blocked for a given period (5 seconds for activities). For possible long running tasks, consider using an AsyncTask. Also, consider using a ProgressBar while your app is performing a background task.
Not reading the docs
The Android Developer website is a comprehensive and extensive resource for Android app design, development and distribution. There are guides, tutorials, best practices, guidelines, specifications as well as API documentation. The website is regularly updated, and every aspiring Android developer must have this as a top bookmark. In addition, rookie Android developers will benefit immensely from StackOverflow. StackOverflow is an online community of developers, where users ask questions regarding any programming issues/challenges they face, and other professionals answer these questions. Virtually every problem a new developer can run into has been experienced, asked and answered on StackOverflow.
Deeply nested view hierarchy

A common rookie mistake is assuming that using basic layout structures leads to efficient layouts. Actually, every widget and layout added to the app increases the time spent drawing the app layout. Particularly, using the layout_weight parameter can be quite expensive during rendering. It is better to use a single RelativeLayout, and align the widgets in relation to each other. A flat, shallow and wide layout performs better than a narrow and deep layout. The Lint tool, bundled with Android Studio, can help optimize app layout files by recommending actions such as
- Use compound drawables: A LinearLayout with a single ImageView and TextView will be more efficient as a single compound drawable
- Useless parent: A layout with children, but whose removal wouldn’t affect the final appearance
- Useless leaf: A layout with no children and no background
- Deep Layouts: The maximum nest depth is 10. Ideally, app layouts should be 2-3 levels deep
Misunderstanding bitmaps/images
Bitmaps and images can, and do, use significant memory resources. Most rookie Android developers run into the dreaded OutOfMemoryError when loading and/or displaying collections of images. Before an image is drawn on screen, it must first be loaded in memory. For example, loading a 2448×3264 ARGB_8888 image requires 4 * 2448 * 3264 bytes when loaded. That is about 32MB memory allocation needed for a single image. If the image ends up being displayed as on an ImageView that’s 200×200 pixels in size, the memory allocation needed is actually only 4 * 200 * 200 bytes (about 160KB). Loading the entire image, only to display it on a 200×200 widget just used almost 32MB memory space, rather that 160KB.
Experienced developers know to use Bitmap.createScaledBitmap() when loading Bitmaps. Also, a rookie Android developer would be tempted to load images in the main thread. Check out the Android developer page on displaying bitmaps efficiently.
Assuming mobile app equals small project
This is a mistake seen all too often from almost everyone except experienced Android developers, or those with an experience in software development. Many new and aspiring Android developers somehow think that the fact that they are building an app for mobile devices means that it is a small project that shouldn’t require much prior planning, or can be completed in a weekend of pizza and coffee fueled coding binge. This is horrendously far from reality. Android app development is no different from any other software development project, and requires specifications, schedules/timelines, bug tracking, and a release and maintenance plan.
Android Developer Newsletter
Conclusion
Android development, much like software development, is a fun and rewarding pastime (or work, if you call it that). The above is a non exhaustive list of some common mistakes newbie Android developers tend to make. There is only one way to become an experienced Android developer, and that is to keep developing apps. Did we leave something out? What silly mistakes did you make when starting out? Holler in the comments, some of us might still be making those mistakes.