Affiliate links on Android Authority may earn us a commission. Learn more.
How to use SQLite to store data for your Android app
Published onApril 29, 2015

Most Android apps will need to persist user data at sometime. There are different ways to store user data, but SQLite databases are a very convenient and speedy method of saving user (or app) data and information.
SQLite is an opensource SQL database that stores the database as a text file on a device. Basic familiarity with SQL sets up a developer nicely to use Android’s sqlite implementation. And for developers not familiar with SQL, do not be discouraged, SQL is pretty straightforward to learn, use and implement. SQLite is a relational database management system just like Oracle, MySQL and PostgreSQL. Due to its small footprint and public domain license, it is possibly the most widely deployed database engine in the world, it can be found in all types of software ranging from embedded systems, browsers, and operating systems.
Android has a built in SQLite implementation, and application specific database files are stored in a private disk space that’s inaccessible to other applications. This way, no application can access another application’s data.
Preparation
The complete source code for this tutorial is available on GitHub.
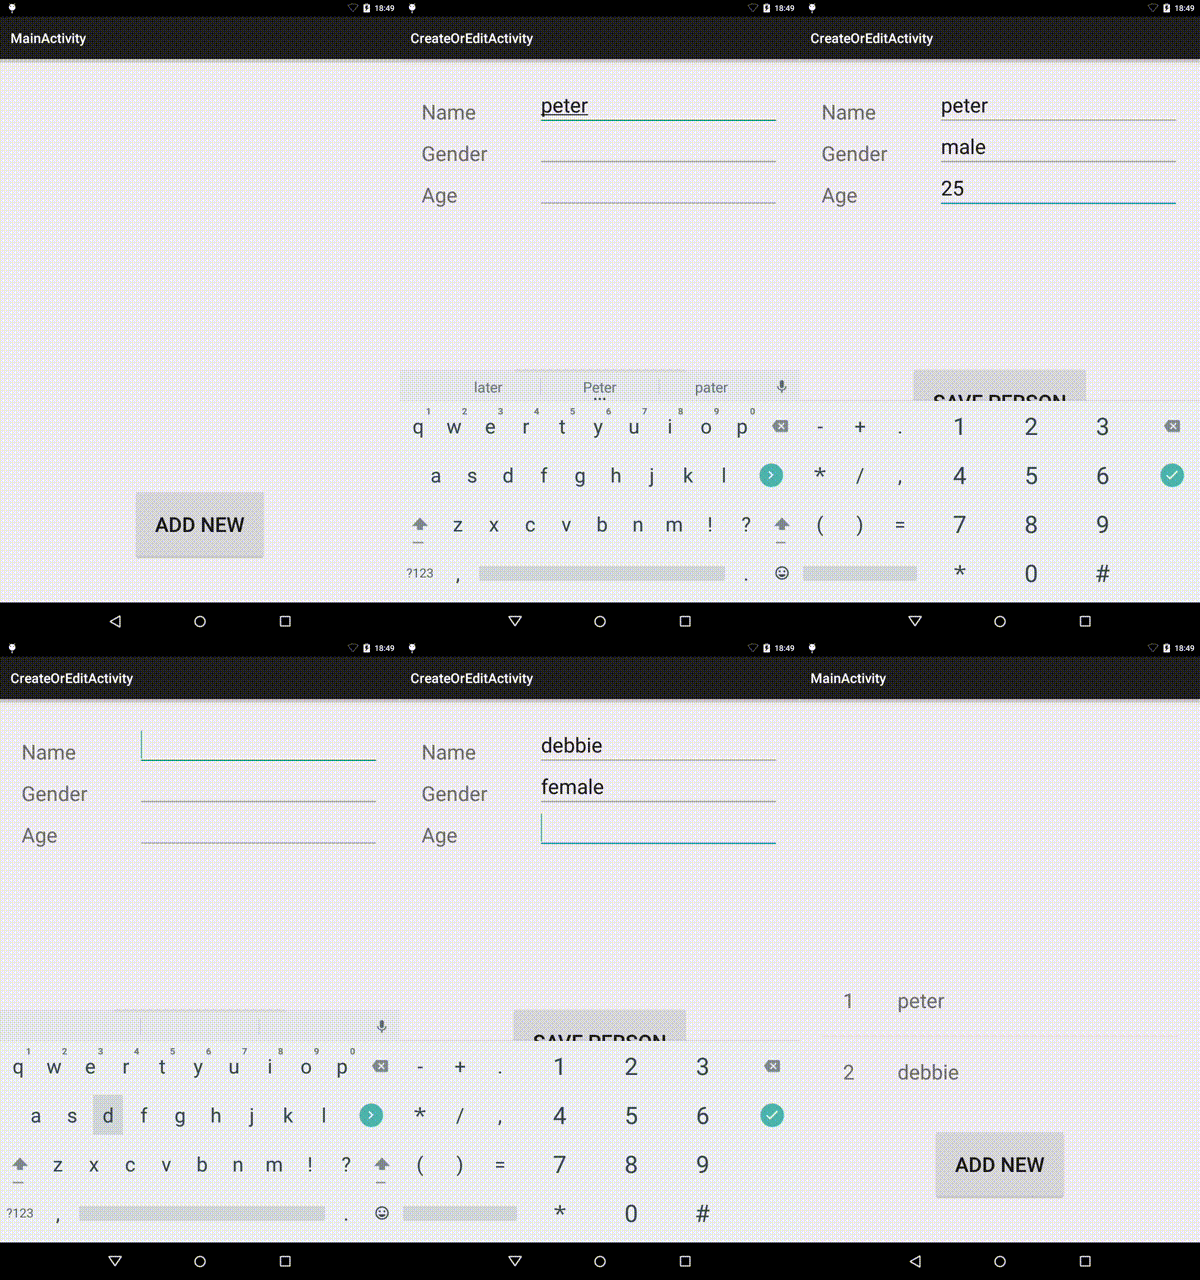
The sample application for this tutorial shows how to create a database, named “SQLiteExample.db”, that contains a single table named “person”. This table stores Person data, including his name, gender and age.
There are two Activities, MainActivity, which shows a list of stored Person names, and CreateOrEditActivity, which allows adding and editing Person details.
The most important class, in our sample, is the ExampleDBHelper class, which extends SQLiteOpenHelper. SQLiteOpenHelper is a helper class designed to manage database creation and version management. You override onCreate() and onUpgrade() methods, and whenever a new database is created or upgraded, the appropriate method gets invoked.
ExampleDBHelper is where all the SQLite operations are carried out, and both MainActivity and CreateOrEditActivity call methods from this class to view, create, update or delete data from the database.
Extending “SQLiteOpenHelper”
We create a class, called ExampleDBHelper, that extends SQLiteOpenHelper. We begin by defining the database, tables and columns as constants. This is always a good idea. If any of these names get changed, rather than hunting through the source for all occurrences, we simply change it once. Take special notice of the column called “_id” (PERSON_COLUMN_ID). This column has special significance which will be discussed below.
public static final String DATABASE_NAME = "SQLiteExample.db";
private static final int DATABASE_VERSION = 1;
public static final String PERSON_TABLE_NAME = "person";
public static final String PERSON_COLUMN_ID = "_id";
public static final String PERSON_COLUMN_NAME = "name";
public static final String PERSON_COLUMN_GENDER = "gender";
public static final String PERSON_COLUMN_AGE = "age";
In the constructor, we call SQLiteOpenHelper’s constructor, passing it the application context, the database name, an SQLiteDatabase.CursorFactory (we actually pass a null object here), and the database version. This constructor handles the creation or upgrade of the database. The database version should begin from 1, and increase linearly, whenever you modify the database schema.
public ExampleDBHelper(Context context) {
    super(context, DATABASE_NAME , null, DATABASE_VERSION);
}
The onCreate() is called whenever a new database is created. Here, you specify each table schema. In our example app, we have only one table.
@Override
public void onCreate(SQLiteDatabase db) {
    db.execSQL("CREATE TABLE " + PERSON_TABLE_NAME + "(" +
        PERSON_COLUMN_ID + " INTEGER PRIMARY KEY, " +
        PERSON_COLUMN_NAME + " TEXT, " +
        PERSON_COLUMN_GENDER + " TEXT, " +
        PERSON_COLUMN_AGE + " INTEGER)"
    );
}
The overridden onUpgrade() method is called whenever the database needs to be upgraded (i.e. when the version has changed). Here, you should drop and/or add tables, or migrate data to new tables, or whatever else needs to be done to move from the previous database schema to the new schema. In our example, we simply drop the existing “person” table, and then call onCreate() to recreate it. I doubt you would want to do this with real user data.
@Override
public void onUpgrade(SQLiteDatabase db, int oldVersion, int newVersion) {
    db.execSQL("DROP TABLE IF EXISTS " + PERSON_TABLE_NAME);
    onCreate(db);
}
For the sample application, we want the ExampleDBHelper class to handle all data insertion, deletion, updates and views (basically all queries to the database must be through ExampleDBHelper). So we define appropriate methods for each of these scenarios.
To insert a new Person, we use the creatively named insertPerson() method. We use the SQLiteOpenHelper method getWritableDatabase() to get an SQLiteDatabase object reference to our already created database. The Person details are stored in a ContentValues object, with the appropriate column name as key, and corresponding data as value. We then call SQLiteDatabase’s insert method with the person table name, and the ContentValues object. NOTE that we left out the PERSON_COLUMN_ID column, which was specified as a primary key. It automatically increments.
public boolean insertPerson(String name, String gender, int age) {
    SQLiteDatabase db = getWritableDatabase();
    ContentValues contentValues = new ContentValues();
    contentValues.put(PERSON_COLUMN_NAME, name);
    contentValues.put(PERSON_COLUMN_GENDER, gender);
    contentValues.put(PERSON_COLUMN_AGE, age);
    db.insert(PERSON_TABLE_NAME, null, contentValues);
    return true;
}
public boolean updatePerson(Integer id, String name, String gender, int age) {
    SQLiteDatabase db = this.getWritableDatabase();
    ContentValues contentValues = new ContentValues();
    contentValues.put(PERSON_COLUMN_NAME, name);
    contentValues.put(PERSON_COLUMN_GENDER, gender);
    contentValues.put(PERSON_COLUMN_AGE, age);
    db.update(PERSON_TABLE_NAME, contentValues, PERSON_COLUMN_ID + " = ? ", new String[] { Integer.toString(id) } );
    return true;
}
public Cursor getPerson(int id) {
    SQLiteDatabase db = this.getReadableDatabase();
    Cursor res = db.rawQuery( "SELECT * FROM " + PERSON_TABLE_NAME + " WHERE " +
        PERSON_COLUMN_ID + "=?", new String[] { Integer.toString(id) } );
    return res;
}
public Cursor getAllPersons() {
    SQLiteDatabase db = this.getReadableDatabase();
    Cursor res = db.rawQuery( "SELECT * FROM " + PERSON_TABLE_NAME, null );
    return res;
}
Deleting data is also pretty straightforward. SQLiteDatabase has a delete() method that takes the table name to delete from, and optional whereClause and whereArgs. NOTE: Be very careful when writing this, as passing null in the whereClause would delete all rows.
public Integer deletePerson(Integer id) {
    SQLiteDatabase db = this.getWritableDatabase();
    return db.delete(PERSON_TABLE_NAME,
        PERSON_COLUMN_ID + " = ? ",
        new String[] { Integer.toString(id) });
}
Integrating the “Helper” with the rest of the app
At this point, we have completely prepared our database for use. To integrate this with both our activities, we initialize ExampleDBHelper in each Activity onCreate() method, and then call the appropriate method, depending on what action is required.
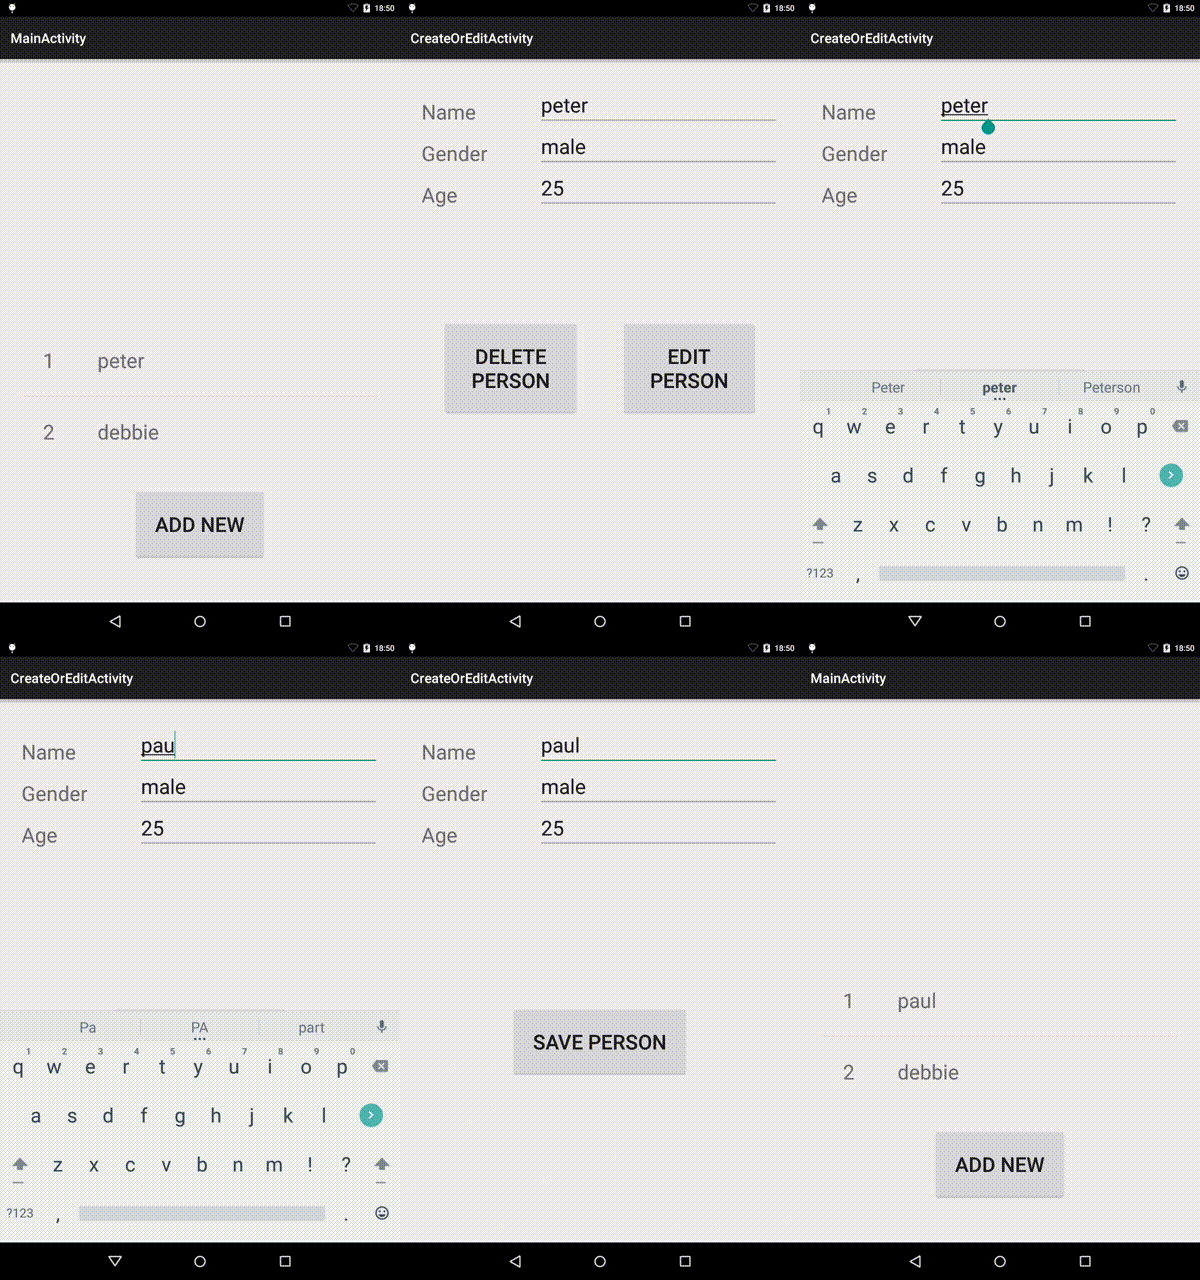
In MainActivity, we display a list of all persons using a ListView. Clicking on the “Add New” button starts CreateOrEditActivity in create mode, allowing us to create a new person. While clicking on any list item starts CreateOrEditActivity in edit mode, allowing us delete or edit and update the person info.
To display the list of persons, we request a Cursor containing all person records. We then use a SimpleCursorAdapter instance for displaying the list items. Do you remember the special column named “_id” mentioned above? SimpleCursorAdapter requires this column, or else it would not work. To use the SimpleCursorAdapter, we define a layout view for each list item called person_info.xml.
<?xml version="1.0" encoding="utf-8"?>
<LinearLayout xmlns:android="http://schemas.android.com/apk/res/android"
    android:orientation="horizontal"
    android:layout_width="match_parent"
    android:layout_height="match_parent">

<TextView
    android:id="@+id/personID"
    android:layout_width="wrap_content"
    android:layout_height="wrap_content"
    android:padding="@dimen/activity_vertical_margin"
    android:textSize="@dimen/text_size"/>

<TextView
    android:id="@+id/personName"
    android:layout_width="0dp"
    android:layout_height="wrap_content"
    android:layout_weight="1"
    android:padding="@dimen/activity_vertical_margin"
    android:textSize="@dimen/text_size"/>

</LinearLayout>
All the magic in MainActivity happens in the onCreate() method. We get a dbHelper object, request for all person’s, and populate the ListView with the received Cursor. Finally, we implement the onItemClickListener() so that when a person is clicked, we get the person ID and parse it as an extra to CreateOrEditActivity.
The complete MainActivity code follows:
public class MainActivity extends ActionBarActivity {
    public final static String KEY_EXTRA_CONTACT_ID = "KEY_EXTRA_CONTACT_ID";

    private ListView listView;
    ExampleDBHelper dbHelper;

    @Override
    protected void onCreate(Bundle savedInstanceState) {
        super.onCreate(savedInstanceState);
        setContentView(R.layout.activity_main);

        Button button = (Button) findViewById(R.id.addNew);
        button.setOnClickListener(new View.OnClickListener() {
            @Override
            public void onClick(View view) {
                Intent intent = new Intent(MainActivity.this, CreateOrEditActivity.class);
                intent.putExtra(KEY_EXTRA_CONTACT_ID, 0);
                startActivity(intent);
            }
        });

        dbHelper = new ExampleDBHelper(this);

        final Cursor cursor = dbHelper.getAllPersons();
        String [] columns = new String[] {
                ExampleDBHelper.PERSON_COLUMN_ID,
                ExampleDBHelper.PERSON_COLUMN_NAME
        };
        int [] widgets = new int[] {
                R.id.personID,
                R.id.personName
        };

        SimpleCursorAdapter cursorAdapter = new SimpleCursorAdapter(this, R.layout.person_info,
                cursor, columns, widgets, 0);
        listView = (ListView)findViewById(R.id.listView1);
        listView.setAdapter(cursorAdapter);
        listView.setOnItemClickListener(new AdapterView.OnItemClickListener() {

            @Override
            public void onItemClick(AdapterView listView, View view,
                                    int position, long id) {
                Cursor itemCursor = (Cursor) MainActivity.this.listView.getItemAtPosition(position);
                int personID = itemCursor.getInt(itemCursor.getColumnIndex(ExampleDBHelper.PERSON_COLUMN_ID));
                Intent intent = new Intent(getApplicationContext(), CreateOrEditActivity.class);
                intent.putExtra(KEY_EXTRA_CONTACT_ID, personID);
                startActivity(intent);
            }
        });

    }

}
CreateOrEditActivity is a little bit more involved. The Activity allows creating, editing and deleting persons. It also changes its UI based on what action is to be performed. Because of it’s length, we shall only show and discuss the parts relevant to database interaction.
In onCreate(), if we receive a personID, we call dbHelper.getPerson() with that ID, and then populate the fields with the person details:
Cursor rs = dbHelper.getPerson(personID);
            rs.moveToFirst();
            String personName = rs.getString(rs.getColumnIndex(ExampleDBHelper.PERSON_COLUMN_NAME));
            String personGender = rs.getString(rs.getColumnIndex(ExampleDBHelper.PERSON_COLUMN_GENDER));
            int personAge = rs.getInt(rs.getColumnIndex(ExampleDBHelper.PERSON_COLUMN_AGE));
            if (!rs.isClosed()) {
                rs.close();
            }
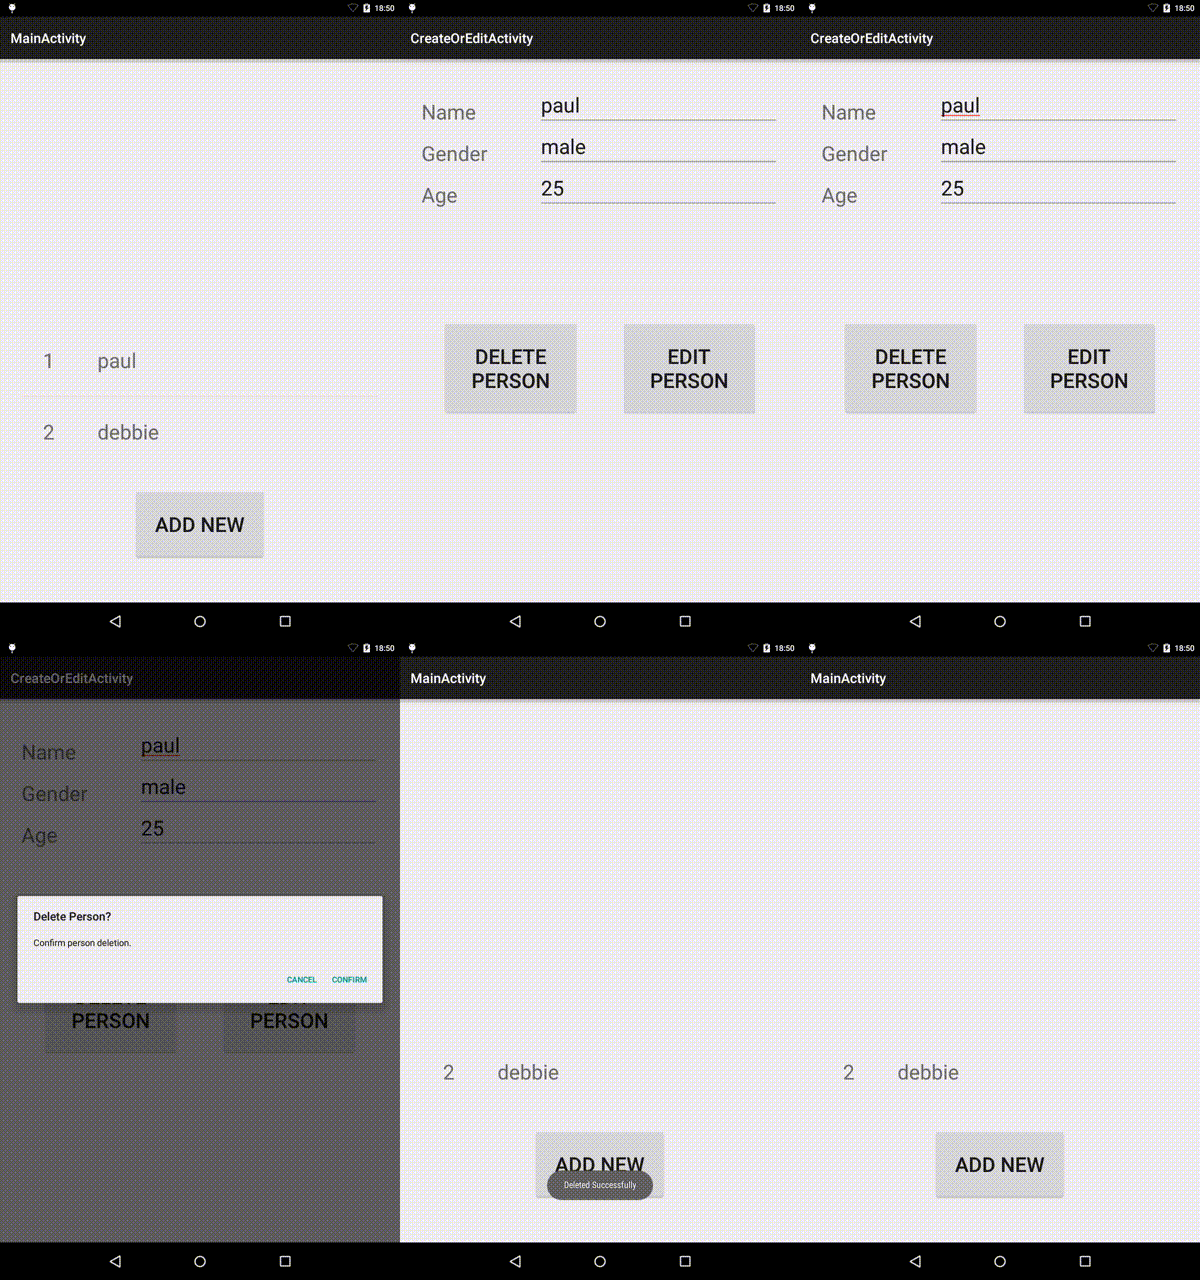
If the delete button is clicked, we call dbHelper.delete() with the personID
case R.id.deleteButton:
                AlertDialog.Builder builder = new AlertDialog.Builder(this);
                builder.setMessage(R.string.deletePerson)
                        .setPositiveButton(R.string.yes, new DialogInterface.OnClickListener() {
                            public void onClick(DialogInterface dialog, int id) {
                                dbHelper.deletePerson(personID);
                                Toast.makeText(getApplicationContext(), "Deleted Successfully", Toast.LENGTH_SHORT).show();
                                Intent intent = new Intent(getApplicationContext(), MainActivity.class);
                                intent.addFlags(Intent.FLAG_ACTIVITY_CLEAR_TOP);
                                startActivity(intent);
                            }
                        })
                        .setNegativeButton(R.string.no, new DialogInterface.OnClickListener() {
                            public void onClick(DialogInterface dialog, int id) {
                                // User cancelled the dialog
                            }
                        });
                AlertDialog d = builder.create();
                d.setTitle("Delete Person?");
                d.show();
                return;
Finally, we implemented a persistPerson() method that checks if we require a person creation or update.
public void persistPerson() {
        if(personID > 0) {
            if(dbHelper.updatePerson(personID, nameEditText.getText().toString(),
                    genderEditText.getText().toString(),
                    Integer.parseInt(ageEditText.getText().toString()))) {
                Toast.makeText(getApplicationContext(), "Person Update Successful", Toast.LENGTH_SHORT).show();
                Intent intent = new Intent(getApplicationContext(), MainActivity.class);
                intent.addFlags(Intent.FLAG_ACTIVITY_CLEAR_TOP);
                startActivity(intent);
            }
            else {
                Toast.makeText(getApplicationContext(), "Person Update Failed", Toast.LENGTH_SHORT).show();
            }
        }
        else {
            if(dbHelper.insertPerson(nameEditText.getText().toString(),
                    genderEditText.getText().toString(),
                    Integer.parseInt(ageEditText.getText().toString()))) {
                Toast.makeText(getApplicationContext(), "Person Inserted", Toast.LENGTH_SHORT).show();
            }
            else{
                Toast.makeText(getApplicationContext(), "Could not Insert person", Toast.LENGTH_SHORT).show();
            }
            Intent intent = new Intent(getApplicationContext(), MainActivity.class);
            intent.addFlags(Intent.FLAG_ACTIVITY_CLEAR_TOP);
            startActivity(intent);
        }
    }
Conclusion
Extending SQliteOpenHelper helps you abstract the database creation, updates and maintenance, so you can focus on interacting with the database. We used different methods to interact with the database, including helper methods, and plain SQL commands.
While this sample app creates a simple one-table database, SQLite is a complete relational database system, and supports more advanced features including multiple tables, foreign keys, complex queries with joins and more. Using SQLite in your android app is a fast, secure, efficient and easy way to persist user and app data.
The complete source code for this tutorial is available on GitHub.