Affiliate links on Android Authority may earn us a commission. Learn more.
Create your own voice activated reminders using Tasker - Android customization
Published onNovember 19, 2015
Did you follow all the way through last week’s Android customization project? We had built a tool to schedule delayed SMS messages using Tasker, but more to learn the tools than for the actual functionality. This week will be more review of tools in Tasker, we’ll use variables, voice input, and conditionals to build a little timed voice reminder.
Fair warning, as we’ve seen before, there are some excellent apps out there that can handle this action, including Google Now, which almost all Android devices have installed by default. We’re focusing on the tools, not on bulletproofing the project, so expect some gaps and shortcomings, but it will work.
Before we begin
Hold on, hold on. Tasker was pulled from the Google Play Store. You can still grab it from their official site. Update: never mind, it’s back.
Voice reminder using Tasker
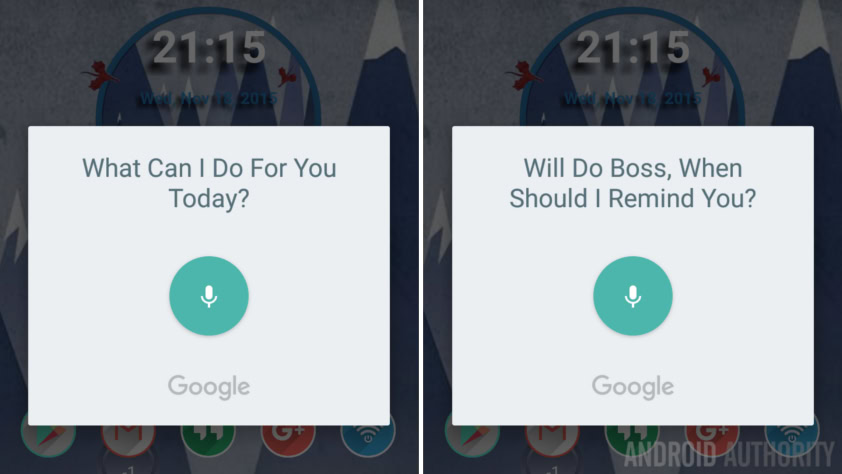
Before we start, let’s take a closer look at the plan for today. Our voice reminder will accept voice input to collect the message and the amount of time before playing it back to you. When that time comes, we will actually have the system read aloud the message back to you. That actually sounds easier than it is, hope you are ready.
To make things a little easier, we will break up the message and the time into two voice inputs, we could work harder on manipulating the variables to work it all into one, but I think it is easier to understand this way.
My mind is churning on all the other little things that can be done to enhance this project, but I’ll try to keep the actual tutorial simple. Let’s do it.
Fire up Tasker and head into the Tasks tab.
Start a new Task and name it appropriately, I’ll call mine “VoiceReminder“.
Voice your needs
Tap the “+” button to add your first action. This action will accept voice input for the message.
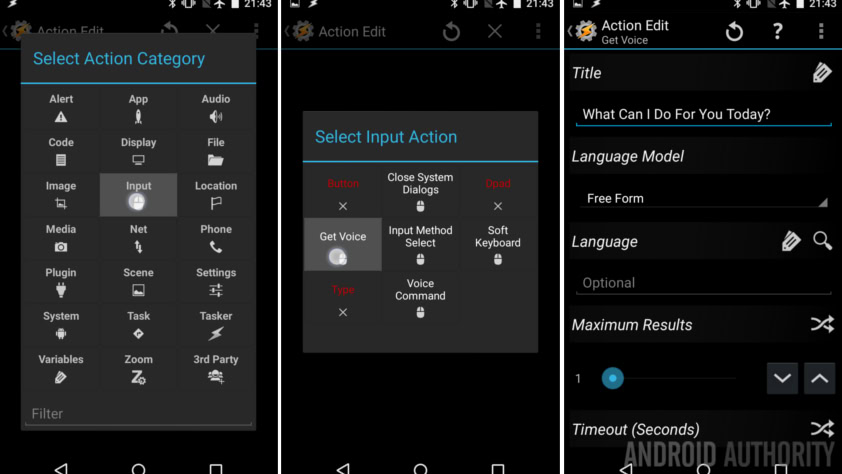
Select Input.
Select Get Voice.
Provide a Title, something like “What can I do for you today?”
Tap the system Back button to save and exit.
Tap the “+” button to add your second action. This one will save the voice input into a variable for later use.
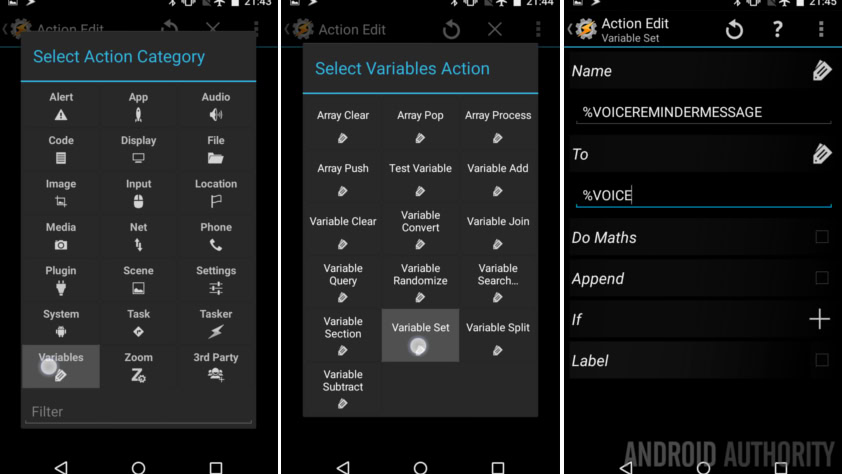
Select Variables.
Select Variable Set.
Provide a variable Name, I’ll call mine “%VOICEREMINDERMESSAGE“.
Under To, tap the labels icon to find ‘Voice Results,’ or simply type in “%VOICE“.
Tap the system Back button to save and exit.
Tap the “+” button to add your third action. Now we collect voice again, this time for the timing.
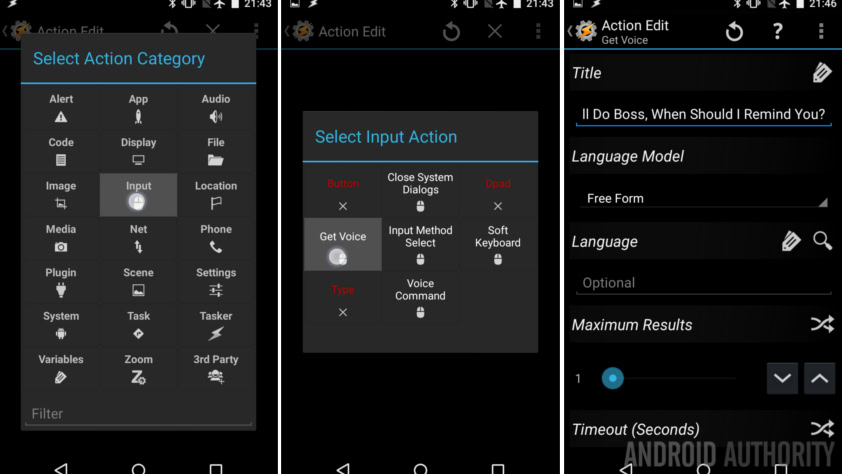
Select Input.
Select Get Voice.
Title “OK, when?”
And Back out of the action.
Tap the “+” button to add your fourth action. We need to save the second voice input to a new variable.
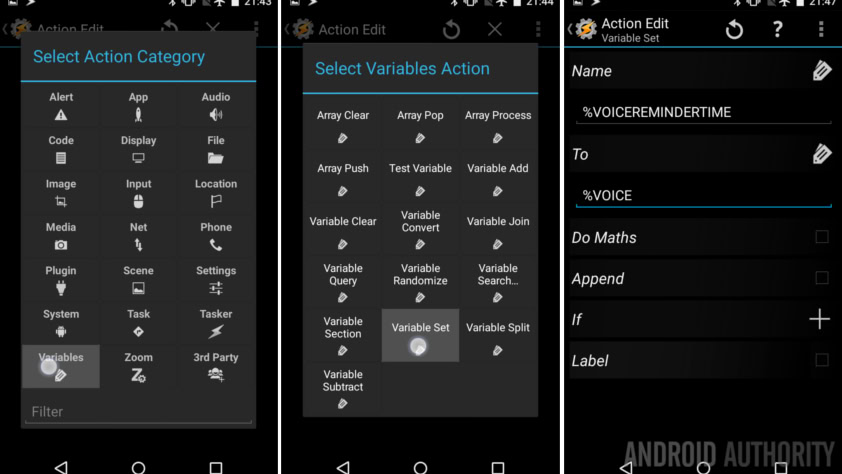
Select Variables.
Select Variable Set.
Name “%VOICEREMINDERTIME” and set it To “%VOICE” once again.
Tap the system Back button to save.
Tap the “+” button for your fifth action. We have to split that time variable so that we know how long to wait.
Note: For this project, we are only accepting “# seconds” as input. I will explain at the end quickly how to accept minutes, hours, and specific times of the day, but I won’t actually show them off, sorry.
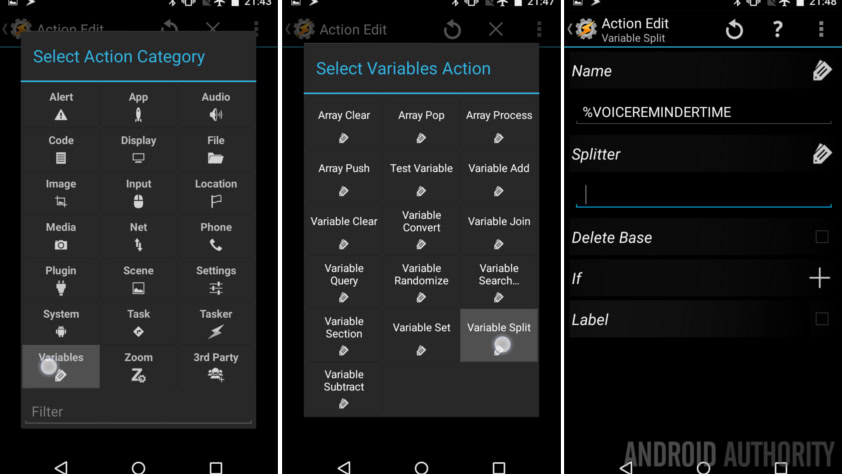
Select Variables.
Select Variable Split.
Under Name, enter your time variable, mine was “%VOICEREMINDERTIME“.
Under Splitter, you are going to enter a single blank space ” “.
Tap the system back button to save and exit.
So, if you’ve provided a voice input of “90 seconds”, the Split will create two new variables, the first will have value “90” and the second will have variable “seconds”. If you need a refresher on how this all works, be sure to hit our tutorial on the Variable Split from a few weeks ago.
What IF we did things differently?
Tap the “+” button to add your next action.
Now, instead of just pushing through the timer and such, we are going to use the IF functionality to validate the voice input from above. This will prevent errors and provide you with the control needed to add in delays for other units of time. You’ll see what I mean.
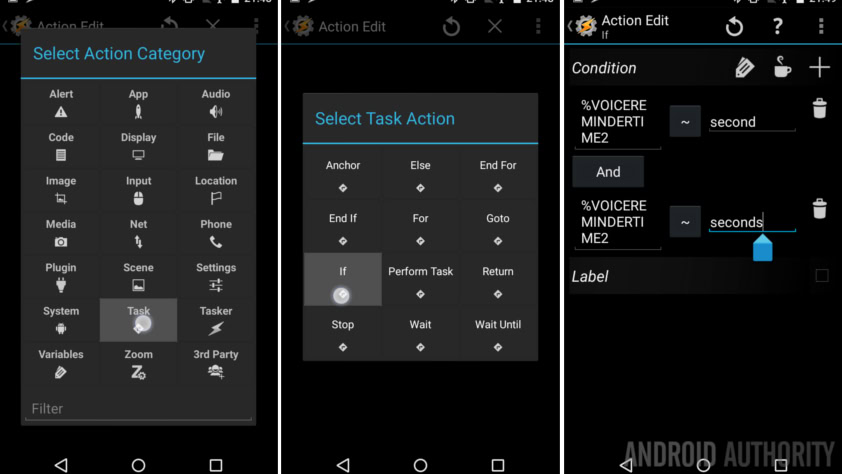
Select Task.
Select IF.
Under Condition, type in the Split version of your reminder time variable. If you are following along exactly, you’ll need to input “%VOICEREMINDERTIME2“.
On the right hand side, enter in the word “second“.
Now tap the “+” symbol in the top right to add an additional condition.
Tap the “And” button and change that to “Or“.
Once again, on the left hand side enter that split variable “%VOICEREMINDERTIME2“.
This time, on the right hand side, enter “seconds“.
See that, we are looking at the second voice input for the words “second” or “seconds.” If neither word is present, the project will come to a halt.
Tap the system Back button to save and exit.
Wait, I need to flash something
Tap the “+” button to add your seventh action. We are just waiting here.
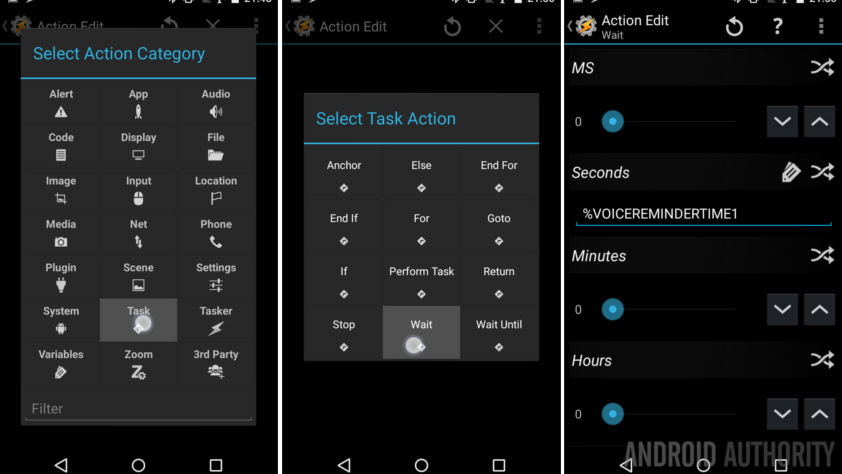
Select Task.
Select Wait.
Beside Seconds, tap the crossing arrows, then enter the split variable for the amount of time you wish to wait. That would be “%VOICEREMINDERTIME1” for me.
Tap the system Back button to save and exit.
Now, tap the “+” button to add your eighth action. We’ve waited, time to talk.
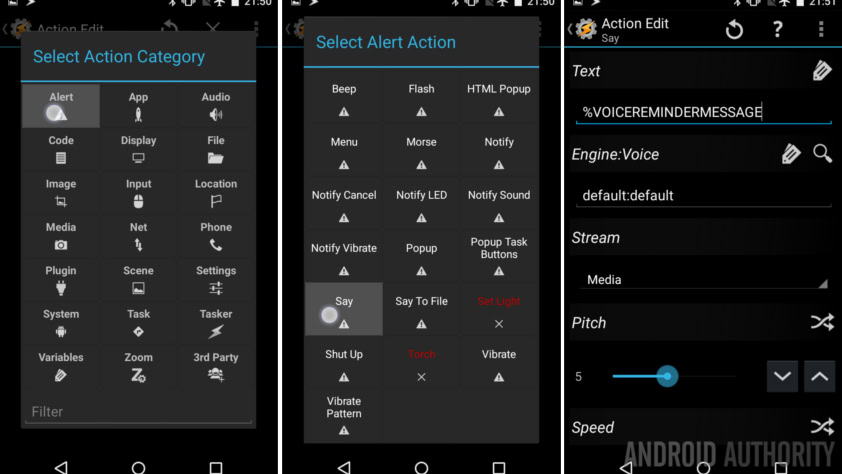
Select Alert.
Select Say.
Under Text, simply enter your reminder message variable, mine was “$VOICEREMINDERMESSAGE“. I’m thinking now I should have used a shorter variable, oh well.
Tap the system Back button to save and exit.
Finally, we close the IF. Tap the “+” button.
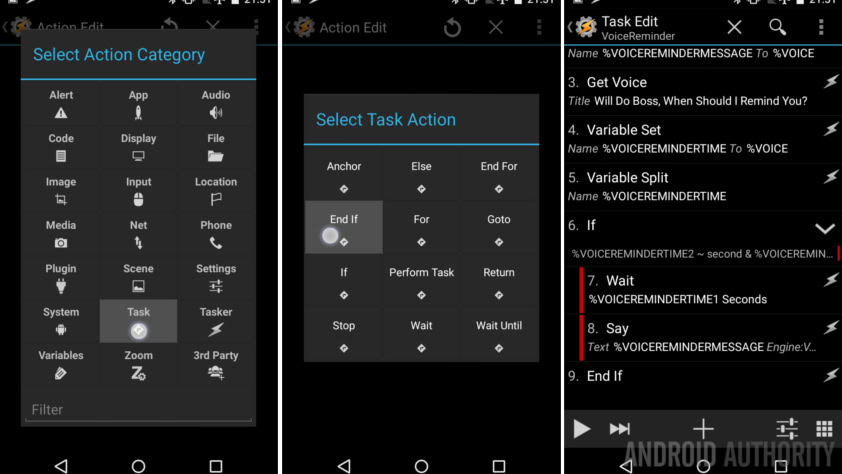
Select Task.
Select End IF.
Done!
Be sure to create a method to start up this project. A button on the Homescreen would work. So would a button on the default persistent Tasker notification, thus, on your lock screen.
What’s next
As you can tell, we kept the project pretty simple. You probably noticed as well that I added a few Alert -> Flash notifications along the way. Go ahead and enter these as often as you see fit and add in the variables to enhance them. As you can see, I added a flash before saying the message, just a heads-up to pay attention. Then I added the actual message as a flash after it was read aloud, just in case I didn’t hear it.
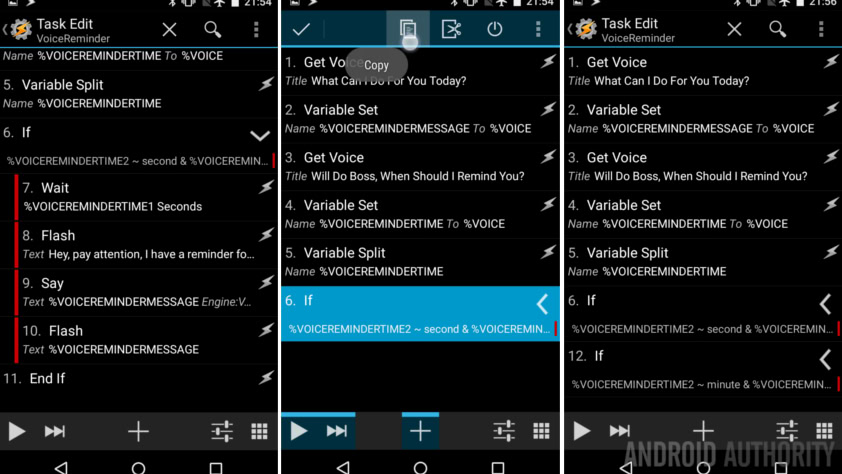
If a reminder with delay of only seconds is not ideal for you, go ahead and duplicate the entire IF -> End If actions, and everything in between. If you catch for the words “minute” and “minutes”, then you can make your Wait delay in the Minutes. This goes for milliseconds, hours and days as well. Just duplicate the IF actions once per time measure.
If you would like to set the reminder for a specific time of the day, you will have to do a bit more grunt work. There are other methods we won’t cover here, but to use the above basic setup, go for the following: Use a new IF to look for the word “o-clock” or “am” “pm” however you can remember to consistently say the time. Now you will need to do some variable conversions into a common measure, I recommend seconds. Compare the requested time to the current time and Wait for the difference. Did that make sense? Let’s try an example.
“Remind me to go to sleep” “10 pm”. (Let’s just pretend that it is 9:30pm.) First, you’ll have to change 10 pm into a full Date Time variable. This works on a 24 hour clock and in the format ##.## I don’t know why they opted for a decimal instead of the colon, but we can work with this. You may use another IF statement nested into the first to check for am vs pm, then either use the number as is or add 12. Like, 10pm is 22.00
Now, use the Variable Convert action to change your completed ‘%DATE Time’ into seconds (Variable -> Variable Convert). Convert another variable with the current date and time into seconds (remember we said it is 9:30 now) and then perform basic math. Subtracting the current time from the reminder time, in our example, offers up a difference of 1800 seconds. And so, that is what you will Wait back in your main project. I admit I’ve somewhat over-simplified the instruction here, just keep playing, you’ll get it.

Last, and I probably should have mentioned this sooner, you are going to often encounter errors with some words. For example, when I try to use “1” or “4”, be it seconds, minutes or other, the voice input often uses the word instead of the number, possibly the wrong words “won” and “for.” So, when the Wait action comes around, I get an error because ‘for’ is not a number. Sometimes it takes my voice as ‘four’ and it works, but not always. I can’t explain “one.” Like I said earlier, we’re learning the tools, sometimes the outcome is not perfect.
Next week
I could have gone on even more with this week’s Android customization project. I hope you get the most out of your new simple reminder and even more out of the extra time spent learning these tools. Next week will be a surprise. Let’s be honest, I had a project in mind, but with Tasker being pulled from the Google Play Store, I’d like to hold off on that. I haven’t decided what to do next instead, so I am very sorry, you’ll just have to check in to see next week, a little Thanksgiving special is in order.
Be honest, how well does this reminder tool stack up vs your other voice activated reminder tools?