Affiliate links on Android Authority may earn us a commission. Learn more.
Windows Update not working? Try these possible fixes
Published onMay 8, 2019
Keeping Windows 10 up-to-date is an important part of your computer’s health. It’s the most-targeted operating system on the planet, requiring continuous updates to keep you safe and sane from unwanted crashes and crooks. Is Windows Update not working correctly for you? We provide several possible fixes to get your PC back on track.
Clear disk space
The first step is to clear space on your PC’s primary drive. This likely isn’t the root issue unless the primary drive displays a red bar in File Explorer > This PC. Since Windows 10 needs space to store temporary files, you should always keep this bar in the blue, as it’s a visual indicator that your storage capacity is either good or reaching its limit. We provide a separate guide on how to scan and clean your drive in Windows 10.
Check for malware
Your second less-intrusive option is to scan all drives for malware. Evil software on your PC could lurk in the shadows, preventing system updates. For instance, if Microsoft attempts to patch an exploit currently used by hackers, malware hidden deep within your PC may block the update. Malware probably isn’t causing your Windows Update woes, but we need to cover this basic practice first before diving into “advanced” solutions.
Consult Microsoft’s error code guide
If you see an error code on the Windows Update panel, navigate to Microsoft’s online guide. Here Microsoft provides simple suggestions like removing external hardware, uninstalling non-Microsoft antivirus software, and uninstalling nonessential, outdated programs. Microsoft also explains 0xC1900101 errors and provides a chart detailing other common errors.
Use the built-in troubleshooter (Settings app)
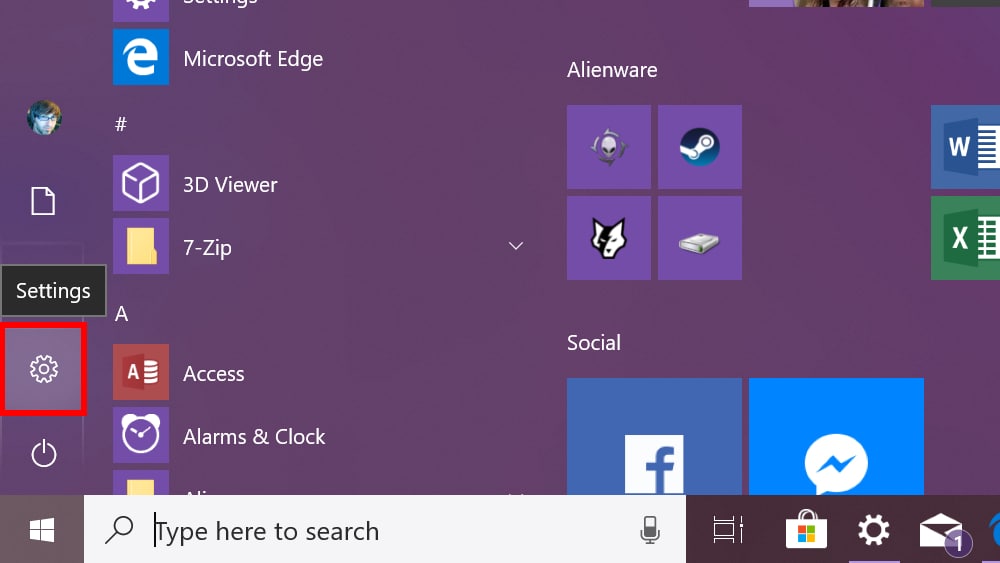
1. Click Start followed by the “gear” icon on the Start menu. This loads the Settings app.
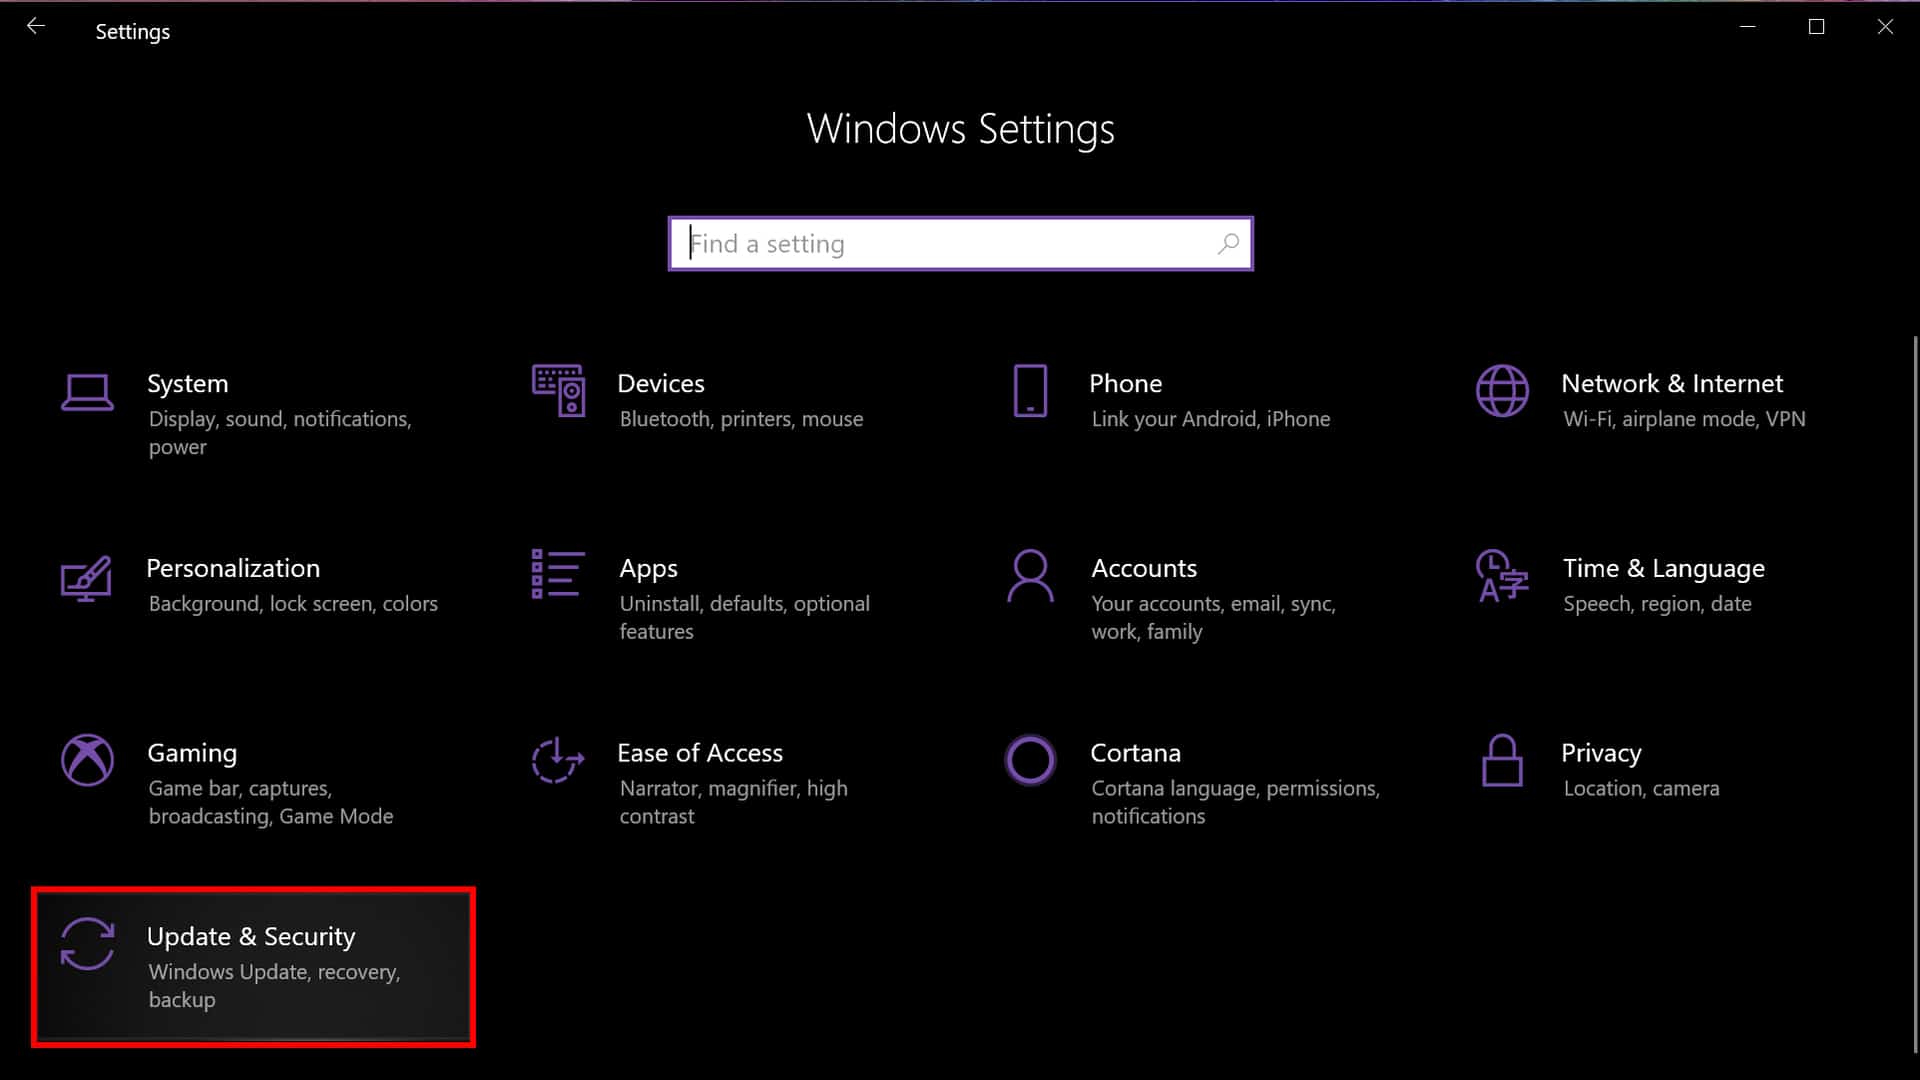
2. Select Update & Security.
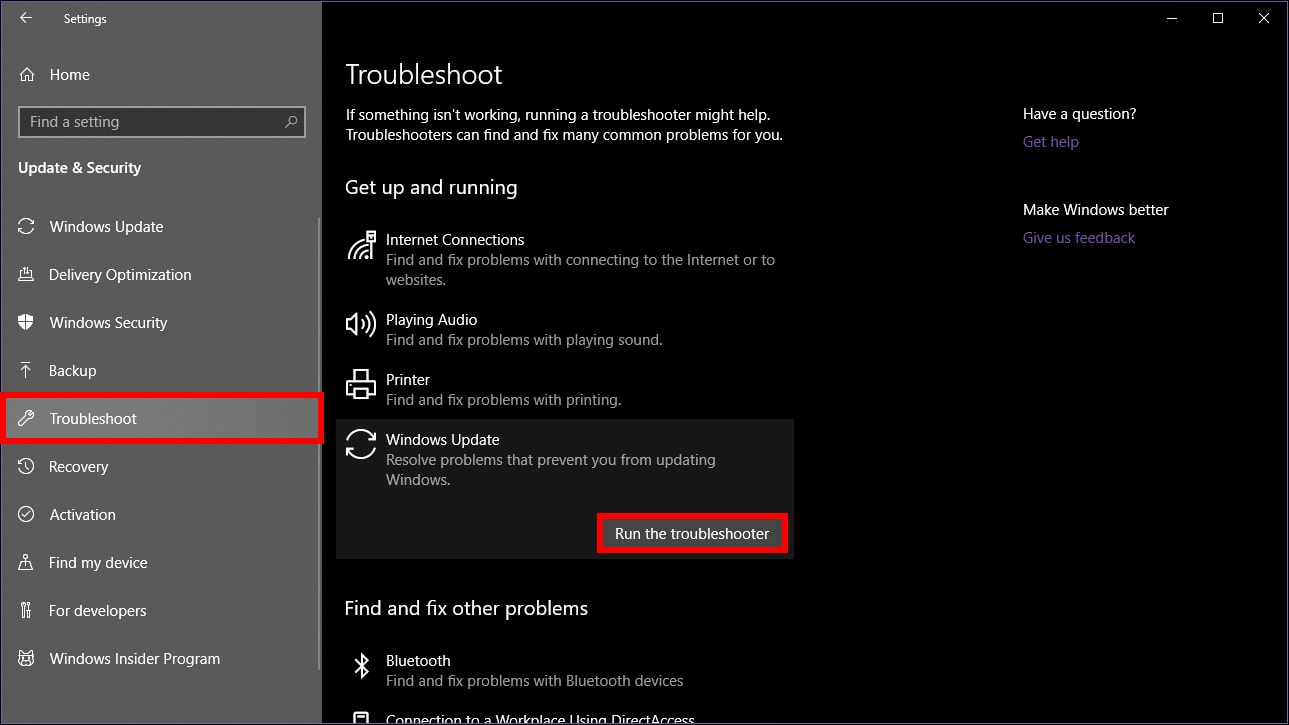
3. Select Troubleshoot.
4. Select Windows Update listed under Get up and running.
5. Click the Run the troubleshooter button.
6. Wait for Windows 10 to diagnose the problem and follow the instructions.
Use the built-in troubleshooter (Control Panel)
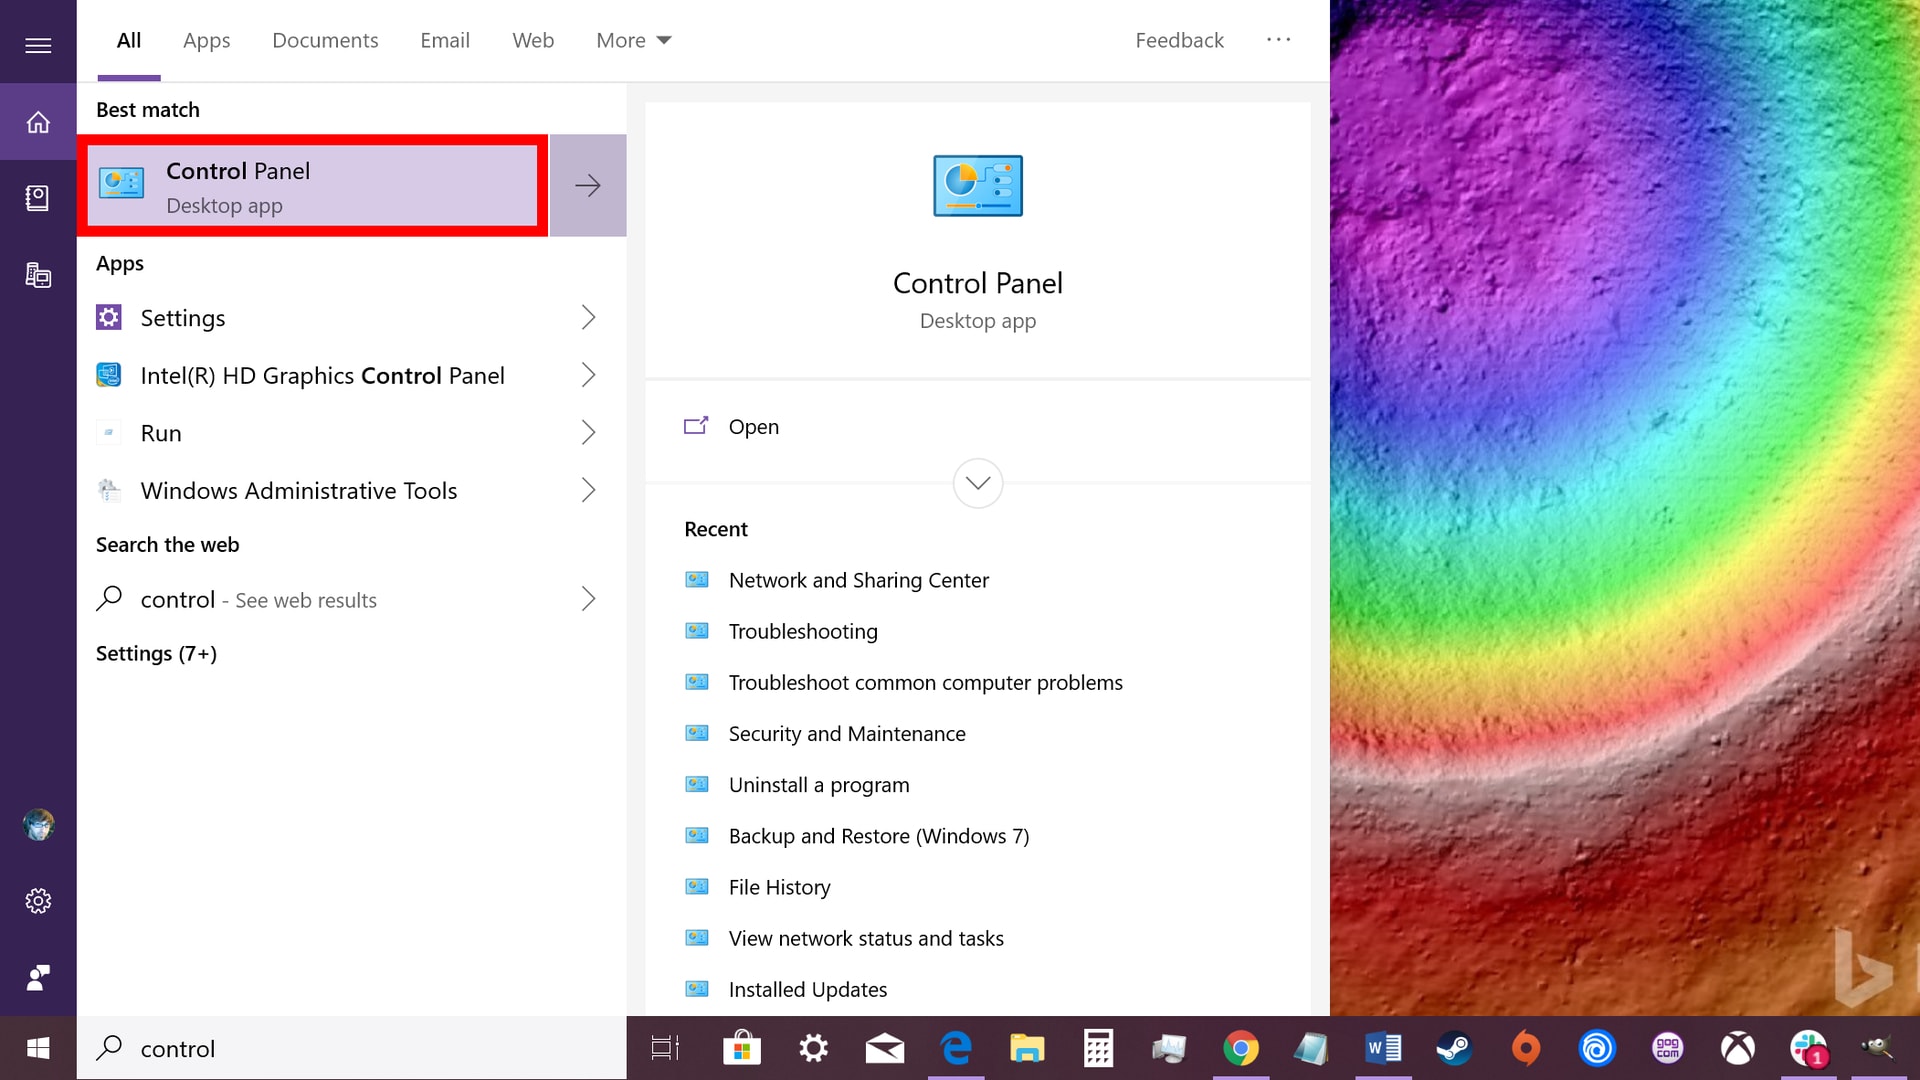
1. Type Control Panel in Cortana’s search field on the taskbar.
2. Click the Control Panel desktop program in the results.
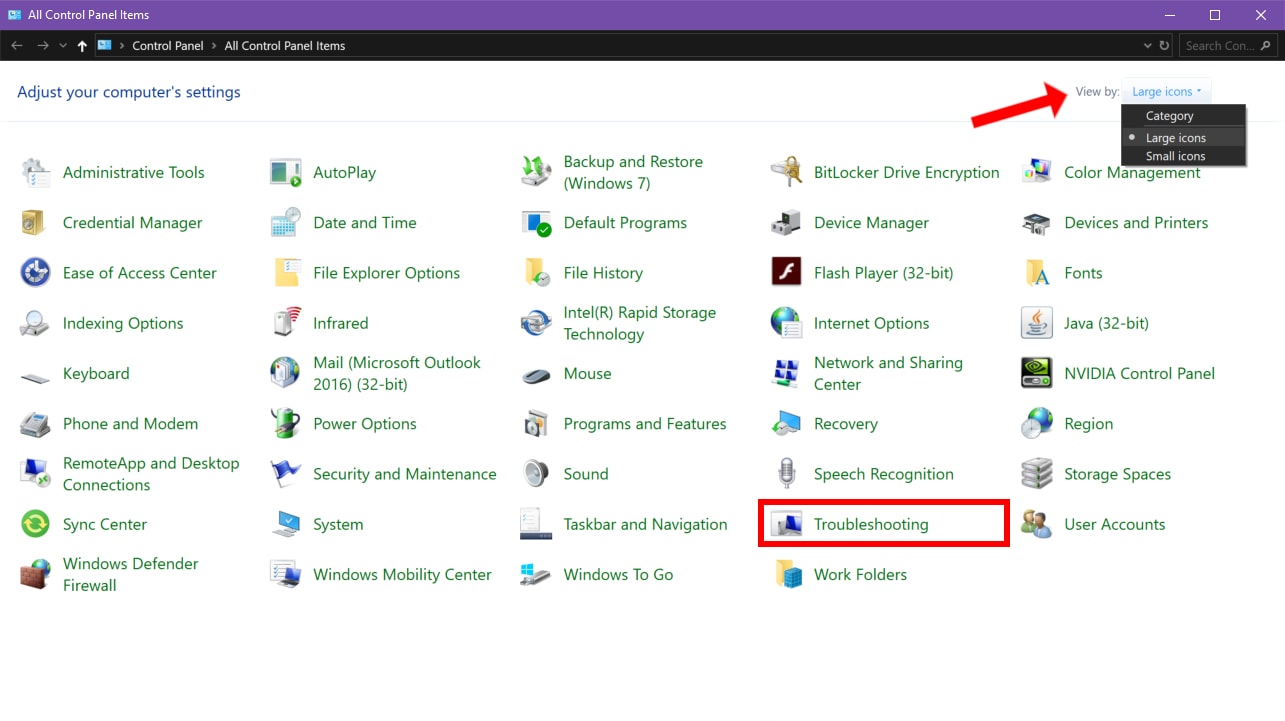
3. Click View by in the top-right corner and select Large Icons.
4. Select Troubleshooting.
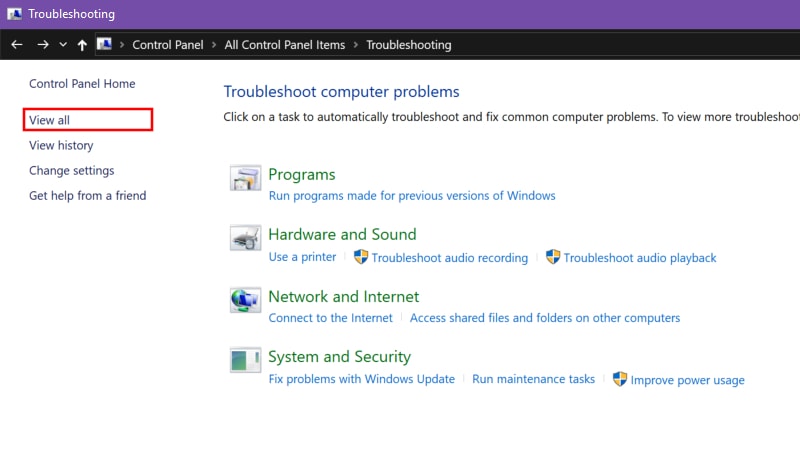
5. Click the View all link listed on the left.
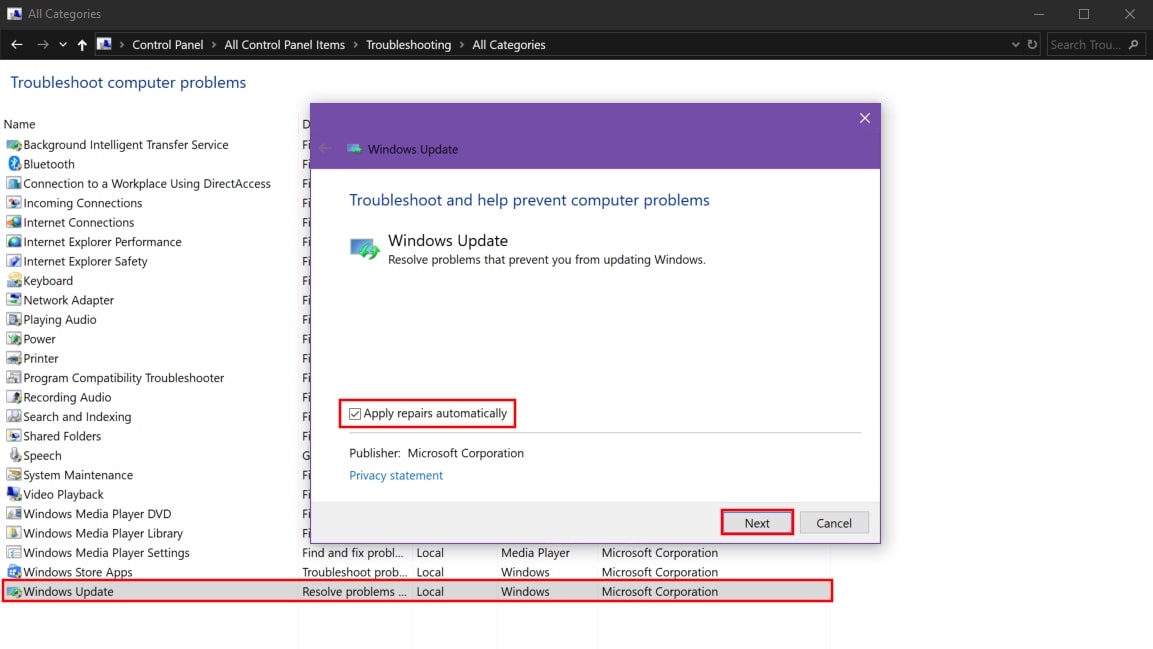
6. Click Windows Update at the bottom of the list.
7. Click Advanced in the pop-up window.
8. Check Apply repairs automatically.
9. Click Next.
10. Allow the tool to diagnose the problem and follow the instructions.
Use the downloadable troubleshooter
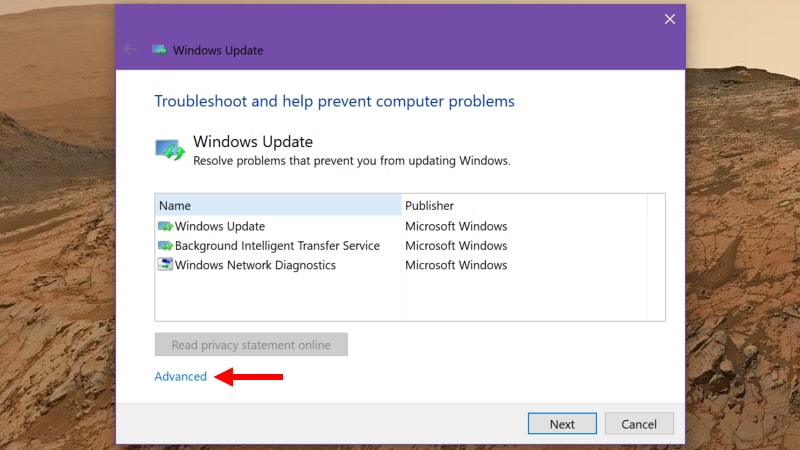
1. Download Microsoft’s Windows Update Troubleshooter here. The file should read wu10.diagcab.
2. Launch the tool and click Advanced.
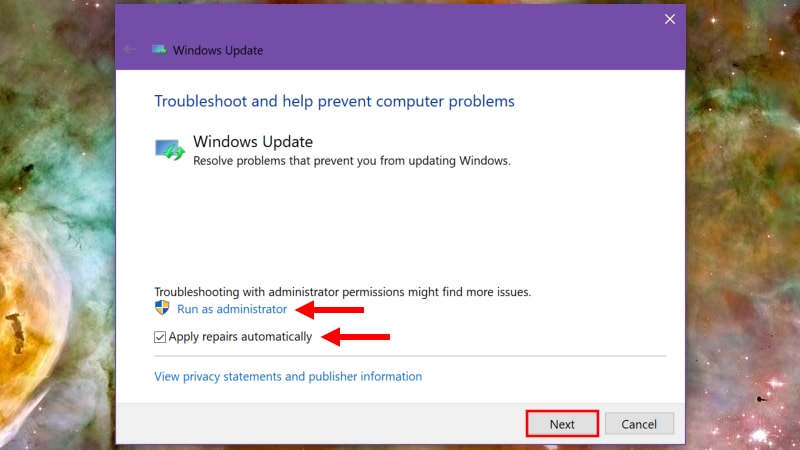
3. Check Apply repairs automatically.
4. Click Run as administrator.
5. Click Next.
6. Allow the tool to diagnose the problem and follow the instructions.
Confirm Windows Update services are running
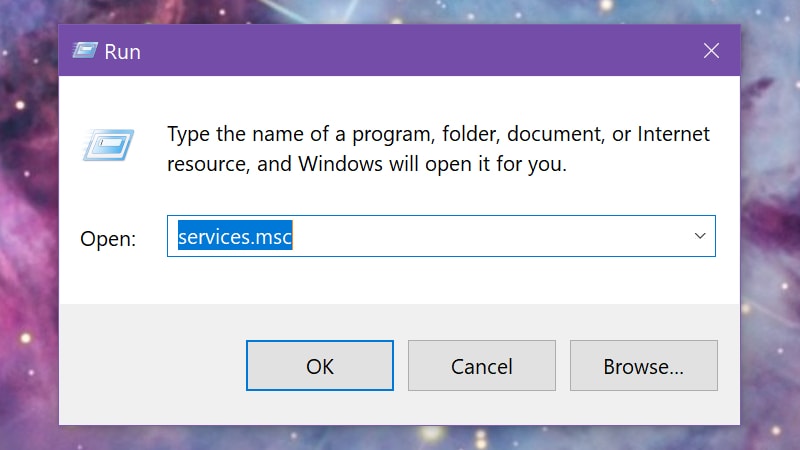
1. Hold down the Windows key and press the “R” key.
2. Type services.msc and click OK (or hit Enter) in the Run pop-up box.
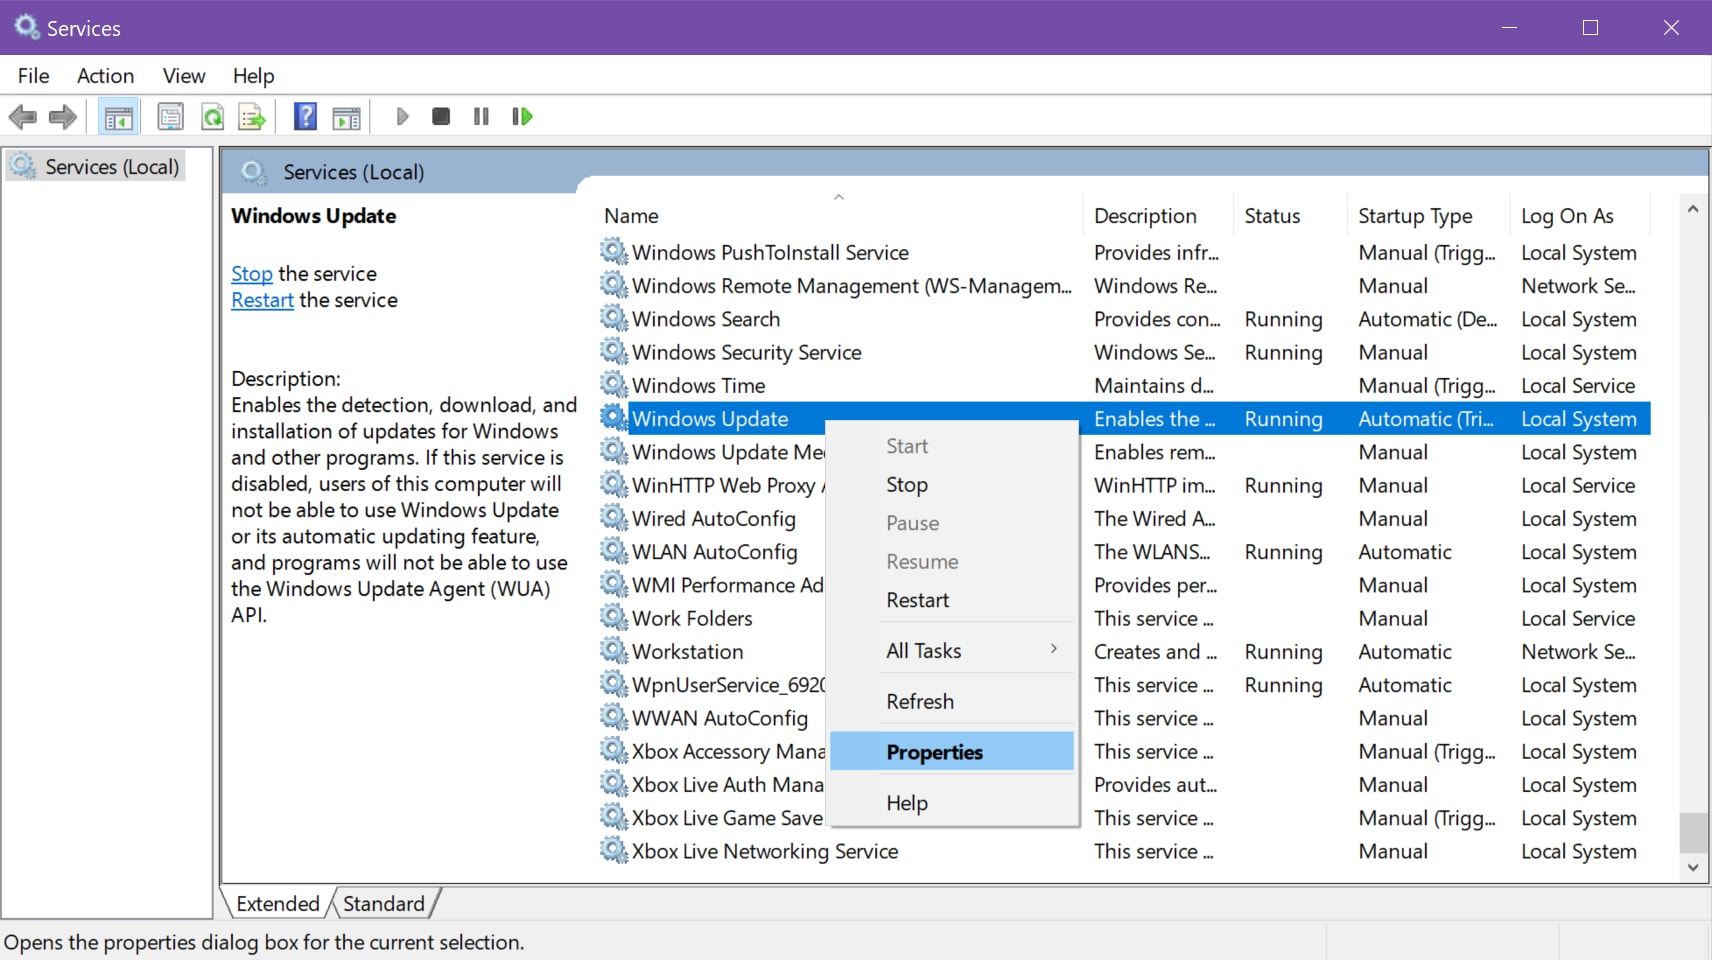
3. Scroll down to Windows Update.
4. Right-click on the service and select Properties.
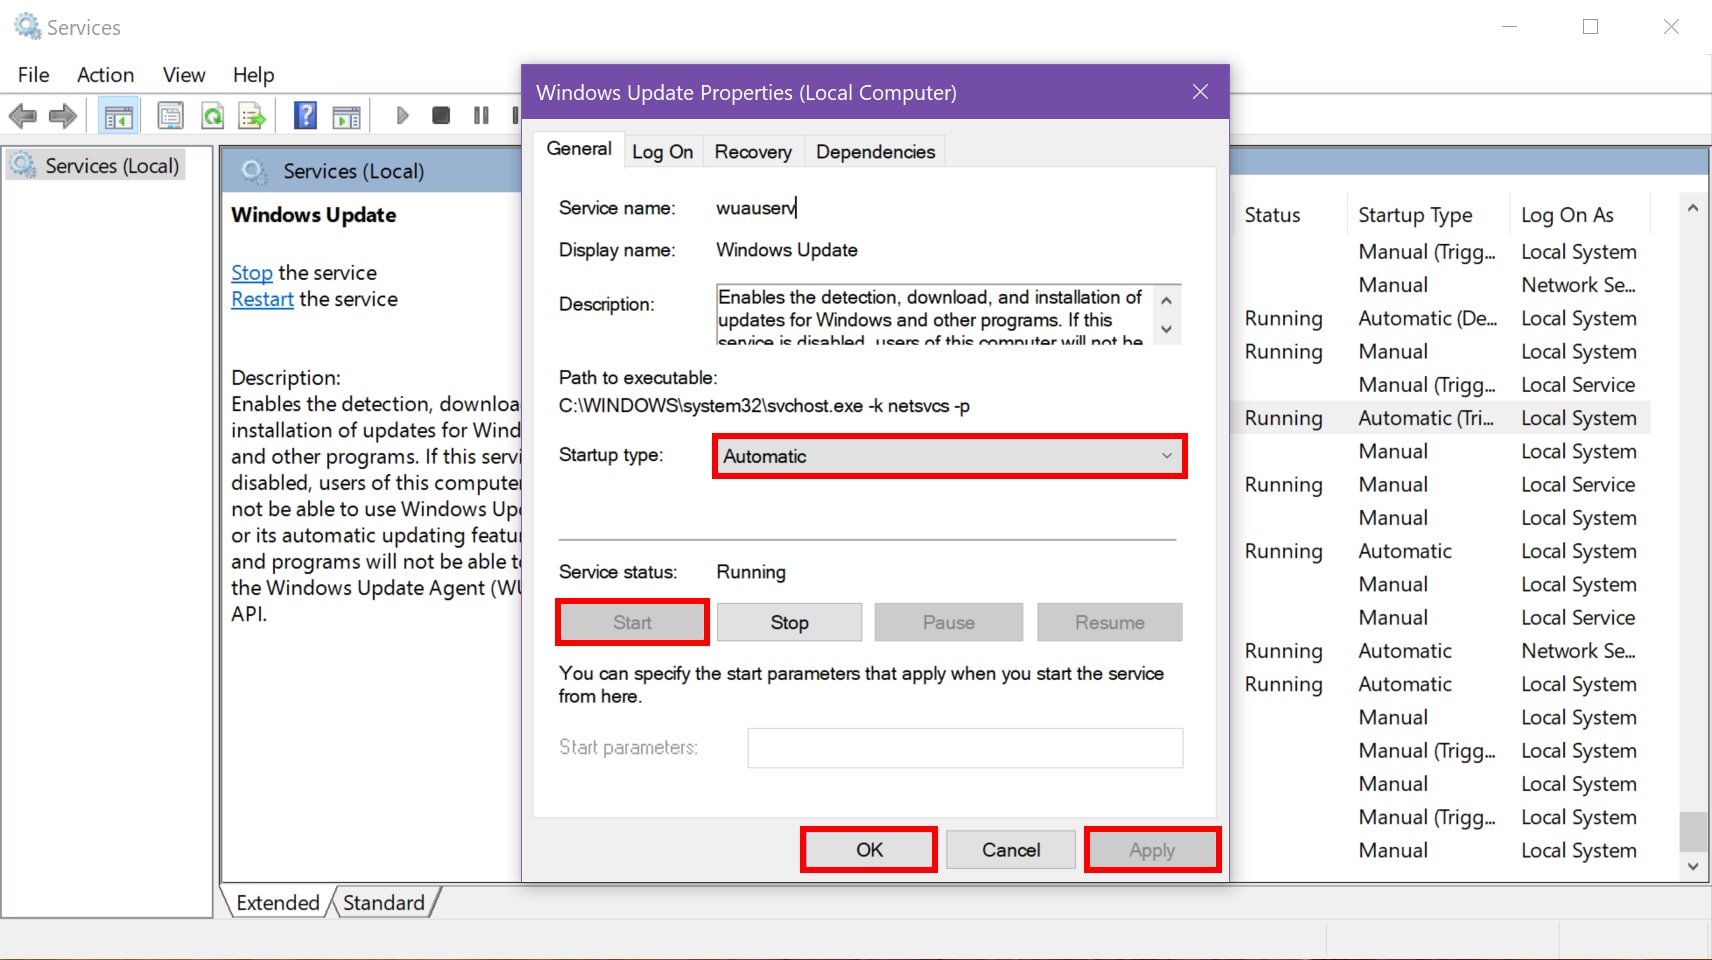
5. Set Startup type as Automatic on the pop-up window.
6. If the Service status reads Stopped, click the Start button.
7. Click Apply and OK.
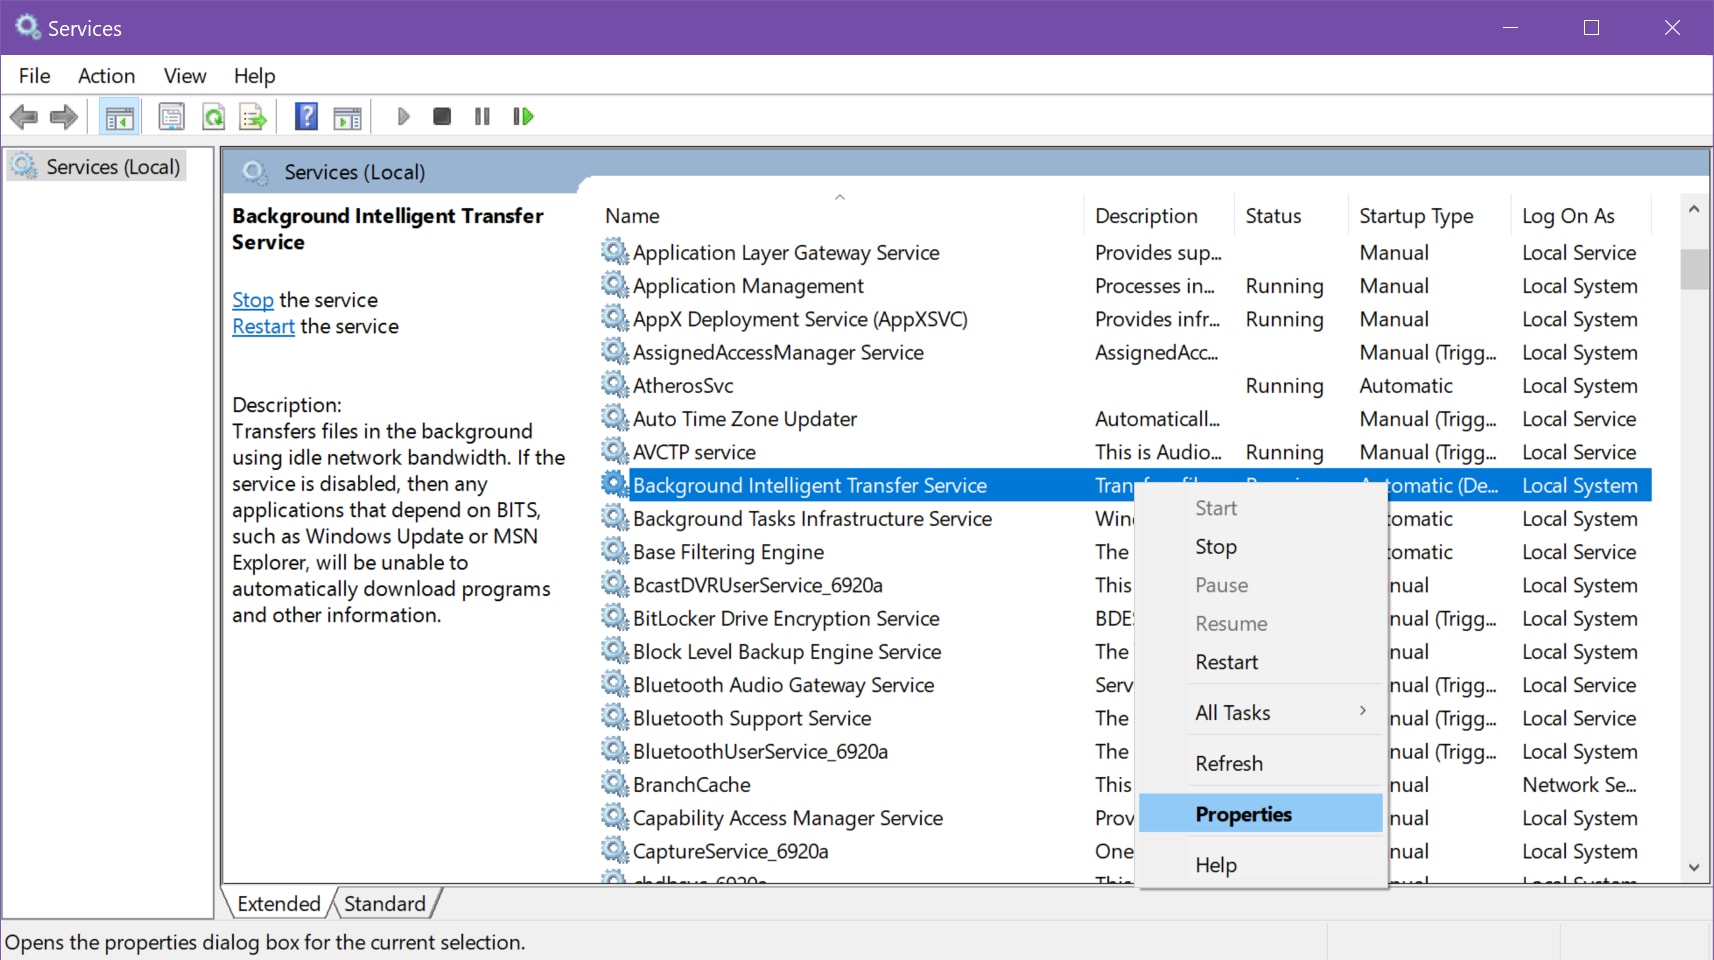
8. Locate Background Intelligent Transfer Service.
9. Right-click on the service and select Properties.
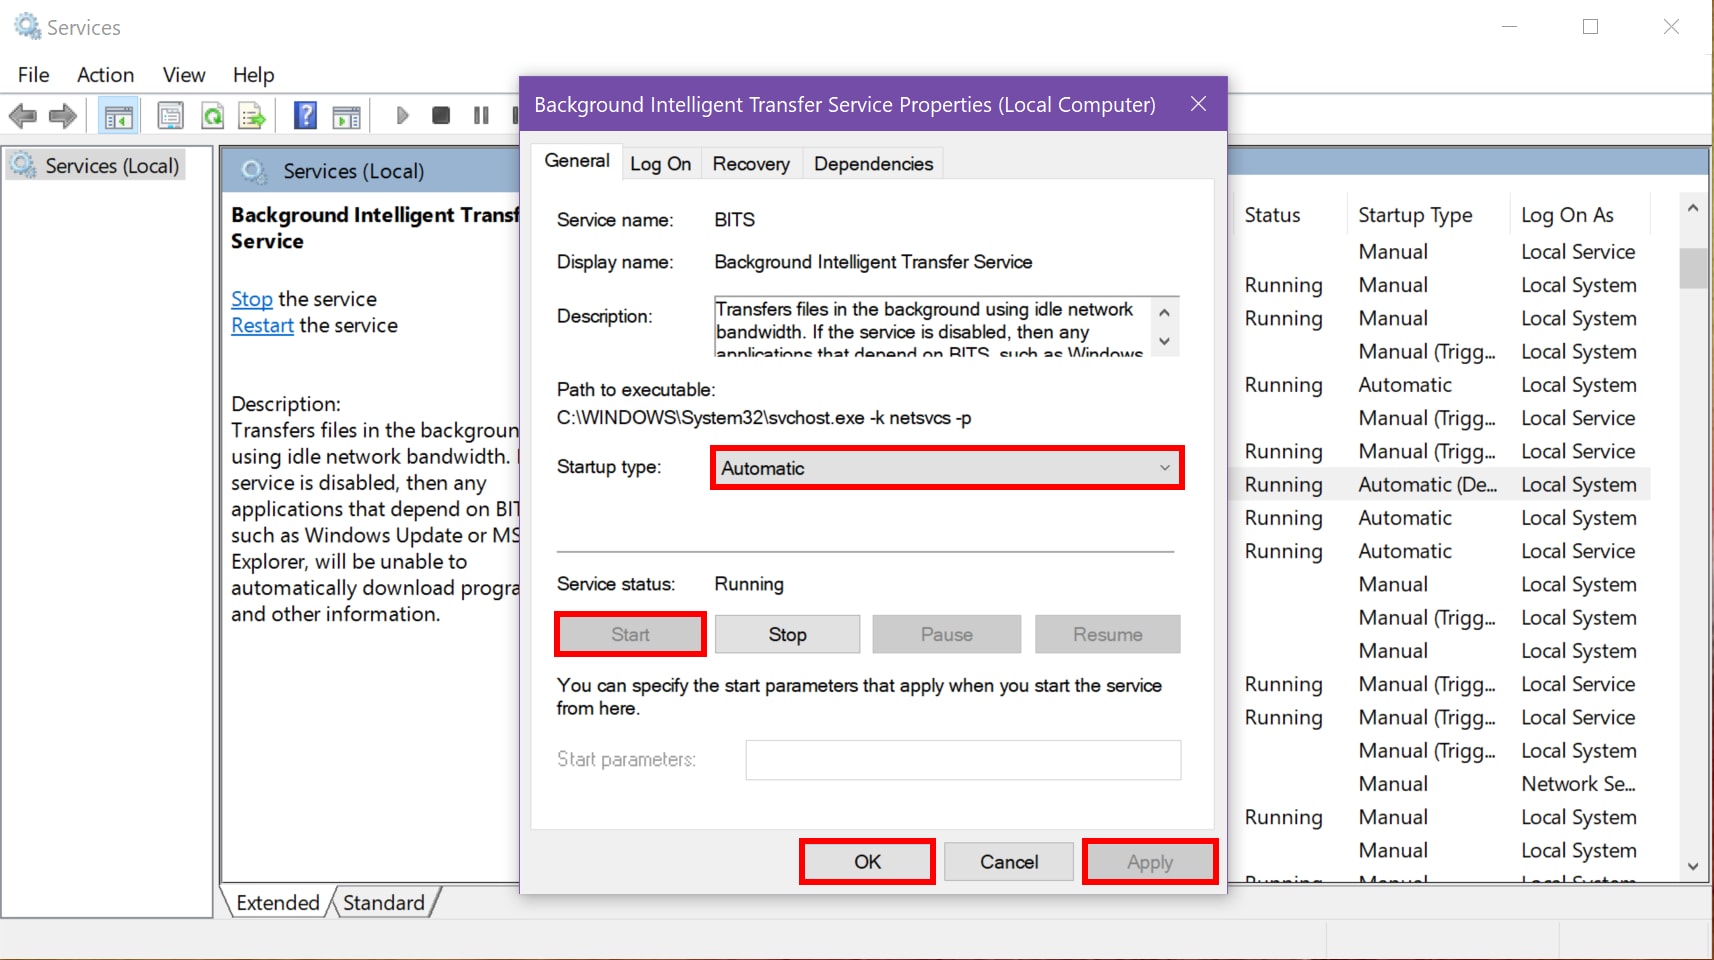
10. Set Startup type as Automatic on the pop-up window.
11. If the Service status reads Stopped, click the Start button.
12. Click Apply and OK.
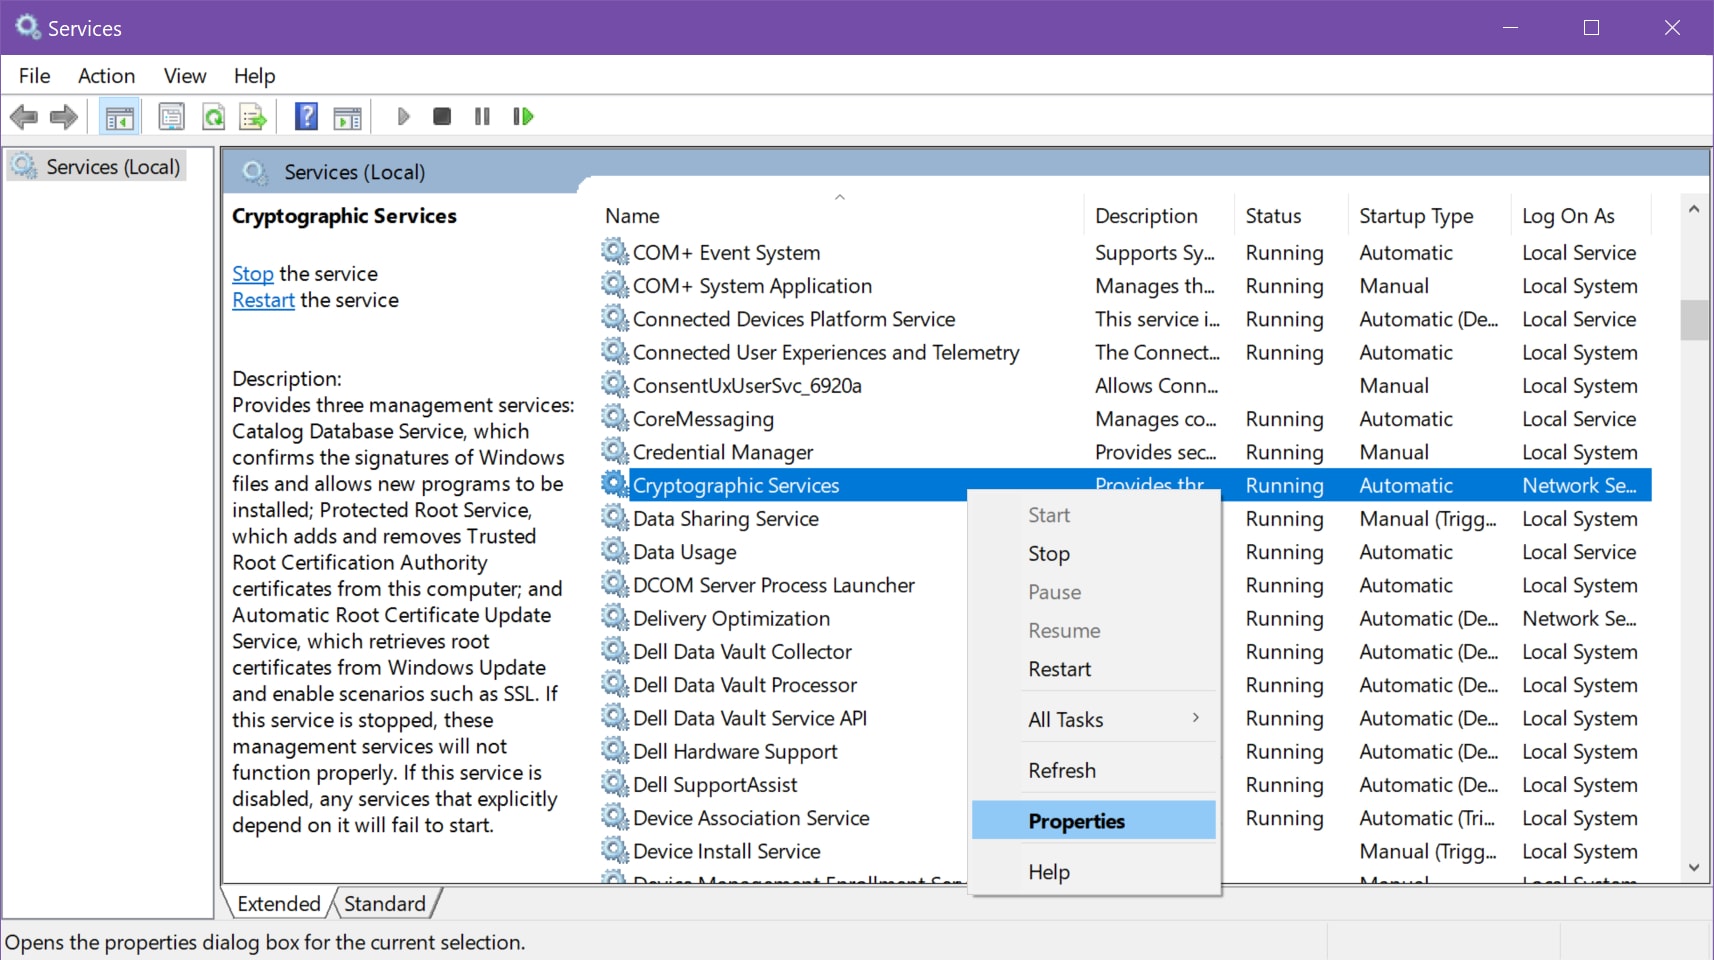
13. Locate Cryptographic Services.
14. Right-click on the service and select Properties.
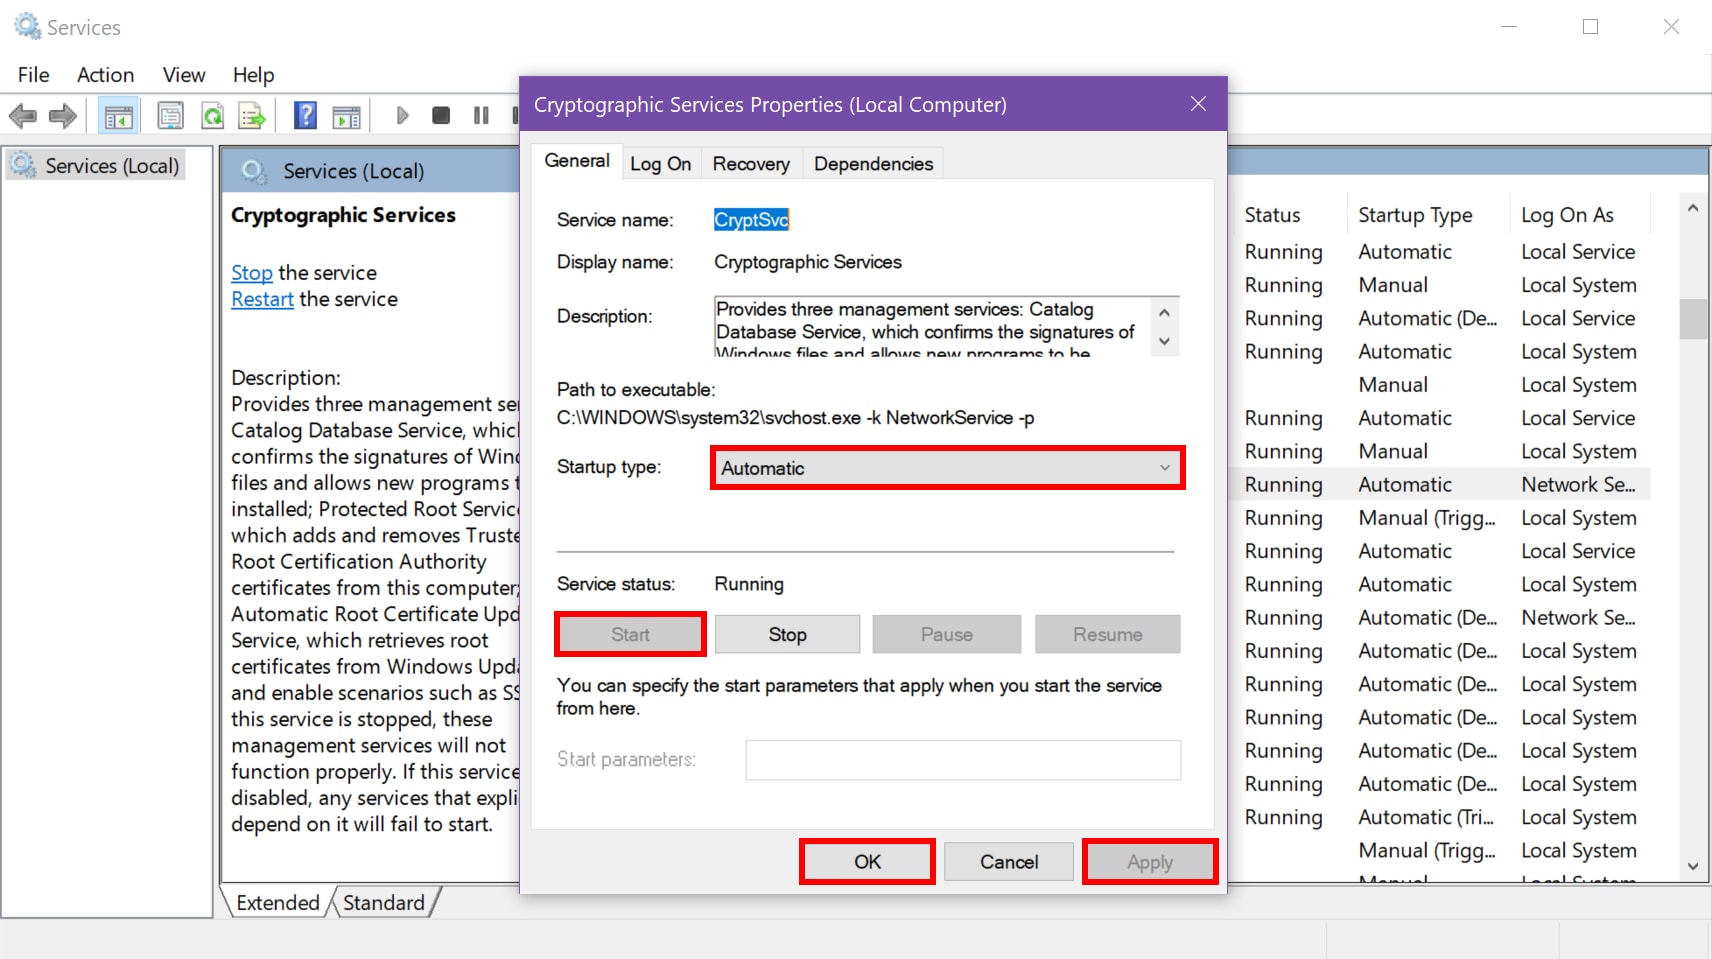
15. Set Startup type as Automatic on the pop-up window.
16. If the Service status reads Stopped, click the Start button.
17. Click Apply and OK.
18. Close the Services utility.
19. Restart your PC.
Change your DNS
You could be experiencing problem with your internet service provider (ISP) and its Domain Name System (DNS) servers. DNS translates names like androidauthority.com into numeric web addresses in a shared directory used by servers across the globe. Your ISP’s DNS servers may have ongoing technical issues, are outdated with old DNS information, or overloaded with traffic. Here we’ll bypass your ISP and use the DNS servers maintained by Google.

1. Type Control Panel in Cortana’s search field on the taskbar.
2. Click the Control Panel desktop app in the results.
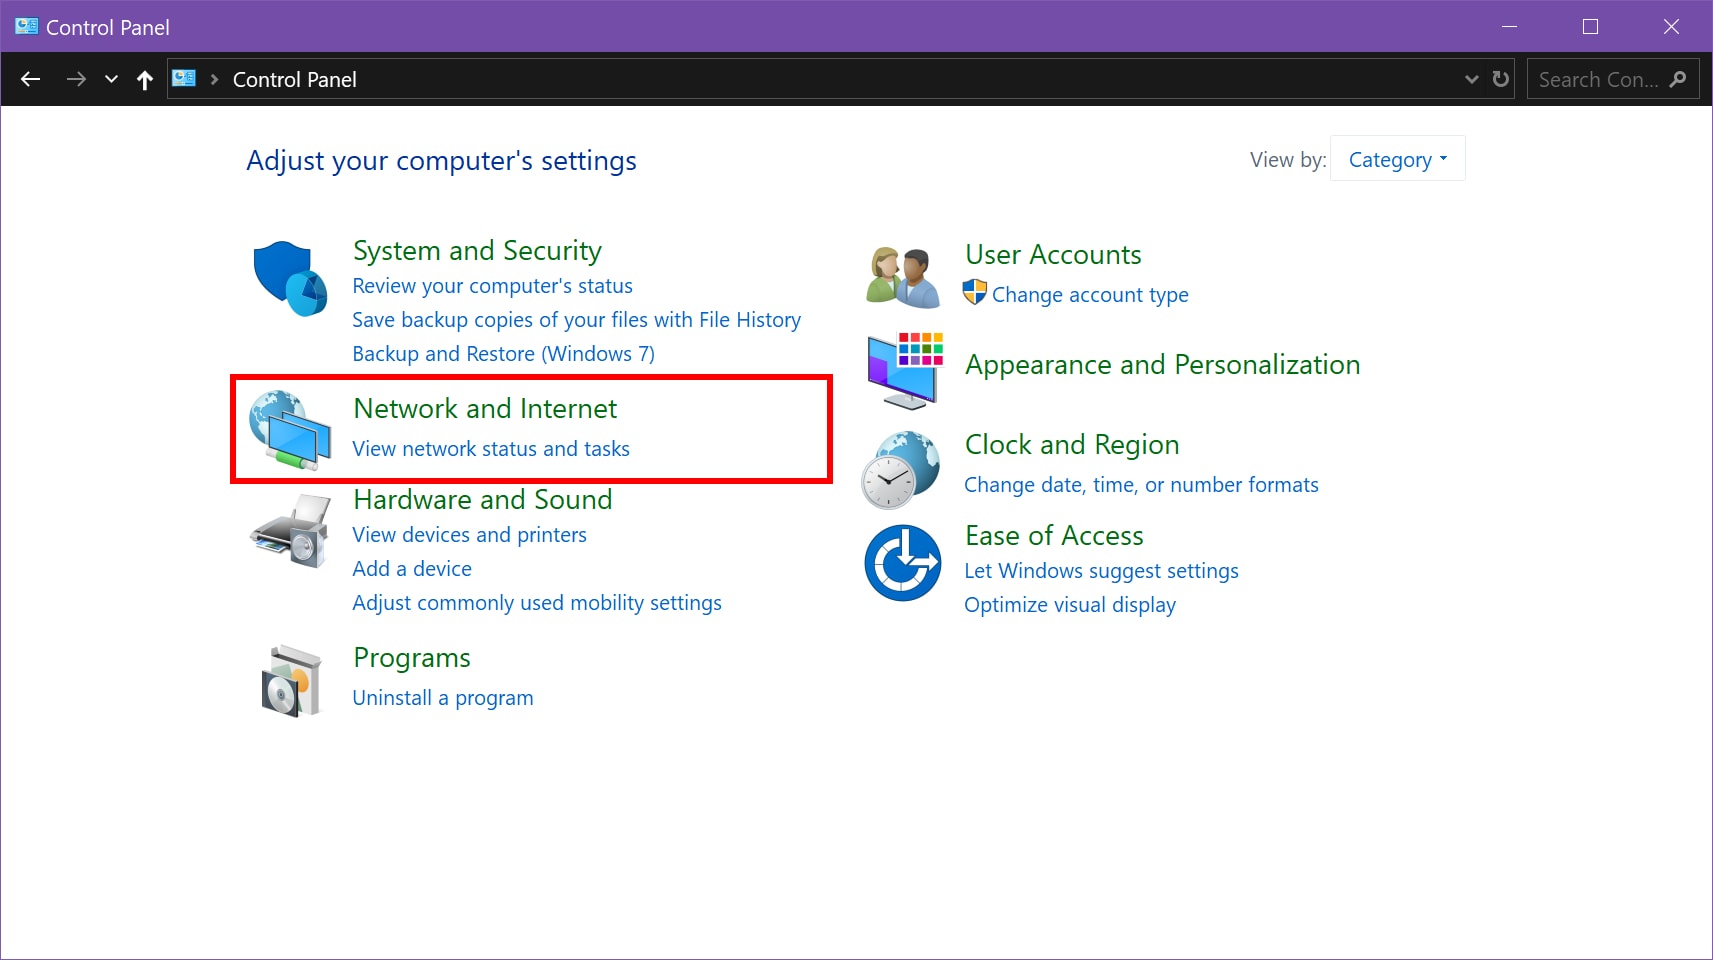
3. Select Network and Internet (Category view) in the following window.
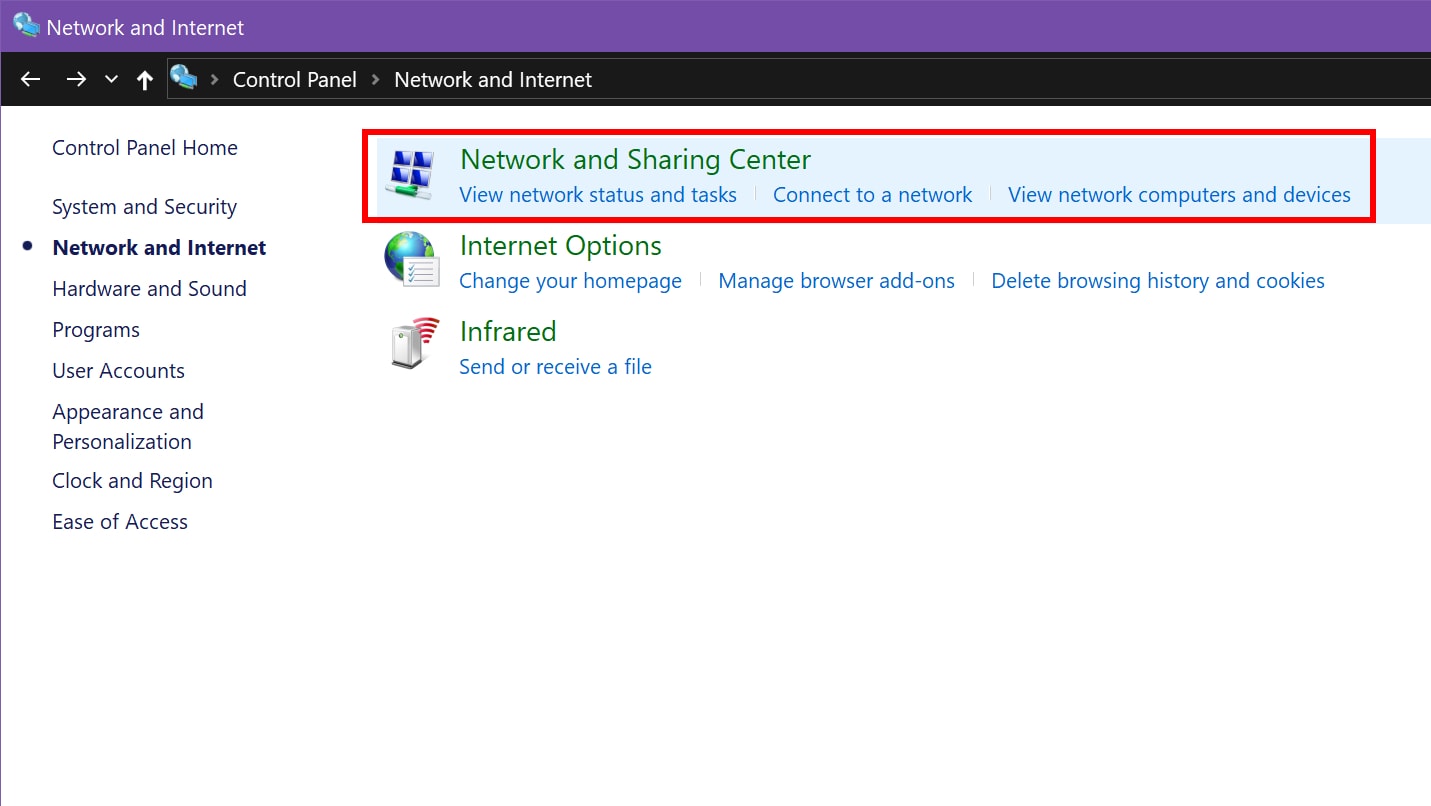
4. Select Network and Sharing Center.
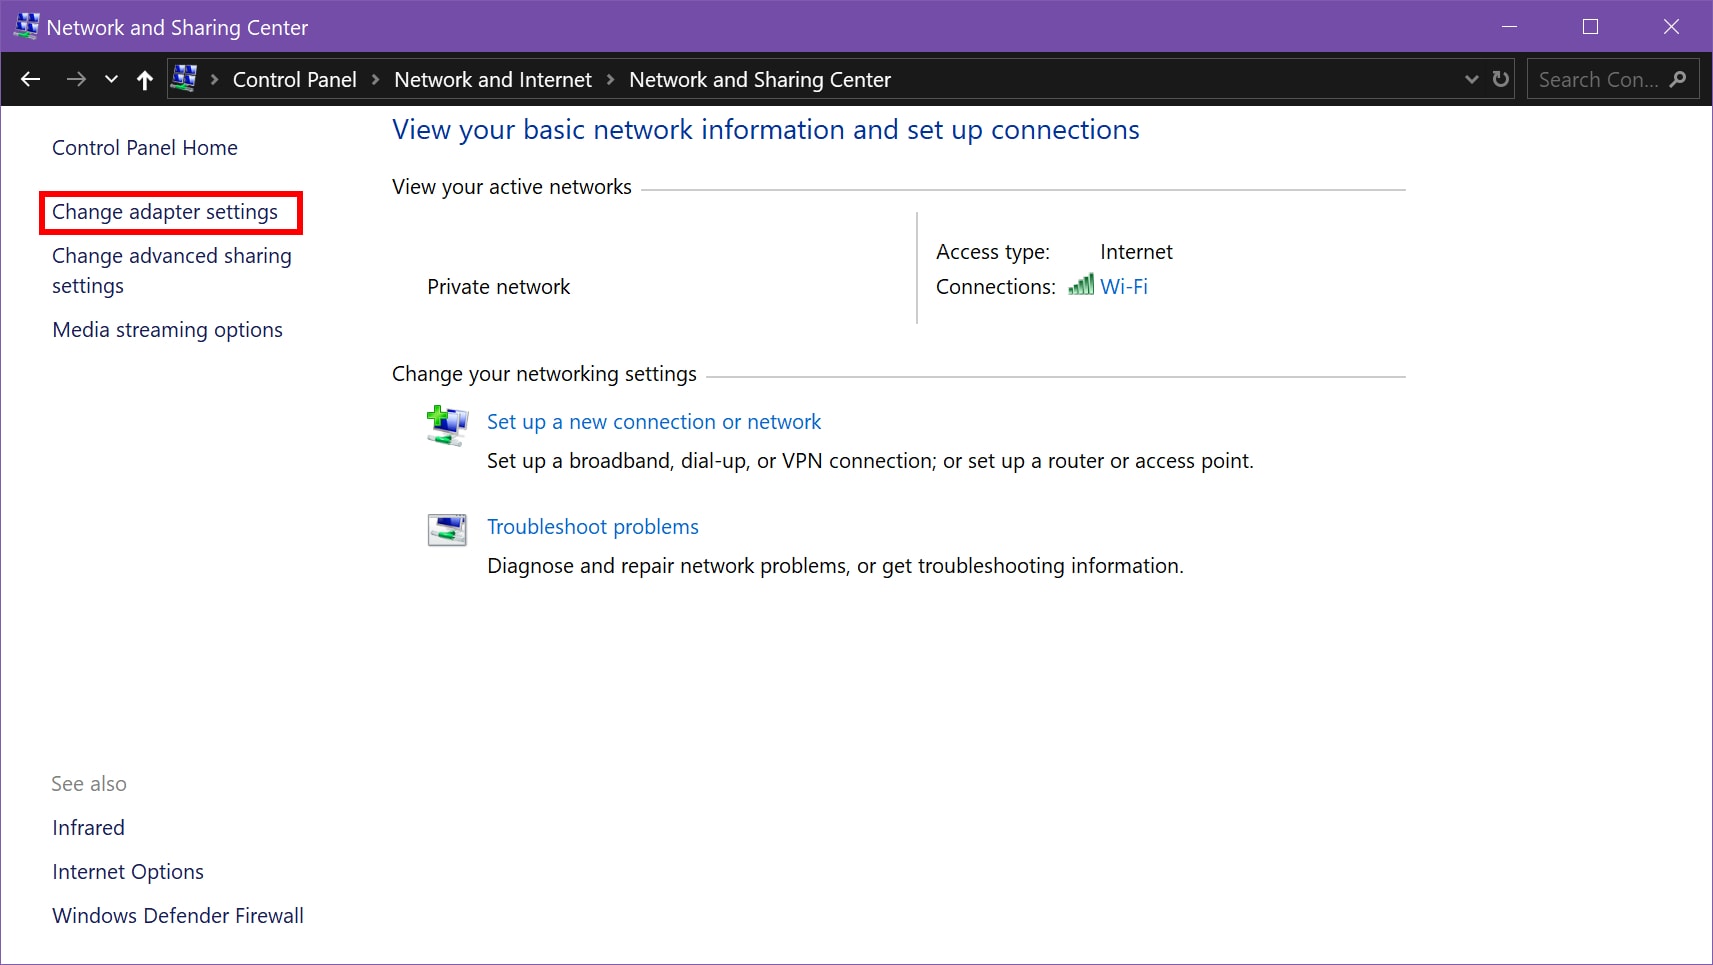
5. Next, click Change adapter settings listed on the left.
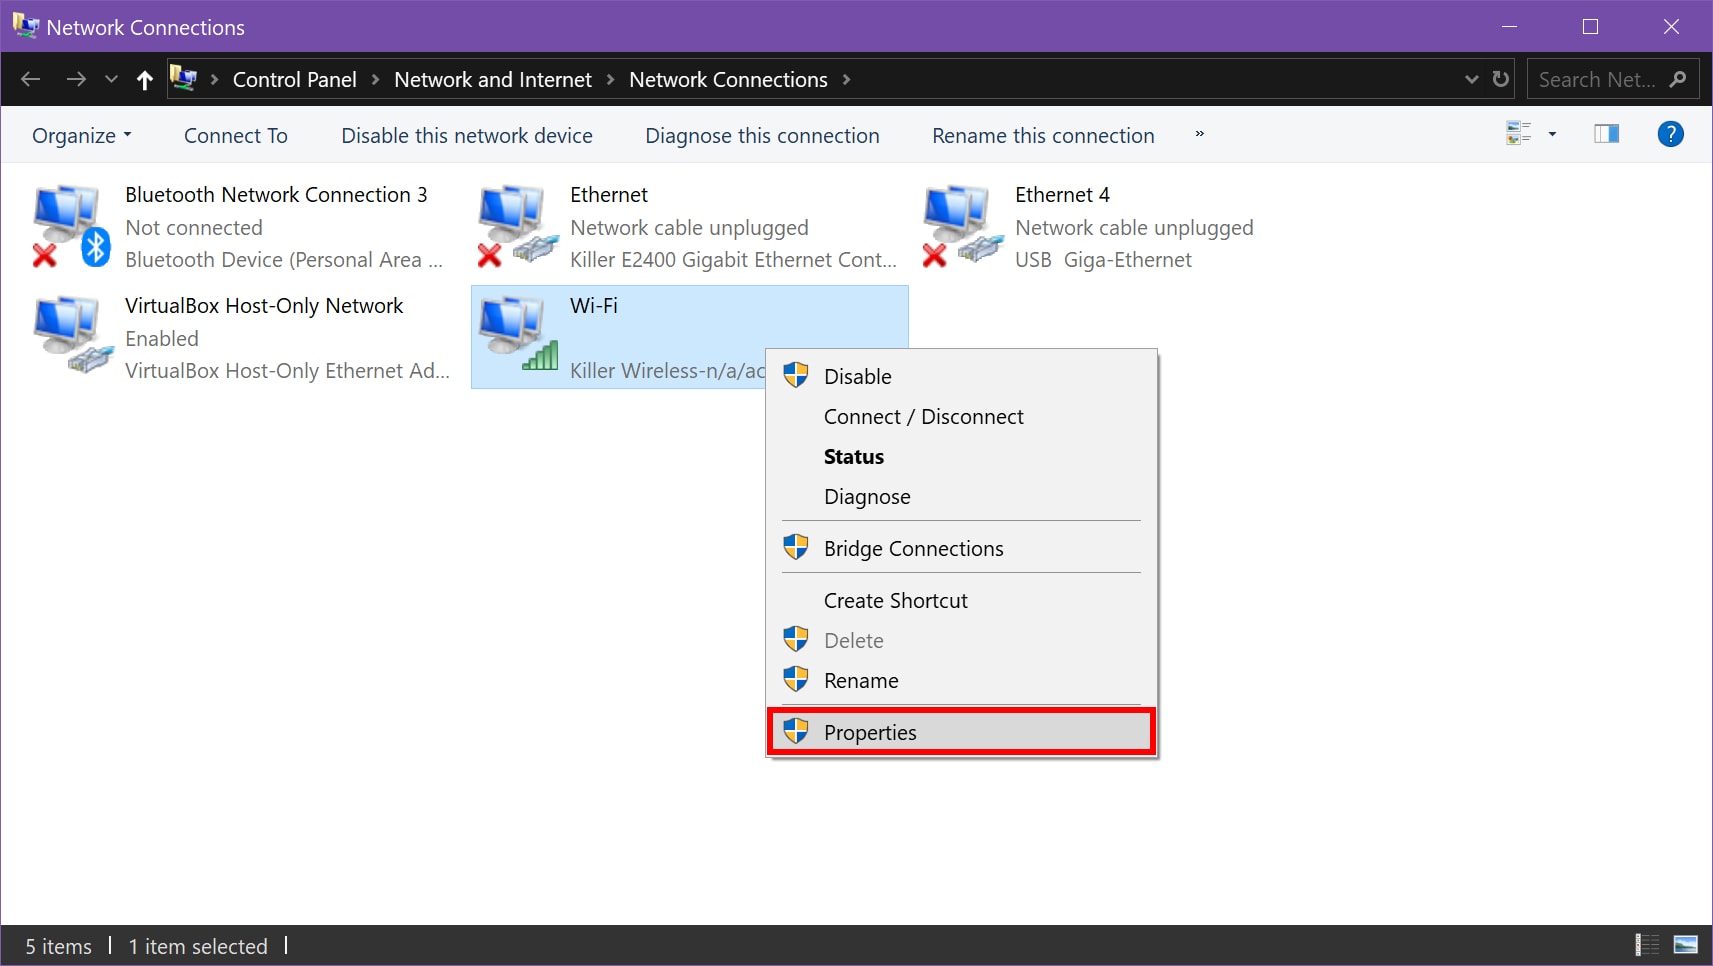
6. Select your network connection.
7. Right-click and select Properties.
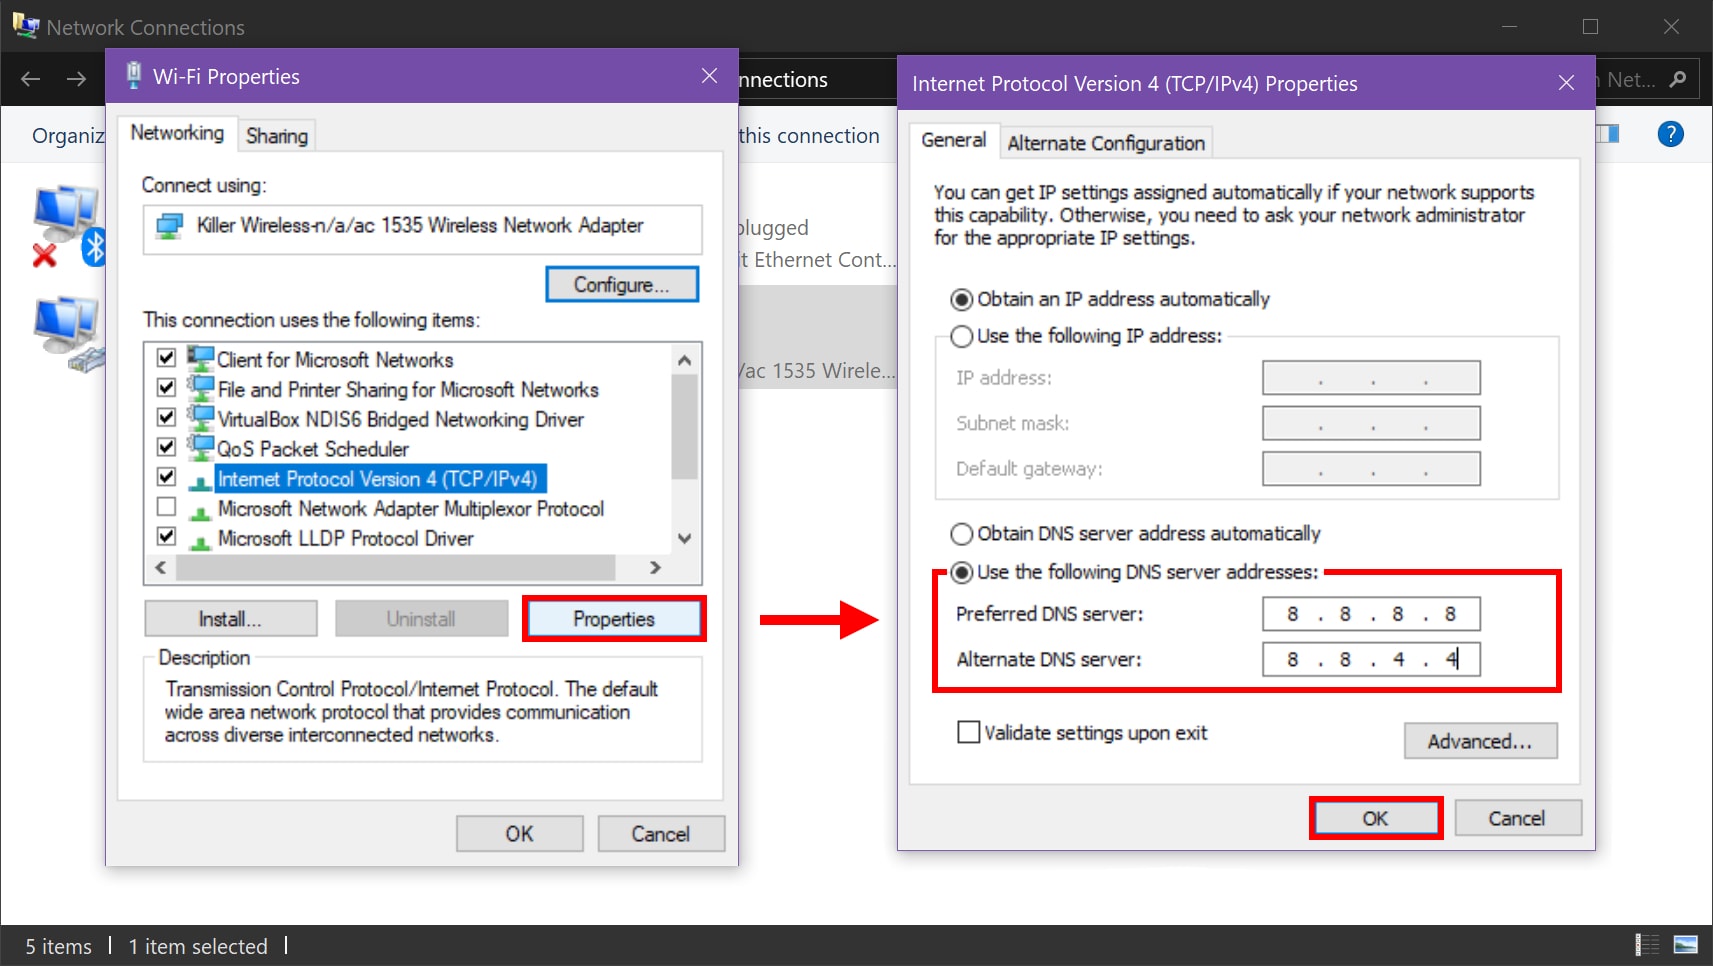
8. Select Internet Protocol Version 4 (TCP/IPv4) and click the Properties button.
9. Enable Use the following DNS server addresses.
10. For Preferred DNS server, enter 8.8.8.8.
11. For Alternate DNS server, enter 8.8.4.4.
12. Click OK.
Temporarily disable automatic updates
Windows Update issues could stem from Microsoft. By disabling automatic updates, your Windows 10 PC will not retrieve updates for a specific number of days while Microsoft resolves its distribution problems. This is also a good way to prevent Windows 10 from automatically installing botched updates.

1. Click Start and select the “gear” icon on the Start Menu. This opens the Settings app.

2. Select Update & Security.
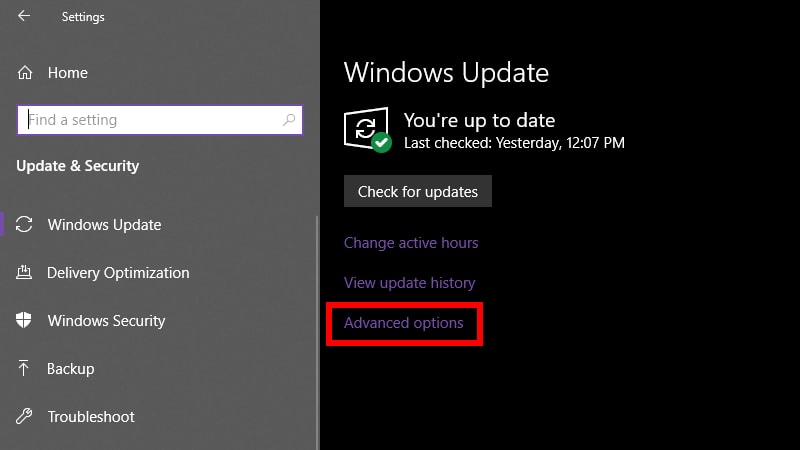
3. Click the Advanced options link.
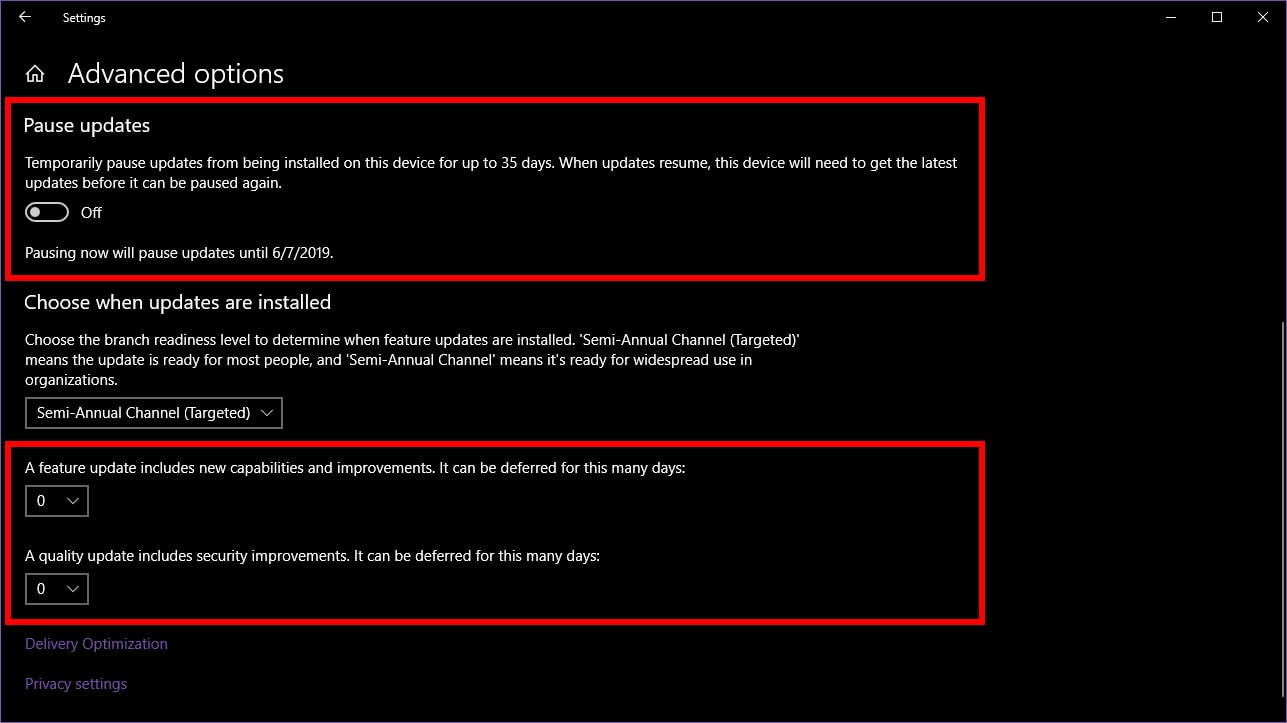
4. Toggle on Pause updates. This will halt updates for 30 days.
5. You can defer feature updates (October 2018 Update, etc.) for up to 365 days.
6. You can defer quality updates (security patches, fixes) for up to 30 days.
Run the DISM and SFC commands
Short for Deployment Image Servicing and Management, the DISM tool scans and fixes issues related to the Windows 10 disc image, which typically resides on your PC in a hidden partition. Windows 10 uses the disc image to install or remove major components, and fix corrupted system files. Meanwhile, the System File Checker tool, or SFC, checks the integrity of the core components in Windows 10 and fixes any issues.
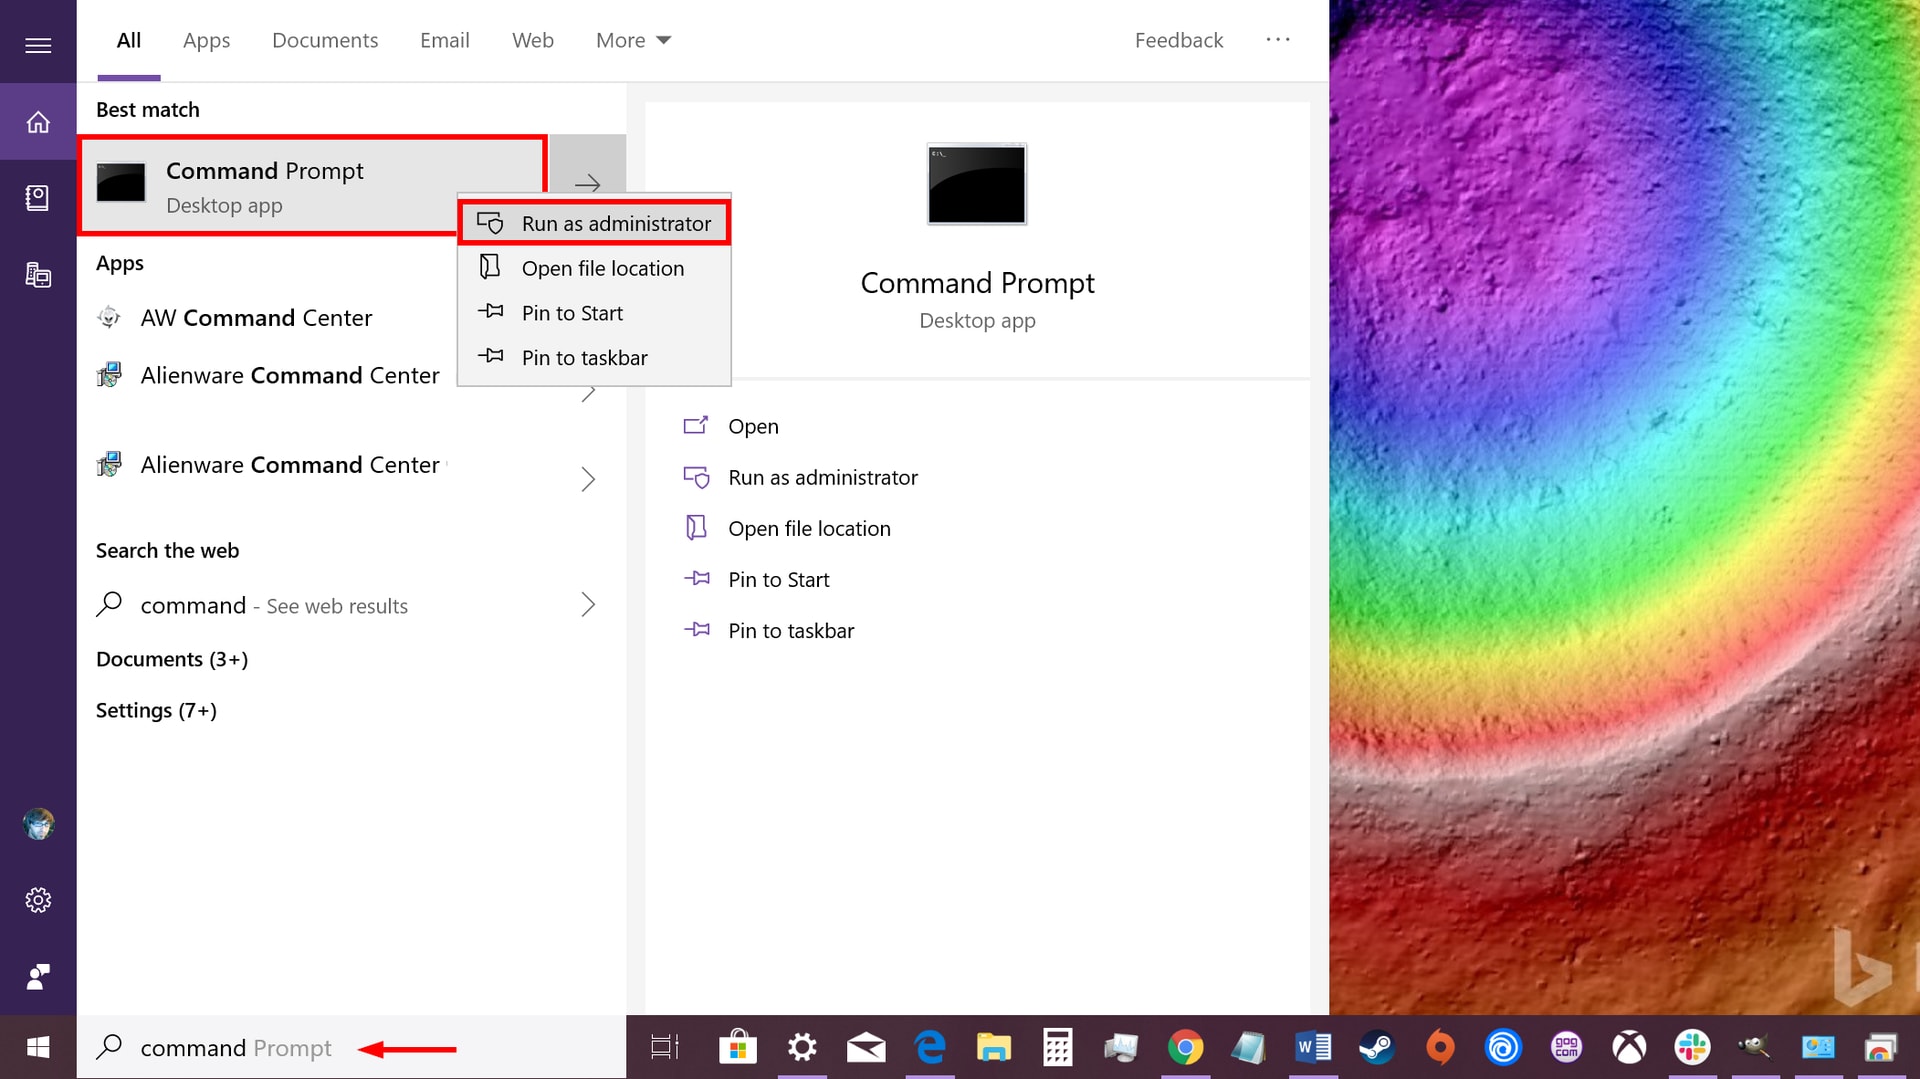
1. Type Command Prompt in Cortana’s search field on the taskbar.
2. Right-click on the resulting desktop app and select Run as administrator on the menu.
3. Click Yes on the User Account Control pop-up.
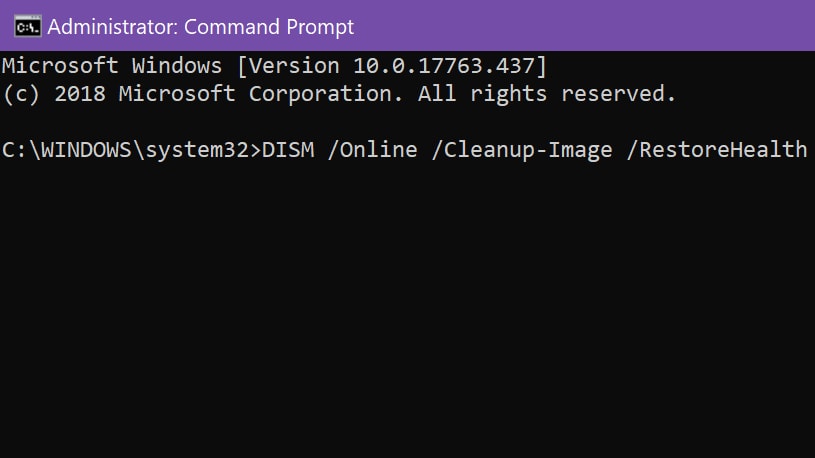
4. Type the following command and press Enter:
DISM /Online /Cleanup-Image /RestoreHealth
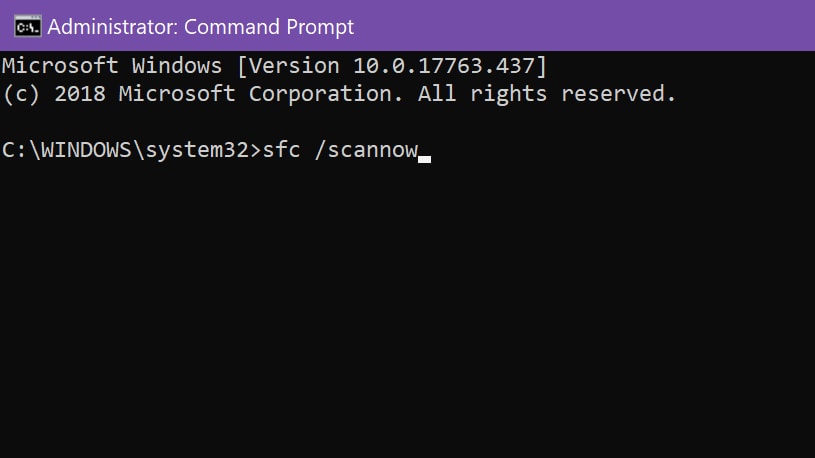
5. Type the following command and press enter:
sfc /scannow
6. Close Command Prompt.
7. Run Windows Update.
Restart Wuauserv and related services

1. Type Command Prompt in Cortana’s search field on the taskbar.
2. Right-click on the resulting desktop app and select Run as administrator on the menu.
3. Click Yes on the User Account Control pop-up.
4. Type the following commands individually:
- net stop wuauserv
- net stop cryptSvc
- net stop bits
- net stop msiserver
- ren C:\Windows\SoftwareDistribution SoftwareDistribution.old
- ren C:\Windows\System32\catroot2 catroot2.old
- net start wuauserv
- net start cryptSvc
- net start bits
- net start msiserver
5. Close the Command Prompt.
6. Restart your computer.
Delete files from the Software Distribution directory
This is where Windows 10 temporarily stores files needed to install updates. Just as you sometimes need to clear a web browser’s cache to solve connection issues, corrupted files in this folder may spark Windows Update woes. Clearing out this cache forces Windows 10 to download and use fresh files.

1. Hold down the Windows key and press the “R” key.
2. Type services.msc and click Enter in the Run pop-up box.
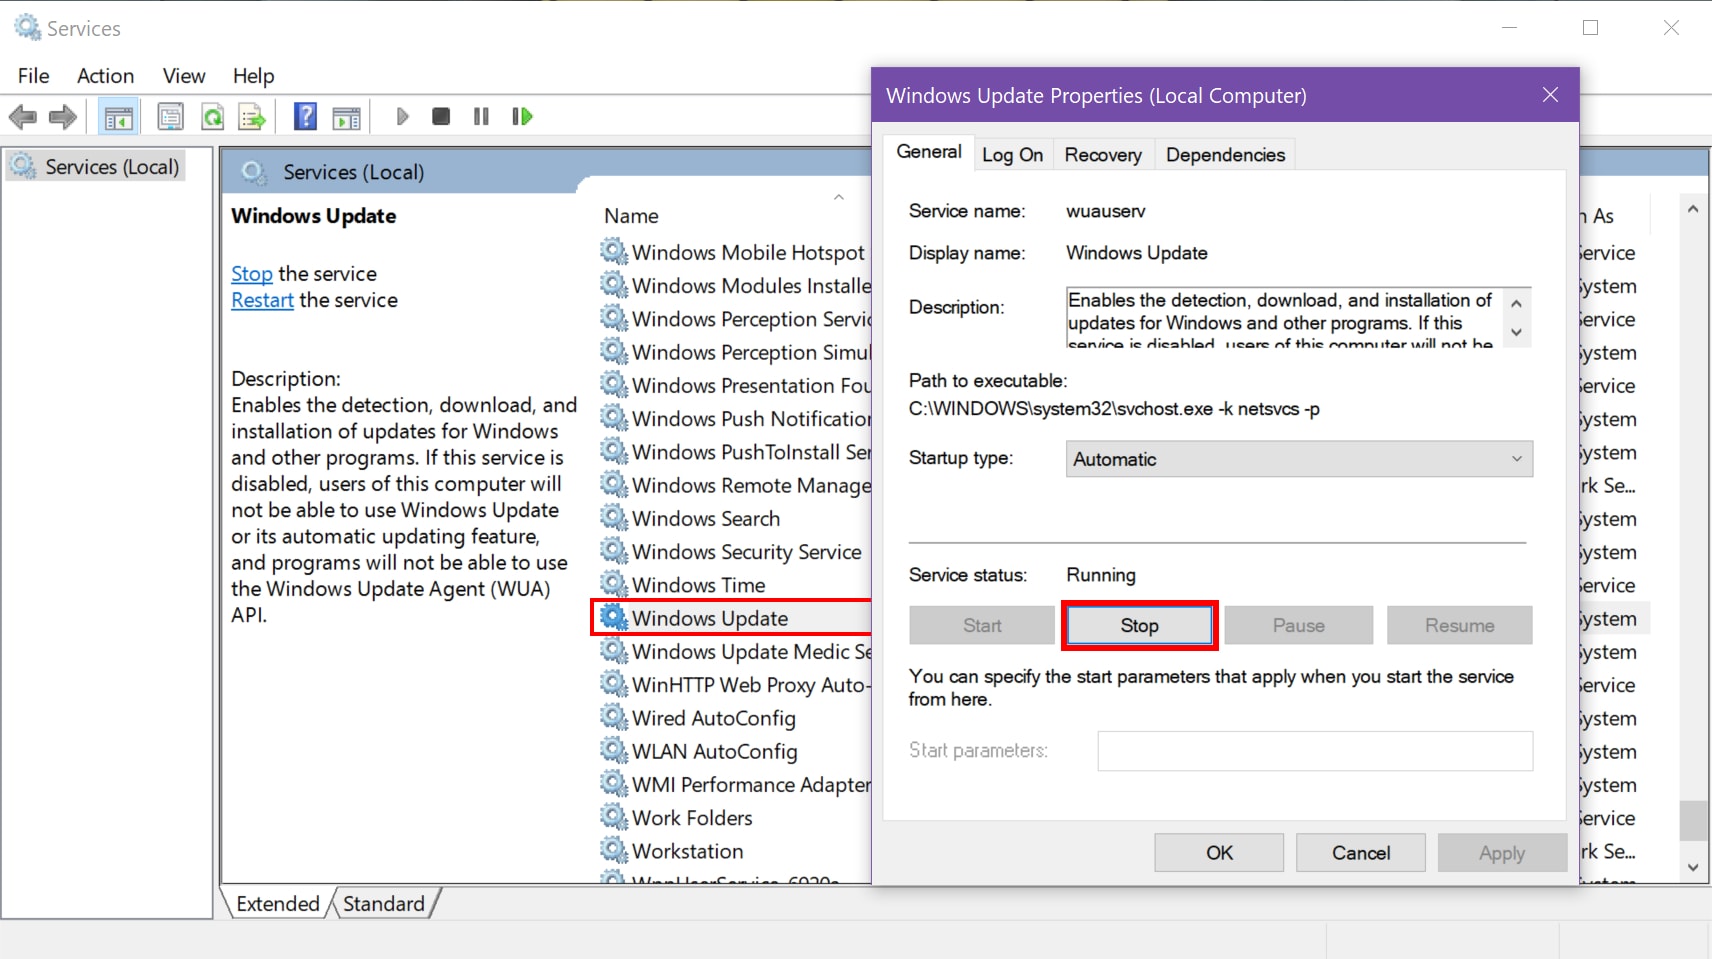
3. Scroll down to the Windows Update service.
4. Right-click on the service and select Stop.
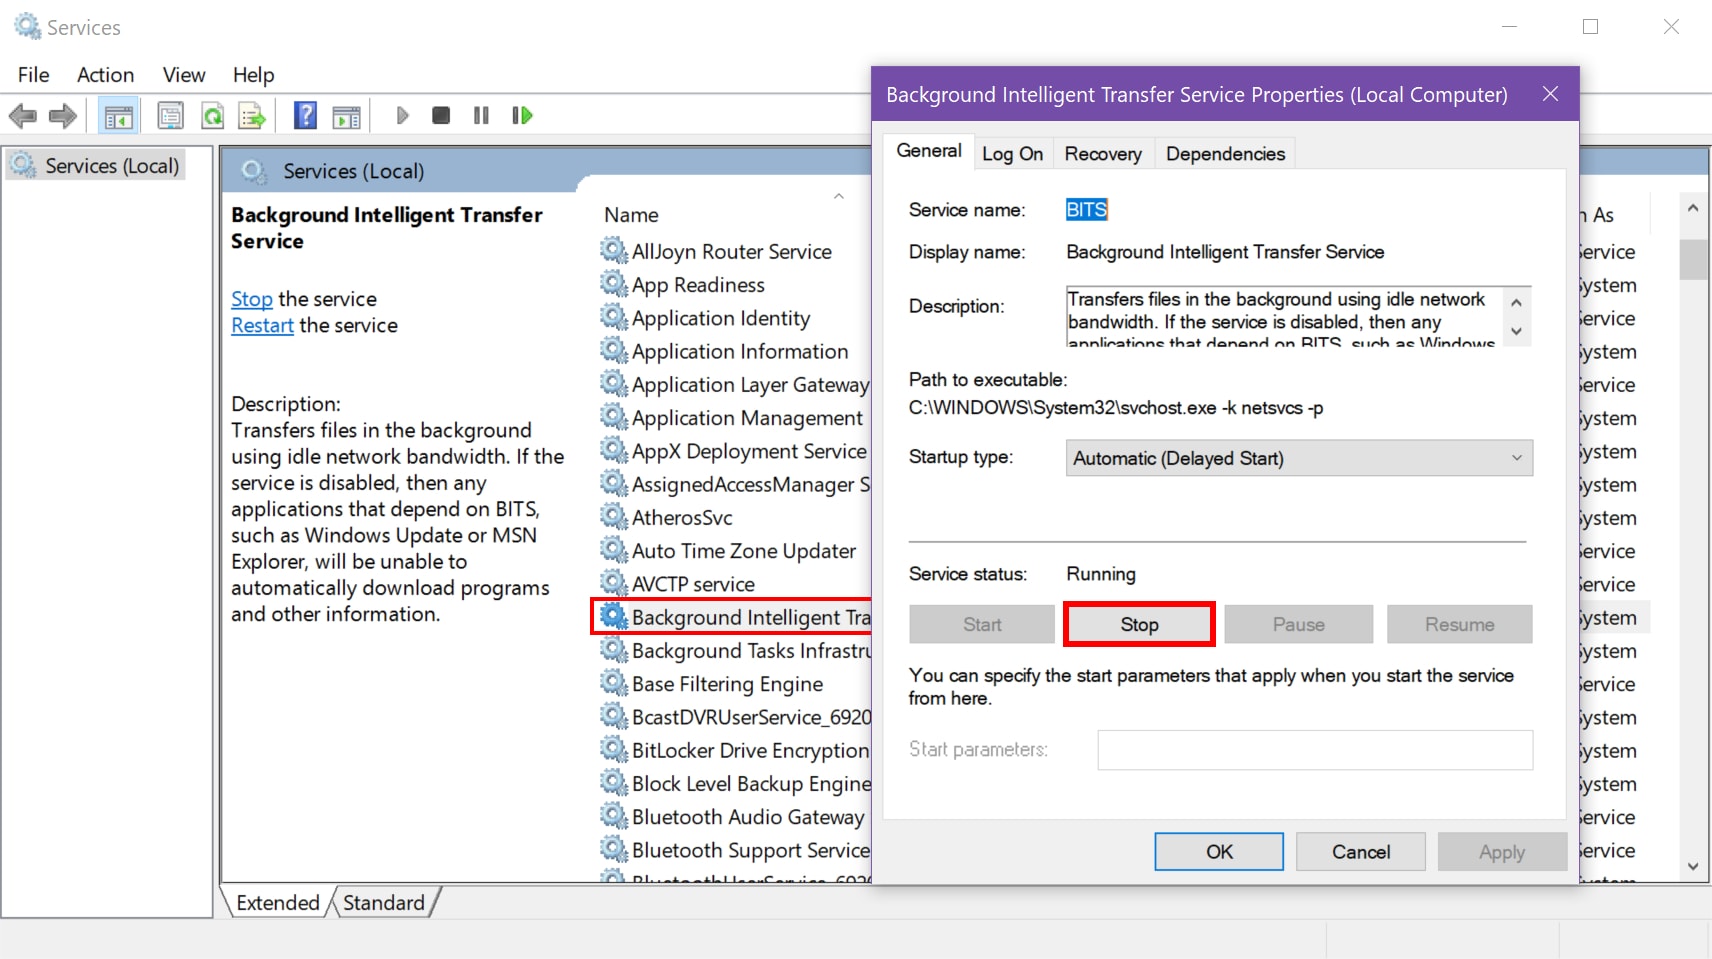
5. Locate Background Intelligent Transfer Service.
6. Right-click on the service and select Stop.
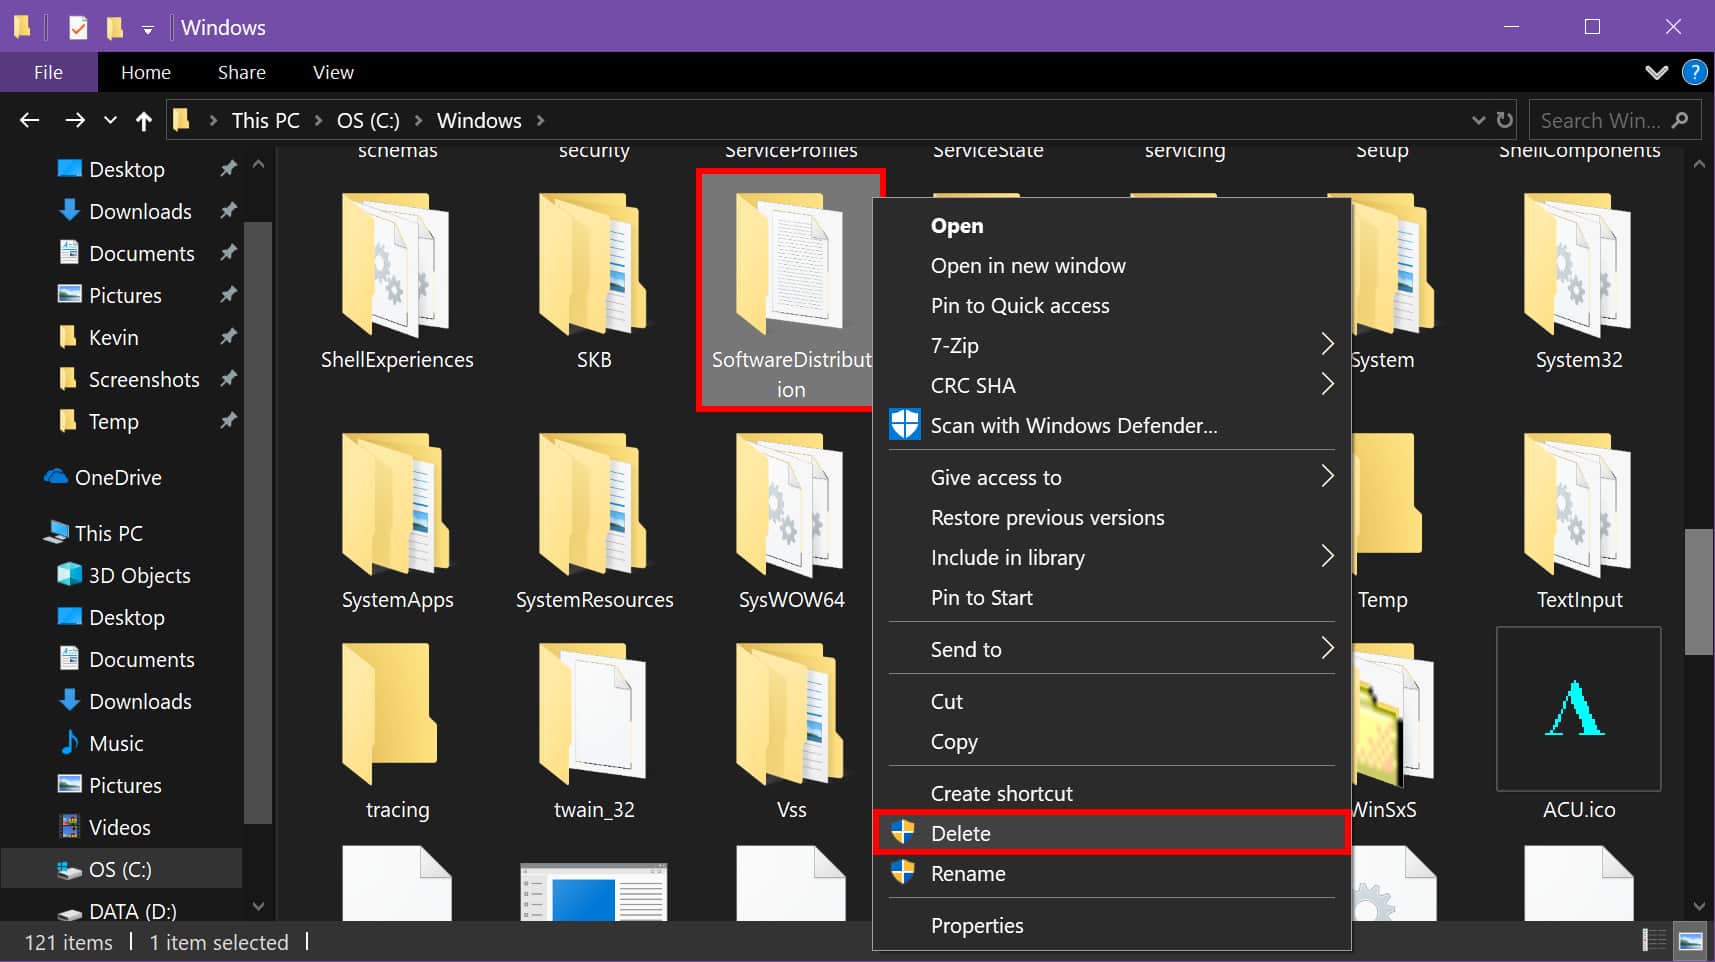
7. Open File Explorer, but do not close the Services window.
8. Double-click on your primary drive to access its contents.
9. Double-click the Windows folder to open.
10. Scroll down to the SoftwareDistribution folder.
11. Right-click on the folder and select Delete. If you feel uneasy about deleting this folder, open it and delete its contents instead.
12. Return to the Services window and restart the Background Intelligent Transfer Service and Windows Update services.
Use a restore point
Windows 10 typically creates a restore point before any update. This feature enables you to send the troubled PC back into time before whatever update, driver, or program was installed that’s currently breaking Windows Update.
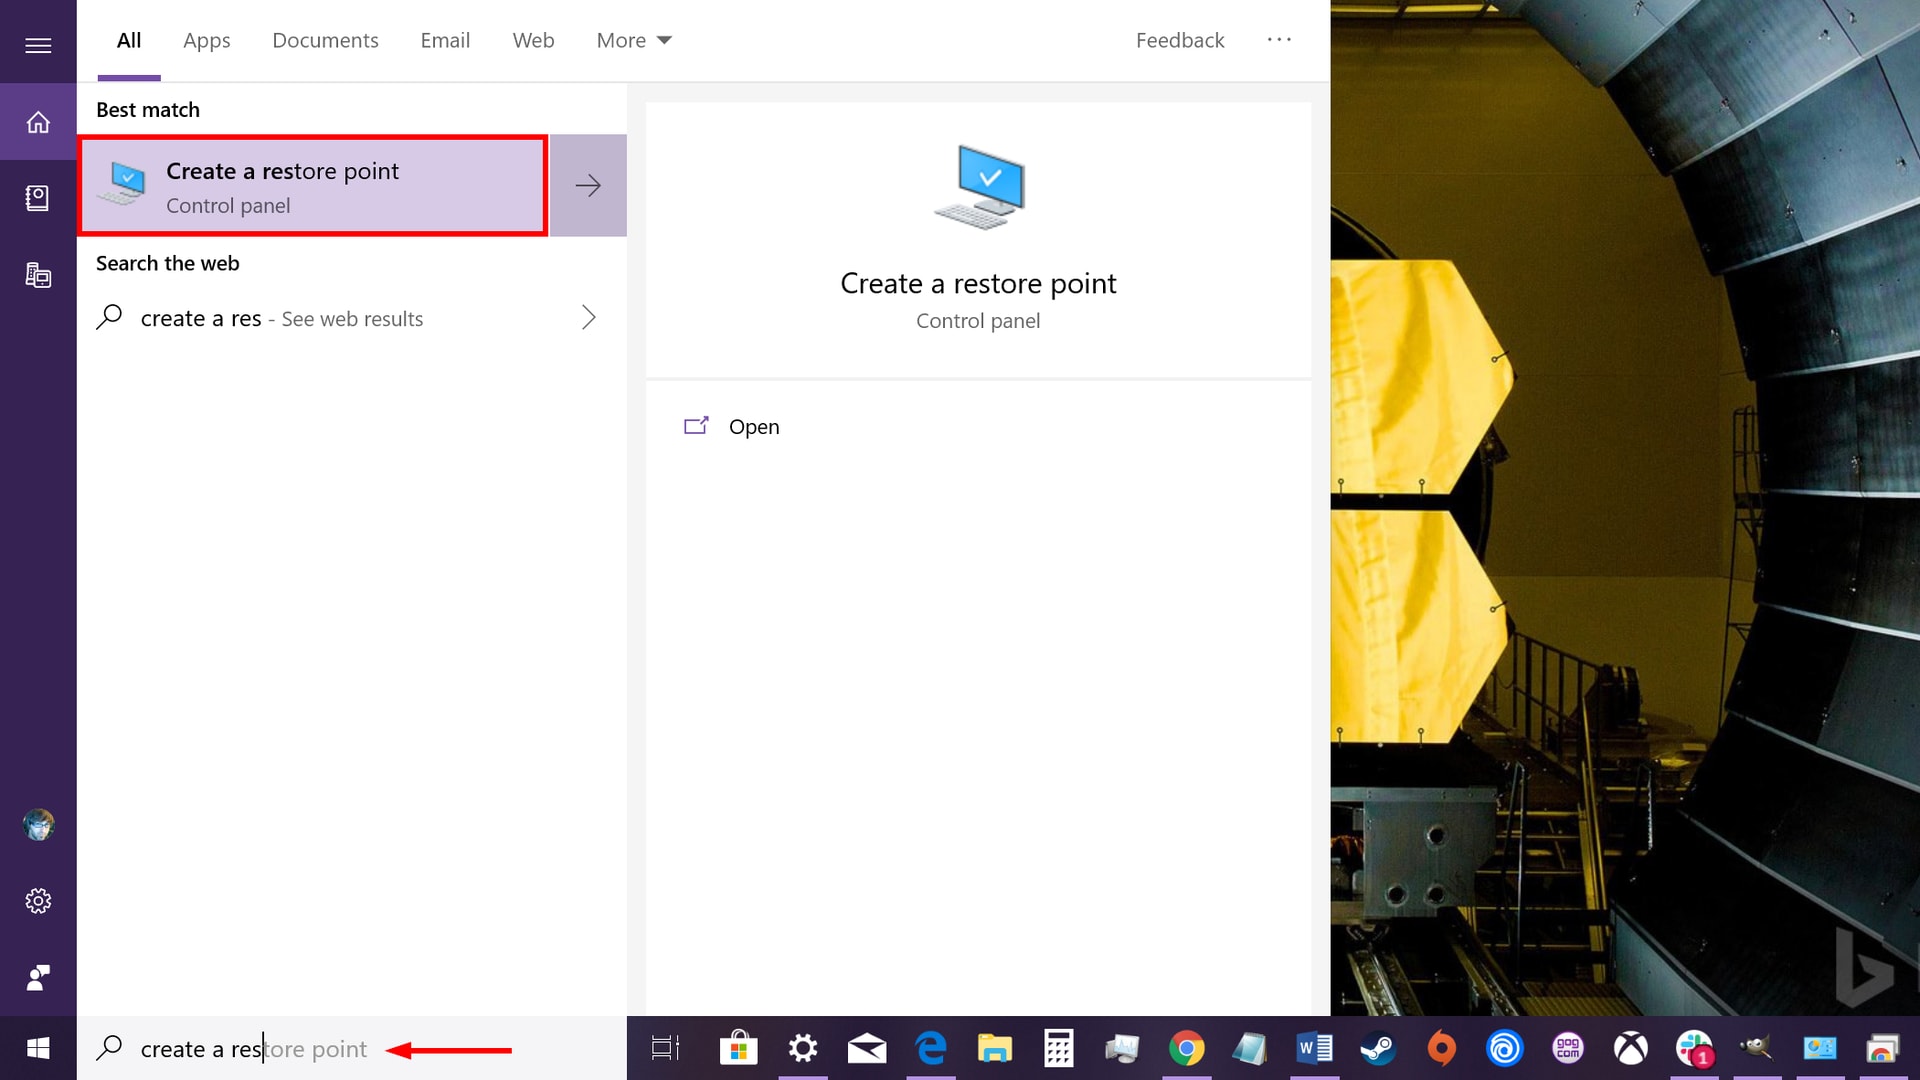
1. Type Create a restore point in Cortana’s search field on the taskbar.
2. Select the Create a restore point (Control Panel) result.
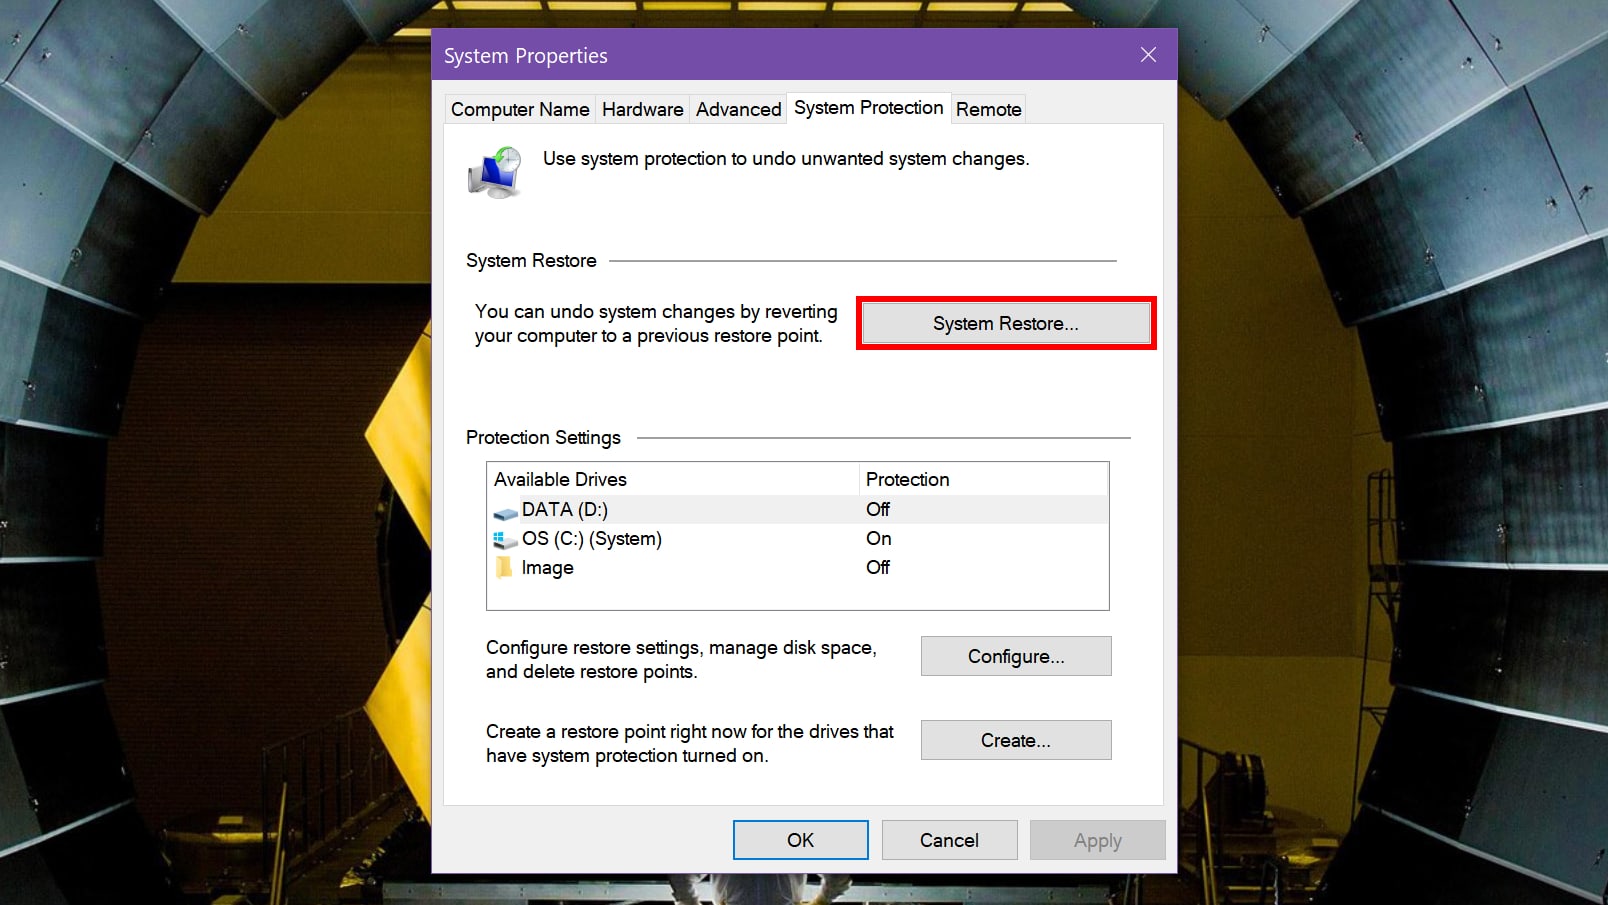
3. Click the System Restore button.
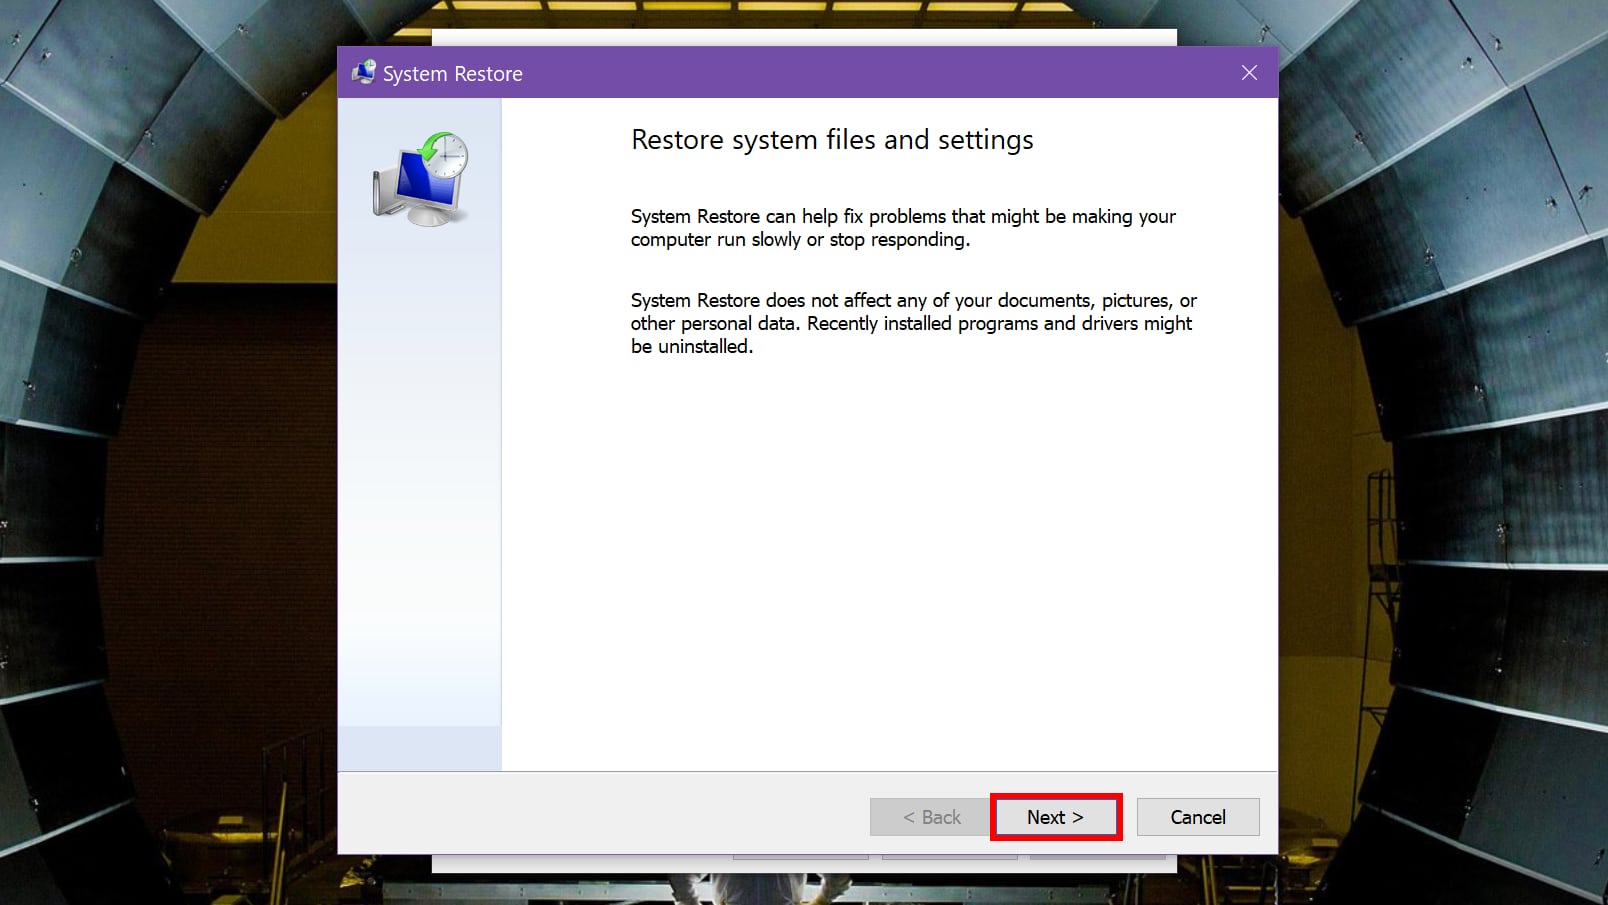
4. Click Next in the pop-up window.
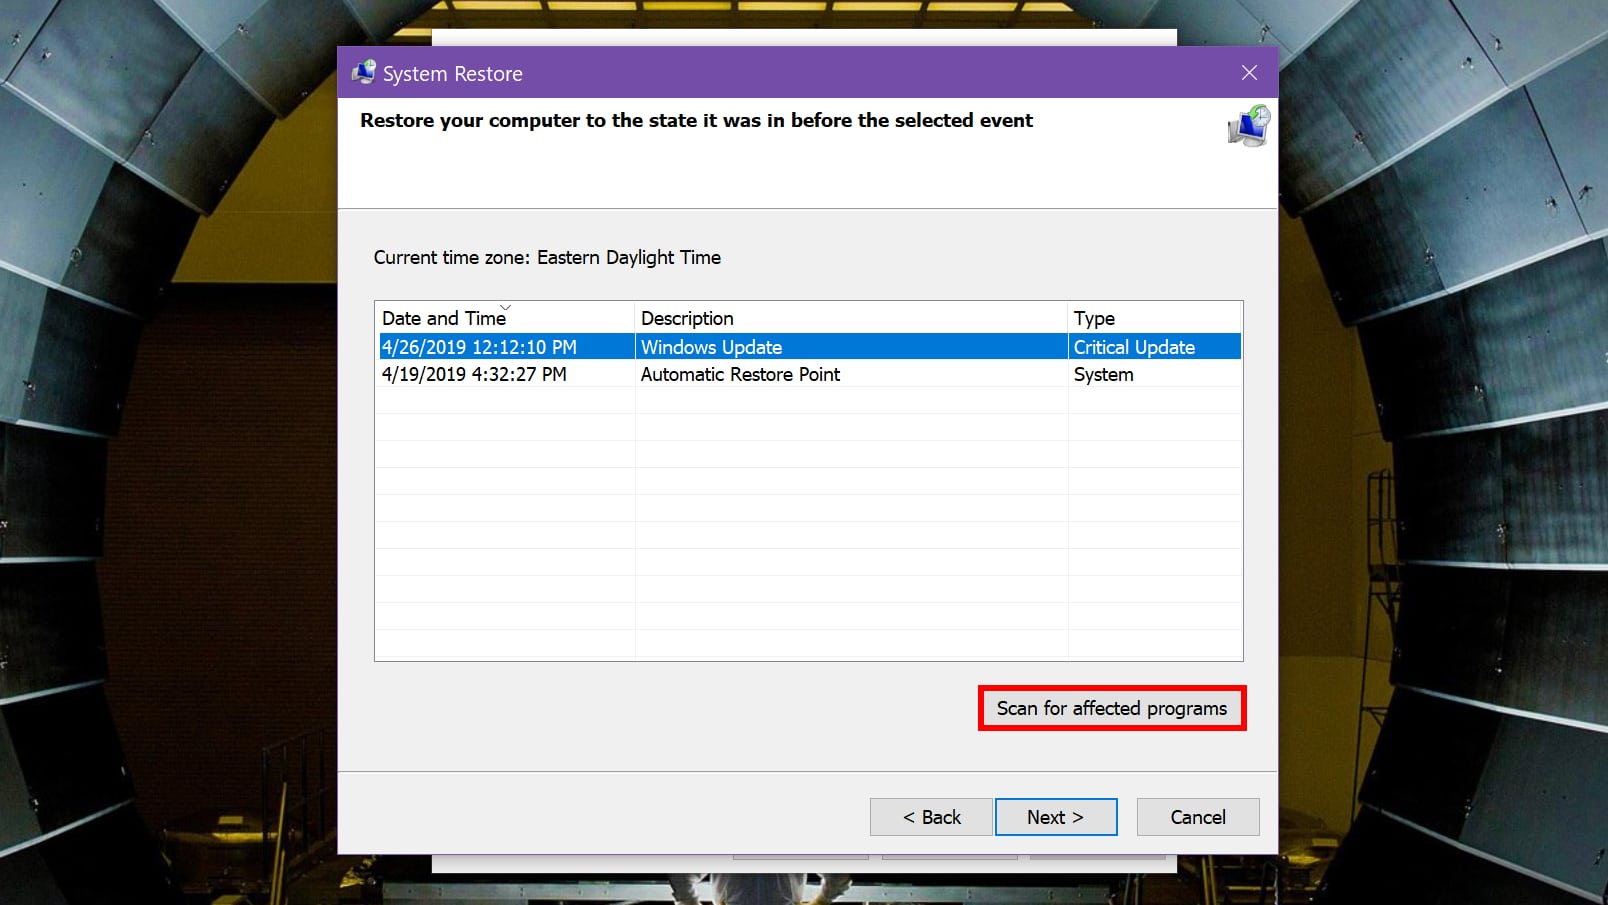
5. Select a restore point.
6. Click the Scan for affected programs button to see what programs, apps, and drivers will be affected by the change.
7. Click the Close button when the scan concludes.
8. Click the Next button.
9. Click the Finish button.
Reset your PC
This method returns your Windows 10 PC back to its original out-of-the-box state though you can choose to keep your files.

1. Click Start and then click on the “gear” icon on the left side of the Start Menu. This opens the Settings app.

2. Once the app loads, select Update & Security.
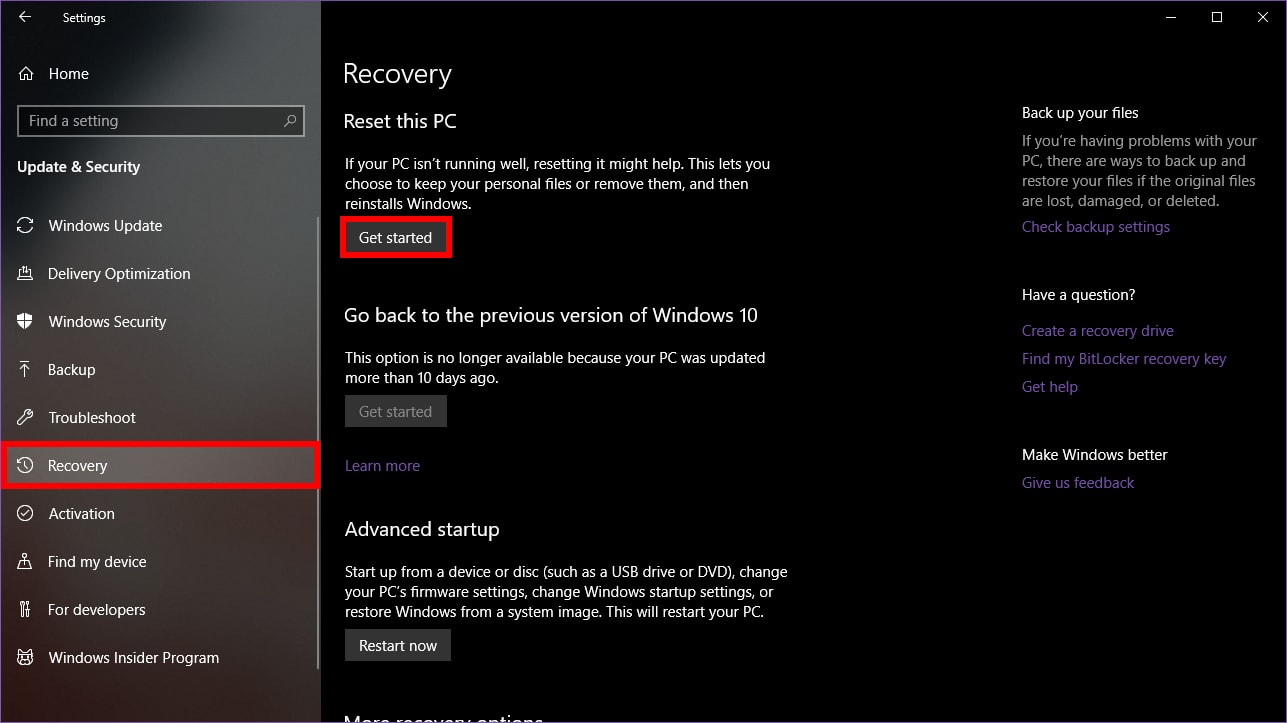
3. Select Recovery on the left.
4. Click on the Get started button under Reset this PC.
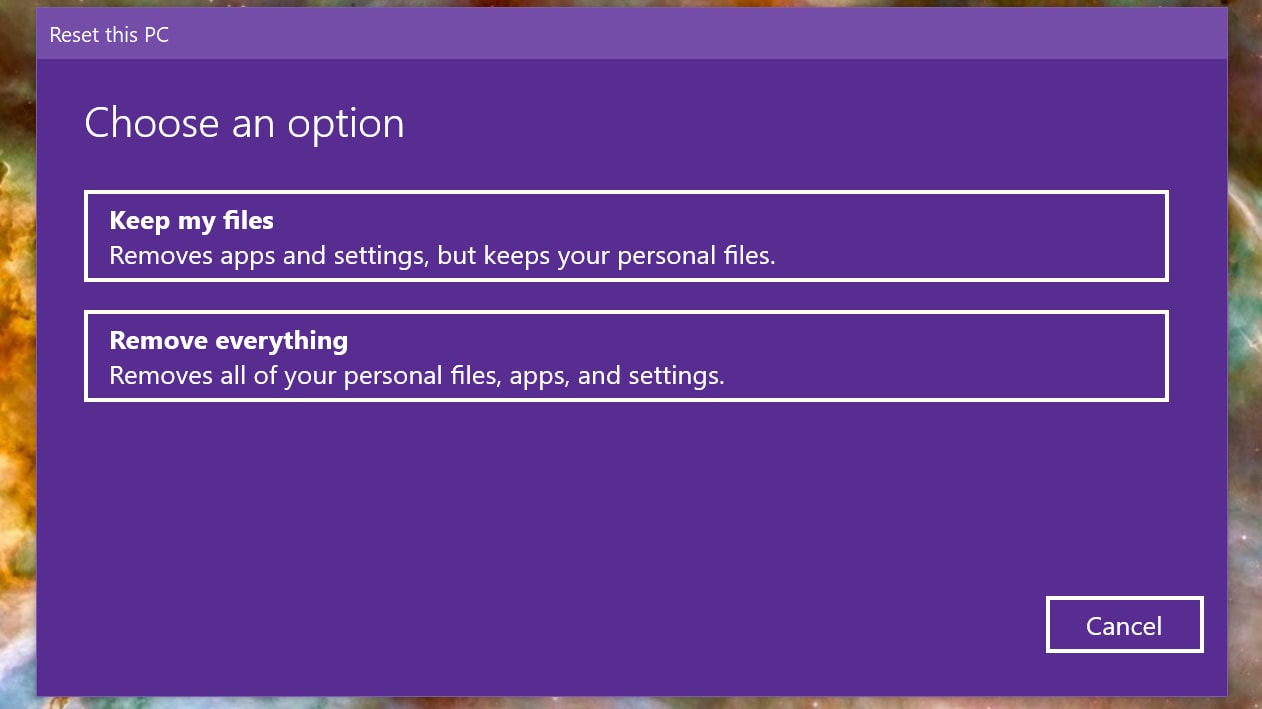
5. Choose to keep your files or remove everything. The process to reset the PC will automatically begin.
That concludes our guide on what you should do when Windows Update isn’t working. For additional Windows 10 tips, check out these guides: